Hey Warhawk,
The Tamiya cement is not going to bond the plastic of the corrugations like all the other parts in the kit which are polystyrene or similar. (I've tried...it bonds to the corrugations but nothing like the following recommendations). You need something that can bond the ABS (or whatever the corrugation material is...it behaves like every other ABS I have handled over many years). Tenax 7R, "Same Stuff" from Micro Mark (it's the "same" as Tenax, just cheaper), Plast-I-Weld from Flex-I-File, Plastruct Plastic Weld (not Plastruct Bondene...description makes it seem like it will work but doesn't really adequately dissolve the corrugated skin) or other liquid cements which contain either methylene chloride (preferred...it goes after ABS and tough plastics better) or MEK (methyl ethyl keytone). Just experience talking here. I'm wrapping up my 11th LJII build and other than on my first one, zero problems with bonding with Tenax, "Same Stuff" (my preferred) or Plast-I-Weld (second choice).
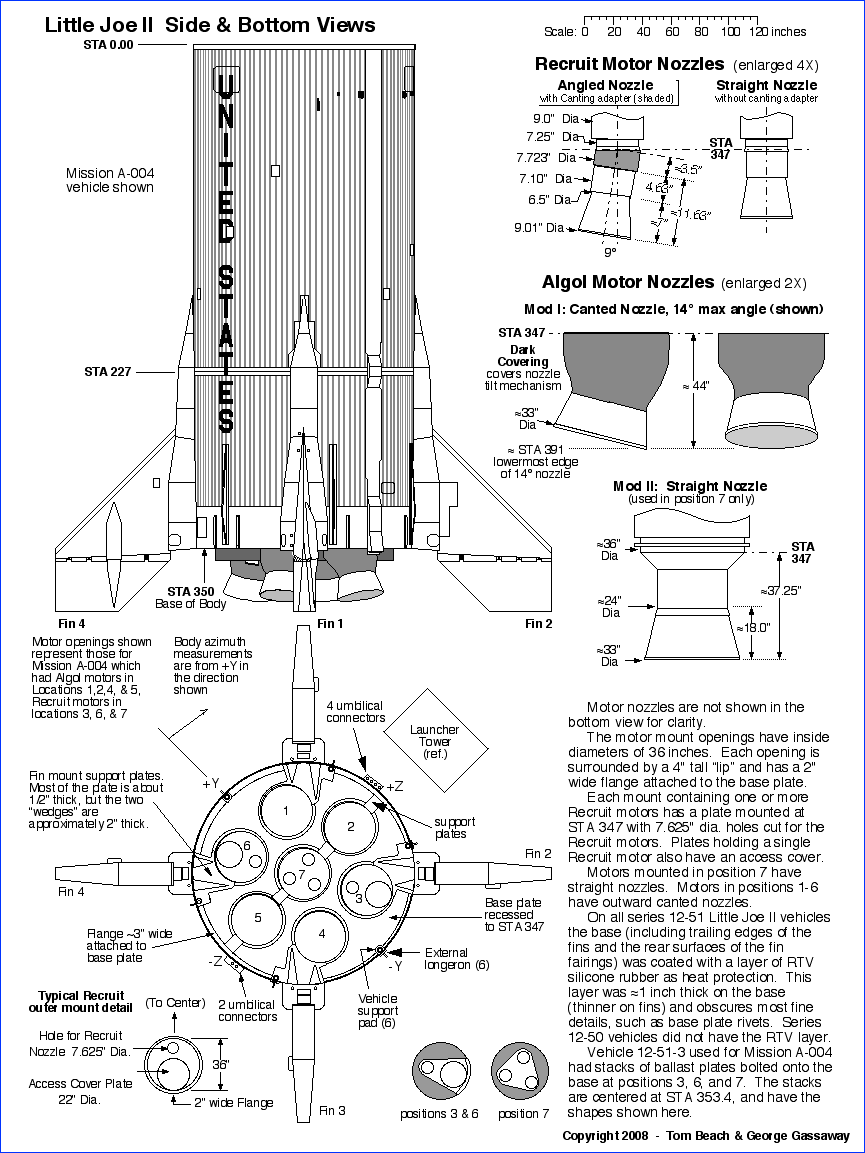
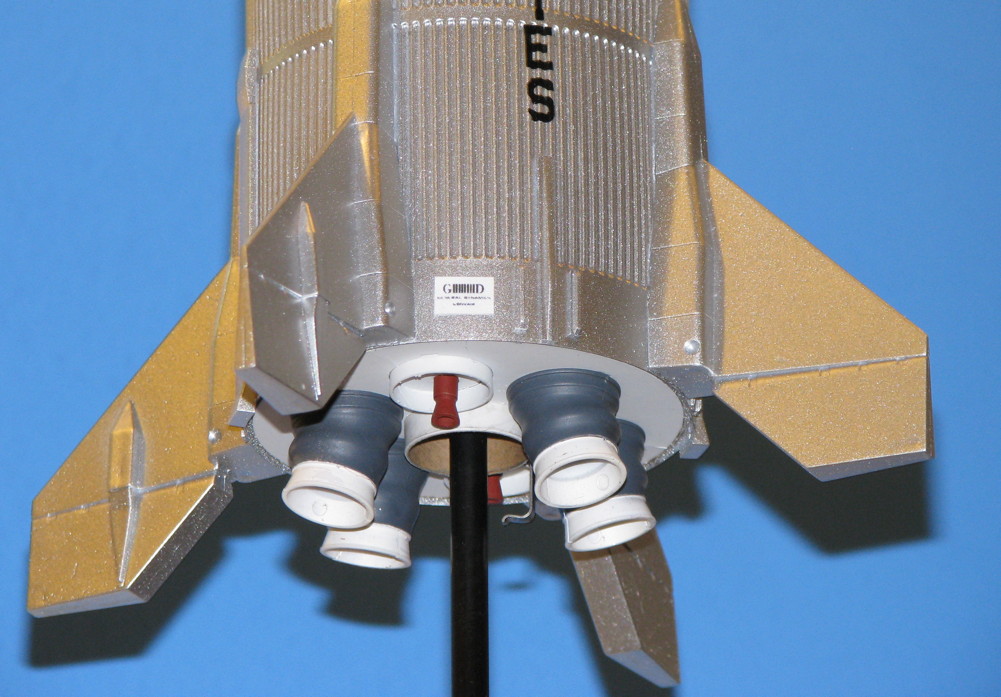
I also equipped all of the builds (except first one) with a fin spar that runs through the corrugated wrap, body tube, and to the engine tube. The spar method is covered earlier in this thread. Even with proper cements, the method of mounting the LJII fins is inadequate. The weak point is the bond between the corrugation and the body tube on the inside of the skin. A spray adhesive with the limited contact area caused by the corrugations is the "weak" joint in the whole "stock" Estes mounting method.
Going to toot my own horn now... I offer a "skin" kit for the LJII that includes the SM (which includes panel lines, radiators, and the roll pattern), the BPC (includes markings to simulate the cover used on A-004), the Escape Motor (markings for the roll pattern, electrical conduits, various joints, and jettison motors) and the motor nose (mainly the pitch motor and the canards). It's a very thin vinyl material with very high rez printing (not silkscreened like decals) and are self adhesive. Super easy and fast to apply...plus the wraps completely cover the body tube spirals of the LES motor and the SM...seams are camouflaged by falling on detail lines. Go to eBay and search for "Estes Little Joe II" and you will see my "Accur8 Skin Kit". When using the skin kit the only decals you need from the Estes Kit are the "UNITED STATES" which are just the right weight and quality to snuggle down easily in the corrugations with the use of a good setting solution like SolvaSet.
Within a month (I hope) I will offer a set of true 1/45 scale RCS quads...depending mainly on if there is demand (let me know). I had the good fortune of having in my possession a quad off a production SM a few years ago for a conservation project...and measured every square inch of the bugger while I was working on it. The RCS motors are the same as on the LJII but the RCS housing is a bit different. The motors will have the neat external stiffening rings and, of course, be of the proper shape and dimensions. Right now, the plan is to have a metal pin run through the throat of the motor to secure it to the RCS housing for added strength.
You can contact me at
[email protected]
---John Pursley
I don't know about a "top 5," but here's what I learned in building mine:.....
I did not use tube-type plastic cement for any of the construction as the directions indicate, but instead Tamiya extra-thin cement. This is my glue of choice for plastic models and worked fine for gluing the fins and nozzles together and for the construction of the tower (which requires a little patience to build). I did not have Plastruct on hand at this point, but I believe it would work just as well.
The decals really cling, and after having some issues with the capsule decals either folding in on themselves or sticking like glue so that fine adjustments in their positions were very difficult (even with setting solutions), I decided to cut out the squares for the body tube in groups to apply them. I felt that if I tried to apply that huge one-piece decal as is, that if I didn't ruin it then the very least is that I would end up with a lot of wrinkles.
Other than that, I pretty much followed the directions and had no problems. But I didn't super-detail mine like many others have.
HTH,
Mark


")