Building the Estes Little Joe II: Tips, Tricks, and Modifications

The Rocketry Forum

Help Support The Rocketry Forum:

This site may earn a commission from merchant affiliate links, including eBay, Amazon, and others.
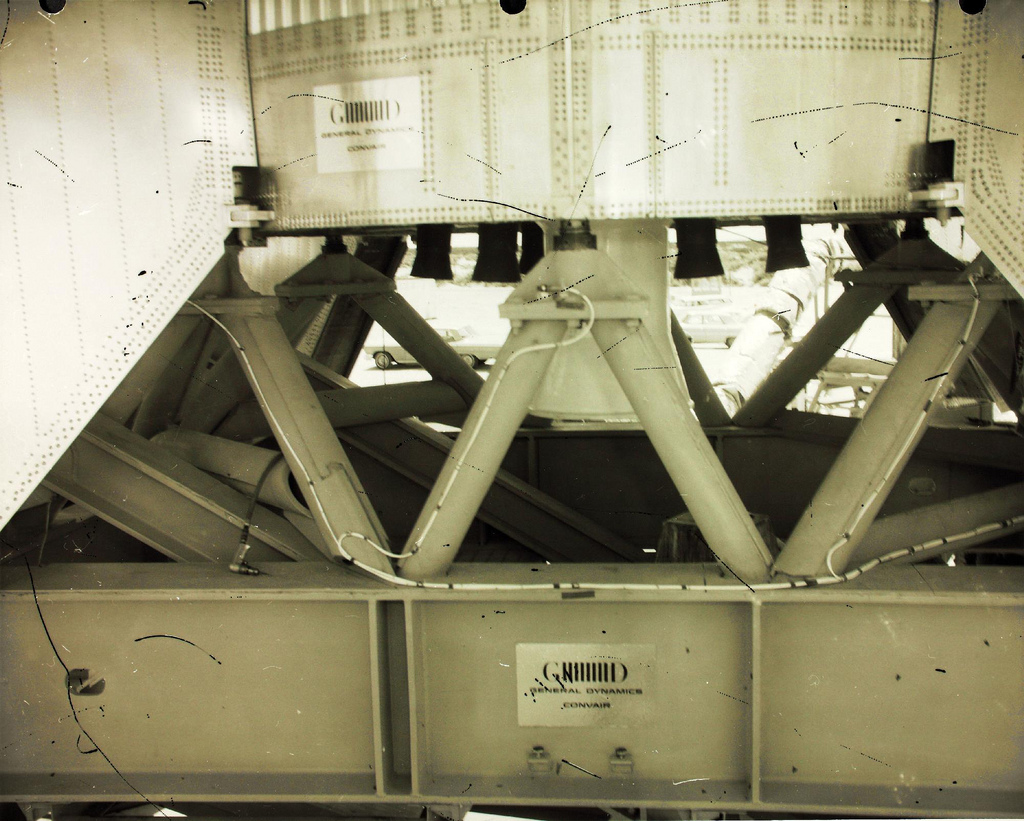
General Dynamics Convair Plaque

PDF file at: https://www.mediafire.com/view/j2h1v1xfykkm38d/Plaque_print_test_145.pdf

VdzSWqt.gif


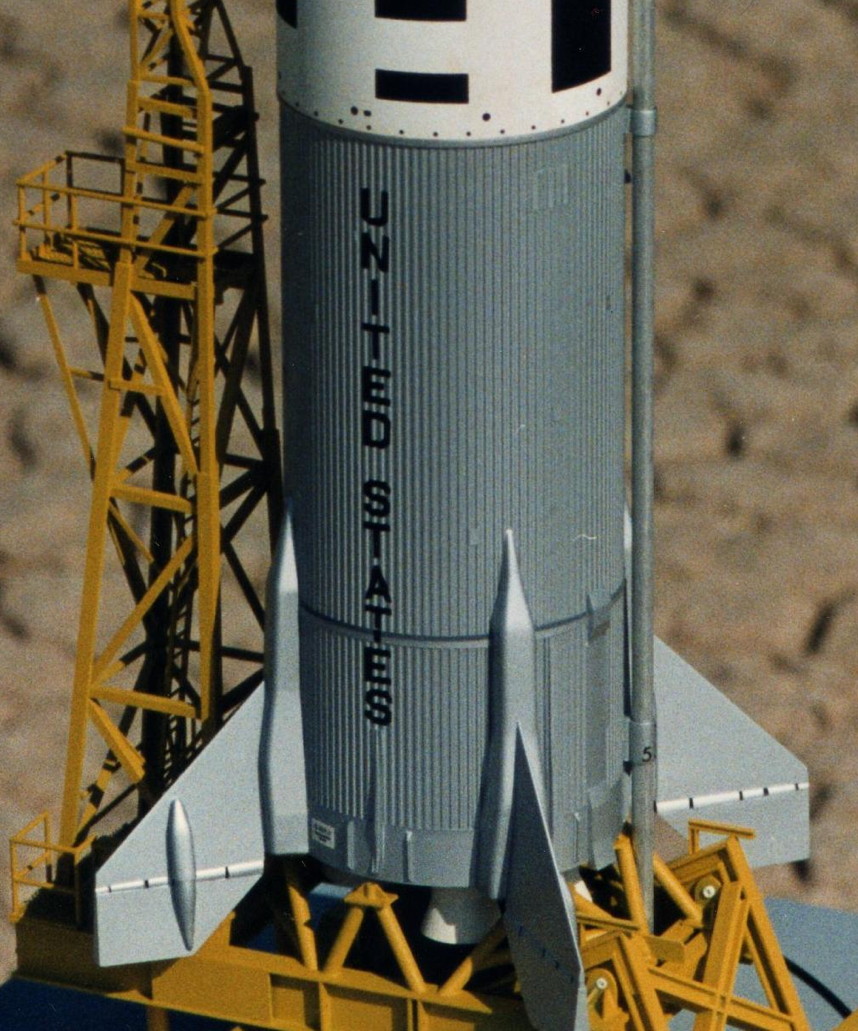
This is an approximately 20 x 14” plaque that is located on two sides at the base of the Little Joe-II. It was also on the Launch Pad.

sYOBym5.jpg


It is a very shiny plaque, such as stainless steel or chrome. I have done one model in the past that had the plaque set, a 1/100 Peanut Scale model of A-002 in 1991. What I did for that was to print the black onto clear decal paper. For the plaque, I cut out a rectangle for adhesive chrome mylar tape, and put the decal over it. In the image below, the model is with a photo of the real A-002.

MPq9YdB.jpg


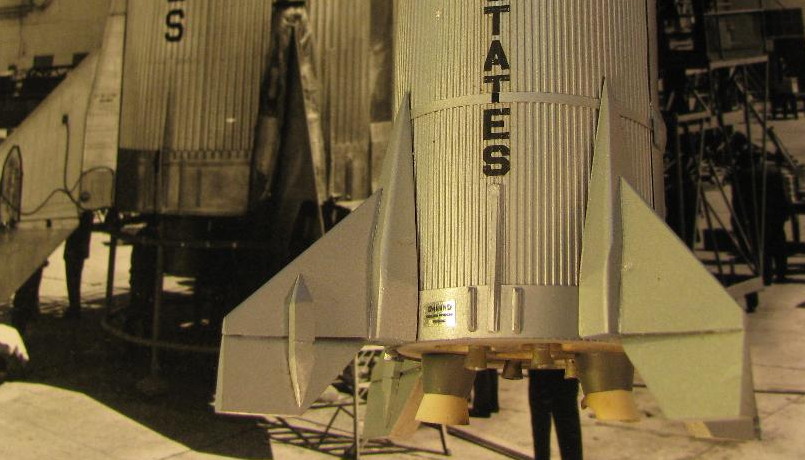
In the Plaque file linked above, I have at 1/3 scale, 1/9 scale, and 1/45 scale. I made up some with some gray gradients, because I’m not ready to print up any decals yet. So, I printed it out on paper, and used the darkest 1/45 gray versions for the new model. Used double sided tape to stick them on. Later I’ll replace the paper ones with mylar and clear decal plaques.

Also, I am going to create a custom decal sheet for those plaques at 1/45 scale, and for the UNITED STATES lettering. The lettering is needed in part as spares for when things go badly in applying the decals. Indeed I ruined one of the ones from the kit decals and had to cut a spare out of a sheet for a second kit. Also, I think could be a bit more accurate, the letters in the kit decals are spaced a bit too far apart, the “U” is up bit higher than it should be when the second “T” base is where it shield be at the splice ring.

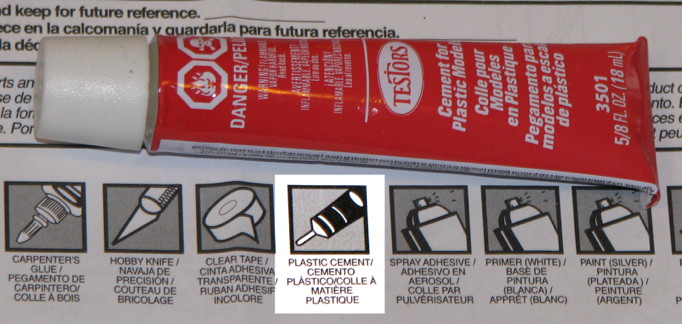
So, that will be a future file addition, GD/C plaques and spare UNITED STATES decals. I’ll draw them onto a 5.5 x 8.5 sheet, as that is the size of the paper that Testor’s sells, which often can be bought at Michaels with a 40% coupon.

- George Gassaway
 
Last edited:
Thanks for the files George. They look great. What weight paper did you use to print the wraps?

Also, from quickly looking through your attachment technique, did I see that you only used double sided tape for the attachment of the wraps, and no spray glue or the like?

Steve
 
Last edited:
Thanks for the files George. They look great. What weight paper did you use to print the wraps?

Also, from quickly looking through your attachment technique, did I see that you only used double sided tape for the attachment of the wraps, and no spray glue or the like?

I think the paper printed at OfficeMax was 20 pound.

I thought the LES wrap might have needed to be printed onto adhesive paper. If the LES wrap had been sprayed, it would have needed to be an extremely fine spray or else the thickness of the adhesive would not allow the conduit edges of the seam to butt up together, there would be a gap (most of the spray adhesives go on pretty thick). One way to solve that would be to print the wrap a bit bigger like 101%. It would be a bit long, but if printed using the Style #2 wrap and trimming off the upper band with the pitch motor it would be OK.

- George Gassaway
 
I was looking at the old Century instructions and noticed that Capsule / LES was recovered on one chute and the booster on another. They used a sling method on the capsule like the Estes Saturn V. I am thinking this may help save the LES from being broken. What have others done when flying or plan to do when they fly?
 
I plan on recovering mine under two chutes. I used the Centuri instructions as a guide.

With all the weight in the LES, I had to adjust the attachment point of the line that goes from the tower to the main cord to get a decent angle.

I will post some pictures once it is completed.

Steve
 
Thanks for the tip on Plasti-Zap. I might have to hunt some of that stuff down. I only have one local hobby shop in my area. If they don't have it, I'll have to order it online.

I do agree with you on the E30 not being "right" for this model. Let alone the fast un-scale lift off, the Blue Thunder propellant would give off the wrong visual effect while the White Lightning would be ideal.

I currently have an unopened pack of E18-4W's in my box. That's what I plan to use in mine. I'm just wondering if I would need a longer 3/16 inch launch rod. I have looked around for 6 foot 3/16 inch stainless steel rods but they're a bit pricey. I think $22 was the cheapest I saw.

I am thinking of going with rail guides on my LJII, and possibly have them removable. Here is a picture of the MakerBeam rail. It is avaialble in 900 mm and 1500 mm lengths from Amazon. prices for a two-pack are around $20 and $27, respectively. Also pictured is the 80/20 20mm rail, a four foot rail is available for ~ $20 shipped from rail-buttons.com, who also sells the micro buttons and the mini buttons for these two rails. Note that the "tube" pictured is an 1/8" launch lug between the mini and micro buttons. -- these rails are small! I plan to to use the micros for small rockets, and the minis for mid-power, but people have flown G-powered rockets off the Makerbeam rail with micro buttons. I will likely use the minis on the LJII.

2016-01-13 17.14.04-1.jpg
 
Last edited:
Finally flew my Little Joe-II Saturday at a club launch!

c8h5vvc.jpg


Wind of about 10 mph, so I decided not to use a D12. I used an Aerotech E15-4

wYXgHX8.jpg


rxd4GKl.jpg


I got a nice photo of the launch.

QNnPP0a.jpg


Whoa, I’m feeling a little woozy…

It boosted beautifully, dead arrow straight. Ejection right at apogee.


Deployed the main 36” flare chute and the 18” “semi-drogue” chute attached to the nose section.


Much cheering from the crowd.


The model landed slowly, sitting upright on its fins as the wind died.


Nearly everyone at the launch walked over to check it out.


Shortly after, the Blue Angels did a flyby, and performed their famous skyburst maneuver overhead.


Then a Unicorn flew by, leaving a rainbow trail.


No, wait, that’s not what happened after the launch photo.


Reality is setting back in.


Oh, the horror…….


The horror…….


THIS:

vQPgJCQ.jpg


I did not have a good view of what initially happened, because I was taking the photo. By the time I put the camera down to see it, it was nearly horizontal, still under thrust of the E15. It burned out coming down, and crashed about 600 feet away or so before the ejection went off.

A lot of the people at the launch walked over to help find it and see what happened. It crashed into a curb, but damage-wise didn’t matter if it had crashed into a field (at least it did not damage anything that it hit). Some said it had started to veer off as it took off, I was mostly in line with the pitch direction so it flew over me (NOT close, I mean the direction), so that is why I didn’t have a good indication at first what had happened (and the small viewfinder of the camera did not show enough at the time).

Anyway, lots of pieces, Some little ones like tower segments, even an individual RCS thruster (So, the one “advantage” of crashing where it did, finding little pieces more easily). I noticed something that was a clue as to what had gone wrong. I’ll end this message here to give readers a chance to figure out what happened, before reading the next message where the clue turned to be correct.

The photo of the crashed model shows what I noticed as a clue as to what happened. If you look at the little pieces in the pic….. you're missing it, the clue involves the rocket body.
 
Last edited:
2YYTeAq.jpg


So, as I saw the model crashed on the curb, I noticed the rectangular white areas on the corrugated body (to the right of UNITED STATES), where the lugs had been.

Why would the lugs break off in a crash, but three of the four fins stay on? And so many little pieces found on the pavement….. NONE of them the lugs.

Oh - S. & F.

Got back to the pad and YEP…..

AoBF2U6.jpg


Lugs.... still on the rod.

The lugs snapped off as the E15 hit high thrust and started moving the model up the rod. Perhaps Rod Whip, of the 4 foot 3./16" rod (The rod is slightly curved to the right, and this is not a 90 degree view of the bending axis.). I often use my camera to take liftoff video near the pad looking up. It probably would have shown what happened. But I was using it for a liftoff photo. I had intended to use my iPod Touch for that same kind of pad looking up video but in the preparing for launch forgot to do it.

So it got very little guidance. Here’s the liftoff photo again, this time showing the rod.

ohQ0Vpi.jpg


The upper lug is visible on the rod, about a foot from the top, but the lower lug is not visible. This implies that the lower lug broke first, the model started to pitch the tail away from the rod and eventually the angle was enough to pry the top lug off, with the model therefore having momentum in pitching from vertical toward horizontal.

Also, note that you can already see more of the “top” of the model, and none of the “bottom”, indicating it had already pitched over quite a good bit.

Even though last week I glued the lugs back on, using “Bondene” which is supposed to bond ABS and Styrene, it seems that it was not able to bond well to the residue of the Testor’s tube glue that was on the lugs after they broke off the first time.

UPDATE - See Message #177 - DO NOT USE BONDENE! It did NOT bond to the ABS wrap whatsoever, even though it is supposed to. It simply re-melted the Testor's cement, which does not bond to ABS.

I REALLY consider it a major drawback of the instructions NOT to be TOTALLY CLEAR about what kind of glue to use, and what kind NOT to use, to glue the fins and lugs to the body wrap. Since the ABS plastic of the body wrap is NOT a plastic that a lot of plastic glues will bond to properly. Certainly NOT the tube type glue (generic icon that looks like Testor's) that the instructions indicate to use.

Here it is in the autopsy room. Note that both systems tunnels popped off. They were glued on with Testor's tube glue..... just the horizontal sudden stop of the impact was enough to make them pop loose, the tunnels themselves did not have anything physically hit them to knock them off..
H35tcw9.jpg


znQhMSe.jpg


YOfQjOs.jpg


So, turns out that Zap brand’s Plasti-Zap DOES glue the fins on quite well. Well enough so that the wrap will rip before the fin will pop off. Indeed, one of the other three fins still on, is a bit loose but it is the wrap that has cracked and is loose, the fin is still securely glued to it. For the next model, I’ll try to think of some good, yet light, way to reinforce the area so that the fin can share some of the structural load directly to the body tube. And I’ll attach the lugs with Plasti-Zap.

I will not trash this model. At worst, I could turn it into a funky sport rocket.

My old Centuri Little Joe-II, yeah, it’s beat-up. But that was accumulated damage over DOZENS of flights over many years. It never crashed. A very reliable flier. Its closest call was the day I flew it on an FSI E60…. it flew great, but went so high and drifted, so it landed in a tree and it required “Chainsaw recovery” to get it back.

My other Little Joes, other than two that went unstable, none the contest models crashed. The only one I had crash before today was the 1/22 scale “fun” 7” model with a G25 and six C6’s, that failed to ignite the G25, and it flew to about 100 feet on the six C6’s, and crashed since the G25 was what ejected the chutes.

I remembered today something that Ben Roberto said long ago. He’d had an R/C Rocket Glider fold a wing on boost and crashed. He said: “If you’re gonna fly, you’re gonna crash”. So, I often think of that when something like this happens.

But also, it didn’t have to happen. I suspect there are going to be several of these models built by other people, that likely will do much the same thing, snap the lugs off at liftoff when using a high thrust motor, when gluing the lugs on AS SHOWN with plastic tube glue like Testor’s that does not properly glue the lugs to the ABS body.

Ironically, had I flown it on a D12, the lugs probably would not have snapped off.

And still, had I flown it on a D12 and it was fine, eventually when I flew it on a higher thrust motor, it was going to snap the lugs anyway. Indeed had the winds been lower, my plan for the day was D12-3 for flight one, then E15-4 for flight two.

- George Gassaway
 
Last edited:
At a minimum suggest Estes send George not one, but two Little Joe kits. Also suggest Estes hire ( pay $$$$ ) George to rewrite the kit instructions. And also pay George for permission to use his wraps for the LES, BPC and Service Module.

Went to STAPLES and printed off copies of the wraps for the LES, BPC and Service Module. They are beautiful.
Thank You George!!!

And thank you to everyone here for the comments and suggestions on the construction of Little Joe..... have taken many notes.
 
I recall a sequence of photos(from my r/c race boat days) of a builder gluing CF to an ABS boat hull, using CyA. it seems that CA is one of the few glues that will stick to ABS w/o requiring chemical 'welding'.
Rex
 
Oh man, almost made me sick to my stomach looking at those crash photos.:(

Looks like plastic glues aren't up to the task of holding the lugs on the model during launch. I bet if you had used the E30 being the recommended motor instead of the E15, it would have been MUCH worse.
 
Looks like plastic glues aren't up to the task of holding the lugs on the model during launch.

Well, actually, it is bad to just lump "plastic glues" all into one generic category.

That would be like lumping Gasoline and Diesel together as "fuel", then putting Diesel into a car that uses gasoline, or putting gasoline into a vehicle that uses diesel.... very bad and expensive result (engine damage).

So, the right fuel for the right vehicle, and the right plastic glue for the right kinds of plastics to be joined.

There ARE plastic glues that work well for FUSING ABS and styrene together. But they are not so common to find. And you HAVE TO KNOW THAT YOU NEED THEM, that you need to get a glue that works with both ABS and Styrene. That is where part of the problem is, not knowing, and the other part is being shown to use just any generic plastic tube glue.

In the photo below, of my best model, take note of the lugs. They are relatively small. Certainly much less gluing surface area to the body. The lugs are styrene tubing, the standoff spacers are styrene from the same "metal siding" styrene sheet as the corrugated body (12" wide sheet curled into a tube). I used Plastic-Weld to bond those together, and indeed they are fused almost as though they were molded as one piece of styrene. Never had one break off. I would never use anything BUT Plastic-weld, or similar type of solvent glue, to bond those all-styrene parts together and to the model.

Now, none of that involved ABS, but I'm showing that the RIGHT plastic glue is better than any other glue when it comes to joining most plastics such as Styrene to styrene, or styrene to ABS, where the solvent is able to "melt" and therfore fuse the plastics together (I can't say all plastics. Polypropylene for example is almost the "teflon" of plastics).

Ironiically, the Plastruct Plastic-Weld that I used on the model below, and for many parts of this 1/45 kit (Tower assembly, RCS assembly), would likely have bonded the lugs on well, as ABS is one of the plastics listed for using it with. But I was a bit concerned about about the thin (watery) glue running, and wanted to have some "gap filling" capability that a tube type glue provides, so knowing no better, I went with the tube glue like the instructions show.

- George Gassaway


asRpNR7.jpg
 
Last edited:
George... My stomach still churns when I think of the sound your Little Joe made when it hit the ground. It was a beautiful model. So sorry for your loss.
 
I want to give thanks to Gary Aslakson who sent me this video.


[video=youtube;0dtxN_6_a4M]https://www.youtube.com/watch?v=0dtxN_6_a4M[/video]

Here are some screenshots. The first two groups of 8 frames are taken about 67 milliseconds apart.


ZNaYc1f.jpg


By the 3rd frame above, the bottom lug must be gone, as the LES escape rocket is no longer parallel to the launch rod. Somewhere around the 4th frame or just after is when the top lug was pried off.

dK4ApGQ.jpg


The rotational momentum kept the model pitching towards horizontal.

This next image is 67 ms after the last, a bit over 1/2 second after the first frame.

krnDpJp.jpg


And this image, 134 ms later, about 7/10 second after the first frame.

qUsTLXW.jpg


These pretty much support what had been theorized before. Actually, worse pitch-over at launch than I thought it was.

- George Gassaway
 
FWIW.. I'm using Tenax for the launch lugs and other plastic parts on my build of the LJII. I'm not saying it better, because I have no idea, but only that I will give a report on how hold up after it's first launch. Since the problem seems to be gluing Styrene to ASB, maybe it would be best to make a slot in the ABS wrap, trimming around the launch lugs, and then glue the lugs directly to the body tube?

Paul
 
Regarding the wrap being made of ABS and the other plastic parts being high impact styrene and finding a glue that will be strong enough to join these items. Maybe Estes could offer a Styrene version of the wrap and dump the ABS wrap. I have thought about making a mold of the wrap and doing one myself, But I figure that would be a copyright issue.

Paul
 
OUCH!!! Sorry to hear about the crash George.

[EDIT] I posted before reading the first report of the crash. I hate it that Estes keeps suggesting tube glue for gluing plastic parts together. If they're going to recommend tube glue, then what brand specifically? When I can finally get one of these kits for myself, I'll be using rail buttons.
 
Last edited:
Sorry to see that, George. Estes instructions have been too far on the "minimal" side it seems. I would think any reasonable person seeing "plastic cement" and a depiction of a "plastic cement" tube on the instructions would interperet that as Estes' endorsement of that style of glue. Hopefully Estes can make this right for you and improve the quality of their manuals.
 
So, as I saw the model crashed on the curb, I noticed the rectangular white areas on the corrugated body (to the right of UNITED STATES), where the lugs had been.

That's a bummer, George. Sorry to hear your model took the big Dirt Nap, but I'm sure that v2.0 will be even better.

I took your misfortunate crash as a call to action to reinforce the lug mounting. Here's what I did...

First, a pair of small holes were drilled on each side of the lug bezel completely through the lug, the vacuform wrap, and the underlying tube. (What size drill bit did I use? I have no idea as it was one of those numbered bits, but it is about 3/64" in diameter.)

IMG_1774.jpg

Next, a piece of .030" styrene rod was forced into the hole to check the fit. After confirming the fit was appropriate, the rod was pulled out, slimed up with some Plastruct Plastic Weld, and reinserted.

IMG_1776.jpg

The process was repeated for the upper lug.

IMG_1777.jpg

The extra rod scrap was then cut off flush with the surface of the lug bezel. It will also be necessary to trim off the excess rod scrap on the inside of the tube for the upper lug. A small sanding stick was then used to polish the nub of the exposed rod level with the lug bezel.

IMG_1778.jpg

IMG_1779.jpg

Later today I'll touch up the paint with some Tamiya lacquer sprayed into a cup and applied with a brush.

Will this help? I have no idea, but it's worth a shot.

James
 

Attachments

  • IMG_1775.jpg
    IMG_1775.jpg
    111.8 KB · Views: 215
Regarding the wrap being made of ABS and the other plastic parts being high impact styrene and finding a glue that will be strong enough to join these items. Maybe Estes could offer a Styrene version of the wrap and dump the ABS wrap..

It's a matter of getting the right glue. Tenax 7R is a very powerful solvent glue for styrene and ABS, so I expect that would work well. Indeed it may be one of the best glues for the job from what I’ve read…. just I can’t say that for certain since I have not used it myself.

UPDATE - In light of the horrible result I found out about Bondene NOT gluing the lugs properly (see message #177), DO NOT ASSUME that Tenax or anything else will work. TEST it unless someone has posted proof they've used it and that it DOES melt the ABS for a GOOD bond. Sooner Boomer wrote this earlier and what he wrote implies that Tenax and Bondene MAY have the same primary chemical (though he writes about Tenax 7B, but I find nothing about a 7B. Maybe he meant 7R?):
Doing some on-line searching, Plastruct Bondene, Tenax 7B, and Ambroid Pro Weld all have as their main component methylene chloride (dichloromethane) (some have MEK as well).

As for Estes replacing the corrugated ABS wrap with a corrugated styrene wrap, let’s just ignore the logistical and company issues with doing that, as I do not think a styrene wrap is a good idea for this model.

Again this is an issue of considering all "Plastic" things to be generically the same. ABS is a tougher, more durable and less brittle plastic than styrene is. Those classic Centuri vac-formed Saturn wraps were nice... but BRITTLE. But at least they had no high-stress parts like fins glued to them. It now makes perfect sense to me to know that the wrap is ABS, because that is indeed about the best vacform-able plastic that they could use to create a vac-formed wrap that is supposed to have key structural parts attached to it such as fins and lugs. A styrene wrap would rip very easily compared to ABS.

So, now that I know what it is, I’m actually in favor of that wrap being made out of ABS. I'm just NOT in favor of the lack of information with the kit about the kind of glues needed to properly bond the lugs and fins (and other parts) to it. As well as not also stating in the instructions WHY, since a lot of "plastic" glues do not work well with ABS.

I realized after a previous post I made, that there is a far better example of using the right glue for the right plastic. Plumbing. You don't go trying to glue PVC pipes together with Testor's tube glue, or really any hobby type glue for plastic. Not unless you love flooded basements. You use the glues made for the SPECIFIC TYPE of plastic plumbing parts that are being used. And, yes, there are also ABS plumbing parts (and also CPVC), so you don't use PVC cement to join ABS, or ABS cement to join PVC. IIRC there is some cement that works to join both ABS and PVC, so that would be the one to use in that case, but not as optimal for all-PVC or all-ABS as cement optimized for one or the other. And just imagine the mess from using epoxy, CA, or "gorilla glue" to "glue" all the PVC or ABS or CPVC plumbing in your house, instead of using the correct type of plumbing cement for the job.

OK, did a quick Google and found this page explaining use of the proper cement for “plastic” plumbing:

https://www.plumbing-geek.com/solvent-cement.html
There are three plastic plumbing pipes that are put together with glue. They are ABS, PVC, and CPVC pipes. We don’t really call it glue, but solvent-cement. None of the plumbing cements are interchangeable, each one is specific for its pipe.

Each pipe is joined with its own cement. One exception is transition cement, used to weld ABS pipe and PVC pipe together. This transition cement is green in color so it's easy to recognize. The other exception is all-purpose cement which can be used to join any of the three pipes to each other.

I know, the above risks going too far off base but I really want to stress how important it is to not generically think all “plastics” are much the same, or that other types of non-plastic glues are as good as the RIGHT KIND of plastic glue for the given plastic(s) to be glued together.


I have thought about making a mold of the wrap and doing one myself, But I figure that would be a copyright issue.

Not a problem. You could make a hundred copies of the wrap if you wanted to, and it's not a copyright issue at all. Until you SELL one, THEN it is. But for your own personal use, fine.

But I don't see much point in that. It's a PITA to mold a good looking wrap even with an existing one as a master, and part of the usefulness of this kit is not having to get into custom work like that.

Most of this can be addressed by using the right glue to attach the parts to the wrap. I think Tenax 7R will do it well for the lugs, if applied correctly [UPDATE- Perhaps NOT. TEST!!!]. And now that I have seen that Plasti-Zap held the fins on so well that the wrap rips before a fin lets go, I consider Plasti-Zap to be what i'll use for attaching the fins to the wrap from now on.

- George Gassaway
 
Last edited:
I wrote the following as part of a reply to the above message, but decided it was best to split it into its own message.

I have been giving some thoughts to good ways to make the wrap take landing loads better, or for the fins to share the load into the body tube, without adding too much weight.

Some ideas such as these, either one alone or perhaps more than one added together:

Just before attaching the wrap, brush some contact cement under the fin attachment areas of the wrap, to get a better surface bond to the body tube. But that would not do a lot, and some contact cements could melt the wrap (though the area i'm talking about would be underneath the fin root fairing area).

Before applying the wrap, drill some 1/16" to 3/32" diameter holes into the insides of the glue tabs of the wraps (the sides opposite of where the inside of the fin root fairings glue to). After the wrap is in place, using a small diameter glue tip on a bottle of Plasti-Zap, to use those holes as access holes to apply Plasti-Zap inside of the glue tabs, so the Plasti-Zap can seep inside and hopefully under the wrap to bond it better to the body tube.

After the wrap is on, drill some holes such as 1/16" diameter, perhaps only 1/32", in many places along the fin root are of the wrap, and apply a drop of Plasti-Zap into each one, to sort of "rivet" those areas of the wrap to the tube.

After the wrap is on, drill holes. Use VERY small screws, no bigger than 2-56, ideally smaller to save weight, inserted thru the inside of the body tube, heads inside the tube, threaded end sticking up thru the wrap. Could simply apply Plasti-Zap over the threads that stick up (easy), or use actual nuts.

Even more advanced, drill a hole, maybe 1/8", into the center of each wrap's root location for each fin, about 1/2" or so from the bottom. Test fit 1/8" wood dowel inside of an assembled fin (I mean the hollow area of the fin, not the fin root fairing). Find the right spot to match the hole in the tube, and use Plasti-Zap to glue the dowel securely into the fin, so it is at 90 degrees to the body tube. Once done, test-fit it into the hole thru the wrap and body tube. If off, then enlarge the hole a bit (might need to be shifted up or down a bit). Also, trim that dowel length so it will only stick inside the tube by about 1/8” to 1/4”. Then when it will be able to fit properly, temporarily remove the fin, apply Plasti-Zap to glue the fin to the wrap, and put in place, with the dowel going into the hole. Once the Plasti-Zap is set, then go back to the inside of the body tube and use Plasti-Zap to glue the fin dowel to the tube. This step would tend to add more mass than the others, but would also tend to be the most robust. Still, if not done sloppily it may not add THAT much. I do not advocate going crazy overkill with HPR-type big TTW tabs and slots

Take note that any of the above steps that involve holes into the tube, would require a different engine mount assembly sequence. What I’d do would be to glue the forward centering ring into the body first, at the correct distance from the end of the tube. First I’d use sandpaper wrapped in a cone to sand the downward-facing part of the engine tube hole of the ring, so the hole would have angled edges so that it would be easier to “blindly” guide the engine mount tube to fit into it. Also for the engine mount tube, I’d sand the outer edges of the top of the tube to round it for the same reasons. I would use a disposable model paint brush, or a wooden dowel cotton swab, to apply a epoxy inside of the tube at about 1/4” above where I wanted the upper ring to be, then insert the ring and slide it down to the epoxy, and slide it that let 1/4” to be sure that it pushed the epoxy with it.

Then I’d do all the other wrap related stuff, and glue the fins on. And probably paint the model next since for mine I wanted the lower centering ring to be white, to represent the white RTV coating on the base. Then when it was time to install the rest of the engine mount (the white-painted lower ring would be glued to the engine tube by this point), I’d apply some 5 minute epoxy near the top of the engine mount tube, and carefully along the inside of the lower body tube, and slide together. Top of engine tube would meet up with the upper centering ring first (unless I blew it and glued the ring too far up), slide into the upper ring, then guide the lower ring into place in the lower end of the tube (Algol motor holes properly aligned in the roll axis), and set aside to cure.

The above sequence for engine mount centering ring installation is something I have done before for a few Joe models that had a bolt thru the tube to help anchor the fin to (though it was done in a heavy way).

Now, with all of the above said, those are suggestions for making the fin attachment or wrap attachment more robust, for those who want to take those extra steps. I am NOT saying it needs it.

The only thing that I think it needs is proper identification of the correct glues to use, and why it is so important to do so.

Otherwise, those ideas are enhancements to reduce the chances of the fins breaking off or the wrap ripping, during a rough landing. But there’s lots of models that will break fins off when the land. Just we usually are not as concerned about that since it’s not as big a deal to break off a fin on some random sport model, as compared to a scale type model or in this case ripping the wrap which is a harder thing to fix than just a fin popping off.

And yes, my old beat-up 1/45 Centuri Little Joe, it broke fins off several times on landings (sometimes ripping the vac-formed Fin Root fairings, which is why some are missing). And those balsa fins were glued directly to the paper body tube.

- George Gassaway
 
Last edited:
After the wrap is on, drill holes. Use VERY small screws, no bigger than 2-56, ideally smaller to save weight, inserted thru the inside of the body tube, heads inside the tube, threaded end sticking up thru the wrap. Could simply apply Plasti-Zap over the threads that stick up (easy), or use actual nuts.

I like this idea and I just might try it. I agree with you on all you said about making a styrene version of the wrap. I was just "typing out loud". I love scale kits, but I always hate being afraid to fly 'em.
 
Sorry to see that, George. Estes instructions have been too far on the "minimal" side it seems. I would think any reasonable person seeing "plastic cement" and a depiction of a "plastic cement" tube on the instructions would interperet that as Estes' endorsement of that style of glue. Hopefully Estes can make this right for you and improve the quality of their manuals.

Yeah, I posted this before, after the lugs that were originally glued on with Testor's tube glue, popped off:

OX7pVvB.jpg


That's all the info there is, an icon of "plastic cement" that looks like a generic Icon for Testor's type tube glue for "plastic cement" (Including the narrow oval shape on the icon that has Testor's logo on the real tube).

Now, If i'd gone rogue and used say epoxy, or "Gorilla Glue", (or insane and used hot glue), and the lugs (and fins) popped off, that'd be on me for not following the instructions. In this case, I did exactly as shown. And then I used "Bondene" which I expected to work better to bond the styrene lugs to the ABS wrap than Plastruct's Plastic-Weld since it is more specialized (lists only ABS and styrne) while Plastic-weld is more generalized (ABS, styrene, butyrate, acrylic) and a different chemical.

UPDATE - I made a terrible mistake, by TRUSTING the Bondene!

DO NOT USE BONDENE!!!


Only now have I done a glue test with the crashed model. I finally took a look close-up at where the lugs let go and the ABS plastic was smooth, no indications of melting as would be expected from a solvent. I applied Bondene to the exposed area of the ABS wrap where the lower lug popped off. I touched the area with my finger, expecting it to be "sticky" from partially melted plastic. NOTHING! Now, the instructions say to hold the parts together when applying the glue. But the fact that there is no sticky melted ABS at all, is very troubling.

I applied Bondene to styrene, and it DID melt the Styrene! But Bondene is labeled to bond styrene and ABS. So it ought to work with ABS too. This is nuts. Either the Bondene is trash, or the wrap is yet some other kind of plastic material and not ABS???

I NOW believe that when I used the Bondene, that all it did was to melt the dried Testor's plastic cement enough to "stick" the lugs back onto the ABS body wrap, no better than it was originally.

I have just tried Plastic-Weld on the same lug area of the ABS (?) wrap, and it DOES work, it melted the ABS and made it sticky. I have taken a piece of styrene and am gluing it to that area to confirm that the Plastic-Weld works. And it bonded right away. I expect once it dries, it will be hard to pry it off, and I may need to cut it away.

So, DO NOT USE BONDENE for the wrap!!!

Use a PROVEN GOOD solvent glue meant for ABS and styrene (that you test yourself if not listed by someone here as proven good) to attach the lugs!

And it may be that Plastruct's Plastic-Weld is very good for attaching the lugs on, and perhaps fins too. Btu again since I know Plasti-Zap is strong enough and easier to apply (not water-thin), I'll go with that for fin attachment.

So ironically I had the RIGHT GLUE with me to begin with, Plastic-Weld, which I used for the LES Tower, RCS nozzles, and a few other things. But not knowing about the ABS wrap, went ahead and used Tube Glue to attach the two (OK, six) most critical parts of the model, lugs and fins, instead of Plastic-Weld.

- George Gassaway
 
Last edited:
Later today I'll touch up the paint with some Tamiya lacquer sprayed into a cup and applied with a brush.

Just finished with this step, which should make the lug attachment more secure. Reinforcing the lug attachment, painting, and clean-up took less than ten minutes in total.

IMG_1781.jpg

James
 
I love scale kits, but I always hate being afraid to fly 'em.

Well, that makes the difference between model rocketry and display models on a shelf.

To quote a too-true saying by Ben Roberto: "If you're gonna fly, you're gonna crash".

Also, despite what it MAY have seemed, this was not an all-out max workmanship project for me (The wraps took up time to redraw but then once done EVERYBODY could use them, as well as for my own future models. And those wrap files did not die with this model). I always looked at it as a model to just to sport fly and not worry (Much) about some damage.

At the launch, a few were surprised I was going to fly it in winds of 10 mph. "Of course I'm going to fly it, that's why I built it". OK, had it been 20 mph, probably not.... :)

Of course I was more concerned about the increased chance of landing damage due to sideways landing speed, and possibly getting dragged along the ground after landing (I did get a nice volunteer that went downrange to get to it soon to stop it being dragged).

But again, "stuff happens", whether it is lugs snapping off, or an ejection charge to never go off, so you never know. But again that's why we fly model rockets as a hobby and not build display models to stare at as hobby (which is fine, but not the same).

- George Gassaway
 
Last edited:
I painted the LJ II booster tonight using Tamiya Gloss Aluminum. This is my 1st time using this brand. I am out of practice & really suck at painting to be honest. If you look close you can see a few paint run on the fins & fairing. The Little Joe II off to the side is a 1/70th version that I been building for the last 5 years or more.


Paul
 
Back
Top