The Paint.Net Graphics Editor Tutorial.

The Rocketry Forum

Help Support The Rocketry Forum:

This site may earn a commission from merchant affiliate links, including eBay, Amazon, and others.

K'Tesh

.....OpenRocket's ..... "Chuck Norris"
TRF Supporter
Joined
Mar 27, 2013
Messages
22,544
Reaction score
15,005
Several people are singing the praises of Paint.net. It's a graphics editor program (like Photoshop, or Gimp 2), and supposed to be pretty powerful. However I can't make heads or tails of it.

So, your mission... If you choose to accept it.

Bring K'Tesh (and the rest of TRF's Rocket Scientists) up to speed on Paint.net.

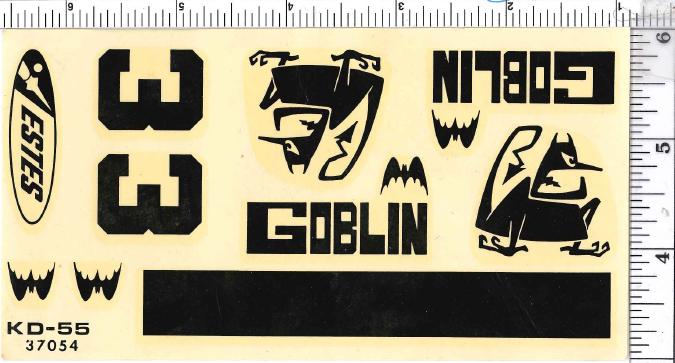
First objective: Rotation and resizing

You must rotate the k-55f.tif (found here) image from JimZ's website so that the black body tube wrap decal is 56 pixels tall (length will scale from that), and is parallel with the top and bottom edge of the image, and save it as a .png (.tif files will not display on TRF's site).

Second: Edge cleanup.

The image needs to be presentable before the decals can be virtually applied to the Estes Goblin (K-55)(Decaled).ork that K'Tesh is currently working on.

If you are caught, TRF will disavow any knowledge of what K'Tesh is currently up to.

Thank you gentlemen.

This message will self destruct in 5 billion years.
 
Last edited:
The second step, edge cleanup, is going to be a task as this is one of those 90s fax-machine-quality monochrome scans. 1-bit dithering is like nails on a chalkboard... Better to have the scan than not at all though.

Perhaps a demonstration of using the original as a background layer to re-create a high-res anti-aliased version in the foreground layer? That's what I did for my Javelin decals as the only remaining scan on the net was the same low-res monochrome scan.

I'll leave that up to Neil though. This thread is in good hands.
 
The second step, edge cleanup, is going to be a task

Yeah that's not exactly a freshman-level assignment, and also somewhat atypical of general paint usage. But we'll give it a whirl.

Perhaps a demonstration of using the original as a background layer to re-create a high-res anti-aliased version in the foreground layer? .

Excellent idea, I'll do it that way.
 
Image is coming in at 96 pixels/inch for me. This doesn't match up with K'Tesh's default 100 per inch; and isn't making sense as a once around wrap for a BT-55 body tube (too long). Can we assume that K'Tesh has established that the black band is .56" wide and goes once around the tube, which would make it 418 pixels long?

Diggr

I measured my Goblin's (K-55) black band's width when I did my first update to the Goblin's .ork It's actually 5.625" wide by my measurement, but you can't do a .5 pixel... So, I rounded it to 56 pixels. I'm sure that Estes did it with an overlap. However, OR doesn't need to have any overlap for wraps.


If you want to measure it yourself, here's the scan I took of it:

 
I have no idea what skill level anyone reading this will come in with, so I'm gonna do just a *little* basic orientation to make sure everyone has a reasonable starting place.

Here's my screen with the Goblin decal image open:
orientation.jpg

I usually keep my three tool windows open. From top to bottom:

1) Tools (although you can also access all this from the "Tools" pulldown in the lower left corner of the toolbar). Right now it is showing the "Rectangle Select" tool enabled.
2) Layers (which we'll discuss a lot more). To start, we only have one layer here.
3) Colors (I actually usually keep it expanded (More >> button) but forgot to before taking this screenshot). Right now black is the foreground color and white is background.

Those three windows can be shown or hidden with the buttons in the upper right corner of the window as shown with the red arrows.

The bottom row of the toolbar shows the selected tool and all the options for that tool. For the Rectangular Select tool I've highlighted the selection mode options, because they're the ones you're most likely to use. The default "normal" mode is "Replace" (leftmost), which means that each time you select a region it will replace the old selection region. Right next to it is "Add", which means that each region you select will be added to the selection (you can accomplish the same thing by holding down "Ctrl" and while selecting a region), and then "Subtract", which means you can take an existing selection and remove areas from it (or hold down "Alt" while selecting a region). The other two modes are less frequently used, but you can play with them and figure them out if you like.

Good to start by experimenting with the rectangle selection tool a bit.
 
Last edited:
I measured my Goblin's (K-55) black band's width when I did my first update to the Goblin's .ork It's actually 5.625" wide by my measurement, but you can't do a .5 pixel... So, I rounded it to 56 pixels. I'm sure that Estes did it with an overlap. However, OR doesn't need to have any overlap for wraps.


If you want to measure it yourself, here's the scan I took of it:


Thanks for the information! This will make things a whole bunch easier, frame of reference and all.:)
 
Let's fix the wrap. Of course, it's a solid black bar, so the easiest thing would be to create it from scratch, but we'll try to force ourselves to work with the image from the file.

Select the magic wand tool (fourth down on the left in the toolbar). Essentially, the magic wand lets you make a selection by clicking in an area and it'll automatically select all adjacent pixels that are the same color (or close enough, as defined by the "tolerance" slider up top). By default, tolerance is set to 50%, which is pretty high. Experiment with the magic wand by clicking in different places on the image and seeing what gets selected.

In our unusual case, with a (really crappy BTW) black-and-white image, we can live with a very high tolerance. Click inside the black body wrap box and you'll see (at 50%) that some of the surrounding grey pixels are not select. Try increasing the tolerance to have them all included. I found that about 87% tolerance did the trick.

Magic wand notes:
1) Once you select with the magic wand, you can change the tolerance and immediately see the effect of the change without having to click in the drawing again.

2) The same "selection mode" options are available as for the rectangle select tool.

3) The "Flood Mode" option is nifty. Normally, the wand will select *contiguous* pixels close to the color you clicked on. But if you set the flood mode to "Global", it'll select all pixels in the image regardless of contiguity. So if you set flood mode to "global" and clicked in a black area, it'd immediately select all the black stuff in the entire image.

Suck it, MS Paint. :)

After selecting the body wrap with 87% tolerance, my screen look like this (I zoomed in as well):
magic_wand_select.jpg
 
With the wrap selected, copy it to clipboard (CTRL-C of course) and then move it to a new image. First create the new image (I always use CTRL-N, but you can do it via the File menu if you prefer). The "New File" dialog will default to the dimensions of the selection, so just hit return and you'll get a new blank image. Now paste in the clipboard and you will have the wrap centered in the new image. Don't click anything else yet.

If you roll over the selection, you'll see a little curvy arrow below the bottom right corner of the selection. That's the rotation handle. Click on that, and you can now free rotate the selection until it is straight.

When you're done, you should have a bit of white border around the selection. Crop the image to selection (either use the menu or the "Crop" button in the toolbar) and now you have... well you probably still have a bit of white border. That's because the edge of this block is so messy.

First check to see if it's really straight; you should have equal-looking border around all four sides. If not, adjust the rotation a bit more, same way as before. Once it's really straight, go back and use the rectangle select tool to select a solid black rectangle inside the selection (in other words, omit the fuzzy edge). Then crop again, and you should have a nice black rectangle, that is within a pixel or two of the original size. Hard to be precise when the source material is so imprecise.

Now resize the image to the desired size using the Image -> Resize menu option. That should be straightforward. Make sure "maintain aspect ratio" is checked, and set the width to the desired size; the height should go along for the ride.

The body wrap is now finished. Save the file as PNG and this task is complete.

If any of the steps in this post were unclear let me know, I'm away from my PC so I can't take screenshots at the moment.
 
I want to say Thanks for the tutorial!


I've yet to get the chance to really look at it, but it looks like it'll be a big help.


Another request... Any chance it can "average" a color? Say I want to get a single color decal (like the blue fin decals from the Omega), but the scans appear to have multiple colors that compose the single color. I'd love to see something average the colors together to obtain the desired single color?

Thanks!!!
 
neil_w

Thanks for the information! You've helped in my quest to understand Paint.net in a big way.

K'Tesh

As you get into this project on the Goblin a little farther, I would respectfully suggest that you work from the scan you posted above, rather than the TIFF image. In my opinion it's much cleaner and less out of square. But when I opened the jpg I found the scaling to be a bit off. Which is to say that I'm seeing it as about 109% of what it "should" be.

If you, or anyone else for that matter, is interested I will post the reworked jpg and my take on a body wrap for the Goblin.

In any case, good luck and thanks again Neil, I appreciate the help.

Diggr
 
Another request... Any chance it can "average" a color? Say I want to get a single color decal (like the blue fin decals from the Omega), but the scans appear to have multiple colors that compose the single color. I'd love to see something average the colors together to obtain the desired single color?

I'm looking at the Omega fin decals and the blue areas on each fin sheet are a single solid color, so I don't think I see what you're referring to. If you can point me to a specific file that shows what you're talking about I'll have at it.

In the meantime, I do notice that the two fin sheets use a slightly different blue, so I'll show how to make them the same.

Open both in Paint.net. Pick which one has the better blue. Using the eye dropper tool, select that blue, which you should now see in the color panel.

Now go to the other image and pick our friend the magic wand tool. This time, set flood mode to "global". Click the wand in one of the blue areas, and it should select all the blue areas. Adjust the tolerance so that only the blue is selected, not the black:
select_blue.jpg

Now hit "backspace". That fills the current selected area with the current foreground color (which should be the blue selected from the other image).

Done. Save file.
 
Thanks for the information! You've helped in my quest to understand Paint.net in a big way.

Glad it helps. I'll try to think of a good exercise showing how to use layers, because that's key to getting a lot of the advantages of the program (or any "real" paint program).

As you get into this project on the Goblin a little farther, I would respectfully suggest that you work from the scan you posted above, rather than the TIFF image. In my opinion it's much cleaner and less out of square. But when I opened the jpg I found the scaling to be a bit off. Which is to say that I'm seeing it as about 109% of what it "should" be.

Yes, that scan is way better than the one from jimz's site. If anyone wants I can demo some operations on that one, since it's probably a more realistic scenario.
 
If anyone wants I can demo some operations on that one, since it's probably a more realistic scenario.

Absolutely!! I've already learned stuff today, but why stop now? :)
 
Last edited:
neil_w

Thanks for the information! You've helped in my quest to understand Paint.net in a big way.

K'Tesh

As you get into this project on the Goblin a little farther, I would respectfully suggest that you work from the scan you posted above, rather than the TIFF image. In my opinion it's much cleaner and less out of square. But when I opened the jpg I found the scaling to be a bit off. Which is to say that I'm seeing it as about 109% of what it "should" be.

If you, or anyone else for that matter, is interested I will post the reworked jpg and my take on a body wrap for the Goblin.

In any case, good luck and thanks again Neil, I appreciate the help.

Diggr

I understand the idea... This is more of a familiarization with Paint.net. I don't have personal scans of every decal out there, sometimes JimZ's is the only one that I can find. What's more this one should be "easy" as the decals are only black.
 
I understand the idea... This is more of a familiarization with Paint.net. I don't have personal scans of every decal out there, sometimes JimZ's is the only one that I can find. What's more this one should be "easy" as the decals are only black.

Also, I looked at the other scan and it has a lot of JPEG artifacts, so it has its own problems.

What would you like to do next?
 
Back
Top