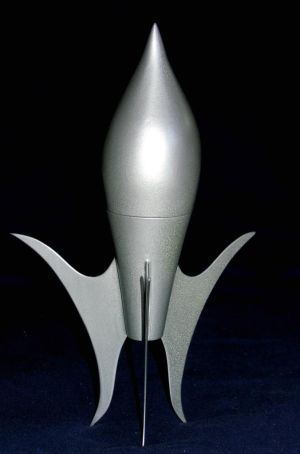
Centuri's Early Concept Rocket

The Rocketry Forum

Help Support The Rocketry Forum:

This site may earn a commission from merchant affiliate links, including eBay, Amazon, and others.

rosko_racer

Well-Known Member
Joined
Jan 18, 2009
Messages
1,503
Reaction score
22
This rocket is based on the rocket that is on the front cover of one of Centur's Model Rocket Design Manual. I think it was the first edition. The Copyright on the manual says 1971. I downloaded that manual some time ago from another site and downloaded the second edition manual from Jimz' site.
 
I made some plans on MS PowerPoint and based the measurements on the X-acto knife (5.75"). The plans ended with a rocket that is 18.75" long (6" nose cone, 12.75" long body), 10" wingspan, 4" wide fins, 2" wide body... well, check the attached file.
 
here is a picture of the layout of the rocket. On the PP file this is a full size layout and two options for body shape...
 
this is page 28 from the 2nd edition of the manual where it details the way to do the body of the rocket.
 
This is a layout of the decal sheet. Note that most of the decals are for the bottom of the rocket. These are almost done.
 
Sorry about the quality of the jpg's but I have limited capabilities regarding graphics. If anyone has any suggestions about how to post more clear pictures please do post them.

Although they are not finished I can offer a copy of the MS PowerPoint file to any interested party. Just PM me with your email and will do. I will be working later on some wraps that I have promised a few months ago to some members of TRF. Sorry for the delay but I was busy with preparations for my engagement... and it was worth it... caught her by suprise and was speechless for almost two days :)
 
It reminds me a bit of the much newer Estes Freaky Flyer/Space Hauler...those "winged" designs are so pretty climbing under thrust.
Nice job!
 
shockwaveriderz: Thanks for the tip about GIMP. I downloaded it last nite and installed it. Will check it out this weekend.

I am finally done with the dimensions of the rocket. I had to make a few corrections but was able to keep it within the 18.75" length. Attached is part of a screenshot of the slide with the dimentions I came up with with a color-coded layout. After this, is getting the balsa and do some carving. I plan to go to a local hobby shop to get the balsa. I was also thinking about HomeDepot but I have not checked there yet... Anyone?

444dc8ef-2.jpg
 
If you bring this project through completion, I hope that you will write it up for one of the rocketry magazines. I remember seeing that model on the cover of the Centuri tech manual and just drooling.

I don't think Home Depot will be of much help in finding you balsa block.

I know that Micheal's Craft and hobby store has balsa sheets and sticks . . . not sure about blocks.

An alternative to balsa is plastic foam carved with a hot wire. I haven't worked with it myself, but I've read articles about the technique. You might find references to it here.

Have fun!
 
I have seen balsa block at the local Hobby Lobby stores...
Should be a great build! Keep us posted!

Mike
 
I have worked on two color themes for this rocket. I am deviating away from what is on the cover of the manual. Something tells me (...the force, the swarts,that little voice inside, my future mother-in-law...) that the original color was orange. Do not know. But, I was surfing the net last nite and came across two pictures that gave me some inspiration. Here is the first one, a white and black theme. It reminds me of the Space Shuttle... I kept the intended decal layout just to get an idea of how they would look on it. Since the outline of the panels are black, I may just paint it a dark grey so that they can be noticed.
 
The second color theme was inspired on a picture of a Buggati car. It is red and black. Again, I left the decal layout for looks...

Any suggestions?

I bought the balsa stock at Hobby Works in Laurel, MD. I'll be preparing them this weekend and start carving them later. I plan to follow the instructions on the 2nd Edition (1975) of the MRDM on how to do the body: glue a sheet of paper onto two balsa planks and let dry, glue paper sides of planks together, carve and sand hull, pry planks apart, hollow interior... and so..., then glue halves together. Does anyone see a flaw with this tecnique?
 
I have done advance searches with Google and Yahoo and have not found a nicer copy of the 1975 edition of the Centuri MRDM. Looks like the only copy you can get is the same one on Jimz site.... Bommer!!!!
 
I like the "Buggati " color sceme, very nice! Can't wait to see the finished product!
 
I just got back from the woodshop. Two things: I got my blessing for using the lathe after making an oak bowl, and I cut, shapped, and glue the balsa planks for the rocket. I'll be carving the body then the nose cone. Let's see what comes out of this.
 
"Carving" - Wow, this is going to be an ambitious project! I definitely want to see a lot of build photos.

It's going to be pretty heavy. How will you prevent the wings from breaking on landing? And what motor will you be flying with to get it up to speed fast enough?

G
 
Here is an end view of what I carved out first. There is plenty of balsa shaves on the floor.
 
Here is an end view of what will become the body of the rocket. After carving I sanded with the sanding block you see on the pic until I got close to the shape I wanted. I had printed and cut out a pattern, that blue piece of cardstock, with the shape I wanted and used it as a template. That helped me get really close to the shape. One side done, another to go... I will continue with the sanding tomorrow. I had to sand outside, too much dust for inside.

Once the body is done then I will paper-glue what will become the nose cone and sand to shape, pry apart the NC, drill a hole at the center of the body and pry the two halves with a long screw driver. I placed a thin layer of white glue between the paper and the balsa. Once it dryed, I placed tiny drops of glue along the edge about 1"apart and a few in the middle, then I used three presses and two pieced of hardwood to press and glue the planks. This should make it easy to take apart.
 
This attempt to do a rocket this way is more of an experiment. Some things may change as I go along. Some problems I foresee is a matter of balancing it properly, anchoring the fins to the inner BT, and there is also a matter of weight. I think this is going to be on the heavy side. I plan to carve the inside to accommodate a BT-50, which, If I am not mistaken, could take a 24mm engine. The 24mm engine may have to be pressure tight but I may carve a channel in the balsa so that I could accommodate an engine lock.

GEOF brought up a good point: how to avoid damaging the wings upon landing. To be honest, I have no clue, I am open to suggestions.

I want to thank shockwaveriderz for suggesting GIMP. I downloaded and it works great... just what I needed. For the last few pictures I used GIMP.

Here is the Bugatti pic from where I got the red color theme...
 
Before I glue back the balsa halves I can carve some of the balsa out to make it lighter. Also I think I can carve a channel to slip in the fin and glue it to the BT beside to the the balsa halves. I will have to pay close attention so that the fins are straight...

... something like this... the fins are in yellow going through the BT but not the transition, which will be another piece of carved balsa.
 
The reason I ask is from my own experience with such an effort (see pic below). I tried a build strategy somewhat like yours, but not nearly so ambitious. I started with nose & tail cones that were approximately the desired shape, and had cores predrilled. I found weight to be an issue. First, it was pretty heavy and I needed a high-thrust 18mm D to get off the pad safely. Second, this caused issues with needing noseweight (because of my short/stubby design, which you don't have as bad), and there was little space for weight. Breaking fins was also a problem, but I blame more than just the weight: the insane shape of my fins was prone to breakage, and basswood seems very brittle.
Anyway, I am fascinated by your project, which I think is much more challenging than building most 3FNC scratch birds at almost any level. Your photos are great...keep them coming!

Geof


scratch_moonship01.jpg
 
... like the subject says, I did a lot of carving and sanding today. Lucky that balsa is not a hard wood to work with... fragil though...
Here is the body all rounded and slightly tapered. The NC is under the body but not carved/sanded yet.

What is that white thing? Could it be a secret weapon? Maybe a turbo laser cannon?...
 
Here is the NC placed on the body. I glued the NC to the body and sanded it to almost conform to the body shape so that I could do a final shapping later...
 
Here is another balsa plank. I marked it to cut it and make the boat tail... I decided to carve it out of balsa. The round piece of balsa with the blue cardstock on top will be later glued to the NC as a balsa block... it is sanded to fit a BT-50
 
Here is the tail transition... at least a preliminary look... I carved a hole into it and sanded the outsides of it like you see here. the piece of BT is not really glued it is just that I can sand it and round it the corners to meet the BT... will see how this one turns out...
 
Back
Top