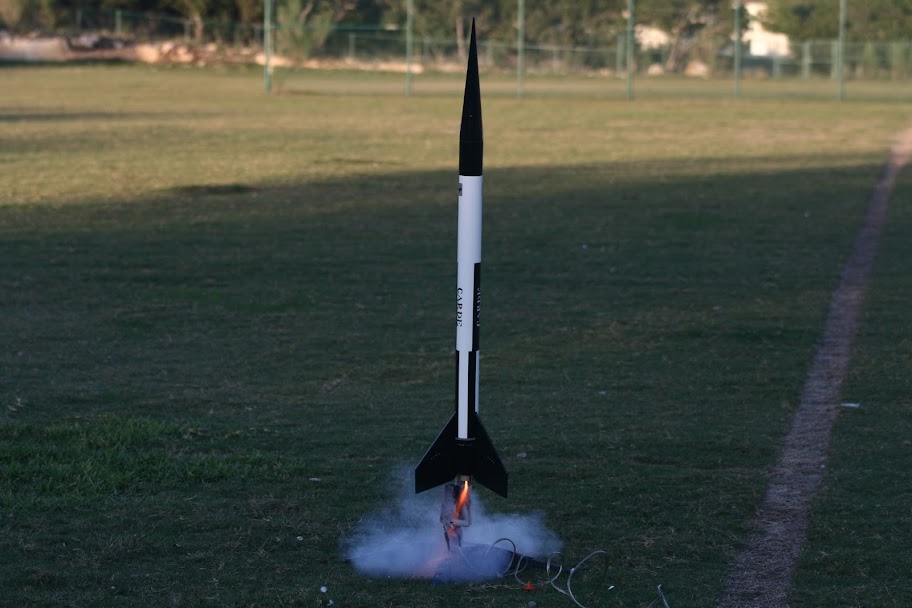
Black Brant ll BT70-FSI sized

The Rocketry Forum

Help Support The Rocketry Forum:

This site may earn a commission from merchant affiliate links, including eBay, Amazon, and others.

dave carver

....what hump?
Joined
Jan 18, 2009
Messages
4,973
Reaction score
9
Location
Idaho
A while back I received an order from SEMROC that included 2 bonus sets of fins. One was a set for a Flis Rhino that I cut the fins in half and made 2 rockets from. The second set was to a large Black Brant ll, I recognized them due to building a FSI version years before that exploded on it maiden flight on a F100.... go figure... Anyway, I checked SEMROC's site for nose and tailcones. They had the tailcone bit no nosecone. I then tried to find info on airframe tube lengths with no luck until I came upon a PDF of the FSI instructions, the body tube lengths were listed :)

Later today I'll contact sandman for the last piece, the nosecone. It's such a huge piece I don't think any of the 3D guys can do it, I'm not sure. I have a warm, fuzzy feeling for balsa, anyway, so I'm going with that. Besides, the tailcone is drilled for a 29mm motor mount and I happen to have a 36" piece.

So I will be building without the foreward solid balsa tube coupler, I have a bunch of couplers from an assortment of 50 I got from Uncle Mike's. I'm going to have to order more of the BT70 and BT80 sizes, running low and more that size to build in the future. As my construction moves back towards high power I can use BT70 and 80 tubes, doubled with couplers ;) Going to the full length ones from BMS I think, amount per dollar + shipping dictates, it's the lowest cost.

I'll be back after the nosecone get's here...the one I haven't ordered yet....:eyeroll:
 
Nosecone ordered :) Now we wait....

I'll be ordering some BT70 to 29mm centering rings, too, but they won't take long to get here.
 
Last edited:
Cool,I'll be watching. I too,have a large set of BB fins from Semroc. The ones I have are like around 1/4" thick balsa.
 
Cool,I'll be watching. I too,have a large set of BB fins from Semroc. The ones I have are like around 1/4" thick balsa.


Mine are 1/8th", measure yours and tell me how long your leading edge is. I just went and checked SEMROC and they are out of tailcones. Sandman is making the nosecone but I don't know if he could do a tailcone.
 
6" and they are 1/4" thickness, thru and thru.

Same size but mine are half as thick. Maybe those are closer to scale and your supposed to sand them down to knife edges like a scale Nike fin.

Nosecone's being turned even before I can PayPal the money :) And I'm happy about the cost, about $12 less than expected :) I think I paid the same for the whole kit back in the early '90's. Only thing left is the scorched 16" yellow nylon 'chute, this one's getting about a 22".

I don't mean to jinx myself but I've had a bad history with Black Brants, all 4 previous have went down in the first flight for various reason...I think I'm cursed and yet here I go again, high power this time....head for the hills!!!
 
Nosecone is here and it's gorgeous :) sandman did an excellent job. Full caliber shoulder, hard balsa and signed on the bottom, Whoo hoo ;) I can't do anything until next week but that's ok, this one's going to take a little time. Next month I'll get with sandman for some of his decals, I'd like a half-accurate scale representation. The ones I destroyed were unfinished or oddly colored....maybe the rocket gods were trying to tell me something.... ;)
 
Pieces and parts :) Pictured are the SEMROC BT70 tubes, 1 to be cut at 8" and 5". I think there'll be some fudge factor because the SEMROC tailcone isn't a Black Brant cone. The paint scheme I'll be using will cover that defect and when you consider it's a high power rocket no one will see at 100 feet anyway ;) 29mm tube from Giant Leap I'll be cutting off longer than the 18" FSI calls for. I'm not putting in the nose block so there's more room at the top. I cut two centering rings from Totally Tubular Multi-Rings then glued them with Super Glue. I show the 4" ring I cut it from. The Balsa one is to show how they work. Once glued they're as good as anything else and are nice to have for those odd sizes. The 29mm was close so I sanded it out to fit. A benefit of the fiber ring is when you sand it sorta delaminates on the edge just slightly really giving a lot of surface for glue to run into. The tailcone is drilled for a 29mm tube making that part easy so there will 3 places of attachment for the motor tube. The cone is a sandman cone, it's prettier than it looks in the photo. :) First thing is to figure out where things need to be, ballpark the length and all that.

I kinda need to wait to put together the top, I have bigger eye loops on the way, should be just a few days.

005.jpg
 
Well, it's all put together. With Gorilla Glue it sorta has to be done that way. I started with glueing a ring at the top of the 29mm motor tube with TiteBond ll and one to the end of a coupler with CA. I checked the overall length in the FSI plans, it's 41". The cut List say a 5" and a 3" section of BT80 to be joined with a balsa noseblock but I'm leaving that part out so I just cut an 8" piece out. Dry fit leaves a 2.375" shortage of body tube. This is due to the tail cone section from FSI is longer to provide for a groove in the body. This is where the coupler with the ring comes in. The open end butts up against the tailcone shoulder for a continuous coupler in effect. This is where I used the short 2.375" BT80 tube then the 18"section. The top 8" section got a 4" coupler inserted so that it set against the coupler joining the upper and lower sections. The ring on the stuffer/motor mount tube butts against this coupler. The nosecone sits on the very most upper stiffener coupler. FSI calls for an 18" motor tube but for my purposes it needed to be longer, that worked out to be 21" with a little sticking out the end. What I have planned leaves a 8" parachute bay. Wadding down the stuffer tube and it's all good :)

To assemble; the inside of the BT80 tubing where there was to be a coupler I used a damp paper towel to dampen the inside of the tube, not soak, just dampen. I kinda drizzeled a line of glue around each coupler and rolled them on a smooth polished shiny advertising paper and rolled the couplers until evenly coated with a thin coating. The glue will not bind so you have time to get it all lined up before the glue foams up and fills all the gaps and then sets up. Takes about 1-2 hours. Small amounts can leak out at the joints but I just scrape them off plus it sands easily. I use a length of angle iron to tape the assembly to while curing insuring straightness.

I got so eager to build I had a brain fart and forgot the shock cord anchor :p I guess it's a bridle of 1/2" Kevlar epoxied to the inside of the body tube. Fins are on and the second filet is drying. I like the way TiteBond drys and shrinks, pulling the joint together.

002.jpg
 
Funny, I built a FSI Black Brant II that used ST-20 tubes and the tailcone and nose cone that Semroc offered. It pretty much clicked together perfectly and I used those plans you linked. A BT-70 seems like it would be a little loose...

I used this parts list: https://www.semroc.com/Store/scripts/ClassicParts.asp?ID=646

And a picture of it here:
IMG_3231.JPG


I still have decals that I built for it to clean up the ones that existed.

FC
 
Mine all started from a set of free fins :) By the time I got to order a nose and tailcone SEMROC had neither but when I found the tailcone I did get I considered myself lucky, they are out of even those now.

I'm going to primer today after I attach the rail guide. I hope to have the same roll pattern you have going before this weekend, we have a launch and I have an H128-10 that needs burned ;)

edit: I weighed without motor or paint but included recovery gear, 12.1 oz. FSI says 9.5oz for theirs, what does yours weigh, FC?
 
Last edited:
Mine all started from a set of free fins :) By the time I got to order a nose and tailcone SEMROC had neither but when I found the tailcone I did get I considered myself lucky, they are out of even those now.

I'm going to primer today after I attach the rail guide. I hope to have the same roll pattern you have going before this weekend, we have a launch and I have an H128-10 that needs burned ;)

edit: I weighed without motor or paint but included recovery gear, 12.1 oz. FSI says 9.5oz for theirs, what does yours weigh, FC?

Mine weighs 9.1 oz. I used 3/16 basswood for the fins, and didn't build it with a separate payload section, nor the wire antennas. Finally, I built it to take only 24mm engines...I very rarely fly on fields big enough to support a hot 29mm engine in that size rocket.

She's been flown quite a bit. I'm in the middle of a partial refresh...some filling, sanding and repainting to make it closer to what it was when I first finished it.

I'm still bummed about Semroc closing up shop...they were such a great company. I did manage to snag another nose cone before they had made their announcement they were closing. I'm not as worried about the tail cone, since that can be replicated with paper shrouds (like I did for my BT-55 and BT-50 downscales).

FC
 
Last edited:
Nice and light :) Yeah, mine's built extra stout, every bit of the outside body is supported in some way. My fins are 1/8th" hard balsa and are finishing up real nice and smooth.

I've done 2 coats of primer in the last 2 days, it picked up an ounce in weight. I used grey Rustoleum 2X primer for the first. Good paint, glad I switched. Then the white primer. I brought it in the house a while ago...I have shadows :p Recoat tomorrow with the white primer. I will use it for the flat white in the paint scheme it's that nice a white
 
Ok, here's where I'm at: I got the nose and tail sections in black, as I am flying it tomorrow no roll pattern. It's been planned from the beginning to fly this on a H128-10, I'll be loading that later.

Thing is the flight is a bit more significant; I actually failed my cert try on the 4th :p It used to be if you returned the rocket in flying shape you got certified (or was that confirmed?). The nosecone pulled the eye loop from the cone and the came down separate. I had my CA with me and glued the eye back into the cone. I didn't know until I got home about the new-to-me rules, like having to have the CP located on a 1st level rocket....really...computer crap on a first level rocket? I have to leave this alone, on the whole "certification" deal. Let's just say my concepts are...heretical.

Be that as it may, back to the rocket, it's pre-flight weight is 14.45 ounces, half again as heavy as the FSI inspiration. There's the possibility of an I200 in the future so it needed to be stout. I'm seriously thinking on a bigger chute, though. I have a stock sized 22 incher but to forestall the chance of failing again by popping off a fin or something I might go with a 24"...chances are I will. We're expecting dead air today, no breeze at all...might even go with a 30" flare chute I've had for years and never used....hmmm...


edit: well, I put in the flare chute. It's a surplus from 1987 flare chute, 8 shroud lines with a center line. Weight went up to 1 pound without motor, in this case a AeroTech 29/180. I think it will fly good on a G138 AT or some of the 24mm CTI F motors.

But first let's get that pesky First Level out of the way :)
 
Last edited:
Well, long story short. I got an email from rocketjet787 that they'd found my nosecone and parachute but I was gone before they could get it back to me so at least I didn't lose it. What happened is despite putting an 8 inch plug of crepe' paper like I've used for years a jet of ejection charge gasses cut a new shock cord in two right above where it joined the Kevlar. I already have the fin broke off on landing glued back on with a new to me glue, Gorilla Wood Glue. Seems pretty nice so far...

Oh, well, I try again :) Next project is a 4" scratcher with a 54mm motortube. We have a launch on Nov 1 and I have everything I need. I300-10 mebbe.....

See you in the scratch section ;)

001.jpg
 
Back
Top