You are using an out of date browser. It may not display this or other websites correctly.
You should upgrade or use an alternative browser.
You should upgrade or use an alternative browser.
My path to level 2. A painkiller, a Scion, and a whole lot of time. (Successful!)
- Thread starter HHaase
- Start date


Help Support The Rocketry Forum:
This site may earn a commission from merchant affiliate
links, including eBay, Amazon, and others.
L1 certified, 1801ft with the Scion on an H133. Main deployed at apogee, probably due to some last minute nose weight added to fix the Cg. Didnt have time to ground test it. Otherwise a perfect flight. Couldnt be happier. Now a 4 hour drive home. More details later.
Edit:
Well, it's been a long day. 4 hours driving each way to visit Tripoli Southern Minnesota. Much thanks to David, Gary, and all the assistants helping me search through the corn.
My flight was the last high power of the day for TSM, as I got there later than expected, heck I almost missed the event. I'm glad I contacted David ahead of time to let him know I was coming.
She tracked arrow straight, with a estimated altitude of 1765ft and max velocity of 305mph with open rocket.
Actual altitude was 1802ft, and actual velocity of 304mph. So kudos to Open Rocket on an accurate sim.
The only hitch came of my own doing. I had goofed up my body tube length in Open Rocket, which I didn't find out until Thursday night when I was doing the final Cg and Cp markings, and didn't like what I was seeing. I ended up having to add 3oz of nose weight to get the stability margin back where I wanted it. There wasn't time for an additional ground test of my deployment, and the extra mass caused the main chute to deploy along with the drogue. So it made for a long search in 5ft tall corn. The good news is that everything deployed nice and clean. No zippers, no damage. I did get a good bit of friendly ribbing about the backward fins on the Scion. So I'll add in a sheer pin, and enjoy the heck out of this rocket.
Now it's time to plan for my L2 with the Painkiller 3. I'm not even going to try and be ready for August, but they have launches scheduled for September and October. I'm going to aim for the September launch, which gives me a month of buffer time.
Either way, I'm tired. Time to do a bit more cleaning, take a shower, and go to sleep.
Last edited:
I didn't have time to set up the go-pro, and didn't want to be distracted taking shots with the pentax.
So I just winged it with the iphone. I may have some alternate video coming to me in a couple days.
[video=youtube_share;LHqPaeLB7IA]https://youtu.be/LHqPaeLB7IA[/video]
So I just winged it with the iphone. I may have some alternate video coming to me in a couple days.
[video=youtube_share;LHqPaeLB7IA]https://youtu.be/LHqPaeLB7IA[/video]
Good luck. My level 2 was single deployment, but after after a gust of wind, I instantly wished mine was dual deployment(DD).
I encourage everyone to consider DD on their level 2. It puts you a step ahead for level 2. Heck, I have seen a few do level one with DD.
I encourage everyone to consider DD on their level 2. It puts you a step ahead for level 2. Heck, I have seen a few do level one with DD.
Nick@JET
Well-Known Member
- Joined
- Sep 1, 2011
- Messages
- 1,693
- Reaction score
- 20
Good luck. My level 2 was single deployment, but after after a gust of wind, I instantly wished mine was dual deployment(DD).
I encourage everyone to consider DD on their level 2. It puts you a step ahead for level 2. Heck, I have seen a few do level one with DD.
I agree! With those bigger motors you are going to be going really high unless you are going to build a very heavy , high drag rocket. My L2 was my first DD and with enough testing you will be plenty comfortable.
Chuck:
This one was supposed to be dual deploy, but that extra nose weight caused both chutes to deploy at apogee.
Easy enough to fix on the next flight, and a great learning experience for the L2 flight which will have to be DD for sure.
Nick:
Ironically, that's another lesson I learned on the Scion build. I use way too much epoxy. This played a big factor in my premature main deploy.
If I hadn't used a couple ounces of epoxy in the motor mount, I wouldn't have had to add so much weight in the nose.
I'm already working on some new techniques for myself that should really cut down on the epoxy use.
I started the Painkiller 3 build today, and managed to attach both centering rings to the motor tube, plus attach a 1" wide kevlar strap..... yet used half the epoxy that I used to use doing the same job on a 29mm mount.
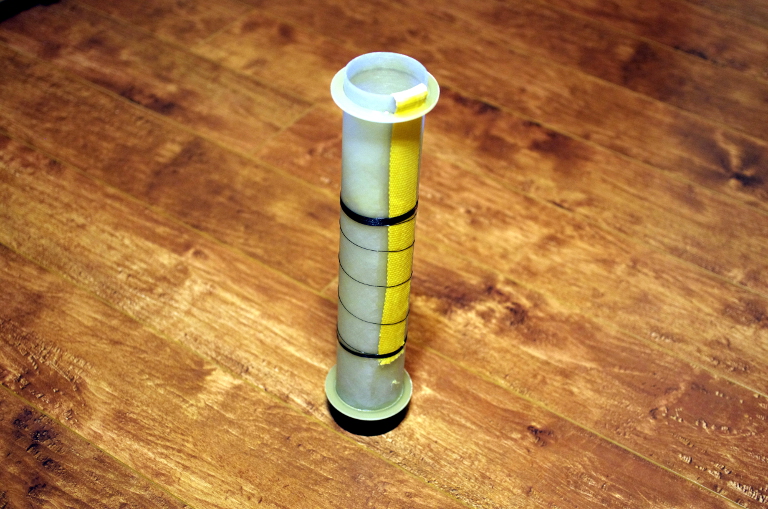
So, I decided I'm using way too much epoxy in my builds. Last couple times I epoxied kevlar to a motor mount, I KNOW that I was using way too much. Time to get smarter, and dig into the 'ole box of experience. So I went with wrapping it like eyes onto a fishing rod. I used some 90# bonded nylon thread, which I usually use to make stuff from 1000d cordura. A tight wrap around each end, with a loose spiral in the middle. This holds the kevlar nice and tight to the motor tube, which let me really work the epoxy through and also scrape off the excess. I was able to epoxy the full length of the kevlar, all the wrapping line, plus both centering rings with only 1/8oz of epoxy.
If I use this technique again I'll use something with less viscosity than the G-flex I've been using, as I had to lift up the kevlar and smear some underneath to make sure it was fully penetrating. I'm starting to really appreciate working with translucent fiberglass, makes it so easy to see penetration of adhesive. The nylon thread is thin enough I'll only have to sand very shallow clearance notches on the fins. Heck, with thinner epoxy I may even think about trying vacuum bagging to really get a good bond with minimal weight. Could probably go with a shorter length of kevlar bonded to the mount too in that situation.
If I use this technique again I'll use something with less viscosity than the G-flex I've been using, as I had to lift up the kevlar and smear some underneath to make sure it was fully penetrating. I'm starting to really appreciate working with translucent fiberglass, makes it so easy to see penetration of adhesive. The nylon thread is thin enough I'll only have to sand very shallow clearance notches on the fins. Heck, with thinner epoxy I may even think about trying vacuum bagging to really get a good bond with minimal weight. Could probably go with a shorter length of kevlar bonded to the mount too in that situation.
Well, I found the limits of the G-Flex epoxy I have been using up until this point. The stuff is, from a practical standpoint, not suitable for injecting internal fillets. At least not without a really big gauge syringe. It's just far too viscous. I was able to get the first of three injections done tonight, but it was a hell of a chore getting the stuff through the needle. Thankfully I did get complete fillets front to back. I'm pretty much committed at this point to finish the final two batches using the same stuff, but after this build I'll be limiting it to applications where it can be poured or brushed into place.
-Hans
-Hans
Last edited:
Coop
Well-Known Member
- Joined
- Dec 15, 2011
- Messages
- 1,768
- Reaction score
- 8
So, I decided I'm using way too much epoxy in my builds. Last couple times I epoxied kevlar to a motor mount, I KNOW that I was using way too much. Time to get smarter, and dig into the 'ole box of experience. So I went with wrapping it like eyes onto a fishing rod. I used some 90# bonded nylon thread, which I usually use to make stuff from 1000d cordura. A tight wrap around each end, with a loose spiral in the middle. This holds the kevlar nice and tight to the motor tube, which let me really work the epoxy through and also scrape off the excess. I was able to epoxy the full length of the kevlar, all the wrapping line, plus both centering rings with only 1/8oz of epoxy.
If I use this technique again I'll use something with less viscosity than the G-flex I've been using, as I had to lift up the kevlar and smear some underneath to make sure it was fully penetrating. I'm starting to really appreciate working with translucent fiberglass, makes it so easy to see penetration of adhesive. The nylon thread is thin enough I'll only have to sand very shallow clearance notches on the fins. Heck, with thinner epoxy I may even think about trying vacuum bagging to really get a good bond with minimal weight. Could probably go with a shorter length of kevlar bonded to the mount too in that situation.
Nice...
Have you considered epoxying only the kevlar at this stage, and cutting off the excess thread, after cure? This way it won't get in the way of your fins at all?
I really like this. I may try it on an upcoming build which will require to-the-MMT cord bonding...
Later!
--Coop
Ok, I give up. The G-flex epoxy is just too viscous, and driving me to a special kind of insane trying to inject it for internal fillets. I need to use something more conventional, such as aeropoxy or west system 105.
Too bad they don't come in smaller sizes, it'll be years before I'd used up the smallest size of West System. I might grab some system 3 epoxy, the numbers look almost identical to West System 105, but you can get it in just a pint instead of a quart.
-Hans
Too bad they don't come in smaller sizes, it'll be years before I'd used up the smallest size of West System. I might grab some system 3 epoxy, the numbers look almost identical to West System 105, but you can get it in just a pint instead of a quart.
-Hans
Igotnothing
Well-Known Member
- Joined
- Oct 26, 2014
- Messages
- 1,000
- Reaction score
- 210
"...through the needle. "
Through the needle? Or through the plastic cylinder the needle attaches to? I don't use a needle. I drill holes in the body tube right next to the fin. Then the holes are covered with an external fillet. If not doing external fillets, then tape over the holes and flip the rocket over so that the internal fillet flows into the hole and fills it up. Of course that begs the question - is your epoxy so thick it will not flow?
Through the needle? Or through the plastic cylinder the needle attaches to? I don't use a needle. I drill holes in the body tube right next to the fin. Then the holes are covered with an external fillet. If not doing external fillets, then tape over the holes and flip the rocket over so that the internal fillet flows into the hole and fills it up. Of course that begs the question - is your epoxy so thick it will not flow?
It flows very slowly, but it does flow. I might try a more narrow bodied syringe, the one I have was pretty bulky and couldn't get right next to the fin without attaching a needle onto it.
I will be doing external fillets on this one.
I will be doing external fillets on this one.
I really didn't want to start mixing epoxies on the internal fillets if I could avoid it, so I got my hands on a 14 gauge syringe nozzle. G-Flex injected just fine with that big of a point on there. Holy cow does it make sense why so many of you guys use this technique, it's so darn easy. I should be done with the internal fillets by the weekend.
-Hans
-Hans
Last edited:
Internal fillets are injected and cured now. I had a bit of an issue on one fin with the epoxy leaking around it. In the end, it just changed my sequencing around a bit as it flowed down to the next fin and did a fillet there instead. Either way, I have good fillets on both sides of all three fins between the fins and motor mount. Due to the viscosity of the G-flex, and how little space is there between the body tube and motor tube, it also gave me good internal fillets between the fins and body tube too. External fillets are also done now as well, I did those with Glenmarc g5000 (rocketpoxy).
This means the main structures of the rocket are done. I'm going with a similar layout to my Scion with the body coupling epoxied to the upper body tube, and I'll be placing my av-bay there. My Raven will be mounted there for deployment control. I'll also be doing a second av-bay in the nose as well for mounting some kind of tracking solution. I just haven't decided if I'm going with an eggtimer or not. I'll be launching with TSM, and they do have a Walston RDF system available, so that is my other option. If I can fit it all in there, I'm also considering running dual tracking systems.
Why dual tracking? Well...... Open Rocket is giving me a stable flight on a K445 to just over 9,000ft, peaking at 14.5g's. It's tempting, very tempting. But I'm making no decisions on motors yet until I have a more accurate flying weight. I'm assuming around 100oz without motor, if it ends up lighter it risks going trans-sonic and I'm not ready for that yet. Plus I'd hate to drift outside the designated area and fail the certification. I'm more likely go stay conservative with a healthy J instead of the risks of flying a K at this point.
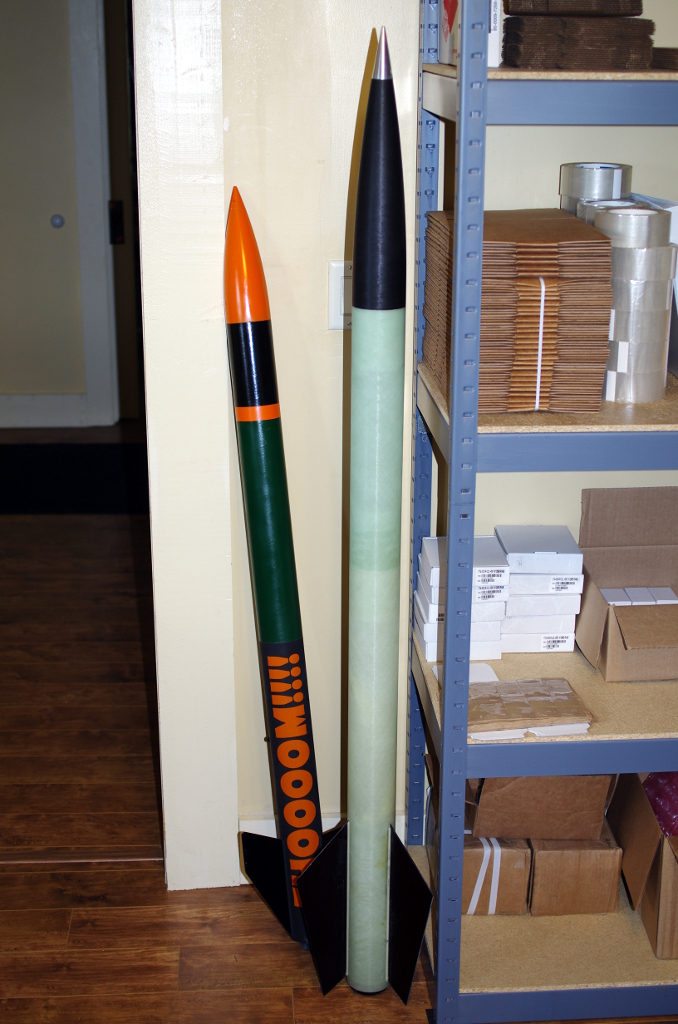
Here's what it's looking like next to my L1 bird.

This means the main structures of the rocket are done. I'm going with a similar layout to my Scion with the body coupling epoxied to the upper body tube, and I'll be placing my av-bay there. My Raven will be mounted there for deployment control. I'll also be doing a second av-bay in the nose as well for mounting some kind of tracking solution. I just haven't decided if I'm going with an eggtimer or not. I'll be launching with TSM, and they do have a Walston RDF system available, so that is my other option. If I can fit it all in there, I'm also considering running dual tracking systems.
Why dual tracking? Well...... Open Rocket is giving me a stable flight on a K445 to just over 9,000ft, peaking at 14.5g's. It's tempting, very tempting. But I'm making no decisions on motors yet until I have a more accurate flying weight. I'm assuming around 100oz without motor, if it ends up lighter it risks going trans-sonic and I'm not ready for that yet. Plus I'd hate to drift outside the designated area and fail the certification. I'm more likely go stay conservative with a healthy J instead of the risks of flying a K at this point.
Here's what it's looking like next to my L1 bird.
Time for much math, as I need to start sorting out recovery gear.
Right now my estimated weight is 6.25 pounds without motor, otherwise ready to fly.
Assuming a K445 (estimating on the larger size, regardless of first flight motor size), that puts liftoff weight at 9.5 pounds.
But you don't pop the chute at liftoff, weight at motor burnout calculates at 7.8 pounds.
I also have to think about deployment bags possibly too, particularly with the sky angle or standard fruity chute.
Right now I've got my options for the main narrowed down to a 36" Fruity Chute Ultra Iris, 44" Sky Angle Classic, 54" sphereachute, but am also open to other suggestions too.
As to the drogue, I'm just not sure. Likely a generic 18" or 24" chute. I also really like Top Flight's X-type chutes, I may use a 24" one of those.
Edit: Sky angle is out, packed size is too big for the available space. Trying to find out more about the packed size of the rocketman chutes, their 4ft chutes are another option
Last edited:
Good to hear it. I'm actually torn between the 36" standard, or the 30" compact iris. If they had a 30" standard iris the decision would already be made.
Between the drogue and main, descent rates look well within safe limits on the 30". I just don't know if the added cost is worth the weight and dimensional savings.
-Hans
Between the drogue and main, descent rates look well within safe limits on the 30". I just don't know if the added cost is worth the weight and dimensional savings.
-Hans
Well, I'm committed now to the 30" compact ultra-iris fruity. Just ordered it. Drogue will be a 24" x-type from top flight.
Should give me a descent rate of around 20-22fps at burnout weight.
Also downsizing my target motor. That K445 puts it too close to trans-sonic for my current comfort level. I'll still use it for my stability and recovery planning to give me some buffer to work with.
Who knows, I may fly it at some later point with that motor. Currently I'm looking at the K360 if it's a normal flying day, or down to a J293 if there's some wind to worry about.
I'd like to hit a full mile if conditions allow it. The K360 does that comfortably at a 9g max. They all exceed available motor delays, so it's going to have to be electronic deploy.
-Hans
Well, damn. I epoxied the bulkhead into my nose cone coupler last night. Looked nice and straight when I went to sleep, but it slipped a bit overnight, now it's sitting at a bit of an angle. Won't cause any problems with structural strength or anything, still perfectly usable, but it's just going to annoy me. Eh, oh well.
Now that main airframe construction is done, time to start working on the avionics.
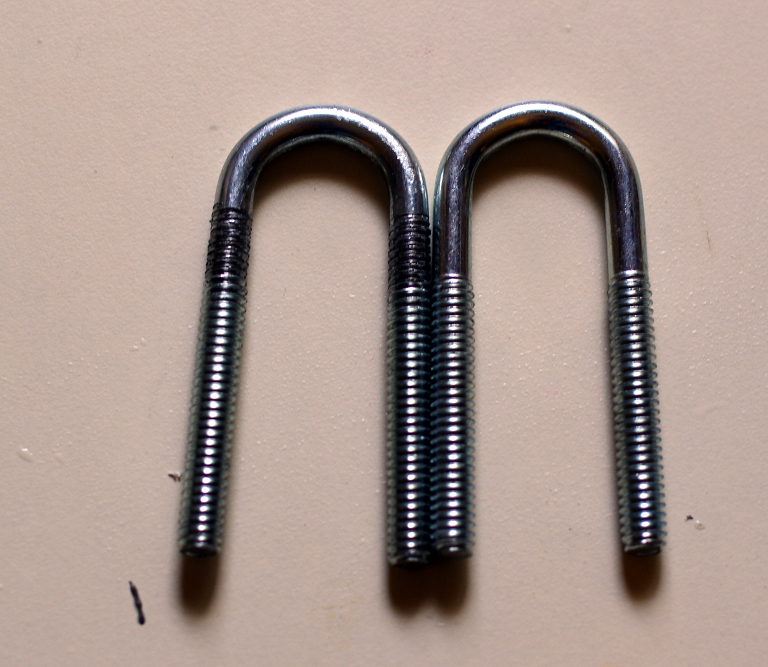
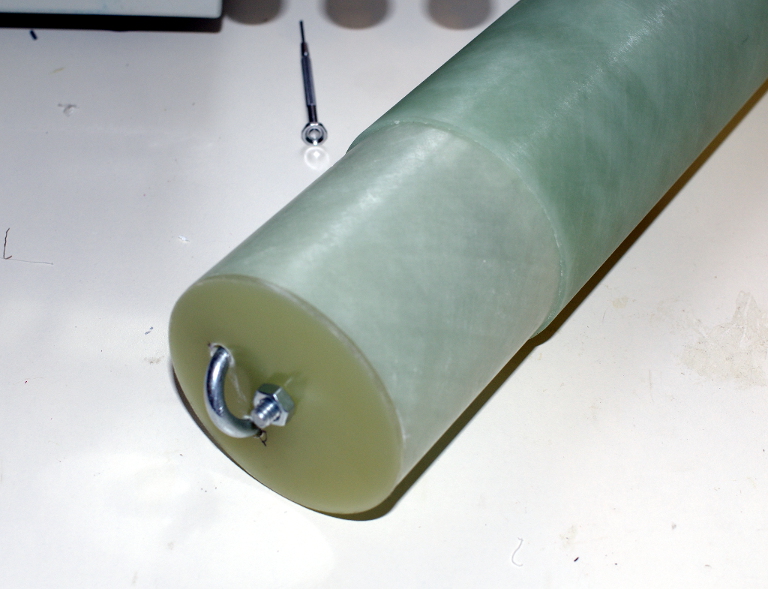
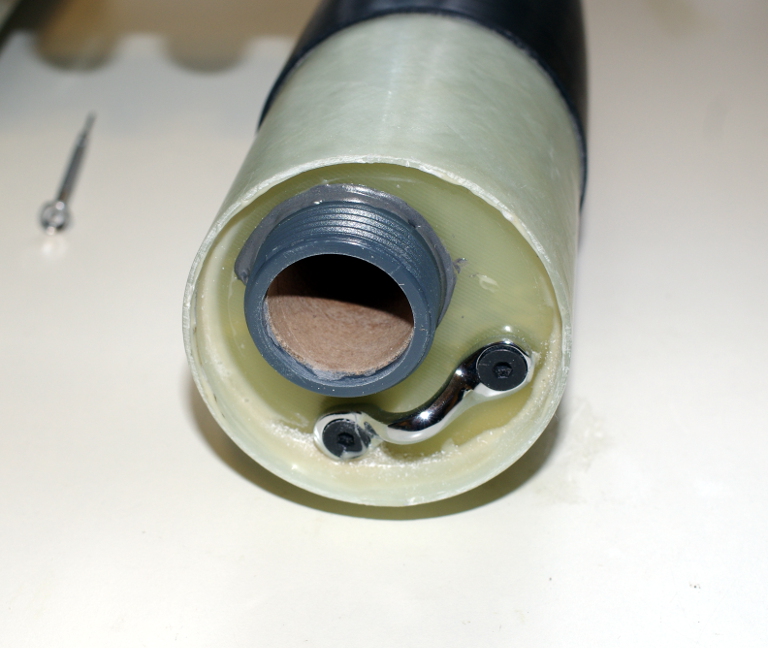
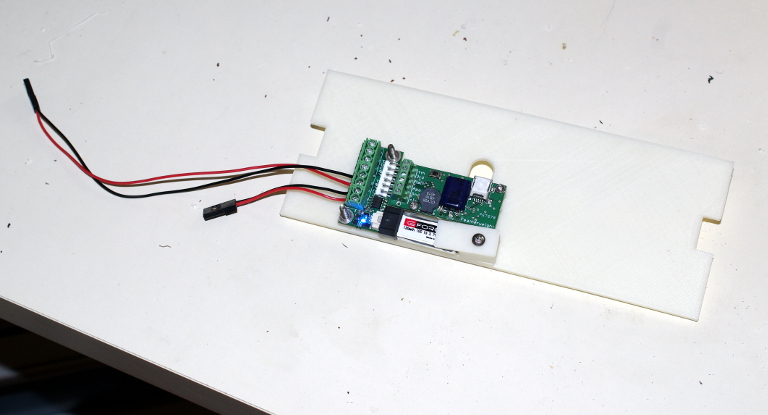
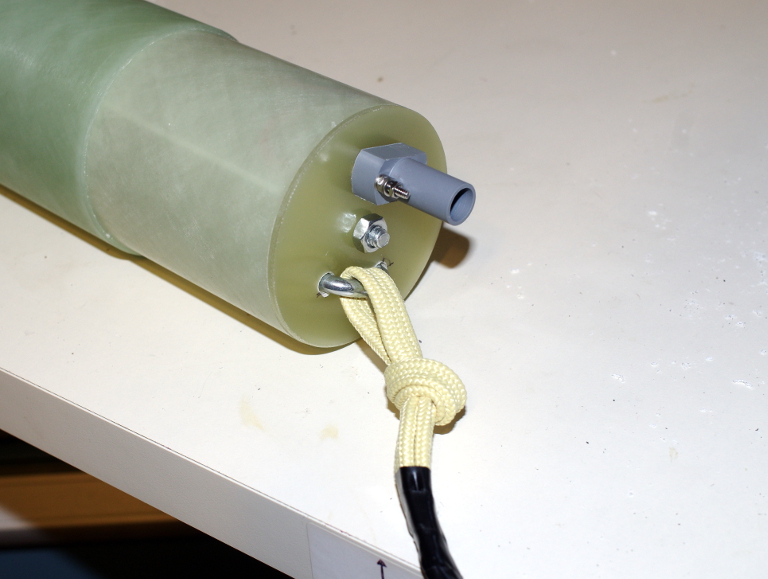
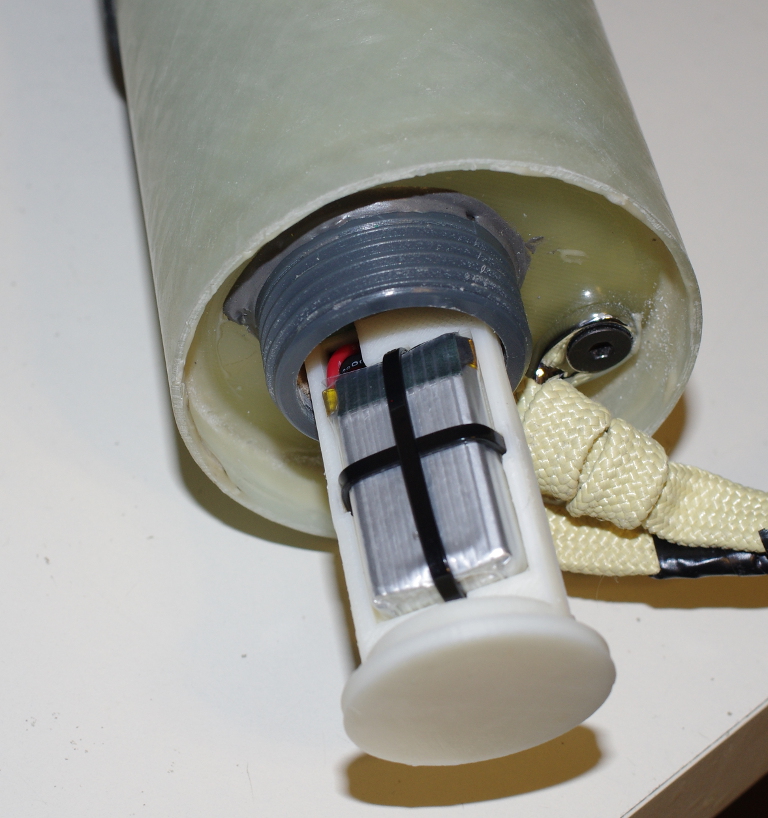
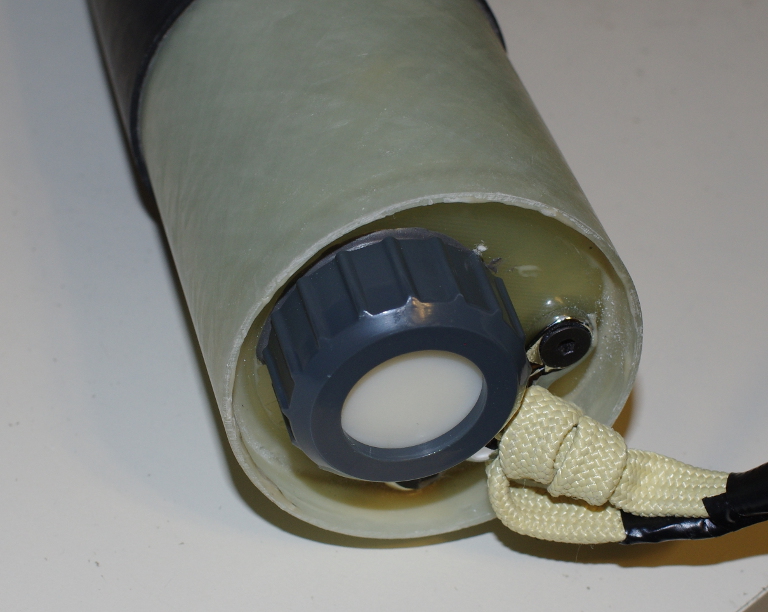
Like my Scion build, I opted to not do a switch band. Instead, I've epoxied the body tube coupling to the upper tube. It does make things a bit cumbersome to put together for flight, but for this build it's what I know how to do. I'll be keeping it all together with a single 1/4-20 threaded rod. Recovery gear will attach via 1/4" u-bolts on each bulkhead. To try and keep the weight down, I took a threading die and ran threads further up the U-bolt, this will put it very close to the bulkhead without a second set of nuts for depth control. Once I get the length down for sure, I'll be cross-drilling the rod for some cotter pins. The last thing I want is to have the thing unthread itself on the way down.
For recovery charges I've ordered a pair of the 1.5g Doghouse combo charge well / wiring terminals to try out. Looks like a nice and compact solution. We'll see how it looks when they arrive. The Raven setup in my L1 build was already pretty clean internally due to the power perch, but I never was totally happy with the bulkheads. They worked, but they felt patched together, and the result was a lot heavier than I would have preferred. So I'm trying to go more refined on this build.
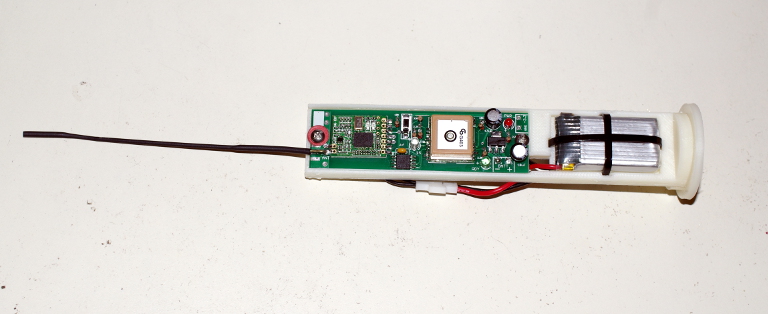
I've also opted to add a secondary av-bay in the nose to mount an eggfinder or walston transmitter. So I offset the recovery mount a bit and am using an Estes 29mm motor retainer plus motor tube. This will give me RF separation between the tracking transmitter and the deployment avionics. It also pushes a bit more weight toward the nose to help with stability. For both the deployment and tracking avionics bays, I'll be doing 3D printed sleds. Nothing fancy to be honest, just basically a flat slab with mounting locations for the avionics integrated into them. If it works out I'll probably retrofit my Scion the same way.
Like my Scion build, I opted to not do a switch band. Instead, I've epoxied the body tube coupling to the upper tube. It does make things a bit cumbersome to put together for flight, but for this build it's what I know how to do. I'll be keeping it all together with a single 1/4-20 threaded rod. Recovery gear will attach via 1/4" u-bolts on each bulkhead. To try and keep the weight down, I took a threading die and ran threads further up the U-bolt, this will put it very close to the bulkhead without a second set of nuts for depth control. Once I get the length down for sure, I'll be cross-drilling the rod for some cotter pins. The last thing I want is to have the thing unthread itself on the way down.
For recovery charges I've ordered a pair of the 1.5g Doghouse combo charge well / wiring terminals to try out. Looks like a nice and compact solution. We'll see how it looks when they arrive. The Raven setup in my L1 build was already pretty clean internally due to the power perch, but I never was totally happy with the bulkheads. They worked, but they felt patched together, and the result was a lot heavier than I would have preferred. So I'm trying to go more refined on this build.
I've also opted to add a secondary av-bay in the nose to mount an eggfinder or walston transmitter. So I offset the recovery mount a bit and am using an Estes 29mm motor retainer plus motor tube. This will give me RF separation between the tracking transmitter and the deployment avionics. It also pushes a bit more weight toward the nose to help with stability. For both the deployment and tracking avionics bays, I'll be doing 3D printed sleds. Nothing fancy to be honest, just basically a flat slab with mounting locations for the avionics integrated into them. If it works out I'll probably retrofit my Scion the same way.
Finished up the main avionics bay today, took me a few tries to get the measurements exact for the standoffs on the Raven. Man, the power perch just makes it so clean. The only wires are for the e-matches. Combine that with the doghouse charge wells, with terminals, and it just came out so much cleaner than the Scion avionics bay did. I do need to grab some different screws, the current ones are too long. The Fruity chute also packs down seriously small, it took up almost no room in the main deployment bay. When packed, it's smaller than the drogue!
Eggfinder kit should be here by end of the week, and I can start building that up. Otherwise I'm pretty much done with construction.
Next weekend I'll start testing charge weights and shear pins. That's the only big question I have left, how many shear pins? I do have a couple bags of 2-56 nylon screws, but am not committed either way.
I'm also pretty much set on the final flying weight, minus motor. Came out to 6lb 9oz with all the laundry loaded, everything but the eggfinder and the charges. So figure 6lb 10oz.
Stability margins are looking pretty good for a variety of K's that I'm looking at, from about 1.06 to 1.24 calibers at ignition. Probably going with a CTI white 3-grain. Anything more than that in the K range risks busting the waiver height, and going supersonic in the process. Easily hitting a mile, and then some, that's aggressive enough for this flight.
List of things to take care of / figure out / build is drawing down pretty fast.
Got a tracking number for my eggfinder, will be here by the end of the week.
I've settled on the 1281K360 as the certification motor. I'll have to pull the charge out of the motor, optimum delay is 17s, motor only goes to 13s. Talk about a coast phase!
I think I worked out a glitch with my motor supply.... vendor won't be at the launch. Looks like that is worked out as I have transport arranged on the motor. Still need to finish that up.
Decided I'll run 3 of the 2-56 nylon screws for the shear pins. Just need the tap and drill to get them installed.
Rail buttons I'll do this weekend.
Charge testing will be starting on Saturday maybe, will start with 1 gram first and work from there.
Starting to have that nervous feeling settle in. One month to go, and this project may just be complete.
Another bit of irony that I spotted the other day. I started this thread on September 26th, 2014. Looks like my L2 flight is going to be September 26th, 2015.
Weird.
-Hans
I just cannot find a 2-56 tap in this town, all the local places only go down to 4-40. So I need to order one, and that pushes back my charge testing a bit.
The good news is my Eggfinder arrived, and built up fine. I'm just waiting on some battery connectors before I can do the final install into the nose bay.
-Hans
The good news is my Eggfinder arrived, and built up fine. I'm just waiting on some battery connectors before I can do the final install into the nose bay.
-Hans
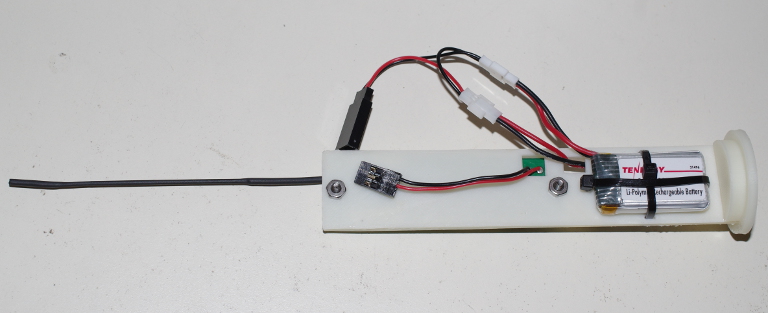
Eggfinder transmitter is finished and mounted.
I have plenty of 1 cell 380mah LiPo's for my Hubsan quadrotor, so I mounted two of them and wired in series with a basic little harness.
Slicker 'n snot, as the farmers around here say.
Receiver is built and functioning, but I still have to sort out the case for it.
2-56 taps are on order, I hope they get here quick. Amazon hasn't been the fastest to ship things lately.
Still need to do the rail buttons.
Rail buttons are on. I have the drill bits for the shear pins, just waiting on the taps to come in the mail. Will probably be a week till they arrive.
Other than those pins and charge testing, it's ready to fly.
Time to start thinking about paint! And I just thought of the perfect reference on this one...... time to start looking up photos.
-Hans
Other than those pins and charge testing, it's ready to fly.
Time to start thinking about paint! And I just thought of the perfect reference on this one...... time to start looking up photos.
-Hans
Similar threads
- Replies
- 17
- Views
- 931
- Replies
- 40
- Views
- 2K
- Replies
- 4
- Views
- 322