MY VISION MUST BE IMPAIRED

The Rocketry Forum

Help Support The Rocketry Forum:

This site may earn a commission from merchant affiliate links, including eBay, Amazon, and others.

hball55

Well-Known Member
Joined
Nov 19, 2013
Messages
2,452
Reaction score
621
Location
Oroville, CA
Despite measuring, drawing lines, etc., I can't seem to get my rail buttons aligned on the first try. I end up drilling a new hole to line up with whichever hole looks to be at the peak of the curve. Good thing for my Rocketpoxy, which I turn to any time I need to plug a hole in one of my rockets . . . it sands so nicely and the paint covers it anyway. Not as good on my colored fiberglass rockets; though, it doesn't look too bad, as the black circle of the patch contrasts well with most any color. :wink:
 
Find the center between two fins---mark it--take the bt to a drawer --open the drawer--lay the bt on the open drawer and pull it to the edge---roll until mark appears--align mark with edge of drawer--scribe line down bt--drill as needed-----Hey, it works for me !! I live in an apt. now with no shop , so everything is a tool...--H
 
All my drawers are old and have lots of dents/chips :rofl:

I do measure between the fins and mark and I'm not kidding about the drawers. I'll manage though . . . just thought it was funny.
 
Last edited:
Laser sight for contacting/woodworking. Lays down a perfectly straight red line along the body tube. That's what I've been using

Nate
 
If your doors and drawers aren't helpful, try a piece of angle stock from a local hardware store. It needs to be long enough to draw a single line that reaches both points you are looking at and has an edge that is straight. There should be plenty of angles stamped or rolled from strip stock that are light and straight instead of a cast or extruded product that would be cumbersome with an erose edge.

The laser is great but, if you don't have one, the angle is a cheaper alternative.
 
This is a easy task. You don't have to buy nothing. All you need is a peace of paper with lines on it and a pen and a ruler. Wrap paper around tube and mark top and bottom of paper then use a ruler or yard stick to make the lines you need. I used a paper towel in this pic but you get it.

IMG_20140910_070059_885.jpg
 
I always get them aligned with each other, but sometimes, well, most of the time when I use Standoffs for Rail Clearance I end up getting them off center by a couple of Millimeters.:facepalm:
They still work but make me sad.
I've made a personal promise to myself to do a better Job from now on getting them centered between the Fins properly.
 
If your doors and drawers aren't helpful, try a piece of angle stock from a local hardware store. It needs to be long enough to draw a single line that reaches both points you are looking at and has an edge that is straight. There should be plenty of angles stamped or rolled from strip stock that are light and straight instead of a cast or extruded product that would be cumbersome with an erose edge.

What he says ^^^^. :)

I have three aluminum "angle irons" of various sizes for aligning fins, lugs, and rail buttons. I think they are extruded, but they have straight edges.

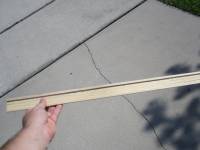
For larger rockets, I've started using a piece of wood that I route into a wide "U" shape to help ensure straight rail buttons.
image-rail-guide-attachment-200-300-051612183121170.jpg


I'm not sure if it's clear in the photo, but it's a piece of 1" wide, 1/4" thick wood with the middle routed out on one side to form a trough. You could also create it using a strip of wood with smaller strips glued along the edges.

I draw a line down the center of the strip to identify where the rail buttons will go.

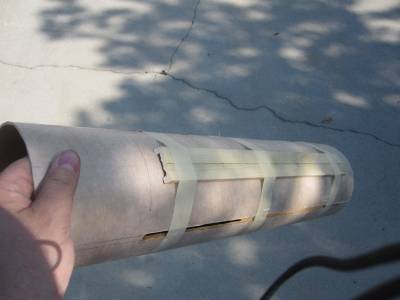
The strip is glued (and/or screwed) to the body tube with the trough side down. Like an angle iron, it automatically aligns itself to the body tube so that it is straight.


image-rail-guide-attachment-400-600-051912185021341.jpg


I then drill holes through the strip and body tube for the well-nuts that the rail buttons screw into. Because the strip has a flat surface, it's much easier to ensure that the hole is straight into the tube. The well nuts extend into the body tube, so the rail buttons are actually attached to the tube, not the strip of wood.

image-youbee-fins-with-75mm-motor-mount-400-600-061812172310972.jpg


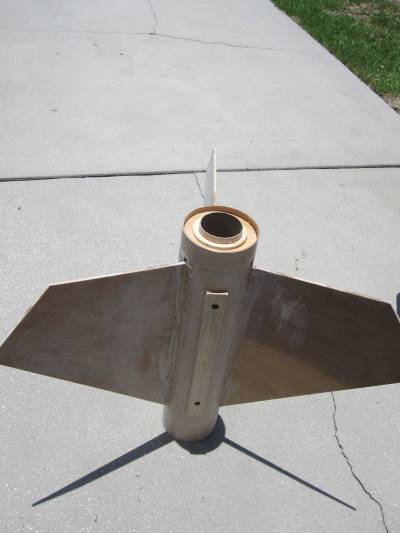
Finally, I add fillets along the edges of the wood strip and, after painting, screw in the rail buttons.

In addition to helping ensure that the buttons are straight, this technique creates a slight stand-off so the rocket is less likely to get scratched as it is slid onto the rail or is blown around while waiting for lift-off.

-- Roger
 
Metal angle (iron or aluminum) works great and you can even use two of them when attaching fins to make sure they are straight.
 
It's cuz yer old, Hank.

The eyes are the second thing to go. D'oh!!!!
 
As noted above, there are several free ways to improve the alignment. If you are a gadget person Doghouse Rocketry sells a nifty tool that will not only help with the alignment, but will also ensure your holes are drilled nice and perpendicular to the body. Looks like they may be out of stock at the moment, but I bought one recently and it works quite nicely.
 
As noted above, there are several free ways to improve the alignment. If you are a gadget person Doghouse Rocketry sells a nifty tool that will not only help with the alignment, but will also ensure your holes are drilled nice and perpendicular to the body. Looks like they may be out of stock at the moment, but I bought one recently and it works quite nicely.

I was just about to come back and mention it. It's a really nice tool and it complements the techniques already discussed.

-- Roger
 
Back
Top