EZI Dual Deploy

The Rocketry Forum

Help Support The Rocketry Forum:

This site may earn a commission from merchant affiliate links, including eBay, Amazon, and others.

rfoote35

Member
Joined
Oct 12, 2013
Messages
18
Reaction score
2
I am in the process of updating my EZI 65 to a dual deploy and would be happy for some recommendations. I have purchased the LOC ebay that comes with a payload tube https://shop.locprecision.com/product.sc?productId=55&categoryId=39 I have a RRC3 and USB Dongle as well as misc Ebay construction materials. I also have a slightly damaged altimiter that will be used for back up as well as a Transolve beacon. I am looking forward to this endeavor and am especially interested in ground testing advice.
 
Last edited:
On the ground, I would
-test the altimeters in a vacuum chamber hooked up to mini Christmas lights.
-Test the charge size with the ebay empty, run the igniter leads out of a vent hole and hook directly to a 12v source
-test that the RRC3 will fire the igniters by hooking it up to your laptop, connecting to it, and test firing
 
For static testing, you need some kind of vacuum chamber like this (some people do it homemade). You can use LEDs and see if they light at the appropriate times (apogee for zero pressure, later as pressure increases for main).

For ground testing, I place my rocket horizontally on a stand. It is best to load it up exactly as you would to launch it. If you have a spent motor in the casing, slide it in. That will most accurately reflect the state of the rocket when the first charge fires.

Use one of the online calculators to determine a starting point for BP. Try it and see how it goes. Add more or less until you get complete separation with the chutes out. I believe a lot of people will then add another 25% to account for wind resistance. Someone should check me on that.

Make sure that the igniters/e-matches you use in testing are the same as you will be using in flight. Write down the amount of BP you need for each charge. NOTE: they may be different. Also, the online calculators seem to always assume you are using shear pins. If not, back off your starting amount.

Good instructions. The only thing I would caveat is that if you are testing charges in the rocket and using a remote controller, there is no reason to use ematchs to light the charges. Estes igniters will work just fine, or even some nichrome wrapped on shooter wire. You are testing the strength of the charges, not the electrical part of the system.

When you do get to testing the electrical part of the system, the altimeter, definitely use the same ematchs and batteries as you will use in flight. Commercial matches are very dependable, but I did have some home made ones that were perfect with my HiAlt45 but only about 50% reliable with a different altimeter. Test the fight configuration.

As a last test, I usually assemble the rocket in a flight ready configuration, tape up all the av-bay static ports except one and apply a vacuum to the port with a thick wall tubing. The vacuum simulates the flight profile and you'll get a test of the whole system.
 
Last edited:
Everything here is excellent advice, and I did all these things when I was testing my first AV-BAY set up. The only failure I ever had was due to not securing the upper payload tube properly.

I converted my LOC Expediter to a more conventional rocket the same way, with the LOC av bay and payload tube.The only thing I suggest is that the tube LOC provides is 11" and I found it was just a little bit too short to stuff the shock cord and parachute in, and still have the nose cone seat well. I had to tape the nose cone on. The alternative was shear pins. To remedy this, I bought a length of 4" tube which is 34" and cut it in half, making a 17" upper tube which was a more comfortable fit for the main chute.
 
These are all great ideas. I was thinking about the main chute in the lower body tube and the drouge in the top tube. The payload tube that came either the AV bay is 15 inches. If the main needs to be in the top, I could cut the plywood with the eyebolt (don't know the proper name) and glue it higher for a very large space for the chute.
I was thinking about a 24 inch drouge.
 
Yeah, the forward space is tight, especially if you use the coupler as the electronics bay, so I went the same route in terms of drogue forward and main aft.
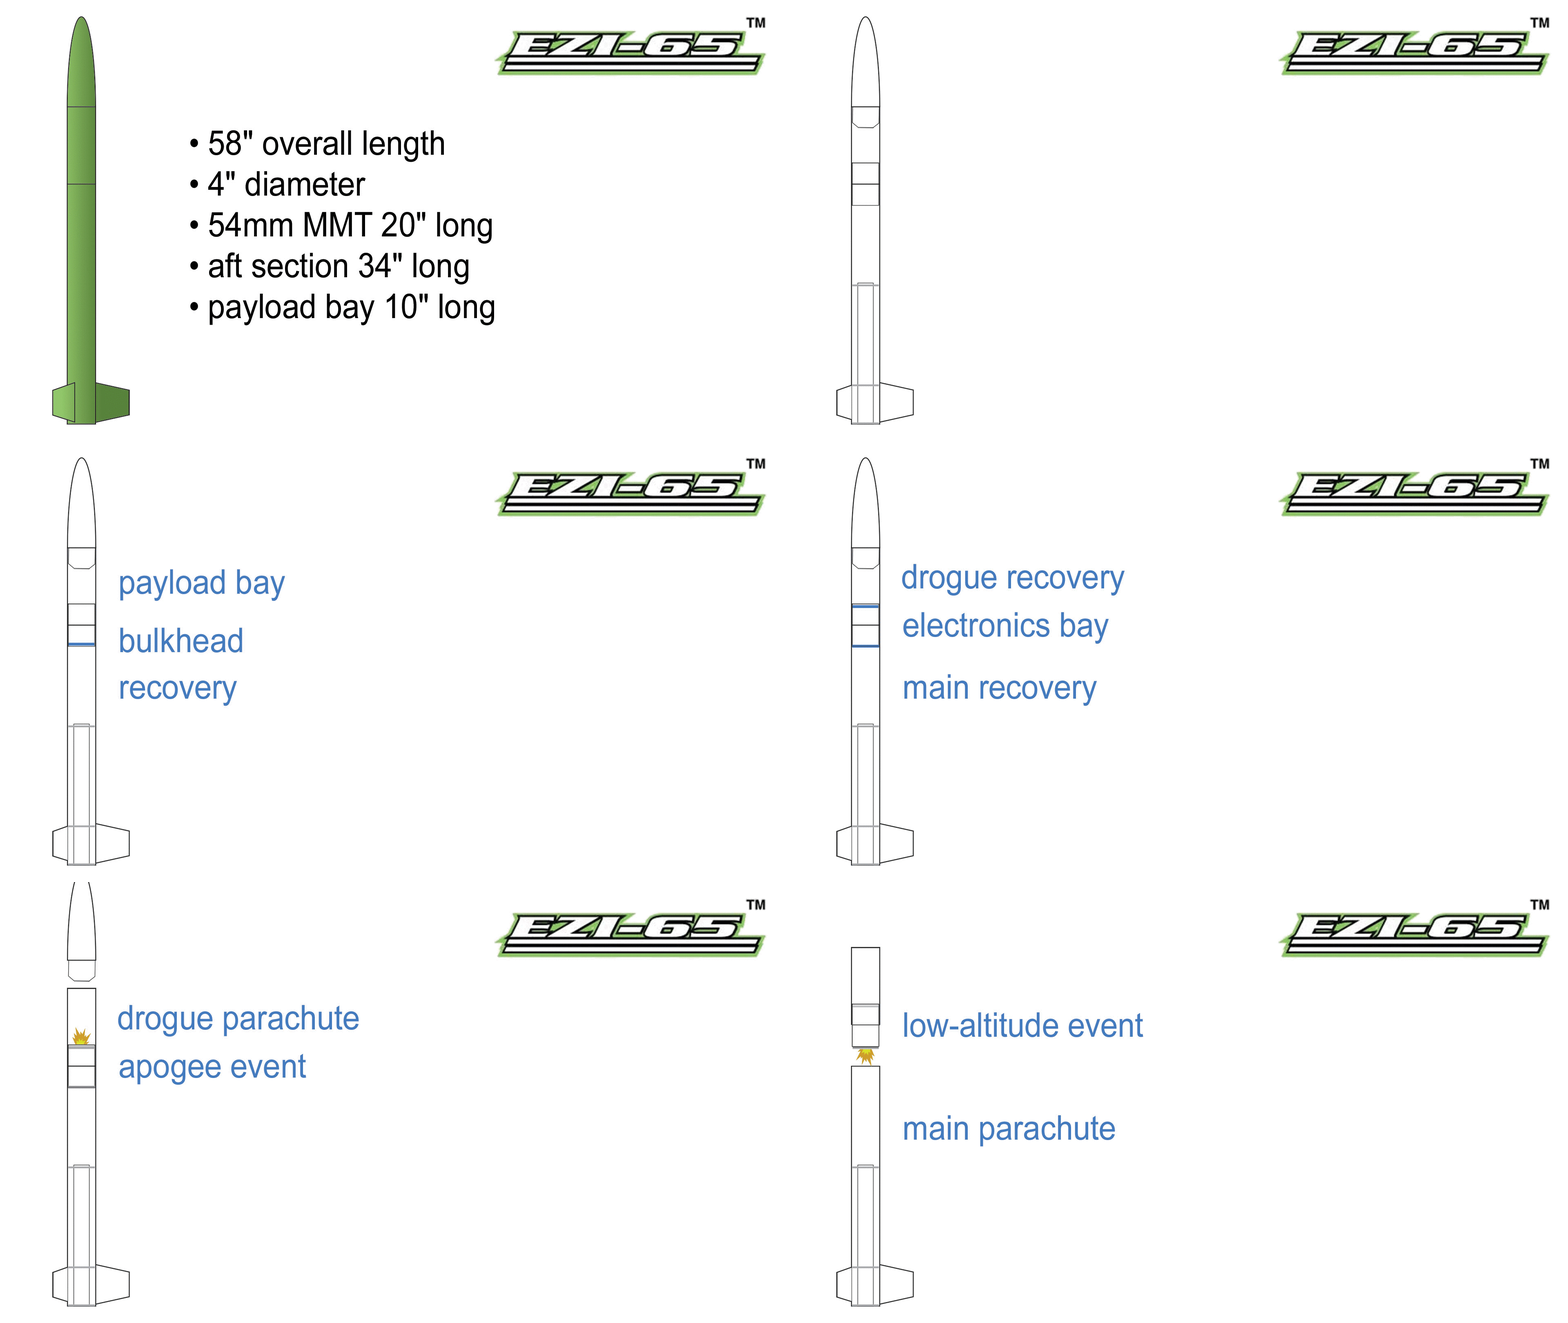
Here is an animation of some of the frames from my Level 2 in Style video (with an EZI-65 as it happens).
Sorry about the large size, they were designed for a 1920x1080 video.

layout.gif
 
Last edited:
Back
Top