Constructing a Ringsail Parachute Canopy

The Rocketry Forum

Help Support The Rocketry Forum:

This site may earn a commission from merchant affiliate links, including eBay, Amazon, and others.

jcato

Well-Known Member
Joined
May 6, 2013
Messages
260
Reaction score
8
OK,

Some of the comments over on the 'Three Canopies...' thread has prompted me to start a new one and we'll see how this goes (or how much interest there is). I still need to organize things a bit, but the request to see some other pics is something we can get out of the way up front (and this may clarify people's interest in this topic).

I'll simply add some of the other canopies (not Ringsail) in this post that I've constructed over the years (mostly 20+ years ago - in fact, I don't think I've done any canopy work in about that time). I'll have to refresh my memory on a few things - but that shouldn't take too much effort.

As to the 'backstory', I've just about always had a love of parachutes - don't know why - but, as a child, one of my first parachutes was about a 4 footer that I pieced together from some scrap military rip-stop (I remember orange and olive drab) and was the 'drag chute' behind my bicycle -- I'd get a running start down our street (in Atlanta) and let it drop. While I developed an appreciation of 'opening force', I don't remember that any of those deployments threw me over the handle bars <g> (Of course, it probably would have knocked me out - which would explain the, "I don't remember" part of it, no? <G>) I used to joke that I got into rocketry simply as a way to get my canopies in the air.

At any rate -- here's some of the other canopies I've put together (most of this in the late '80s to early '90s):

The first are some canopies that immediately preceded (in time) my ringsail. The 'rainbow' canopy is about 6 feet (I'd have to re-caculate the exact 'Do' (nominal diameter), but these figures are close enough for this) - 32 gores - 'Le/Do' about 1.5 (some of my earliest canopies started with a 'Le/Do' of about 1.0 - but I didn't like that ratio too much (here we see my trending to the look of the Apollo ringsails)). The red/white canopy is about 7 feet - again 32 gores:

cato_para1_0001.jpgcato_para1_0005.jpgcato_para1_0007.jpg


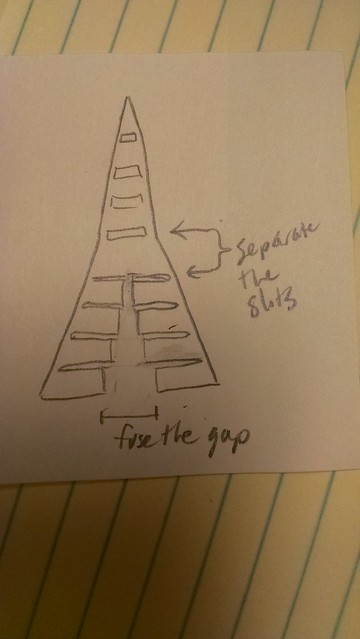
Here, you see the 'baby' red/white -- about 2 feet - again 32 gores (I really like narrow gores - more work, but looks nicer). When you get down to 24 inch canopies at 32 gores, the sewing up at the apex vent becomes a near nightmare of tedium. The first is the 2 footer beside the 7 footer and the second the 2 footer alone. I've actually never finished this canopy -- got the actual canopy sewn, all the lines run but haven't yet terminated at the bridle (all my canopies use 'continuous line' construction - from link, up and over the canopy and down to opposite link (we'll talk more about this later)):

cato_para1_0009.jpg


This is my 'Auburn' (or 'War Eagle') canopy - in honor of my Alma Mater. 4 footer x 24 gores (if I counted right). This canopy no longer is in my possession - as I flew it in the upper stage of my 1:3 Nike-Tomahawk in Wichita at LDRS 13 and it drifted away a few miles. Ross Dunton (of Magnum) returned the basic airframe to me 6 or 8 months later when down for a launch -- but.... no canopy. Canopies don't just disconnect themselves from rockets - so somebody's got themselves a nice canopy. Hope they are Auburn fans.

The similar sized 'rainbow' canopy (I believe 50-55inch) was actually my first canopy (of the 'modern era' - i.e. 1980s -- not from my childhood) that used continuous line construction and I'll talk about the slight differences between this and my later canopies to follow:

cato_para1_0012.jpgcato_para1_0014.jpg


This is my 'Bulldog' canopy (in honor of my home state) - I didn't have to grit my teeth too hard in building this - mainly because it was THREE feet in diameter (compared to 4 feet for the 'War Eagle') I'm no fool. <g> Again, 24 gores - same general color patterning -- the silver represents the 'silver britches' of the Bulldogs. This, also, is no longer in my possession - but there was some 'trade' deal with Jim Balliro, a vascular surgeon from Tallahassee who used to fly with us here (I can't remember anymore what I got in trade - if it's less than a fine piece of real estate, Balliro got the better end of the deal <g>):

cato_para1_0016.jpg


Finally, another pair of the 6 foot 'rainbow'

cato_para1_0021.jpg

This should get us started,

-- john.
 
Forget how you make them. How do you take such nice photos with them angled up?
 
Forget how you make them. How do you take such nice photos with them angled up?

Generally, just have a nice, stiff breeze - and then timing (lots of times, canopies will oscillate around and 'bounce' off the ground and then back up -- just catch them when they're 'up' - altho, these designs here were generally pretty stable). I assume, also, that 'ground effect' helps keep them elevated.

-- john.
 
Subscribed............
John,,
What do you do for a living ??
Where did you pick up the knowledge and skill to make these chutes??
These are not a kid messing around trying to construct a chute.....
Very cool John...
They really are gorgeous....

Teddy
 
Ha! I have a similar bicycle memory. When I was about 10, I made a parachute out of a bedsheet for my bicycle. I made a box for it with a spring loaded door that would open when I pushed the lever. But I went so far as to have a smaller pilot chute in its own box and with its own lever. I'd ride down the street as fast as I could, deploy the pilot chute, then the main. The pilot would pull the main out of its box. My dad got the biggest kick out of that. Ah, precious childhood memories.
 
Those are some really nice chutes!
I finally run into someone who is as much of a parachute nut as me.

Do you have a seam folder on your sewing machine?
I am trying to find one that I can adapt to my Brother home model sewing machine.
 
Very nice chutes! Do you sell any of yours?

There's only been one chute (the 'Bulldog' canopy above) that I parted with willingly - but considering the time I put into these efforts, nobody would want to pay what I'd feel comfortable with -- I could see even the simplest canopy (of minimal size) being several hundred dollars (size hardly matters -- the work is almost the same).

{edit} I failed to thank you for your compliment -- I apologize - but "Thank You."

-- john.
 
Last edited:
Those are some really nice chutes!
I finally run into someone who is as much of a parachute nut as me.

Thanks (for both the compliment and calling me a 'parachute nut' <g>).

jazzviper said:
Do you have a seam folder on your sewing machine?
I am trying to find one that I can adapt to my Brother home model sewing machine.

Mike, I believe my machine (a JC Penney) has a 'felling foot' (I think that is what you are referring to), but I never used it -- just formed the Fell seams manually (I'm so CDO*, that I wanted total control over the width of the seam - as conditions warranted).

I'm glad you are here (on this thread) -- 'hover close' and chime in as conditions warrant.

-- john.

*CDO -- the same thing as OCD, but the letters are in proper alphabetical order, *like* *they* *should* *be*!!

:)
 
Subscribed............
John,,
What do you do for a living ??

I'm an Architect (I guess you'd say 'semi-retired', considering my age (63)).

onebadhawk said:
Where did you pick up the knowledge and skill to make these chutes??

Well, the love of doing it is a lot of the motivating force -- study the literature, read a lot, look at other work (mostly how the pros do it) and *pay _really_ close attention to the details* (then, tear it apart analytically (to understand *why* it was done the way it was), fix the image in one's mind of how you want it to be and never give up -- no matter what, "never give up" until the reality matches the mental image).

I suppose, also, some of my design training at Auburn gave me a little 'design sense' (as to the visual aspects of canopy color layout, etc).

onebadhawk said:
These are not a kid messing around trying to construct a chute.....
Very cool John...
They really are gorgeous....

Teddy

Thanks, Teddy -- hopefully, we'll make this little 'odyssey' an informative and enjoyable one for all who ride along.

-- john.
 
tightwad said:
Very nice chutes! Do you sell any of yours?

There's only been one chute (the 'Bulldog' canopy above) that I parted with willingly - but considering the time I put into these efforts, nobody would want to pay what I'd feel comfortable with -- I could see even the simplest canopy (of minimal size) being several hundred dollars (size hardly matters -- the work is almost the same).

I wanted to expand a little bit on this as well as give folks an update on where this thread is headed...

As to selling any of these canopies, I don't want to appear 'snooty' on this - but, frankly, they *do* take a lot of time to put together (think 30 or 40 hours even for some simple ones). Then, think of that at minimum wage and you can see where I'm coming from. I sat out on this odyssey (of making my own canopies) because 1) I simply have always enjoyed parachutes and 2) I really enjoy making them "just the way I want to" and 3) because, in learning about how the 'real' ones are made, I became increasingly dissatisfied with what was available in the hobby. I can understand the commercial pressures in trying to build a business catering to the hobby and in keeping costs to a minimum - but I sat out to see what would be the *best* way to make a small scale parachute - with cost as no object (not that there is any (real) cost here - just time). I never had any desire to sell any of my canopies - because I didn't think I ever would (and I *still* have no desire - nor think I ever will). When you have 36" or 48" parasheets for under $20, there (really) is no comparison. Top Flight and Fruity (et.al.) are in the BUSINESS of making parachutes. I'm not.

The purpose of what I'm trying to do here with this 'seminar' on chute construction is to educate -- and show YOU how you can make a canopy that is above what is generally available. It *will* be tedious and it *will* take a lot of time - and, after the first one, you may feel it's just not worth it (and think of losing a rocket where 1/3 of the value is in the rocket, 1/3 in the electronics and 1/3 in the parachute - and it may just not be worth it). I've flown my ringsail a few times and, once, it drifted over the treeline (no GPS back then) - but I announced to the crowd, "I *will* get the canopy back!!" <g> (However, that was here locally - 10 minutes away from the house, so I could have went back to search if need be.) The thought of going to a regional launch and having to come home leaving that canopy in some foreign place (for somebody else to find and never say a word about) is just something I will not do.

So, is learning about any of this worthwhile? Well, that's a question each reader will have to answer for himself (if you fly on the lake beds, these cautions may be moot). And, today, with dual deployment, drift (and lost rockets and parachutes) are far less common, even before adding in GPS. So, it may be worth it after all.

Would these canopies be so robust that they could 'save a project' that otherwise would be lost (through a high speed deployment)? (i.e. would their obviously higher cost be justified in that scenario?) I feel reasonably confident that this would be true - I've had one or two deployments at something over 100 upwards of maybe 200 mph where the canopy was not damaged (although this doesn't speak so well about my delay time choice <g> (this was pre - altimeters)) - but, with the electronics today, that is becoming rarer and rarer. In a case such as this, then a few hundred dollars for canopies such as these could very well be a bargain and money well spent. If that does become a market, I hope someone recognizes it and 'fills that niche', because I hold out very little hope it would be me.

But, the bottom line is --- if you fly a canopy like this in your rocket, you'll most likely will have built it yourself, as I doubt highly you will have bought it from me. This 'build it myself' is a lot of what this thread will be about.

=============

As to an update on the thread, I'm trying to organize what I want to say / cover and it what order. I've got some detail photos of the ringsail taken and am editing to label things and getting some commentary to go with it - but am thinking that a little preliminaries are in order prior to any great depth there. I may come in and post the overall photos, with some UNcommented details first and then get into some of the basics (patterns, materials and general construction approaches) before going back to more detail on the ringsail proper.

Look for some photos later on this evening...

-- john.
 
I'm going to re-post the shots of my Ringsail canopy from over on the 'Three Canopies...' thread - just for completeness here and to keep everything together in one place. I'll add two additional 'overall' shots and then some detail shots (UNcommented) showing some of the construction. As we get farther along, these detail shots will be re-visited (commented this time) to explain both what you are looking at and why it was done that way.

First, the overalls...

This first (B/W) was from the HPR (High Power Rocketry) mag article (Mar/Apr 1993) about the local flying group here (Coastal (GA) Rocketry Assoc) written by the (late - sadly) Steve Roberson - noted for his aerial photography work.
cato_ringsail_HPR_CRAarticl.jpg

cato_ringsail01.jpgcato_ringsail02.jpgcato_ringsail03.jpg

(the last two are the new addition)-----------------^

Some of the details:

The bridle assembly - that's 1/2" tubular nylon to some cast brass 'D' rings and 80# (may be 130#) dacron deep sea fishing line:
cato_ringsail_detail17.jpg

Detail of the skirt area (Rings 9 and 10 - with a ruler to show scale):
cato_ringsail_detail23.jpg

Detail of the crown area (with the 3/8" ribbon weave tape bridle for the pilot chute):
cato_ringsail_detail30.jpg


That's all for now -- will move next into general construction / design items.

-- john.
 
Last edited:
Very interesting john. Thank you for taking to time to write all this up. I love parachutes, always been fascinated with them as a kid. Maybe when you get a chance could you please show some of your deployment bags as well?
 
Very interesting john. Thank you for taking to time to write all this up. I love parachutes, always been fascinated with them as a kid. Maybe when you get a chance could you please show some of your deployment bags as well?

That's my hope, Jarrett - but it's been years since any of this has been used and I'm having to 'go digging' to corral all this stuff back together. I'm confident I'll find it - it'll just take a bit of searching.

Stay tuned,

-- john.
 
Good to see you here, John! I still have the first chute I made from your plans back in the late 90s, and I've done a few more since then, including a ring slot which was easy to do and looks kind of cool (and stable as all get out).

--tc
 
Good to see you here, John!

Good to hear from you as well, Ted. Glad you dropped by.

Ted Cochran said:
I still have the first chute I made from your plans back in the late 90s, and I've done a few more since then, including a ring slot which was easy to do and looks kind of cool (and stable as all get out).

--tc

Well, since the top half of a ringsail *is* a ringslot, you're ahead of the game (you could (seriously) take that canopy and add a few rings of sails to it and end up with a ringsail <g> - if the number of gores were correct (and, most likely even that wouldn't be necessary - just make the 'sails' some multiple of the 'slots' and it would work as well (I imagine - but I can't see why not).)) << (I *think* I got enough closing parentheses there <g>).

See what you started?

:)

-- john.
 
Ha! I have a similar bicycle memory. When I was about 10, I made a parachute out of a bedsheet for my bicycle. I made a box for it with a spring loaded door that would open when I pushed the lever. But I went so far as to have a smaller pilot chute in its own box and with its own lever. I'd ride down the street as fast as I could, deploy the pilot chute, then the main. The pilot would pull the main out of its box. My dad got the biggest kick out of that. Ah, precious childhood memories.

Precious memories indeed. Sounds to me like you were engineering far greater than I - good for you! Engineering is good.

qquake2k said:
Paint caused the drought.

That's good to know - I've got family in CA - I'll notify them to sell all their paint.

:)

-- john.
 
Good to hear from you as well, Ted. Glad you dropped by.


Well, since the top half of a ringsail *is* a ringslot, you're ahead of the game (you could (seriously) take that canopy and add a few rings of sails to it and end up with a ringsail <g> - if the number of gores were correct (and, most likely even that wouldn't be necessary - just make the 'sails' some multiple of the 'slots' and it would work as well (I imagine - but I can't see why not).)) << (I *think* I got enough closing parentheses there <g>).

See what you started?

:)

-- john.

Do the sails refer to the part of the parachute that is nearly parallel to the shroud lines? Or is it just the fact that the gores are only attached on the sides and let air between them?
 
Very cool, do you have any plans your willing to share?


Sent from my iPad using Rocketry Forum
 
Very cool, do you have any plans your willing to share?

Well, it is my intent to provide some as we get farther along with this discussion. The pattern that Ted Cochran referred to is the 'basic' pattern I developed back in the late '80s - a somewhat elliptical pattern (for a *solid* canopy - not a 'ventilated' one) that I used as a basis and modified to the ringsail (slicing it up (into individual rings) and then adding the sail fullness). Initially, I'll attach a smallish (26" Dc / 16 gore) pattern here when we get to that point and then we'll try to develop that into the ringsail pattern. We'll see how all this goes - the exact structure of this discussion is still in the formative stages - but, yes, it is my intent to provide some patterns.

Stay tuned,

-- john.
 
CarVac said:
Do the sails refer to the part of the parachute that is nearly parallel to the shroud lines? Or is it just the fact that the gores are only attached on the sides and let air between them?

See attached:

Greg

As you will note in Greg's upload (thanks, Greg), the bottom portion of the canopy is the 'ringsail' part (the bottom 6 segments in the diagram). The fundamental key to the ringsail (that distinguishes it from the ringslot) is that the bottom (or leading edge) of each sail is wider than the top (or trailing edge) of the sail below it. The result is that it creates a crescent shaped opening when the canopy inflates.

In the ringslot, the basic shape of the canopy surface defines the shape of each (I hesitate to use) 'sail' - but there isn't any 'fullness' in that pattern (well, not any 'differential fullness' between adjacent gore segments). Ventilation here occurs by the fact that there is some space introduced between each individual ring and it doesn't rely on 'fullness' to ventilate the higher pressures inside the canopy volume.

In the Apollo canopies, the gap at Ring 5 (counting down from the top) is where the canopy transitioned from 'ringslot' to 'ringsail'.

-- john.
 
image.jpg This is the solid pattern of which John speaks--my first chute. It took about 40 hours, which taught me that professionally made chutes--and there are lots available--are worth every penny. I got it down to about 10 hours after three more chutes. I'll go back to the archives and get a picture of the ring slot tomorrow (it only has one slot, so don't get too excited! <g>)
 
Last edited:
View attachment 183187 This is the solid pattern of which John speaks--my first chute. It took about 40 hours, which taught me that professionally made chutes--and there are lots available--are worth every penny. I got it down to about 10 hours after three more chutes. I'll go back to the archives and get a picture of the ring slot tomorrow (it only has one slot, so don't get too excited! <g>)

Thanks for sharing your photo, Ted (and the insight as to the time involved in this kind of work). I had forgotten that this was 12 panels - but it turned out nice.

-- john.
 
I have to wonder: Could the construction of one of these be simplified enormously by taking a conical gored parachute and trimming it using a soldering iron with a nylon fusing tip thingy? Adrian Adamson (of Featherweight) made a super-compact spherical canopy by cutting "anti-gores" (my word) out of a flat sheet.

The strength lost would be less necessary, due to the lower opening force of the ringsail, and it would also have much lower volume due to a fused edge being less bulky than a hem.

Well, this idea has occurred to me. One thing that Ewing mentions (in his Ringsail Parachute Design text -- see Tech. Resources in this sub-forum) is the use of 'trip-selvage' (triple selvage) fabric -- as the selvage edge is reinforced in the weaving - thus no need to hem it. This would be especially worthwhile for the leading edge of the sail, as that is the one with the least stress on it - as the shape of the canopy (and, thereby, the greatest stress) is defined by the *trailing* edge. I believe I've got enough fabric with selvage edges that this is something I'd marked down to try next time I got into this. However, even if not, 'heat cutting' (your suggestion) is a viable alternative (at least for the (least stress) leading edge).

Since the basic construction is to make up a series of RINGS and then connect the rings via radial seam tape into the complete canopy, one additional approach that has occurred to me is to make each ring out of a single piece of fabric (instead of individual sails sewn together) - what I call the 'long strip approach'. Since each sail is an isosceles trapezoid - thus:

Isosceles_trapezoid.png

(the outline of which is marked on the fabric), just butt several patterns together down a long strip of fabric - thus:

Isosceles_trapezoid3.png

Sew a reinforced hem down the trailing edge (where it's needed) and then gather up the 'waste' fabric between each trapezoid (sew the two adjacent 'radial edges' together) and trim out this waste fabric after sewing (allowing a 1/2" or so - to be rolled into the radial seam tape once the rings are all connected together in the final stages of canopy assembly). {Even better, reverse those steps - sewing the reinforced trailing edge hem AFTER gathering (and trimming) the waste fabric (you just have to 'sew around a circle')} If you aligned this strip along a selvage edge (for the leading edge), then no sewing would be needed there and the two side 'radial edge' seams would be greatly simplified.

While the (on the surface) simpler approach might be to rotate the patterns so there's no 'waste', that won't work, as one has to keep the warp (or grain) of the fabric the same for each sail, or the stretching that naturally comes from 'bias construction' will warp the ring (and, therefore, the canopy) in different ways, depending on the grain of the fabric in each individual sail. I imagine that could distort the shape of the canopy rather severely.

This 'long strip approach' would only work if the ring is a single color (like the one I've already done) - wouldn't work with something like the Apollo canopy - where each gore alternates in color (i.e. each ring would have to do the same and there we are -- sewing each individual sail together again.)

However, the long strip approach is something I'd like to try.

-- john.
 
Last edited:
I was describing something else: make a parachute with gores of this outer shape, and then once already sewn up, you use a hot knife cutter to cut them as drawn, and also fuse them in the case of the sails. Then you can hem the trailing edges.

15107671376_5508d38e6c_z.jpg
 
Back
Top