Dual Deploy G-Force

The Rocketry Forum

Help Support The Rocketry Forum:

This site may earn a commission from merchant affiliate links, including eBay, Amazon, and others.

Lowpuller

Well-Known Member
Joined
Nov 22, 2013
Messages
2,230
Reaction score
26
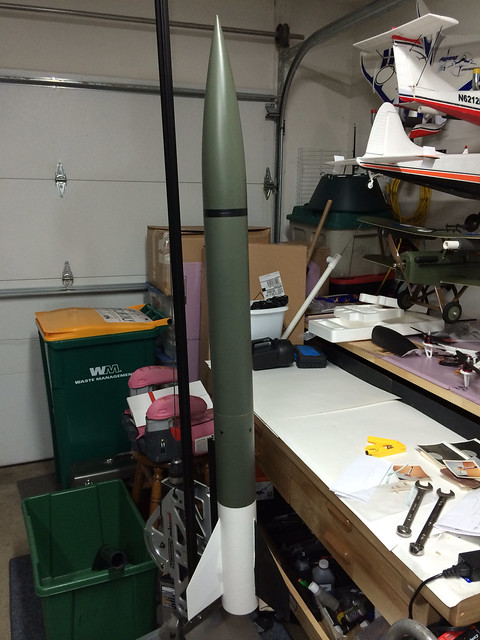
A few pics of my build.

I am using the G-Force main for the main and an old Leviathan main for the drogue. I am using an Estes Motor Retainer and installing both rail buttons and rail guides (why, I don't know, I just want to).

ImageUploadedByRocketry Forum1406909049.601764.jpg

You can see paint colors and a primed body tube in the background.

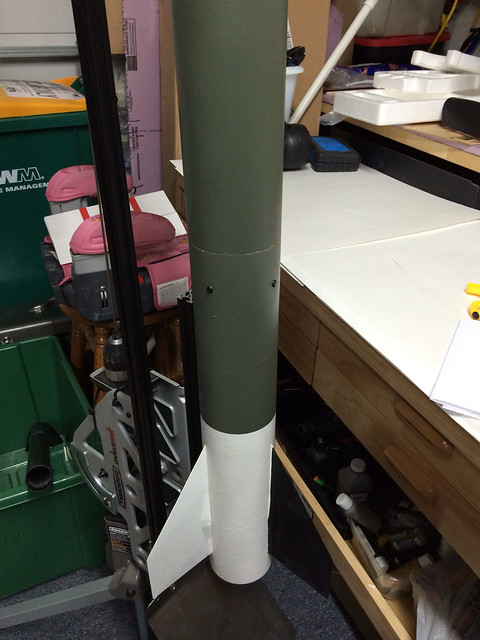
I am using the coupler as my AV bay, this required shortening the motor mount, but it will still accommodate an 8"motor so I have room for a baby H.

ImageUploadedByRocketry Forum1406909187.305472.jpg

Here are my homemade bulkheads for the AV bay, lots of work left to do here.

ImageUploadedByRocketry Forum1406909239.216136.jpg

ImageUploadedByRocketry Forum1406909254.700610.jpg

I'm in the process of priming parts in my DIY paint booth.

ImageUploadedByRocketry Forum1406909391.766776.jpg

ImageUploadedByRocketry Forum1406909405.406746.jpg

Once everything is painted I will assemble.

I plan on building the AV bay while the paint is drying.


So many rockets, so little time, and money.
 
I'm in the process of priming parts in my DIY paint booth.

View attachment 179661

View attachment 179662

I like your paint booth. No paint gets past the filter right? Looks pretty portable as well.

I will be following this as I have a GForce that I built with the intention of making it DD someday so The booster has rivets to hold it to the Body tube and the NC is taped on for now.


looks good, like what you did with the Jawstand also !

Kenny
 
looks good, like what you did with the Jawstand also !

Kenny

Thanks,, It has flown 3 times on "G"'s and soon I will try for L1 with and "H"... after that (if all goes well) I will make it DD,,why you ask?,,, Cause I want to:cool:..until then I'll be watching this thread.

The launcher will get it first test in the next week or so,, I think it's going to work out fine for my needs.

Ed
 
The better the filter the less paint that gets buy, but frankly the cheap filters are working good.

I designed it so I can take out the cross members, and the floor and top accordion, so I can "fold the sides together and lay it against one wall of the garage.

I also built a Jaw Stand Base. I designed it so my rail is attached to a notched 2x4 that "locks" into the stand. I also added a micro adjuster like on a Mantis. It works great except when I lay it down to load. It has an eight foot rail so a heavy rocket will tip it over. My next change will be custom longer legs that set the head much closer to the ground.

I will be riveting the coupler to the payload bay, the drogue is in the booster.

I plan to tape the nose cone versus shear pins, I think, still on the fence because the nose cone is so soft.

Thanks for reading.


Sent from my iPad using Rocketry Forum

Yep.. saw yours and was part of my inspiration. I have 7.5' of 1010 rail and 5.5' of "Mini" rail available for launch and both can be unscrewed for easier transport and if needed later I can make them longer. Also I have a keyless chuck on the backside for any size rod.

I really like the simplicity of your spray booth and will make one myself but could you elaborate on the "Accordian" part.,, thanks.

Ed
 
First, I move the exhaust fan, it is not attached as it does not need to be. Then I take two pieces of tape off the supply fan, and move the supply fan. Both supply and exhaust filters are taped to the plastic. Next, I pull the four pieces(2 top, 2 bottom) that set the width. Then the top drops down, I push each end in to the center, and it is folded. I set it up on a tarp and leave it folded on the tarp, occasionally I wash the dust off the tarp.

When I take it down, I can make a video if that would help.


Sent from my iPad using Rocketry Forum

Yes that would be helpful... I always read the pictures:wink:

I only saw the exhaust box fan, where is the supply one? Also why do you use a supply fan? See I need that "spray booth for dummies" book.
 
The picture from the outside shows the supply fan, the picture of the inside shows the exhaust fan, they are on opposite ends.

If you only have an exhaust fan, you rely on leakage to provide the air you are exhausting. If I only turn on the exhaust fan the booth will begin deforming as it sucks in air via leakage.

However you want to be slightly negative in the booth so you don't force paint everywhere via leakage, and as you paint the filter plugs so you have to run the exhaust fan at one speed higher as the filter plugs.

It ain't perfect by any means but much better than what I used to do whichever was nothing.


Sent from my iPad using Rocketry Forum
 
I've been working on color and clear coat, and purchased parts to build the av bay. I did get my ematches today.

ImageUploadedByRocketry Forum1407208808.853756.jpg


Sent from my iPad using Rocketry Forum
 
Finally a little color and decals

ImageUploadedByRocketry Forum1407468268.042959.jpg

ImageUploadedByRocketry Forum1407468298.762392.jpg

ImageUploadedByRocketry Forum1407468324.364771.jpg

Two big paint problems,

The nose cone and payload bay don't match, they were painted the same color over the same color primer, hard to see in the photo but very obvious in person

ImageUploadedByRocketry Forum1407468430.686412.jpg

And the clear coat on the fin can ran, this was clear coat number 4

ImageUploadedByRocketry Forum1407468493.523299.jpg
ImageUploadedByRocketry Forum1407468511.056264.jpg

Any suggestions for fixing the clear coat runs?

A few more pics of the AV bay mocked up, I ordered an RRC2+ but have not yet received it.

ImageUploadedByRocketry Forum1407468616.257818.jpg

ImageUploadedByRocketry Forum1407468648.790257.jpg

ImageUploadedByRocketry Forum1407468694.491117.jpg

ImageUploadedByRocketry Forum1407468709.973765.jpg


Sent from my iPad using Rocketry Forum
 
Here is what the outside looks like.

ImageUploadedByRocketry Forum1407820103.377846.jpg


Here is what's left to put on the inside.

ImageUploadedByRocketry Forum1407820155.110159.jpg


Total weight will be about 60oz. Counting everything shown plus the motor and a couple of BP charges.


Looking for suggestions on finishing the Kevlar ends.


Sent from my iPad using Rocketry Forum
 
Total weight will be about 60oz. Counting everything shown plus the motor and a couple of BP charges.

Great looking rocket. Hope it flies as good as it looks.

You might want to rename it H-Force though. At 60 oz (almost 4 lbs) , it is really too heavy for almost all the G motors you don't need a cert to fly. But I bet it would be great on a large H or small I! Should be a really fun DD flier!

Have fun! :D
 
Here is what the outside looks like.

View attachment 181074


Here is what's left to put on the inside.

View attachment 181075


Total weight will be about 60oz. Counting everything shown plus the motor and a couple of BP charges.


Looking for suggestions on finishing the Kevlar ends.


Sent from my iPad using Rocketry Forum

Looking real good..How much longer is it now than stock length?
 
It is stock length. I made the coupler the AV bay and shortened the motor mount slightly. There is not much room for the drogue.


Sent from my iPad using Rocketry Forum
 
It is stock length. I made the coupler the AV bay and shortened the motor mount slightly. There is not much room for the drogue.


Sent from my iPad using Rocketry Forum

OK,, Thanks... I'll have to rethink my approach. Maybe I'll put the av bay in the nose cone and utilize that large space in the top portion of the upper BT for the main.

I'm thinking about making it DD after I use it the way it is for my L1 attempt.

Ed
 
More of the AV bay

View attachment 180522


Sent from my iPad using Rocketry Forum

I don't think I have seen anyone plug the igniter wires directly into the altimeter before. How are you going to prevent the ejection gasses from getting into the bay? Are you going to use putty, and add it and remove it each time you insert a new igniter?
 
I do it and a lot of peoples on this forum do it too,

A teachable moment for me ... so, how do you keep the ejection gasses out of the AV bay? I'm always looking to learn something new.... And does it concern you to always be screwing and unscrewing the from the terminal block on the altimeter?
 
A teachable moment for me ... so, how do you keep the ejection gasses out of the AV bay? I'm always looking to learn something new.... And does it concern you to always be screwing and unscrewing the from the terminal block on the altimeter?

I use hot glue , it pull out very easy, I can also use the mastic electrician use. Beside I'm gone use more and more of the AV bay MSW is selling or the CPR 3000 system of PML, I really like the idea to screw the altimeter, bay and the charge in 1 shot. The more connectors, switches and wires you have, the more prone you are to a lawn dart.
 
I plan to use "poster putty" to seal the charge wires.

I also plan to twist wires instead of using a switch. The wires will leave the body tube through a hole, be twisted then reinserted into another hole that is close by. Both holes will then be covered by electricians tape.

What I have not figured out yet is if I plan to use the positive wire from the battery clip as one half of the twist pair. If so I will eventually run out of wire on the battery clip.

Ideas anyone?

Show me you AV bay wiring please!


Sent from my iPad using Rocketry Forum
 
Last edited:
Most altimeters have a pair of switch terminals. It comes with a jumper installed since the electrical connection between the two must be closed to power up the altimeter. Just remove the jumper and put your switch wires in these connections.
 
Handeman,

That's a negative on the RRC2+, the switch must be added in the battery connections.


Sent from my iPad using Rocketry Forum
 
Last edited:
Handeman,

That's a negative on the RRC2+, the switch must be added in the battery connections.


Sent from my iPad using Rocketry Forum

Not surprised. I knew some of the altimeters didn't have switch contacts. What leg do they recommend putting the switch in? + or -. Maybe I'm old school or too car focused, but I would put the switch in the + leg of the battery wires. But that's just me. I don't think it really matters.
 
Finally got to do ground test of my ejection charges. It took a few tries to get everything dialed in right. I ended up using 2.5gs of 3f BP for both main and drogue. I currently have the laundry hooked up with elastic but I will be changing this to Kevlar.

If the weather is good I hope to fly it this weekend.

Here are a couple poor quality photos of the drogue and main ejection charges.

ImageUploadedByRocketry Forum1408502577.594694.jpg

ImageUploadedByRocketry Forum1408502594.467248.jpg


Sent from my iPad using Rocketry Forum
 
Last edited:
Finally got to do ground test of my ejection charges. It took a few tries to get everything dialed in right. I ended up using 2.5gs of 3f BP for both main and drogue. I currently have the laundry hooked up with elastic but I will be changing this to Kevlar.

If the weather is good I hope to fly it this weekend.

Here are a couple poor quality photos of the drogue and main ejection charges. I took videos of both but can't figure out how to post the videos

View attachment 181794

View attachment 181795


Sent from my iPad using Rocketry Forum

Upload the video to YouTube or the like then post the link.
 
Drogue ejection charge video

[video=youtube_share;l7tsDRP2D18]https://youtu.be/l7tsDRP2D18[/video]


Main ejection charge video

[video=youtube_share;eMkJMdoy2Hs]https://youtu.be/eMkJMdoy2Hs[/video]


Sorry for the poor quality video


So many rockets, so little time, and money.
 

Latest posts

Back
Top