Estes V2, Steam Punk, Forward Mounted Canted Cluster build thread.

The Rocketry Forum

Help Support The Rocketry Forum:

This site may earn a commission from merchant affiliate links, including eBay, Amazon, and others.
I would really like to hear some discussion from you steampunk wizards about how you do the weathering. What techniques do you use to apply the black color that gives it the weathered, used, corroded look? It's fantastic, and I just have no clue how you do it.

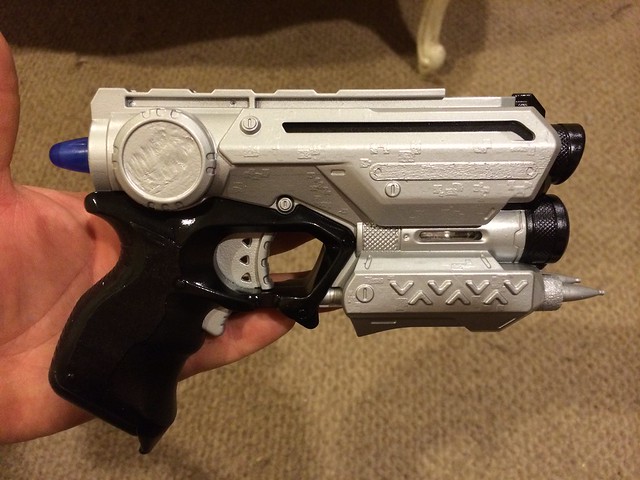
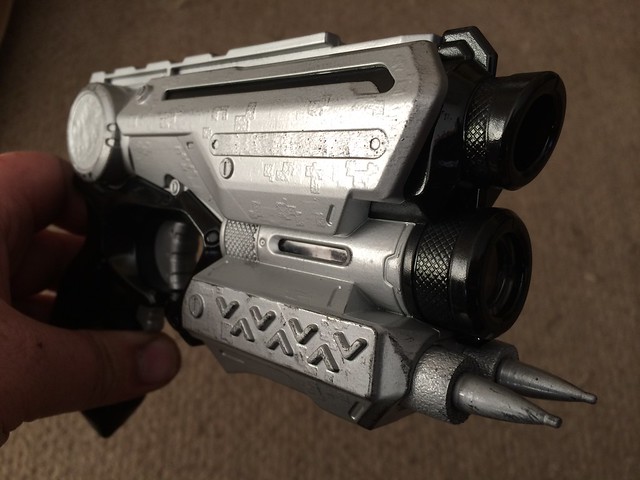
1st of all, this is my first steampunking and am no means a wizard. But I am glad to share what I know/learned from Fatboy and my own experience. The rocket has grey auto primer/filler with Krylon copper paint on top. I then used Testors flat black thinned with primer. Here is where it gets tricky. You quickly paint a thin layer on a small spot (1-2 square inches) and then immediately wipe with paper towel. If the PT is clean, you will remove most/all the paint, so you need to time the paint drying. If the PT is a little wet with paint, you won't remove a lot of black paint. But be careful, the solvent in the thinned black paint also eats the base paint. I actually did this in a couple of spots and have primer showing through. But that's the beauty of steampunk. Mistakes can often make it better. If you look at the pics of the diamond plate, you can see that it was first copper, then silver and then black paint. The black ate through some of the silver and exposed the copper. Also, Krylon makes a Chrome paint as well. If you look at the end plug, the hand wheel was first painted in this. But I found that Lacquer clear coat makes it a dull metal color.

Or, if you want a much lighter antiquing, use water paint (cheap set at dollar store). I tried it at first, but wanted a darker antiquing. However, I only did it once. Repeats may get darker. It is also easier as you won't eat through base coats and aren't nearly on the same time crunch to wipe off excess as you are with oil based paints.

You can take a piece of cardboard and paint it with primer and then the paints you want to use, and do some testing/practice, before you do it to a rocket you care about.

So that is what I learned. I am glad to answer any other questions.
 
Last edited:
Awesome, thanks, that makes a lot of sense.

I wonder if a liquid ink of some sort would do the trick also.

Thanks for indulging me and answering that. I have to practice some and then figure out what I want to steampunk!
 
Looks good, Sean! Are you bringing it to the picnic on Saturday?

I have tried some weld beads in the past and had decent luck with some thick epoxy applied with a tooth pick.

WFCOOK: In addition to the weathering techniques that Sean provided above, here are a few other ideas you can try. Don't worry too much about sanding to get the surfaces smooth. In fact, little blobs of glue or crud left on in certain areas will grab the grime and look like the surface is actually bubbling up from rust and corrosion. For base weathering, I paint the entire rocket black. And then come back and airbrush the metallic color spraying towards the back at a very steep angle. What this does is helps draw out the 3D details like rivets and plates, as the top half of the rivets get the color while the bottom half of them remains black. For corrosion and rust, I simply paint on green, brown and/or rust colored paint with a thin brush. Paint it on so it looks like it is oozing/dripping down. To add the dirt and grime, I use a technique similar to Sean's, but instead of the Testors paint and thinner that has the solvent that can attack your base layers, I use cheap black water based craft paint and water. I dab about a quarter size blob of paint on a paper plate and add some water to thin it out. Then using a 1" brush (or even a paper towel) I brush it onto a section and wipe it off with a paper towel or Q-Tip - wiping from top to bottom. Wiping in that direction (the same direction your rust is oozing) makes the grime consistently streaking in the right direction - as if the rocket were standing upright in the rain for years. Like Sean said, do one section at a time. Do it a few times until you get a grime level you are happy with. You will find that some areas will need this applied multiple times, and some areas may be better with thicker or thinner paint left on for different lengths of time before wiping. Finish it all off with a flat or dull clear coat to hide any shine that only new rockets have. Go outside and look at old stuff that is rusting away (water towers, trains, cars, bridges, scrap metal...) to get some ideas of what old rusty stuff looks like for reference.

Rust 1.JPG

Rust 2.JPG

Rust 3.JPG
 
Awesome, thanks, that makes a lot of sense.

I wonder if a liquid ink of some sort would do the trick also.

Thanks for indulging me and answering that. I have to practice some and then figure out what I want to steampunk!

If you test the ink, let me know the results. You can experiment with how much to dilute it and different solvents. Even the universal solvent, H2O.
 
Looks good, Sean! Are you bringing it to the picnic on Saturday?

I have tried some weld beads in the past and had decent luck with some thick epoxy applied with a tooth pick.

WFCOOK: In addition to the weathering techniques that Sean provided above, here are a few other ideas you can try. Don't worry too much about sanding to get the surfaces smooth. In fact, little blobs of glue or crud left on in certain areas will grab the grime and look like the surface is actually bubbling up from rust and corrosion. For base weathering, I paint the entire rocket black. And then come back and airbrush the metallic color spraying towards the back at a very steep angle. What this does is helps draw out the 3D details like rivets and plates, as the top half of the rivets get the color while the bottom half of them remains black. For corrosion and rust, I simply paint on green, brown and/or rust colored paint with a thin brush. Paint it on so it looks like it is oozing/dripping down. To add the dirt and grime, I use a technique similar to Sean's, but instead of the Testors paint and thinner that has the solvent that can attack your base layers, I use cheap black water based craft paint and water. I dab about a quarter size blob of paint on a paper plate and add some water to thin it out. Then using a 1" brush (or even a paper towel) I brush it onto a section and wipe it off with a paper towel or Q-Tip - wiping from top to bottom. Wiping in that direction (the same direction your rust is oozing) makes the grime consistently streaking in the right direction - as if the rocket were standing upright in the rain for years. Like Sean said, do one section at a time. Do it a few times until you get a grime level you are happy with. You will find that some areas will need this applied multiple times, and some areas may be better with thicker or thinner paint left on for different lengths of time before wiping. Finish it all off with a flat or dull clear coat to hide any shine that only new rockets have. Go outside and look at old stuff that is rusting away (water towers, trains, cars, bridges, scrap metal...) to get some ideas of what old rusty stuff looks like for reference.

I just learned a lot more from Jeff's post.

I may/may not make it to the picnic. My TARC team might be doing a fundraiser at the Tripoli-MN launch. If I get a couple of the kids to sign up to do it, we will offer motor cleaning for donations. If we don't do it, I will come to the picnic but will have to bolt around 6:00 to pick up the wife/kid from the airport. I am a bachelor this week.
 
Thanks so much for sharing your techniques, guys. Great stuff, very informative!
 
IT FLEW!

So I flew it yesterday on (2) B6-0 and (2) C6-5 motors. The RSO asked I launch it out on the HPR pads to get it further from the crowd just in case one of the motors failed to light and the rocket took a turn into the flight line. I obliged. I was definitely getting a lot of stares. Some were admiration and some were questioning of it's fly-ability. The friction calibration rig worked perfectly in ensuring the rear plug stays put during ascent, but releases during ejection.

All four motors lit, and the flight was straight. Chute ejected fine and it landed 50' from the pad. One of the Cersium Hypoxylate lines (bendy soda straws) broke off on landing. Should be a fairly simple repair. There was a guy telling me I need to do a 6" upgrade. Tempting, but expensive. That means (4) 38 or 54 mm motors.

DSC_0039.JPGDSC_0040.JPGDSC_0041.JPGDSC_0043.JPGDSC_0047.JPG
 
Last edited:
Very cool rocket and flight! I hope you'll get to launch it closer to the flight line next time. I had to snap a pic at the RSO table:

IMG_20140809_140055.jpg
 
IT FLEW!

So I flew it yesterday on (2) B6-0 and (2) C6-5 motors. The RSO asked I launch it out on the HPR pads to get it further from the crowd just in case one of the motors failed to light and the rocket took a turn into the flight line. I obliged. I was definitely getting a lot of stares. Some were admiration and some were questioning of it's fly-ability. The friction calibration rig worked perfectly in ensuring the rear plug stays put during ascent, but releases during ejection.

All four motors lit, and the flight was straight. Chute ejected fine and it landed 50' from the pad. One of the Cersium Hypoxylate lines (bendy soda straws) broke off on landing. Should be a fairly simple repair. There was a guy telling me I need to do a 6" upgrade. Tempting, but expensive. That means (4) 38 or 54 mm motors.

View attachment 180835View attachment 180836View attachment 180837View attachment 180838View attachment 180839

Ever

Congrats on the successful flight.
 
Very cool rocket and flight! I hope you'll get to launch it closer to the flight line next time. I had to snap a pic at the RSO table:

View attachment 180840

I launched it a second time on Saturday out at North Branch. This time was with (4) C6-5s. This time they let me launch on the LPR pads. My rocket flew perfectly with all four motors lighting (again). The RSOs are starting to have more confidence in my weird contraption. On the first launch, they asked that I launch it out on the HPR pads.

Funny. I walk up with a 4" x 87" rocket with a J motor, and no one even bats an eye. The RSOs have no issues and quickly approve the rocket. But bring my little ole Estes to the launch, and the tough, steely eyed rocket men start to scratch their heads, not sure what to do with it. :D But I admit, I enjoy the attention.
 
how/what do you use to ignite motors? I got a 4 motor cluster(1E,3c's) I tried one time, but only 2 motors lit. I'm not sure if my 8aa(12v) battery controller was not enough power, but I think it wasnt the lack of power, but rather an igniter issue, since I foolishly tried to whipclip 4 motors & reg estes igniters resulting it a very hard time connecting all 8 wires in sush a small space.
 
Damn good looking rocket. I mean, really nice.

To create weathering, I use a couple different techniques. One technique is to manually weather your item. Works best with black base coats. You spray your base coat on then let it fully cure. Shoot your main color coat and let it dry just to where it isn't tacky anymore. Then take some very fine steel wool and "weather" the corners, edges, any place where normal "wear" would show up. I suggest shooting a matte or satin clear after you're done to maintain the finish.

The second technique I use is dry brushing. You add a small amount of paint to a decently sized paint brush (I use about a 1" brush for most applications) and "paint" on a paper towel until there is barely anything left on the brush. Then you can apply what's left to your project. I find this works well for smoke trails, blending edge "wear", and rather than using a brush stroke, you can use a stabbing motion to get into crevices without worrying about using too much paint.

I did a prop for a friend for Halloween. Here's some pictured of before and after it was weathered.

 
I launched it a second time on Saturday out at North Branch. This time was with (4) C6-5s. This time they let me launch on the LPR pads. My rocket flew perfectly with all four motors lighting (again). The RSOs are starting to have more confidence in my weird contraption. On the first launch, they asked that I launch it out on the HPR pads.

Funny. I walk up with a 4" x 87" rocket with a J motor, and no one even bats an eye. The RSOs have no issues and quickly approve the rocket. But bring my little ole Estes to the launch, and the tough, steely eyed rocket men start to scratch their heads, not sure what to do with it. :D But I admit, I enjoy the attention.

Good to see the rocket gods are with you and all of your motors have lit. Get lots of street cred with the Homes. Soon they will expect you to have another crazier thing to fly and will run up to you car at the beginning of the launch for a good scare. Yep, if they all light that virtual flame fin action will keep it stable. I tell the Homes canted flame fin action is cool, just like the karate chop action on your old action figures.
 
I really like the "Feed line weld" oops.
"Mad Max In Space" looking vehicle.
 
how/what do you use to ignite motors? I got a 4 motor cluster(1E,3c's) I tried one time, but only 2 motors lit. I'm not sure if my 8aa(12v) battery controller was not enough power, but I think it wasnt the lack of power, but rather an igniter issue, since I foolishly tried to whipclip 4 motors & reg estes igniters resulting it a very hard time connecting all 8 wires in sush a small space.

I had a 3x cluster whip and 4 pairs of clip extension wires. After CAREFULLY installing the standard Estes "Initiators", I visually make sure there is no short. If you want quantifiable confirmation, you could ohm them out. I then connect the 4 pairs of extensions to the "Initiators". The extensions are long enough that they go below the blast plate. I then attach the clip whip. 2 pairs of extensions to one set of whip clips, then the last 2 extension pairs to the last 2 pairs of clips on the whip. The extensions are needed so the whip won't hit the fins (NA if not forward mounted motors).

The biggest cause of an Estes motor not lighting, is a short in the exposed wires of the Estes "Initiators". If you can find some, the Q2G2s will practically eliminate this failure mode.

Also, you may have a power supply issue. Though you have the volts, the amount of current they can flow in an instant may not be enough. The gauge of the wires needs to be heavy enough as well (not an electrical eng., but I did stay at a Holiday Inn Express). You can get a 12V lead acid (Lawnmower/motorcycle size or bigger) or (2) 6v flashlight batteries wired in series.
 
Last edited:
Last edited:
I launched it a second time on Saturday out at North Branch. This time was with (4) C6-5s. This time they let me launch on the LPR pads. My rocket flew perfectly with all four motors lighting (again). The RSOs are starting to have more confidence in my weird contraption. On the first launch, they asked that I launch it out on the HPR pads.

Funny. I walk up with a 4" x 87" rocket with a J motor, and no one even bats an eye. The RSOs have no issues and quickly approve the rocket. But bring my little ole Estes to the launch, and the tough, steely eyed rocket men start to scratch their heads, not sure what to do with it. :D But I admit, I enjoy the attention.

I saw a steampunked fliskits Acme Spitfire at the cubscout rocket jamboree I helped at a couple of weeks ago. The LCO called a heads-up flight on it. I told him it would fly straight and true. He was skeptical. Guess who was right... :)

BTW - I really like your steampunked V2. :)
 
I saw a steampunked fliskits Acme Spitfire at the cubscout rocket jamboree I helped at a couple of weeks ago. The LCO called a heads-up flight on it. I told him it would fly straight and true. He was skeptical. Guess who was right... :)

BTW - I really like your steampunked V2. :)

Thanks Rbelknap. My friend Jeff (Fatboy, but he really isn't) has done a few steampunk spitfires and he is a master of it. One of his will be displayed at the new model rocket exhibit at the Seattle Museum of Flight. He was actually my inspiration to do my first steampunk.

Oddrocs draw a lot of attention from RSOs. From there perspective (and mine), is if it is non-standard and un-proven, extra precaution should be taken. I know if my rocket ever took a wrong turn and landed in the flight line, I would be scared and embarrassed. And if someone got hurt, I would be crushed. I would even rethink my participation in this hobby.

Besides, if you're gonna do something unusual, don't you like/want some extra attention? How much more extra attention can you get than an "On your feet, Heads up" called over the PA, with everyone watching your rocket. Especially when your rocket flies right and you show that the extra hoo-ha was unnecessary.
 
Last edited:
Thanks Rbelknap. My friend Jeff (Fatboy, but he really isn't) has done a few steampunk spitfires and he is a master of it. One of his will be displayed at the new model rocket exhibit at the Seattle Museum of Flight. He was actually my inspiration to do my first steampunk.

Oddrocs draw a lot of attention from RSOs. From there perspective (and mine), is if it is non-standard and un-proven, extra precaution should be taken. I know if my rocket ever took a wrong turn and landed in the flight line, I would be scared and embarrassed. And if someone got hurt, I would be crushed. I would even rethink my participation in this hobby.

Besides, if you're gonna do something unusual, don't you like/want some extra attention? How much more extra attention can you get than an "On your feet, Heads up" called over the PA, with everyone watching your rocket. Especially when your rocket flies right and you show that the extra hoo-ha was unnecessary.

I've followed Jeff's builds here (I think - if they are the one's I think they are - yes - they are wonderful) If/when I give any of my builds the steampunk treatment (I have a couple of estes silver comets just begging to be 'punked) I'll be looking to those threads for inspiration.

I have no problem with odd-rocs getting the heads' up call or extra scruitiny from SCO/RSO. Sorry to imply that I did. Plus. the spitfire is a proven design. I know it's not seen as commonly at a launch as an alpha3. I just thought it was a little funny. I knew how the rocket was going to perform. The LCO was a little concerned since it looked "janky". I think his exact words were "Heads up folks, we have an... unusual rocket out on the pad. This could be an ... interesting flight."

In any case the rocket had passed safety check. And it flew just fine. :)
 
Back
Top