You are using an out of date browser. It may not display this or other websites correctly.
You should upgrade or use an alternative browser.
You should upgrade or use an alternative browser.
Estes Star Trooper
- Thread starter TopRamen
- Start date


Help Support The Rocketry Forum:
This site may earn a commission from merchant affiliate
links, including eBay, Amazon, and others.
mrichhcirm
Well-Known Member
- Joined
- Jul 6, 2013
- Messages
- 681
- Reaction score
- 2
I've got one of those too! I'm thinking of making mine a rear-eject but haven't gotten around to it yet. I did pick up some 1/16 basswood for the fins though...the tung wood that Estes puts in the kits these days is such a pain to finish.
The funny thing is that I, too, have lately had this odd urge to build tiny 13mm rockets. Kudos on your 220 Swift, by the way...you made the cheapest kit in the Estes lineup look like a piece of jewelry.
The funny thing is that I, too, have lately had this odd urge to build tiny 13mm rockets. Kudos on your 220 Swift, by the way...you made the cheapest kit in the Estes lineup look like a piece of jewelry.
TopRamen
SA-5
- Joined
- Aug 9, 2013
- Messages
- 9,955
- Reaction score
- 112
I've got one of those too! I'm thinking of making mine a rear-eject but haven't gotten around to it yet. I did pick up some 1/16 basswood for the fins though...the tung wood that Estes puts in the kits these days is such a pain to finish.
The funny thing is that I, too, have lately had this odd urge to build tiny 13mm rockets. Kudos on your 220 Swift, by the way...you made the cheapest kit in the Estes lineup look like a piece of jewelry.
Thanks!
Yeah, I got a Mosquito because I remembered them being fun when I was a Kid, and then I guess I got hooked on the 13mm Nostalgia and decided I needed a few more.
I'm just taking a little break from some of the MPR stuff which I can't really afford right now. Not that they are expensive, but it's all the Support Materials I need that add up quick, like Paint, Epoxy, Foam Board for Fin Mounting Jigs, Motors and everything in general.
Dean B
Well-Known Member
- Joined
- Jul 16, 2010
- Messages
- 221
- Reaction score
- 6
I built one of these about 3 years ago, and it is still flying after a bunch of flights. I usually launch it on a 1/2A3-4, which makes for a really nice flight. I haven't got up the nerve to put an A in it yet.
If I ever build another one, I think I'll choose a different color scheme. The green is really hard to spot on the ground!
If I ever build another one, I think I'll choose a different color scheme. The green is really hard to spot on the ground!

TopRamen
SA-5
- Joined
- Aug 9, 2013
- Messages
- 9,955
- Reaction score
- 112
Everything in the Kit looks good. I'll be papering the Fins, and they look like Balsa, not "Tung Wood".
There's a Streamer, but no Motor Retention, so I guess this Kit is supposed to eject both the Nose Cone and the Motor Casing at the same time?
The Instructions don't mention anything about it.
There's a Streamer, but no Motor Retention, so I guess this Kit is supposed to eject both the Nose Cone and the Motor Casing at the same time?
The Instructions don't mention anything about it.
Everything in the Kit looks good. I'll be papering the Fins, and they look like Balsa, not "Tung Wood".
There's a Streamer, but no Motor Retention, so I guess this Kit is supposed to eject both the Nose Cone and the Motor Casing at the same time?
The Instructions don't mention anything about it.
Good ol' friction fit.
Top of page 4, step 7 shows a picture of a motor with a wrap of tape around the middle.
Step 8 caption: SNUG FIT / DEBE QUEDAR ADJUSTADO / ASSISE PARFAITE
I just finished one. There is enough body tube aft of the fins to secure the motor with an external wrap. I'll post a picture of mine here later if you don't mind.
TopRamen
SA-5
- Joined
- Aug 9, 2013
- Messages
- 9,955
- Reaction score
- 112
Good ol' friction fit.
Top of page 4, step 7 shows a picture of a motor with a wrap of tape around the middle.
Step 8 caption: SNUG FIT / DEBE QUEDAR ADJUSTADO / ASSISE PARFAITE
I just finished one. There is enough body tube aft of the fins to secure the motor with an external wrap. I'll post a picture of mine here later if you don't mind.
You must have a different Instruction Sheet.
TopRamen
SA-5
- Joined
- Aug 9, 2013
- Messages
- 9,955
- Reaction score
- 112
You must have a different Instruction Sheet.
I'll go take a Pic' of it.
I definitely don't mind if you Post Pics' of yours here, and would infact like to see it.
You must have a different Instruction Sheet.
I was looking at the pdf: https://www.estesrockets.com/media/instructions/003031_Star_Trooper.pdf I probably tossed the kit instructions by now but who know what gets packed by those minimum wage earnin' Guangdong folks.
Last edited:

mrichhcirm
Well-Known Member
- Joined
- Jul 6, 2013
- Messages
- 681
- Reaction score
- 2
Everything in the Kit looks good. I'll be papering the Fins, and they look like Balsa, not "Tung Wood".
I suppose I could be wrong; I'd heard that a lot of Estes kits used tung because it's native to China. In any case, it's got a tough, fibrous consistency which may be light but kinda reminds me of a hemp rope. It does the job but it's really open-grained and a bit brittle; not the aircraft balsa I remember from when I was a kid.
There's a Streamer, but no Motor Retention, so I guess this Kit is supposed to eject both the Nose Cone and the Motor Casing at the same time?
The Instructions don't mention anything about it.
Estes instructions can be kinda terse. You'd have to be knowledgeable enough to know you need a good friction fit with tape. That may explain why some people complain that these tend to lawn-dart after spitting the motor. I was thinking of putting a lariat of kevlar thread around the motor, both for retention and for the shock cord mount.
I wonder what the instructions on my kit say, if anything, about a friction fit? I guess it depends on how recently your kit was manufactured.
Last edited:
TopRamen
SA-5
- Joined
- Aug 9, 2013
- Messages
- 9,955
- Reaction score
- 112
I suppose I could be wrong; I'd heard that a lot of Estes kits used tung because it's native to China. In any case, it's got a tough, fibrous consistency which may be light but kinda reminds me of a hemp rope. It does the job but it's really open-grained and a bit brittle; not the aircraft balsa I remember from when I was a kid.
Estes instructions can be kinda terse. You'd have to be knowledgeable enough to know you need a good friction fit with tape. That may explain why some people complain that these tend to lawn-dart after spitting the motor. I was thinking of putting a lariat of kevlar thread around the motor, both for retention and for the shock cord mount.
I wonder what the instructions on my kit say, if anything, about a friction fit? I guess it depends on how recently your kit was manufactured.
You know, you might be right about the Tung Wood. It definitely does'nt feel like Balsa when you cut it out. Yes, it is Laser Cut, but there are still the tiny attached parts, and cutting them, well, the Wood just did'nt feel like Balsa.
Anyhow, I got my Body Tube put together and marked, papered the Fins, and soaked the Nose Cone with Super Thin CA.
I really enjoy using Techniques normally relegated to larger Models on these small ones.
Threw my Mosquito in there for size comparison.

...
If I ever build another one, I think I'll choose a different color scheme. The green is really hard to spot on the ground!
...
I definitely don't mind if you Post Pics' of yours here, and would infact like to see it.
I couldn't agree more Dean B. While the green may go with the trooper theme, I went hi-vis. In spite of my poor camera work, the color is actually Rusto fluorescent pink. A wrap of quarter inch tape around the aft end of the bt and motor should secure it fine.
.jpg")
.jpg")
GlennW
Well-Known Member
We just built and flew this for the first time this past weekend. Flew great on a 1/2A, it would be gone on an A. My son wanted to do blue with a red nose so that's what we did!
Glenn
Glenn
TopRamen
SA-5
- Joined
- Aug 9, 2013
- Messages
- 9,955
- Reaction score
- 112
We just built and flew this for the first time this past weekend. Flew great on a 1/2A, it would be gone on an A. My son wanted to do blue with a red nose so that's what we did!
Glenn
Feel free to share a Pic' if you like. The more Ideas for Paint the better, as I too am not going to paint mine Green. I'm leaning towards red, white, orange and maybe yellow.
I'm not going to paint this one til' next week when I can go buy some more Paint. The last two Mini Rockets I did I just used the Brush On Testors Model Paint, then melted it with the Clear Coat Spray, but I want this one to look nice, so I'm going to Prime it first, and only use Spray Paint.
I got the Fins and Launch Lug on. These little Estes Fin Marking Guides are really handy for these smaller Models. I like them much better than using the Paper Templates in the Instructions.


Last edited:
hcmbanjo
Well-Known Member
- Joined
- Jan 18, 2009
- Messages
- 2,459
- Reaction score
- 417
Here it is.

I assumed Friction Fit will be required, but found it odd they don't mention it in the Instructions, which I typically disregard anyway.
I went to the Estes Website, here's what they have posted now:

On Rocket Reviews here's some ejection results:
"First flight. Taped the engine, but it still kicked from the rocket. Streamer deployed, landed about 50 yards away."
"Taped the engine, but it still kicked from the rocket."
"Motor still kicks out despite tight fitting with masking tape."
"Great launch, kicked engine, drifted and thought lost. Recovered in the morning."
mrichhcirm
Well-Known Member
- Joined
- Jul 6, 2013
- Messages
- 681
- Reaction score
- 2
You must have an older kit; mine has a hollow plastic nose cone. Or did you supply your own?
TopRamen
SA-5
- Joined
- Aug 9, 2013
- Messages
- 9,955
- Reaction score
- 112
You must have an older kit; mine has a hollow plastic nose cone. Or did you supply your own?
It came with this Wooden Cone. The Cone feels like the same Wood the Fins are made from. Slightly darker than Balsa and with an oily Texture.
I saturated it with Super Thin CA to seal it then sanded it smooth.
Oh, and my instructions show the Balsa Cone and Screw Eye Bolt too.
Last edited:
vigilante
Well-Known Member
- Joined
- Aug 12, 2011
- Messages
- 139
- Reaction score
- 0
Ha! There must be something in the water. I started one a couple days ago.

I added a bit of kevlar to mine and shortened the LL. Not sure what to do with the deployment part. I'm thinking of not gluing the middle together or the nose cone on...
I added a bit of kevlar to mine and shortened the LL. Not sure what to do with the deployment part. I'm thinking of not gluing the middle together or the nose cone on...
TopRamen
SA-5
- Joined
- Aug 9, 2013
- Messages
- 9,955
- Reaction score
- 112
Ha! There must be something in the water. I started one a couple days ago.
View attachment 175873
I added a bit of kevlar to mine and shortened the LL. Not sure what to do with the deployment part. I'm thinking of not gluing the middle together or the nose cone on...
That's a clever Idea.
fatdaddynerd
Well-Known Member
- Joined
- Jun 4, 2014
- Messages
- 145
- Reaction score
- 1
I'm thinking of not gluing the middle together or the nose cone on...
I like the idea of a 3 piece tumble recovery with all the pieces attached by the shock cord. maybe add a small streamer to the nose cone too just for visibility sake...
Last edited:
TopRamen
SA-5
- Joined
- Aug 9, 2013
- Messages
- 9,955
- Reaction score
- 112
I like the idea of a 3 piece tumble recovery with all the pieces attached by the shock cord. maybe add a small streamer to the nose cone too just for visibility sake...
Me too. Lookin' like I'll have to build another one of these. Vigilantes Idea seems pretty good.


TopRamen
SA-5
- Joined
- Aug 9, 2013
- Messages
- 9,955
- Reaction score
- 112
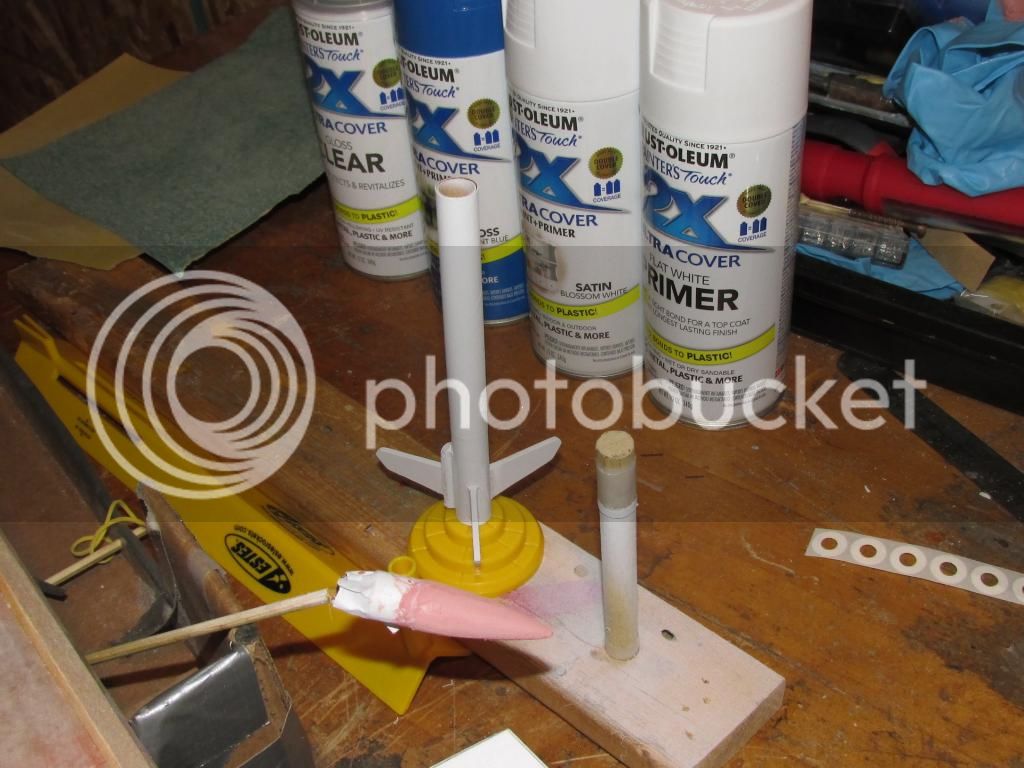
The typical "Balsa Pinholes" were present on the primed Nose Cone, so I slathered it with Bondo Spot & Glazing Putty. I'll sand and Prime again and I should be good. It's a Shame the Super Thin CA did'nt fill it up more. Ohwell, that's why there is the Primer Stage.


Similar threads
- Replies
- 12
- Views
- 920
- Replies
- 27
- Views
- 2K