TTW Fin Trick (For Alignment)...

The Rocketry Forum

Help Support The Rocketry Forum:

This site may earn a commission from merchant affiliate links, including eBay, Amazon, and others.

K'Tesh

.....OpenRocket's ..... "Chuck Norris"
TRF Supporter
Joined
Mar 27, 2013
Messages
22,535
Reaction score
14,942
Through-The-Wall fins are guaranteed to eliminate cockeyed fins... And in the English language, a double positive statement can NEVER form a negative statement... Yeah, RIGHT! :eyeroll:

Several of my older two stage builds have pairs of beautifully aligned fins, and one cockeyed fin. This, of course makes the perfectly aligned fins on the booster look wrong, as the odd one screams out "LOOK AT ME!!! I'm messed up" :facepalm:

So, for my latest trick, I give you...

How to get TTW fins right the first time (or fix them if you foul up)

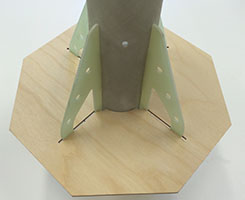
The TTW fins should have tabs that come in contact w/the motor tube, or upon failing that, contact with a forward centering ring. I say "a forward centering ring" instead of "the forward centering ring" because with Estes PSII kits there are three centering rings, and the tabs come in contact with the middle and aft centering ring. If the tab doesn't come in contact with either the motor tube or a forward centering ring, this won't help you.

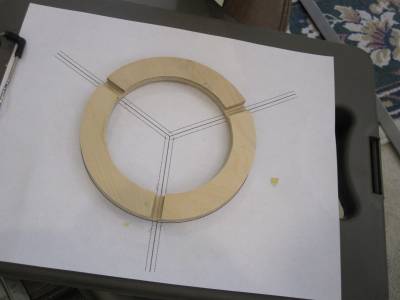
First I determine which centering ring will be the aft one, and sand it so it will easily slip into place without much effort, then I set it aside.

I glue my forward centering ring and my middle centering rings in place first by tacking them with medium CA (DON'T use thin CA, as it sets too quickly, and is far too easy to mess up with). If I need to adjust one, I can cut the tack away, re-position it, and tack it again. Once I'm happy with that, I'm using epoxy to cement them firmly to the motor tube. As the tack will hold them in place well enough as the epoxy cures. While the epoxy cures, I go ahead and tack the motor mount in place (again with CA). I leave off the rear centering ring for now. If I'm happy with the location of the mount, I then tack my fins in place. One drop of medium CA just forward of the slot on the exterior of the body tube, and one aft of the slot. I position my fin, and when happy with it, set it with the accelerator (Insta-Set). I next tack (one drop of medium CA) the fin tab to the motor tube. Once all the fins are in place, I then use epoxy to lock them firmly in place with internal fillets (on the inside of the body tube, and to the motor tube. The epoxy will also lock the fin tab to the centering ring, and the centering ring to the body tube.

When all the fins are filleted, I apply epoxy on the rear of the fin tabs, on the inside of the body tube just behind the fin tabs, and the outside of the motor tube. I then slide the aft centering ring in place, and epoxy it from the outside. If there is a forward centering ring, I'll epoxy it after the rest of the assembly is well on the way to curing.

[EDIT] When you're working in and around the fillets, take care to only get the glue on the parts of the MMT and the BT that you want. IF YOU'RE NOT CAREFUL, you may end up with lumps that have to be sanded/cut away for the CR and motor retainer to fit, adding to the work you need to do.


The nice thing about this method, is that should a fin set in an awkward position, you only need to cut the tack and try again until you get it right. This is also speeding up my construction, as I'm now no longer having to wait for epoxy to cure before gluing my fins in.


Mind you, if the center of the fin tab is slotted to allow fin tabs to lock the middle centering ring in place (e.g. Estes' Mega Der Red Max), you may need to leave the forward-most centering ring off until you epoxy the fins in place. This could be a lot more difficult, but I feel it could be done.


[EDIT] Here's the link to my technique for papering fins (No Runs, No Drips, No Foul Language).
 
Last edited:
Tacking the fins in place with CyA before permanently bonding them is a great idea. If you're really concerned with getting them perfectly aligned, though, using a radial fin guide is the best way to ensure that. Note that this works with TTW or surface-mount fins as well.

finguide2.jpg
 
Tacking the fins in place with CyA before permanently bonding them is a great idea. If you're really concerned with getting them perfectly aligned, though, using a radial fin guide is the best way to ensure that. Note that this works with TTW or surface-mount fins as well.

finguide2.jpg

I'll agree that those kind of guides will work fine for TTW fins. However, it's my experience that I can still mess up with them when installing surface mounted fins. All too often one or more will manage to get one set at an angle. This leads to smears of glue as I try and bring the fin back into alignment, and usually knocks the rest of them out of kilter. Uncorrected, the rocket will have a spin, or a nasty, altitude robbing, spiraling wobble.
 
I'll agree that those kind of guides will work fine for TTW fins. However, it's my experience that I can still mess up with them when installing surface mounted fins. All too often one or more will manage to get one set at an angle. This leads to smears of glue as I try and bring the fin back into alignment, and usually knocks the rest of them out of kilter. Uncorrected, the rocket will have a spin, or a nasty, altitude robbing, spiraling wobble.

Are you using 2 radial fin guides that have a pretty tight fit against the fin? I have built a few rockets this way and the results have been nothing but perfect, including a couple of minimum diameter rockets (including a BlackHawk38). I think that one tip is to install the first fin at solo using the radial guide and then add on the others - that way you have a reference fin that won't allow the alignment to get out of whack.

I like the idea of CyA as well - you can break the bond if you get it wrong. If you want perfectly straight fins there is the Guillotine Fin Jig and the Precision Fin Jig but I'll be honest - I'd rather have a fin set at a few degrees off for my applications than spend money on these jigs. My rockets are for fun and if they have a little wobble or spin that just adds character. However, it is clear that your goals are separate from mine.

Hope this helps!
 
I glue my forward centering ring and my middle centering rings in place first by tacking them with medium CA (DON'T use thin CA, as it sets too quickly, and is far too easy to mess up with). If I need to adjust one, I can cut the tack away, re-position it, and tack it again. Once I'm happy with that, I'm using epoxy to cement them firmly to the motor tube.
(snip)
If there is a forward centering ring, I'll epoxy it after the rest of the assembly is well on the way to curing.
(snip)
So to epoxy the forward CR, you're "coming in from the top?" This is the only part of this I'm vague on ...I mean, with the PSII kit I'm working with, I would guess that I'll have enough epoxy on the middle and aft CRs to stop the mmt from tearing out, but I'd be happier with a nice fillet of epoxy around the top of the top CR...
That said, I love the idea of using CA for tacking fins; I have a non-TTW build that I was dreading. I think I'm going to use 30-minute epoxy for 90% of the fin root, then a drop of CA at the top and the bottom to hold it in place. That way I can know that each fin will be exactly where I want/need it to be while the epoxy dries

As always, excellent insights. Thanks!

Figuring your non TTW is balsa and cardboard, I would very highly recommend the 'double gluing' technique, similar to the 'double butter' of epoxy.

Apply small amount of wood glue to root of fin, then put it on the BT where you want it, then remove. Then, reapply a little more glue to root, -then...wait at least two minutes- as the glue becomes more 'tacky'. Then, position it where needed, it will grab rather quickly. I have used yellow glue extensively in building my wood finned, cardboard tubed rockets.

You will -break- the fin or -rip- the cardboard before the glue will fail...guaranteed

If you have some spare balsa pieces and tube, (even from an empty toilet paper or paper towel roll) try it for yourself, you may be surprised.

I have an almost 6 year old Estes Patriot with well over 100 launches, and only popped 1 fin, which didn't even fall off, it was still being held on by the ripped cardboard...

Titebond 1, 2, or 3 is great, and I've even used 'off brands'. If it's labeled as yellow or wood glue, you'll be fine.

I'll put the YMMV thing in here, but, really, it'll be good!

Save the epoxies for when you start building fiberglass :)


Oops, got carried away!

babble......-off- :p
 
Apply small amount of wood glue to root of fin, then put it on the BT where you want it, then remove. Then, reapply a little more glue to root, -then...wait at least two minutes- as the glue becomes more 'tacky'. Then, position it where needed, it will grab rather quickly. I have used yellow glue extensively in building my wood finned, cardboard tubed rockets.

You will -break- the fin or -rip- the cardboard before the glue will fail...guaranteed

Nice tip! Stopping for a moment to think about it, it really makes a lot of sense! I'll try this one on the next Estes or Zooch.
 
I've been obsessed with getting fins straight on the rockets I build to carry cameras to reduce the roll rate. A couple of tricks that I've been using are ....

1) Cut four rings for above and below the fins instead of two. Cut slits out of two of the rings where the fins will be (I sometimes use the PayloadBay template mentioned above to determine where to cut the rings). Glue the pieces of the cut rings to the uncut rings. This provides notches to hold the fins in the right places.

image-youbee-centering-rings-400-600-054612212520560.jpg


2) Glue runners along lines drawn on the motor tube where the fins will go, leaving just enough space for the fin tab to fit between the runners. This ensures that the fins are in the right place along the body tube.

All that is critical after this is that you line up the notches in the rings accurately with the lines and runners on the motor tube. If you have more handtool fu than I (or a CNC cutter or router), you could make the parts interlock so they can't be misaligned).

I've been using these techniques on larger rockets, but they should work on smaller ones.

-- Roger
 
I agree with Jadebox.

A Rocket that rolls or twists during flight is garbage and should not even fly.

I'm a stickler for PERFECT fins, since most of my rockets are TLP style with 8 fins.

It might not look perfect when it is done, and I know I'll beat myself up over the way it looks, even if it "Looks good from safe launching distance", but I'll be damned to rocket hell if it does not fly exactly how I imagined Openrocket simmed and mindsimmed it!!!

No matter how much work I put into one, if it twists during flight, I'll consider launching it into my woods.

I always laugh when I see other folks videos and see their rockets twist during flight, but they are still so proud of their rocket.:facepalm:

It's like, "Yeah, it flies, but you totally screwed up the fins, so you should actually feel like a complete failure right now."

I'm a jerk about fin alignment, and a couple of rockets hanging to rot in my woods can vouch for that.:wink:
 
Last edited:
BTW ... I've found that the easiest way to reduce the roll rate is to build bigger rockets. :)

-- Roger
 
I use a pieces of angled aluminum to align the fins with the axis of the body tube.
Very simple, and insures that all the fins are correct.
I still also use the Payload bay alignment guides for the other axis of alignment.
I glue them to foamboard, write the name of the model they were used for on them, then cut them out with a brand new X-acto blade. I fine tune them with an emery board. I have a nice collection of them now, and they work great for me.
I know some folks don't like them, but for me, the proof is in the way my rockets fly. You can't tell me they don't work, because I can show you that they do.

I have since this video also learned more about how/where to rig my chute, so as to make them spin less on the way down.

[video=youtube;SO6ylhJma9U]https://www.youtube.com/watch?v=SO6ylhJma9U[/video]
 
Last edited:
I've been obsessed with accurate fin alignment due mostly to NAR competition flying. Long ago I found the very best way to ensure nearly perfect alignment (nothing in this world is ever perfect) is with horizontal fin alignment jig. I have two different size fixtures, one for Micro to BT-60 size. The other will fit BT-5 to BT-101.

I do agree that the double glue joint method is by far the best way to attach TTW and butt on fins.

Personally I don't use TTW on Micro, LPR or MPR models as they are IMHO simply unnecessary. That said any fin alignment jig or fixture that ensures correct alignment would be well worth the time and trouble to build or buy.

Speaking of buying a fin alignment jig the most precision fin alignment fixture is by far the Art Rose precision alignment jig. Expensive yes, but worth every penny.

Lg Fin Jig-g1_4Pic Page 1of2 11-13- 09_rework-11-05-13.jpg

Lg Fin Jig-g2_2Pic Page 2of2 11-13- 09_rework-11-05-13.jpg

MM Fin Alignment Jig-b7_3rd fin on T3 model (no clamp)_02-04-11.jpg

FinJig-a1_Art Rose_3C-690x457_350.00_10-07.jpg

FinJig-a3_Art Rose_Crop2-279x201_10-07.jpg
 
"Oops, got carried away!

babble......-off-"

I have heard the masters can do that mid-babble. I can't, but oh, the power and self control the masters have.
 
I agree with Jadebox.

A Rocket that rolls or twists during flight is garbage and should not even fly.
...
I always laugh when I see other folks videos and see their rockets twist during flight, but they are still so proud of their rocket.:facepalm:
It's like, "Yeah, it flies, but you totally screwed up the fins, so you should actually feel like a complete failure right now."
[video=youtube_share;guBUP5zGmm8]https://youtu.be/guBUP5zGmm8[/video]

You know, I had been super proud of my first MPR build but now I feel like a complete failure. I should just burn all my rockets and go do something else.

Wait, no. I'm gonna be fine. But seriously, consider taking it down a notch. Everyone was a beginner once.
 
Last edited:
[video=youtube_share;guBUP5zGmm8]https://youtu.be/guBUP5zGmm8[/video]

You know, I had been super proud of my first MPR build but now I feel like a complete failure. I should just burn all my rockets and go do something else.

Wait, no. I'm gonna be fine. But seriously, consider taking it down a notch. Everyone was a beginner once.

Fair enough.

I have a TLP Indigo that I will be flying soon, and I think it might twist during flight, as one of the fins gave me trouble, and cured ever so slightly tilted. It was straight as it dried, or so I thought, but in my quest to build light, I used the double glue method, and when I was looking at it a few days later I noticed it had tilted. I should have left the jig on for a couple days instead of one. Humidity may have played a role as I used wood glue.
I'll get a video anyhow, so I guess we'll see what happens.
It obviously is not as big of a deal as I made it out to be, but to me, it is still very important.
We're each entitled to our own views on the subject.:)
 
Hey K'Tesh, PLEASE ADD THIS to your notes here:
When you're working in and around the fillets, it's easy to get glue on the outside of the MMT and inside of the BT. IF YOU'RE NOT CAREFUL, you end up with lumps that have to be sanded/cut away for the CR and motor retainer to fit. You don't want this to happen.

Added:

When you're working in and around the fillets, take care to only get the glue on the parts of the MMT and the BT that you want. IF YOU'RE NOT CAREFUL, you may end up with lumps that have to be sanded/cut away for the CR and motor retainer to fit, adding to the work you need to do.
 
Don't pre-slotted tubes prevent roll? They kind of guarantee the fins are aligned along the length of the rocket. Isn't fin tilt almost entirely cosmetic at that point?
 
Don't pre-slotted tubes prevent roll? They kind of guarantee the fins are aligned along the length of the rocket. Isn't fin tilt almost entirely cosmetic at that point?

Not totally, because the apparent wind the rocket feels isn't necessarily straight down the rocket. There probably will be some angle of attack. At an angle, a crooked fin, as opposed to a canted one, will present more of a surface to the air on one side than the other in the roll direction. As an illustration assume the angle of attack is 90 degrees -- perpendicular to the rocket -- and consider what a crooked fin would do.

-- Roger
 
If your rocket spins on the way up, just say it's "roll stabilization"

I have noticed while building my Phoenix Bird that for example, if the slots are too narrow and you sand the slots for a better fit, you can accidentally sand them out of alignment and have canted fins.
 
Don't pre-slotted tubes prevent roll? They kind of guarantee the fins are aligned along the length of the rocket. Isn't fin tilt almost entirely cosmetic at that point?

And also don't forget, even pre-slotted tubes are sometimes not perfect, and even their straightness must be verified before a build.
There have been PS tubes where the slots are slightly to wide, and PS tube where they were slightly off perfect according to some threads I've read here.
 
Back
Top