Estes V-2 # 3228 Build Log

The Rocketry Forum

Help Support The Rocketry Forum:

This site may earn a commission from merchant affiliate links, including eBay, Amazon, and others.

wagondriver42

Well-Known Member
Joined
Mar 7, 2014
Messages
107
Reaction score
0
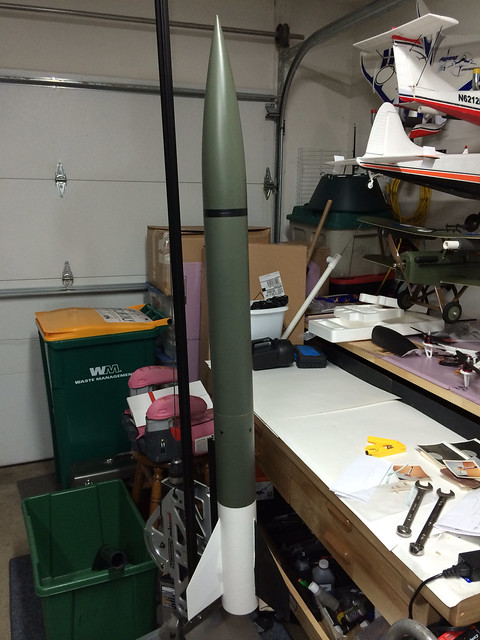
Time for another V-2, this one an actual kit. Got everything out of the package last night. I was super surprised to see that one of the balse sheets containing the fins tapers from 3/32 to 1/16 length and width wise. So I need to cut two new fins, not happy but thats life. I also trimmed the plastic of the lower motor section cone. More to follow :D

IMG_20140510_144538.jpg

IMG_20140510_144527.jpg

IMG_20140510_144600.jpg

IMG_20140510_144635.jpg
 
Well I have cut out the two replacement fins, the Estes fins on the left, my fins on the right, and assembled the motor/stuffing tube. Time to go make some dinner, spend some time with the wife, then I'll get back to the build later on tonight.
IMG_20140510_173238.jpgIMG_20140510_173312.jpg
 
OK after I made myself feel good and fat, (mmmmmmm nachos) I got some more accomplished. I got the motor/stuffing tube mounted in the BT, got the fillets done, and mounted the lower fin section to the BT. Gonna let the Testors red tube set up for an hour or so and get to mounting the fins.
IMG_20140510_200954.jpgIMG_20140510_201002.jpgIMG_20140510_202534.jpg
 
Last update for today. The V-2 is essentially "built." Fins are on, and have had 2 fillets applied so far. I have sanded down the seam lines in the nose cone and applied some Rust-Oleum build primer to fill in the small imperfections in the seams. And have attached the launch lugs. I'm hoping to get the fins sealed/filled and primed tomorrow, but I may be pushin my luck.
IMG_20140511_001423.jpgIMG_20140511_001437.jpg
 
Last update for today. The V-2 is essentially "built." Fins are on, and have had 2 fillets applied so far. I have sanded down the seam lines in the nose cone and applied some Rust-Oleum build primer to fill in the small imperfections in the seams. And have attached the launch lugs. I'm hoping to get the fins sealed/filled and primed tomorrow, but I may be pushin my luck.
View attachment 171690View attachment 171691


Looking good!

What did you use to fillet the fins? I'm never sure what to use that will stick to both plastic and wood and be easy to shape.
 
Im actually using the testors red tube. Testors must have changed the formulation for the glue, it is much thinner and alot less "stringy" than it used to be. Or I got a weird tube lol. But it doesnt stick and string like the old testors red tube did. So I just rolled with it. I might go over it with some light glaze and sand it to make it look a little nicer depends on how the fillets look once Im done.
 
Last edited:
Sounds good. I used the Testors too, which was fine functionally for bonding to both the fin and the tail cone. But it wasn't very good for making a nice looking fillet. The Bondo spot and glazing putty will make a nice looking fillet. One thing I find that makes that stuff easier to spread is to make a less slick surface by spraying on some filler primer and adding the Bondo before sanding. The Bondo spreads on the rough filler primer surface pretty well.
 
Got a little more accomplished not much. I kinda cheated for the fillets. After 2 layers of Testors red tube, I scuffed the fin root with 100 grit, and applied another fillet of glue all. Hopefully scuffing the surface up good will promote adhesion. Im going to seal the fins now before bed and that will be it today. No pics this time. Pretty much looks the same as last night lol.
 
I have the fins all sealed. Time to start sinding and then get a coat of build primer on. Then it gets to set for 2 days so the primer is good and dry and doesnt load up on my sand paper.
 
I havent quite decided yet, its between the Estes suggestion being the classic yellow/black paint scheme, or i may do german camo with my air brush. tough choice lol
 
I havent quite decided yet, its between the Estes suggestion being the classic yellow/black paint scheme, or i may do german camo with my air brush. tough choice lol
To make it tougher, have a look here:
https://www.v2rocket.com/start/makeup/markings.html

There you will find various German markings including several camo variants. The most commonly used camo version, Ragged Camouflage 2, may not need an air brush but will require masking tape as the borders between colours are sharp.

Black-and White later field test is actually mostly green with a black and white tail unit. Not many people use this scheme so if you paint your model this way then it will be distinctive, not just another yellow and black one. :)

Another alternative is the pinstripe colour scheme on some V2's used in the US as sounding rockets:
https://en.wikipedia.org/wiki/File:V-2_White_Sands.jpg
 
Now I am seriosly leaning towards the field test paint scheme, A. I already have all those colors in flat paint, B. Its unique, C. Its a little simpler to paint lol
 
Well I have accomplished at least a little more on this build. First coat of primer has been sanded down and the second coat applied. So far so good. The fillets came out pretty good. I cant complain for not putting a whole lot of time into them. So tomorrow the nose cone will get painted OD, and 2 fins flat black. Then its the waiting game again, but I can finish up my D-Region Tomahawk in the interim.
IMG_20140515_021303.jpgIMG_20140515_021326.jpgv2field.gif
 
Last edited:
Progress has been made! lol I laid down the black on two fins the other day, so tonight I was able to mask off the black areas and shoot the olive drab on the body, the nose cone I finished yesterday and applied the two decals today, one is the stock Estes ring, the other is my own little touch. More proof the transformers were here long ago lmao (sorry Im a big kid and have always loved the transformers lol) Tomorrow I hope I can get it masked off and get the white laid down. After its dry I will add the small black stripes give it a day and flat clear the whole assembly.
IMG_20140518_012421.jpgIMG_20140518_012436.jpg
 
( note to self do NOT allow small children to play in my office)
 
Last edited:
Its alive...ITS ALIIIIVE!!!!!!!!!! MWUAHAHAHAHAHAHA!!!! Ich freue mich, an den Führer zu berichten dass der V-2-Rakete ist jetzt abgeschlossen!

IMG_5560.JPG

IMG_5561.JPG

IMG_5562.JPG
 
Last edited:
New body tube, and lots and lots of sanding lol, and I had to replace a fin. But after a little contemplation and a lot of work, I got it back to snuff so to speak :) Thanks for the compliments gents :)
 
I kitbashed mine into another V-2 Blossom using Peter Alway's Scale Bash plans. Requires longer airframe, fin upgrades (those provided are semi-scale), nose ballast and toothpick for nose probe. A good flyer. I lost the first one during a demo on a D12-5, so C11-3 works for smaller field operations.

Carhart Bibs 004.jpg
 
Last edited:
Thanks guys, and Crash, you caught me lol, its a temporary fix to a permanent problem. I have an actual small booth drawn up I just need to stop building rockets and build a decent booth lol.
 
Actually, I've had great success with a box fan spray booth. I built a cardboard shroud around the fan to catch lateral overspray and I mounted a couple of cheap air filters to the outside of the fan casing to catch paint pulled toward the fan blades. I'd still recommend wearing a respirator but when set on high the fan pulls all extra aerosols into the filters. My wife, a chemist, calls it my redneck laminar flow hood.
 
Last edited:
Its alive...ITS ALIIIIVE!!!!!!!!!! MWUAHAHAHAHAHAHA!!!! Ich freue mich, an den Führer zu berichten dass der V-2-Rakete ist jetzt abgeschlossen!

Hey,, that looks familiar,, oh yeah,,, I modeled my G-Force like that because I wanted a V2 color scheme. I used the exact same reference photo you did in post#14 because I liked it the minute I saw it. Mines not exact like yours because I have no stripe on the fin can and only one black fin.

Your V2 looks great.

Ed

 
What altitude are you hitting with the stretched airframe and a C11? Not all the Blossom rounds were longer - but I bought the tubing from BMS to stretch my V-2 when it finally makes it off the pile and onto the workbench.
 
Back
Top