Vacuum Bagged Foam Core Wings

The Rocketry Forum

Help Support The Rocketry Forum:

This site may earn a commission from merchant affiliate links, including eBay, Amazon, and others.

TheAviator

Well-Known Member
Joined
Jan 18, 2009
Messages
935
Reaction score
122
Getting back on the actual building horse a little, so Bob and I made a couple of small foam core wings to get some practice. This is the fourth set of wings I've made this way, and it definitely gets easier as you go. Anyways, on to some specifics.

I don't have any pictures of the core-cutting process, but the foam cores were made using a drop-weight hot wire cutter. We tried to make 3 sets of cores, but ended up with only one full set of usable cores and one extra set of tip cores. Rather than having the tip cores just sit around, we decided to use them for practice with some new techniques.

First new technique that we were working on is using a live kevlar hinge. Normally, it is necessary to cut the wing apart and face the flaps before you lay everything up, but I wanted to try it this way, and if necessary I will post-face the flaps. You can see me peeling off the waxed paper we used as a transfer with 3M77 spray adhesive.

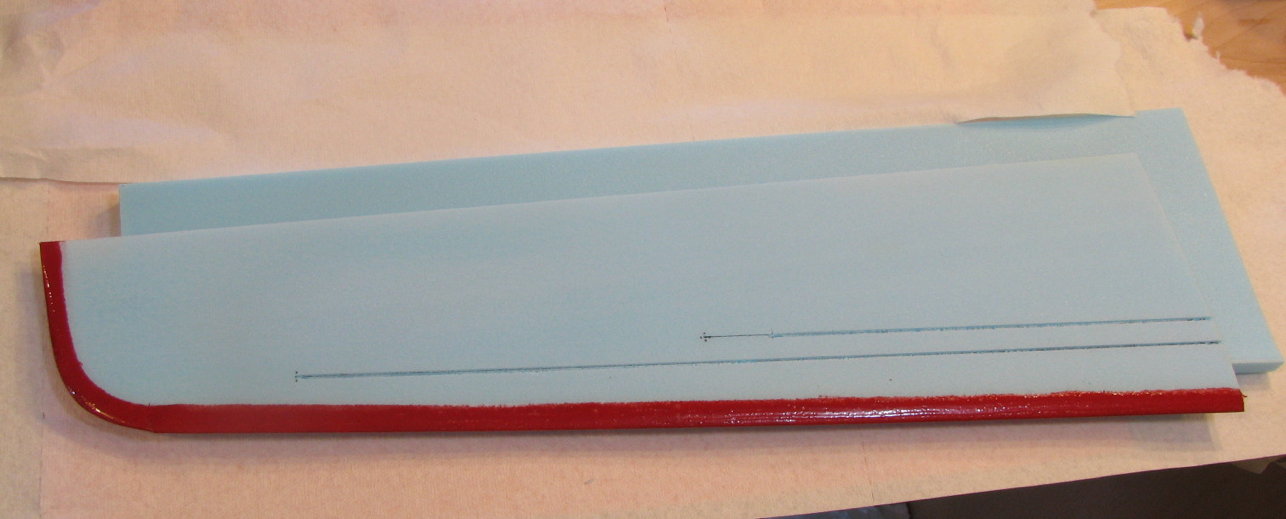
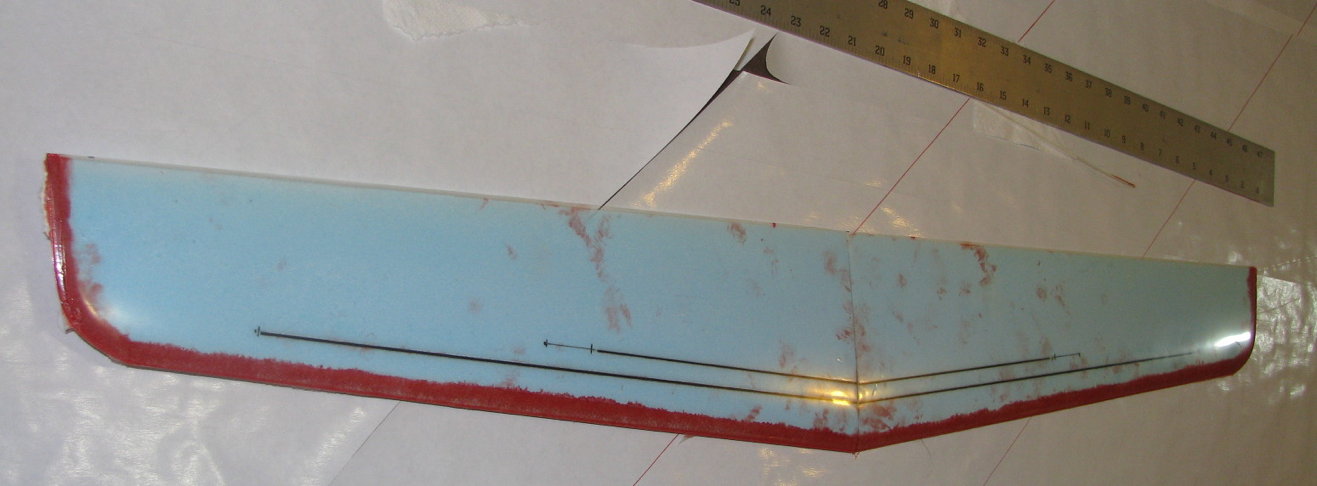
Using the same waxed paper/3M77 technique, we laminated a layer of kevlar and .75oz fiberglass, both on the bias, for the leading edge. Using the wondrous properties of composite cloth, we were able to work the strip around the leading edge, and, with a fair amount of effort, get it to lay flat around the compound curve tips.

To get a little color on the wings, a very light coat of regular Krylon paint was sprayed on the release films. This was allowed to dry, and the the films were 3M77'ed to .75oz fiberglass cloth, which was cut out in the same shape as the release film.

Finally, all of the cloth was wet out with laminating epoxy resin. The leading edge and hinge were wet out with an acid brush, and a small paint roller was used on the skins. We laid the skins over the foam cores with a healthy overlap with the leading edge. Everything was slid into the vacuum bag with some breather. We applied vacuum and weighted the wings between the foam shucks to keep everything straight.

I've attached pictures of the process. I didn't get anything while we were using epoxy, as there were no free hands. The final, untrimmed/unsanded wings weight 14.7g total. It'll probably drop sub-14g trimmed and sanded.

Bob_F_02151407.jpg

Bob_F_02151407_1.jpg

Bob_F_02151429.jpg

Bob_F_02151521.jpg

Bob_F_02152100.jpg

Bob_F_02171349.jpg

Bob_F_02171354.jpg

Bob_F_02171358.jpg
 
Nice looking work! Why did you choose Kevlar for the skin lamination?

Actually, the skins are .75oz fiberglass. Kevlar is only used as the hinge material and the leading edge. Admittedly, for a wing this size the kevlar leading edge is probably overkill, but we wanted to practice for sets of full 1.2m wings without possibly wasting kevlar. As for the hinge, using kevlar is pretty standard in the R/C community. It is a little heavier, but it makes a much tougher and longer lasting hinge than fiberglass. I know people have also used nylon peel-ply as a hinge, but I haven't tried that myself.
 
Nice. :D

You could cut an inch or so off the root and use them for the horizontal stab. Please continue to post, I'm about to cut templates for a S8E wing soon and your posting adds incentive. :headbang:


Richard
 
It is nice to see pics of composite wings being made up.

I had not made truly 100% composite wings until 2012, after learning from Herb (Keith) Vinyard. What I had not expected were all the prep steps. Hours of preparing and preparing. And then finally, the madness of the hour or so once the epoxy is mixed and the layup is done and into the bag and the bag is sealed, vacuum on…. and finally take it easy while it spends a couple of days fully curing (I made up a "hot box" out of 3/4" foam , heated to 120-125 degrees by two 60 watt light bulbs).

Here's a couple of pics from my first foam/glass/graphite wing, a Raven-10 wing for S8D. I first mixed up a little bit of epoxy to apply to the leading edge by brush. I use red dye to help show me the epoxy coverage.

YvzF5jV.jpg


Then I set them aside to mix the rest of the epoxy, roll epoxy onto the waxed mylars, lay the fiberglass cloth in place, roller them down to assure full epoxy coverage, lay all the graphite reinforcement rods (spars) into a long pool of epoxy on wax paper to cover them with epoxy, and so on. Finally getting one of the wing cores, laying the graphite rods into place on one side, lay onto one of the laid-up mylars, apply the other two graphite rods, flip the other laid up mylar over into place, then tape the mylars (already were taped along the trailing edge, like a hinge) to each other in a few spots, lay into the vac bag, making sure the breather felt is in place, close the bag, pull a partial vacuum, lay the foam beds into place top and bottom, apply weights on top of the beds, and pull the full vacuum.

14ly8RQ.jpg


BTW - since that was the first wing, I learned the hard way not to let my fingers (wore gloves) touch the leading edges after the epoxy was applied. There were some smudges on the rest of the wing, from the red dyed epoxy that had gotten onto the gloves. No effect on performance, just appearance. But that was turned into a plus when it came time to name the model, "Smudgie"

For years before, my vac-bagging had first begun with white foam cores and balsa skins. Then for smaller gliders, I used meat tray type foam and vac-bagged them with Japanese tissue. The tissue had epoxy squeegeed onto it, then squeegeed off so the tissue was only damp with epoxy. I found that certain "sheet protectors" (the kind that hold paper inside, for a 3-ring binder) plastic did not bond to the epoxy, so the epoxy-damp tissue was laid onto that and it was used like waxed mylars are used with "real" composite layups.

Two years ago, before making the first Raven-10 wings with a fiberglass and graphite rods, I again used the epoxy-tissue method to make up some 24" span wings for B Boost Glide models. It did not require as much prep work as for the all composite wings, and the tissue was strong enough (Well, I did use two layers of tissue). Main improvement from the meat tray foam wings was that those wings used pre-cut foam cores. The Spyder foam cores were the first I had ever used, so I had some learning to do about sanding the raw cores to be smoother, removing the dust, and using waxed mylars for the first time. A good learning step before moving up to the Raven-10 fully composite wings.

Attached pics below are of the hot box mentioned earlier.

- George Gassaway

IMG_3337.jpg

IMG_3336.jpg

IMG_3340.jpg
 
Last edited:
Looking good! Bob and I just finished putting another set of wings in the vac bag this afternoon. Time was a little shorter, so no process pics, but I do have a pic after it went in the bag. We used a 1.7oz Kevlar leading edge for a little more ding resistance and there is a Kevlar hinge at the 70% chord location. Again, Krylon spray paint top and bottom on the mylars. Black all across the bottom, fluorescent orange on the top tips. Still working on getting the leading edge perfect, but it should be passable.

downsize.jpg
 
Do you get any washin or washout [twist or warp] as I see they are free standing [or laying] and not held down during curing?


Richard
 
Do you get any washin or washout [twist or warp] as I see they are free standing [or laying] and not held down during curing?


Richard

They are laying in the bottom shucks in the picture. After this was taken, we placed the top cores on top and then weighted them down.
 
Do you get any washin or washout [twist or warp] as I see they are free standing [or laying] and not held down during curing?

I'll add to Brian's reply, that sometimes when the cores are cut, there is washout cut into them (Washout is that the wing has a degree or two of negative angle of attack at the tip compared to the root. So when flying, the wingtips will not stall early, the center part of the wing will stall first. Tip-stalling is bad).

So then when later the bagged wings are laid onto the core beds (shucks), and the top of the beds put in place and weighted down, then the wing cures to whatever amount of washout was cut into the cores (which might be zero washout, depends on the decision made for cutting the cores).

If you ever have a model without washout, and it tip-stalls, try this. Add some turbulator strips (google it) for the last 6 inches of the span, at the tips. The turbulator strips will delay stalling. It increases drag a little bit, but if it tip stalls then it is worth it to fix the tip stalling. For turbulator strips, I often just use some electric tape, or vinyl tape, cut 1/8" to 3/16" wide, placed at 25% back from the leading edge. The thickness of the tape is sufficient to act as a turbulator, which thinner tape won't tend to do so well. Sometimes when I have wanted to use a specific color, like yellow, I have used trim Monokote built up three layers thick, then cut to the final width.

- George Gassaway
 
In the picture it looks like they are being bagged without thats why I asked. Good tip George on the turbulators to remedy tip stalling!


Richard
 
Bob sent me a little teaser last night, so I pass it on to you all.

Bob95F9503042121.jpg
 
Here's the wings we made last weekend. Came out at 39g and 40g, so they're balanced out pretty well. This is untrimmed and unjoined, so will probably build out to ~80g before servos. Surface finish is good, need a little work to clean the leading edge and cut the flapperons free. Will post more as I build more, probably in a separate thread.

DSC_0172_Reduced.jpg

DSC_0175_Reduced.jpg
 
Back
Top