Estes D-Region Tomahawk blunders? Messy finishes? Accident waiting to happen?

The Rocketry Forum

Help Support The Rocketry Forum:

This site may earn a commission from merchant affiliate links, including eBay, Amazon, and others.

K'Tesh

.....OpenRocket's ..... "Chuck Norris"
TRF Supporter
Joined
Mar 27, 2013
Messages
22,537
Reaction score
14,950
I've yet to get my hands on my D-Region Tomahawk (2 on order) but in reading Estes' instructions online, I found these instructions that make me feel like this is going to be a mess, and perhaps be unsafe even.

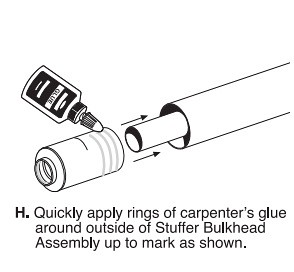
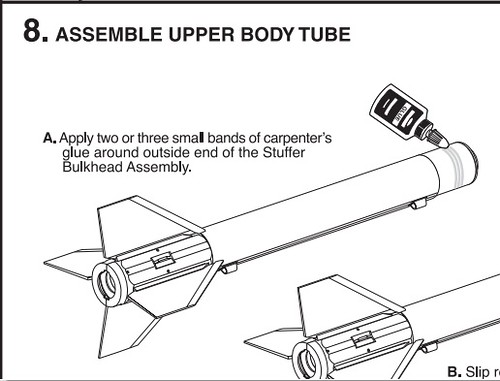
I've discovered in the past that a great way to mess up a build is by putting glue on the outside of something that slips inside of another. It pushes glue out (potentially onto your hand), and can mess up a finish. These are Steps "4H", and "8A".


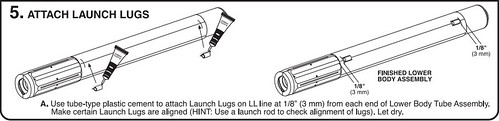
As for the Launch Lugs, tube-type plastic cement is a solvent dissolved into a plastic matrix. Upon application, it is designed to dissolve the surface of the part slightly, melting it, then the solvent evaporates off leaving a welded joint, or (such as on the inside of cardboard tubes) it will melt a plastic part slightly while absorbing a little into the rough cardboard surface before it sets. If the launch lugs, and outer body tube surface, are typical of Estes' products, they're not made from something that will react to (and thus bond with) the tube-type plastic cement given in the instructions. This is found in step "5"


Should the glue bonds fail under the stress of an E9-4 launch, that could cause the rocket to careen off course possibly into people (causing injury), or property (causing damage (to the rocket at least)). My Estes Gemini Titan (1978) kit lost much of it's plastic surface detail to the cement not bonding to the body tube (and it never flew once).

Feedback appreciated.
Jim
 
Last edited:
I don't see wheere the wood glue on the couplers is anything new. Personally, I would put it on the inside of the BT if possible, but there may be a reason they suggest putting it on the OD of the coupler.
The glue for the launch lugs is another issue. I build mine a couple years ago, and yes, one of the lugs recently fell off (not during a flight, thankfully). You may want to rough the surface of the plastic part and use some medium CA instead of the suggested plastic cement.

One thing, make sure you was the plastic parts well in hot soapy water. I did not and have had a bear of a time keeping the fins on. This last round I used Tenex7, it seems to be holding well.

It is a great kit, under powered, but fun. There is an article in the ether of the web that discusses building it for 29mm motors. I highly recommend that you consider it. I have another in the build pile and it will be upgraded during the build.

So, I'm gathering from your post, that the LL's are plastic parts, and not the typical LL material? If they are falling off (and the fins TOO!) that seems rather alarming. Surely Estes could come up with a better set of instructions/product recommendations for assembly.

I wonder, would CA be the solution to the LL issue? or is there something better?
 
Last edited:
It has EVERYTHING to do with your adhesive. T-Rex said he used Tenax7, is that even available anymore? I used Plastruct which I was able to find (after cleaning off the residue from the tube type cement). I also substituted 'regular' launch lug material for the plastic. Of course, YMMV.
 
I did a 29mm conversion on mine with custom CRs, stuffer tube and retainer . Had bought plastiweld as recommended but it didn't work well for me.

Ended up using PlastiZap for the fin can and fins .. solid .

Used 1 of the pair of ACME Conformal Rail Guides cut in half on this also - looked and worked great .

Best flight I had was on a F35W , until I missed the ejection charge and it lawndarted in - debating on weather to rebuild or just build another.

Was thinking if building new would go 24mm since that is all I flew in it anyway , but the advent of the 29mm Estes and the new AT G25 are both a good fit for this .

Kenny
 
Well, if you are curious to try one, now is the time. Estes has them on sale for $5.49, with free shipping if you spend more than $25. https://www.estesrockets.com/rockets/specials/002037-d-region-tomahawktm

From the OPP:

I've yet to get my hands on my D-Region Tomahawk (2 on order)...

Dave,

My concern is, if I (or anyone else) was to build it as per the instructions, I'd end up with a poorly finished (due to glue mess), unsafe-to-fly rocket.

IMHO, the instructions should be changed to reflect building techniques that would result in a clean, well finished, safe rocket. Thus the gluing instructions for the coupler should be altered, and a better surface prep and glue choices be made for the LL (and fins) installation.

Jim
 
Last edited:
These concerns would indeed appear to be correct.
I have a D Region, and after just one flight, while the rocket was on the pad, one launch lug broke off. The kit was built entirely stock, and the adhesives, as described in the instructions, were used. I also had the lower, corrugated body tube section slide out from the cardboard tube after normal handling. I remeadied both issues with a bit of CA, and have not had any issues since, despite a flight on an F39T.
 
I had a D-Region Tomahawk back in the 80s'. I think it looks like they have changed the Design.
I remember I had at least 30 good Flights, and then one day it just went up into the Fog and never came Down.
 
This kit can be built stock and will stay together just fine, including the lugs. I've popped 1 fin with over a dozen flights, and that was from landing on a hard surface. If the fin hadn't popped, it probably would have fractured. Don't fly it with a D12-5 unless you like a little suspense in your flights! And it is one of the best Estes kits for ease of finishing. Mine came out very nice with little effort. Having said that, there are certainly opportunities for utilizing advanced adhesives to beef it up. I found some Tenax7 at a local hobby shop that I'm going to try next time.

I would not consider this rocket to be either poorly finished or unsafe when built stock.

Cheers,
Michael
 
They are back, as are most of the other kits!

Cheers,
Michael

Geez.. grabbed another and another Xarconian Cruiser and a couple of good Probes - they gave me $9.50 in bonus points too that I cashed in .

Will be rebuilding soon!

Kenny
 
My daughter and I built one last winter and modified it to fly on RMS 24/40 using a Rocketarium 24mm retainer. It flies OK on BP but is a much better flyer with 24/40 E and F. We found the perfect engine to be a F24-7W. We did add fillets using use some clear epoxy because of reports of fins popping off after a hard landing. It has held together well and is a great flier. We also used some Ambroid Pro Weld when we glued the two fin body halves together. All other gluing was per instructions using Titebond III. Also added 1/8 Kevlar. If you want details for the modification let me know. For less than $6 you can't really go wrong.

IMG_0708.jpgIMG_0710.jpgIMG_0716.jpg
 
Last edited:
I like how they fly on E9s and don't think they're underpowered at all on 24 mm composite. It's a miracle I haven't lost mine yet.
 
I had a D-Region Tomahawk back in the 80s'. I think it looks like they have changed the Design.
I remember I had at least 30 good Flights, and then one day it just went up into the Fog and never came Down.

And that was one of my 80s Builds, so it likely had Fuzzy Fins and all the other Craptastic Details, but I remember it with great Pride as I got so many Flights out of it.
 
My daughter and I built one last winter and modified it to fly on RMS 24/40 using a Rocketarium 24mm retainer. It flies OK on BP but is a much better flyer with 24/40 E and F. We found the perfect engine to be a F24-7W. We did add fillets using use some clear epoxy because of reports of fins popping off after a hard landing. It has held together well and is a great flier. We also used some Ambroid Pro Weld when we glued the two fin body halves together. All other gluing was per instructions using Titebond III. Also added 1/8 Kevlar. If you want details for the modification let me know. For less than $6 you can't really go wrong.

View attachment 156569View attachment 156570View attachment 156571

Yup'. It is most definitely not the 1980s Version. I don't recognize any of that stuff.
 
My daughter and I built one last winter and modified it to fly on RMS 24/40 using a Rocketarium 24mm retainer. It flies OK on BP but is a much better flyer with 24/40 E and F. We found the perfect engine to be a F24-7W. We did add fillets using use some clear epoxy because of reports of fins popping off after a hard landing. It has held together well and is a great flier. We also used some Ambroid Pro Weld when we glued the two fin body halves together. All other gluing was per instructions using Titebond III. Also added 1/8 Kevlar. If you want details for the modification let me know. For less than $6 you can't really go wrong.

Where/how did you attach the Kevlar? I'm going to build one of these myself, and replacing the supplied shock cord is at the top of the list of modifications.
 
First, we used epoxy and some lightweight cardboard (in place of the Estes paper) and mounted the kevlar on the BT. We punched three small holes in the cardboard to weave the kevlar through (instead of the tri-fold). Next, we drilled a hole in the top plastic centering ring that fits in the coupler. After inserting the motor mount we wrapped the kevlar around the motor mount and put a figure-8 knot in the kevlar.

The following photos should give you some idea of what we did. Might not be the best way but it has worked so far.

IMG_0721.jpgIMG_0720.jpg
IMG_0715.jpg
 
Nice mod, thanks for the pics. I plan to do something similar. With the attachment point so low, that'll keep it from interfering with smooth parachute deployment.
 
I'm thinking about modifying one of my D-Region Tomahawk kits for 29mm motors. Does anyone have a RockSim file for this kit? Or does anyone know where to get couplers for this (apparently) non-standard BT?

Thanks.

NikeMikey
 
Back
Top