TLP Gabriel III/AS Fins And Build Thread

The Rocketry Forum

Help Support The Rocketry Forum:

This site may earn a commission from merchant affiliate links, including eBay, Amazon, and others.
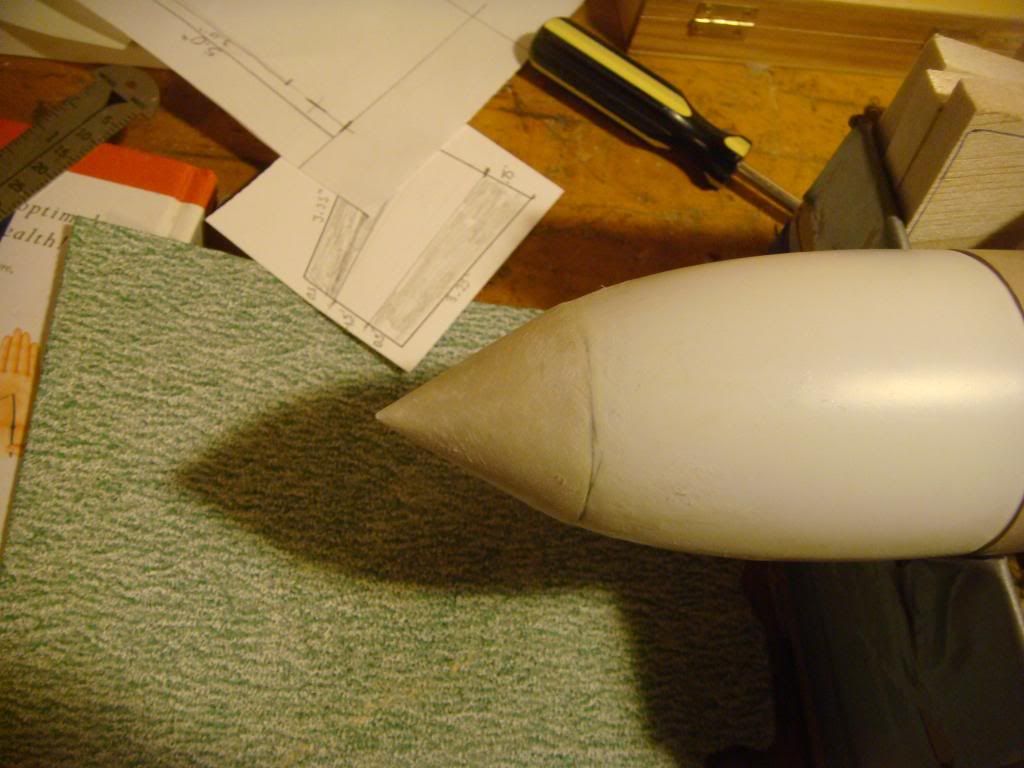
I had to do SOMETHING to the Rocket, so since I can't make a Pinching Grip with my Right Hand, I made an Emery Board with Basswood and 60 Grit Sandpaper to begin the Process of eroding the "Paper Hat" and cutting down the Ridge between it and the Plastic Nose Cone. I am happy to report there are no Bubbles or Voids in my now cured Nose Cone Tip. I could only do so much before my Hand hurt too bad, but it's looking good and I'm confident I can make it perfect eventually.:

 
My Armor Peircing "Paper Hat". Not that there's any Paper left. She's pure 100% PC Superpoxy. I'm lovin' it, and it still needs a little fine tuning.

 
Here's what it looks like on the inside. I opened up the Hole in the Plastic Cone to a little over 1/4", and after pressing Paper Hat filled with Poxy' on, used a long stick to spread it around on the inside.:

 
Just ordered my Tail Cone from Mad Cow. I was going to wait til' Friday, but it's not included in their BF Sale, so I figure first come first served, and I would hate to be at the Tail End of a Bunch of Black Friday Orders which their Site claims that due to Black Friday Orders will take longer to ship. So, instead of "Black Friday" I'll have "Tail Cone Turkey Day".


"Oh noes! it's too heavy for a TLP Kit!" cry the Naysayers.:facepalm:
 
Last edited:
I'm building the original Cardstock Paper Tail Cone Assembly just for Giggles, but it's kind of an aside to this ACTUAL Build, but if anyone is interested in my Technique for filling the Tail Cone with CA and Cotton, or filling the Tail Cone with Epoxy, (I'm going to make 2), let me know via PM, as these are untested Methods, and I'm not proud enough of my Practice Exercises to add them to this thread in a Build Fashion. I will Post Pics of the finished Products though, as I'm sure those will look fine. I have a very steady Hand with a Hobby Knife. Interesting considering I stay awake for days at a time. Note the Aero Pack Decal on my Hobby Knife Set Box in the Upper Right. If you have that Sticker you know it is supposed to have a white Backround.:

 
Last edited:
Ok, well, I must admit, the Day is done, and I managed to only spend a few Hours with Family, and my Son is staying at Nanas, so me and my Bottle of Wine will share a Pictoral Adventure of Tail Coney Goodness with you, whether you like it or not. No Tutorial or Dialogue, but since I'm going to catch a buzz tonight, I'm not going to touch the Rocket stuff. I took this series of Photos early this Morning after ordering my Fiberglass Tail Cone from Mad Cow. So, I started around 0300.

I'll shut up now.


Last edited:
I got my Shipping info on the Tail Cone Yesterday. Should be here by Wednesday.
 
I think the nosecone extension and tailcone look perfect ,nice work !

I normally soak my cardstock parts in 20 min. finishing epoxy ,inside and out using a soft flat 1/2" brush (I re-use the brush by washing it in alcohol) this makes the parts pretty durable.

The Madcow tailcone, and all their components are very well made ,you`re gonna like it.

Cheers

Paul T
 
I placed the Order with Stickershock today. Very impressed with the Level of Customer Service so far. I actually made a couple changes throughout the Design Layout, and failed at first to provide adequate Dimensional References, but Mark was Patient with me and came up with exactly what I was looking for.
 
It will look like this.:

ETA: The Tail Cone is going to be Black though.


Artwork: Mark @ Stickershock.
 
Last edited:
That ought' to light up the Sky when launched Vertically. I've come to realize that the reason Rockets have Checkerboards on them is for recording Telemetry/Trajectory/Speed Data Via Camera as Checkerboards show up so well. I have even noticed that certain Warships feature Checkerboards on Static Fixtures next to Missile Pods, with Cameras trained on them. It seems every single Missile Launch is a Big Deal. Rightly so I suppose.
Wish I could find some Pictures of a Gabriel III/AS. Guess I'll have to make some of my own.:wink:
 
Last edited:
In Real Life, this is a Sea Skimmer Missile, that must be set to the Average Wave Height before Launch. That's how Low it Flies.
Talk about Violating the Safety Rules, eh?:lol:
 
Last edited:
Wow! That was fast. Here's my Tail Cone from Mad Cow.:D

 
Last edited:
This is the Hsiung Feng, looks like a Gabriel?:


This one claims to be a Gabriel:


And this one is definitly a Gabriel, but apparently not the III.:


Very Frustrating.

I'm gonna' do the Tail Cone Details on this one. Look Closely at the Pics'. There's a Detail that needs done and looks doable.:)

ETA: Scratch that Idea!
 
Last edited:
I'm gonna' have to order a few more Parts now to make these Versions of the Gabriel and Hsiung Feng Missile.
I scanned the Templates and the Instructions, so I can make as many Paper Molds for the Nose out of Cardstock Prints as I need.
The next Skill Set that I'm intimidated by is the shaping of the Forward Fins, which I look at like Wings. I know they need to be perfect, and I'm working up to them. I need my Belt Sander in Action, and for that, I need the Weather to be decent so I can take the whole Mess out on the Front Porch. I have a small House, and my Workshop is pretty much in my Living Room. I plan on building a Sanding Table, but have'nt yet, so that kinda' thing has to go outside. I've done it inside before, but then I need the Respirator and it makes an awful Mess. Not so young and dumb anymore.
 
I may shorten the Tail Cone, and for future 2.6" Builds, use the BT-80 Nose Cones to make my Tail Cones. This one is Top Notch, but the Dimensions need to be Tweeked, and since it's Fiberglass, this work needs to occur Outdoors. It's Winter here, so that's a pain in the Butt.
Atleast I'm learning a lot about Tail Cone Building.

 
Last edited:
It`s always nice to get a package from Mark !

Also, Gordon (Excelsior) has a very nice line of waterslides for TLP kits


Paul t
 
It`s always nice to get a package from Mark !

Also, Gordon (Excelsior) has a very nice line of waterslides for TLP kits


Paul t

Mark was great to work with! I revised the design a couple of times, but he was patient with me and came up with a killer Scheme. It'll be an Honor to fly his Graphics on this Bird.
Oh, and I've ordered from Gordon in the Past and he is Top Notch too. Just make sure you are good at using Waterslides and know what you need to apply them properly.
Also today I picked up some of that Bondo Glazing & Spot Putty that seems to work so good for you Paul.

 
Last edited:
Got some sanding done on the Spirals that I filled with the Bondo Putty this morning.
 
Got my Nose Weight in. I used Bamboo Skewers for the Retaining Crossmembers. The Epoxy is more PC Superpoxy. It will dry overnight, then I'll finish sanding the outside of it and install the Bulkhead.

 
Looking good!
I came close to getting this one instead of the Martel. Might have to pick
one up at a later date!

JP
 
Made my Nose Cone Bulkhead from 2 Pieces of Plywood and a Core of 1/2" Balsa.
I used the Rotary Tool as an Improvised Lathe to turn the Disc to the Proper Dimensions against 60 Grit Sandpaper. Worked Perfectly!!!:)


Dry Fit. I'll Epoxy it later, and use some Bamboo Skewer to Pin it in Place.


Ever since I got my Scale, I've made a Habit of weighing every Component so I can do Sims accurately.

 
After roughing up the Mating Surfaces, I installed the Bulkhead with 15 Minute Epoxy. When it was dry, I drilled a hole on either side, and into the Bulkhead itself to a depth of 3/4". Then, on my Drill Press, used as a Lathe, I turned down some Bamboo Skewer to make "Pins" and get a precision Fit. No Epoxy would be needed here, as this was a Job for Titebond III.
When I think the Glue is dry, I'll sand the Protruding Pins flush.
This Bulkhead is Bulletproof.


:)
 
Tonight, I will attempt to build the Motor Mount/Tail Cone Assembly. The Mad Cow Tail Cone is nice and all, but it is only round where it meets the Body Tube. The Tail end of it is more of an Oval. This presents me with a unique challenge. I'm going to go ahead and try to make it work, but if it does'nt come out looking good, I'll scrap the whole Assembly and build a new one using a chopped up BT-80 Nose Cone. It's a shame that for what I paid for the Tail Cone that it is not perfect, but it appears as if that is just the nature of the Beast being Fiberglass. I'm making a Plywood Centering Ring to force down into the Tail Cone which hopefully will force it into a Round Circle. I may go ahead and use it anyway even if it is not perfect, as long as it is near perfect, as I may be able to sand and fill it to look right.
If I have to build another MMT/TC Assembly, it won't happen for awhile as I have no Budget for Rocket stuff right now.
 
Update:
I just went outside and sanded the $%^& out of the inside of the Tail Cone, to eliminate the high spots and make it more plyable. Perhaps that is what you are supposed to do with Fiberglass Tail Cones? This is my first time working with Fiberglass anything.
Anyway, it seems now as if my Centering Ring will make it round enough for my liking.:)

Next time I need a Tail Cone, I'll definitely be going back to using Plastic Nose Cones.
Perhaps this is why TLP sells 4 Packs of BT-80 Nose Cones???
 
Back
Top