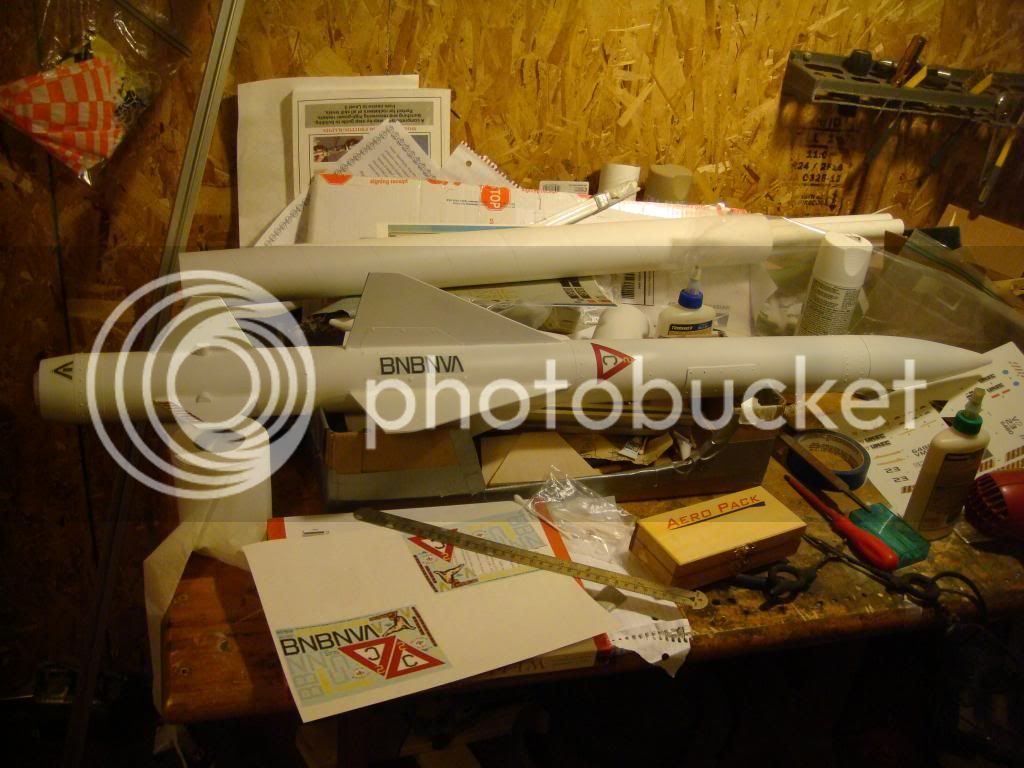
Decals and other delights (Clear Coating, etc)

The Rocketry Forum

Help Support The Rocketry Forum:

This site may earn a commission from merchant affiliate links, including eBay, Amazon, and others.

Kirk G

Well-Known Member
Joined
Jan 9, 2012
Messages
1,326
Reaction score
1
I'm certain this topic has come up before, but please share your knowledge with a new rocketeer...

Many kits have a few decals to apply. Some are waterslide, some are self-stick, and some require rubbing or additional gluing. (Are there additional types?)

I would imagine that there are some that require you "clear coat" the paint surface BEFORE applying the decals.... and others that can take the "clear coat" over top of the decals... as the final step.
But the worst case would be to apply the decals, spray the clear coat overtop, and then discover that the decals are shrinking, curling or shriveling...and that you've just ruined your rocket's appearance!

Can anyone give us a thumbnail's rundown on the differences, or how you approach this? Is there a rule of thumb on how to (or NOT to) apply decals? :confused:

Thanks much!
 
For water-slide decals you want to apply them on a glossy surface so that they will not silver. You can use a decal setting solution to make sure they conform to the surface. Once dried, then you can over cote the decals with a clear gloss or flat per your preference.

For self-adhesive, cut close the the sticker removing much of the clear part of the sticker. Be careful where you place it on the rocket, replacing the sticker will lift off paint. I usually don't clear cote sickers.

I haven't used dry-rub transfers in a long time, so I don't know if the surface has to be glossy.

Vinyl, see Stckershock's website for instructions on how to apply them
 
It took me a while to google search Stckershock's website, but found something very helpful and informative in two videos posted on a website by StickerShock23.com
Thank you for the lead.
My rockets are Low Power and much smaller, so we're looking at waterslide or stickers.
 
I prefer water-slide decals because you can conform them to compound curves using a decal solvent (as opposed to a decal setting solution—use decal solvent when applying to compound curves; otherwise, decal setting solution is quite sufficient).

IMG_0281.jpg

All decals were printed on a lazer printer to water-slide decal paper. The rocket on the left has not yet been clear coated (it's unfinished). The three on the right have been clear coated with a Rustoleum product. All these rockets are 5+ years old, and the three on the right have been flown a number of times. These are BT-50 and BT-55 based rockets.

The following pictures show decals applies to the glue fillet (decal solvent was used here, too).

IMG_0283.jpgIMG_0286.jpg
 
After shooting the connection between the two body tubes with a shot of gloss white paint again, I got bold and decided to cut the decals and start applying them. I found it was easier to slice the stickers apart and handle them than I had thought.
While some are upset that you can only place the stickers once, I found they came off with a little careful effort, if I had to re-position them. So, with the bottom half finished, and the top half drying, it's going well.
PONG Decals.jpg
I still haven't determined if I'm going to shoot the whole thing with clear coat or not yet. But I probably will.
 
Last edited:
I prefer water-slide decals because you can conform them to compound curves using a decal solvent (as opposed to a decal setting solution—use decal solvent when applying to compound curves; otherwise, decal setting solution is quite sufficient).

View attachment 152642

All decals were printed on a lazer printer to water-slide decal paper. The rocket on the left has not yet been clear coated (it's unfinished). The three on the right have been clear coated with a Rustoleum product. All these rockets are 5+ years old, and the three on the right have been flown a number of times. These are BT-50 and BT-55 based rockets.

The following pictures show decals applies to the glue fillet (decal solvent was used here, too).

View attachment 152643View attachment 152644


Oh by the way doing a curved surface with VINYL decals... can be done.. you just have to use the right material..

StickerBombing-VW-New-Beetle-Cabrio-18.jpg


I have done COMPLETE wraps on Volkswagen's and WORSE.
 
I prefer water-slide decals because you can conform them to compound curves using a decal solvent (as opposed to a decal setting solution—use decal solvent when applying to compound curves; otherwise, decal setting solution is quite sufficient).

View attachment 152642

All decals were printed on a lazer printer to water-slide decal paper. The rocket on the left has not yet been clear coated (it's unfinished). The three on the right have been clear coated with a Rustoleum product. All these rockets are 5+ years old, and the three on the right have been flown a number of times. These are BT-50 and BT-55 based rockets.

The following pictures show decals applies to the glue fillet (decal solvent was used here, too).

View attachment 152643View attachment 152644

Some decals can react badly to the more harsher solvent. It's best to test one first.
 
I still haven't determined if I'm going to shoot the whole thing with clear coat or not yet. But I probably will.

caution: if you have not previously used your current paint with your current clear coat, I recommend you take some scrap balsa and prep and paint it like your fins, then try your clear coat and confirm compatibility. I speak from a bad experience..... SR-71 built and painted and decal-ed. Looked great.:grin::grin::grin:
Clear coated.......total orange peel.
:shock::y::facepalm::sad:

see signature block below
 
Some decals can react badly to the more harsher solvent. It's best to test one first.

Very true!

Proper technique is extremely important, too. You must use a soft brush to deform (stroke) your decal into shape. Use only the tip of the brush. Poke it with your fingers, and you'll probably ruin the job. You also need to work quickly. The decal can only "survive" the solvent for so long. This "trick" requires practice to get it right. In other words, you'll have to "throw away" some decals, before you can do it (so it helps if you can make your own).

Until you've nailed the procedure in practice, don't try it with your "irreplaceable" decals. Having said that, I don't know of any commercial kits that require you to place a decal on a compound curve. So, if you're working with homemade decals, then they should be easy to replace. In fact, I usually create four copies of the canopy-style decal, so can I get a few extra tries in, if I mess things up.

Again, the solvent is only for applying decals onto surfaces having a compound curve. You shouldn't ever need solvent to apply a decal to a body tube, or to apply any kit-provided decals onto their recommended locations.
 
caution: if you have not previously used your current paint with your current clear coat, I recommend you take some scrap balsa and prep and paint it like your fins, then try your clear coat and confirm compatibility. I speak from a bad experience..... SR-71 built and painted and decal-ed. Looked great.:grin::grin::grin:
Clear coated.......total orange peel.
:shock::y::facepalm::sad:

see signature block below

Are you saying the paint layer may pucker like an orange skin?
Or are you saying the decals may curl like an orange skin peel?

I've not experienced any difficulty with the paint compatibility before.....it's the decals that are so critical to the appearance of the ship that has me concerned! I want to make sure I don't ruin them!
 
While some are upset that you can only place the stickers once, I found they came off with a little careful effort, if I had to re-position them..
Note that you can use a mild soap water solution to allow repositioning of stickers. IIRC, AT kits recommend this.
 
Are you saying the paint layer may pucker like an orange skin?
Or are you saying the decals may curl like an orange skin peel?

I've not experienced any difficulty with the paint compatibility before.....it's the decals that are so critical to the appearance of the ship that has me concerned! I want to make sure I don't ruin them!

In my case it was an orange peel of the paint and clear coat combo. But essentially it ruined the decals too. I was a novice and I don't even remember what paint and what clear coat I was using. I suspect they were different brands. Hoping someone with more experience will chime in on advice for clear coating, such as brands and curing time between coats. You may already have the experience. In any case, the decals weren't the issue, except that I probably wouldn't have clear coated had I not used decals at all. You can also do a search for clear coating on TRF.
Your rocket looks great so far!

That's cause you can't see the detail to spot the flaws! LOL!:wink:
 
Note that you can use a mild soap water solution to allow repositioning of stickers. IIRC, AT kits recommend this.

Are you saying that use of mild soap water should be used with self sticker to allow positioning? Or is that for another form of decals?
 

Latest posts

Back
Top