You are using an out of date browser. It may not display this or other websites correctly.
You should upgrade or use an alternative browser.
You should upgrade or use an alternative browser.
Here's My Scratch Build Thread.
- Thread starter TopRamen
- Start date


Help Support The Rocketry Forum:
This site may earn a commission from merchant affiliate
links, including eBay, Amazon, and others.
TopRamen
SA-5
- Joined
- Aug 9, 2013
- Messages
- 9,955
- Reaction score
- 112
I just found out that the thing I made my Fin Can out of is called a "Crafty Carousel", and retails for $29.99:
https://craftycarousel.com/store/product_info.php/products_id/34
That's too bad, because I was going to try to find more if they were cheap and make copies of this Rocket, but there's no way I'm shellin' out $30.
https://craftycarousel.com/store/product_info.php/products_id/34
That's too bad, because I was going to try to find more if they were cheap and make copies of this Rocket, but there's no way I'm shellin' out $30.
TopRamen
SA-5
- Joined
- Aug 9, 2013
- Messages
- 9,955
- Reaction score
- 112
Today I got my Bob Smith 2oz. Super Thin CA, so I can finally begin dealing with the Nose Cone. I tried just a little bit, and it's great and all, but I definitely want to do this outside do to the Vapors, so it will wait for Daylight and nice Weather.
TopRamen
SA-5
- Joined
- Aug 9, 2013
- Messages
- 9,955
- Reaction score
- 112
Holy Crap!!! This Nose Cone is soaking up the Super Thin CA like a Sponge!!!
I've never used Super Thin CA, only the regular Viscosity until now. I hope that the 2oz. Bottle is enough.
I'm taking a break from it, because it was starting to feel ridiculous. I'll lightly sand it and start adding more CA in a little while.
I wore a set of Nitrile Gloves while applying the CA and used the Index Finger of my gloved Right Hand to rub the CA into the Balsa Cone. That seems to be working well as far as getting it applied evenly goes.
I'm still in a state of Shock as to how much the Cone can absorb.
Mr Rocket
Well-Known Member
- Joined
- Mar 23, 2013
- Messages
- 475
- Reaction score
- 29
Very nice! Not sure how I missed this thread until now, but I am glad I found it.
Great attention to detail. I love how you used the cardstock spacers for the rail buttons and then placed the screws on to make them look like just another hatch or reinforcement area.
Great attention to detail. I love how you used the cardstock spacers for the rail buttons and then placed the screws on to make them look like just another hatch or reinforcement area.
TopRamen
SA-5
- Joined
- Aug 9, 2013
- Messages
- 9,955
- Reaction score
- 112
Got some Lead Shot and Epoxy poured into the Nose Cone. It is still drying, so I have not weighed it yet, but I suspect it may need a little more, we'll see.
The initial weight of the Cone was 2.7oz., that's why it is written on it, and has nothing to do with the weight I'm adding. I also still need to finish adding more Super Thin CA.

The initial weight of the Cone was 2.7oz., that's why it is written on it, and has nothing to do with the weight I'm adding. I also still need to finish adding more Super Thin CA.

TopRamen
SA-5
- Joined
- Aug 9, 2013
- Messages
- 9,955
- Reaction score
- 112
According to my Openrocket design, I still need 1.85oz. of Weight in the Nose Cone, so I'll drill two smaller Holes on either side of the center Hole, and tuck a little more #8 Shot in there too. Then I'll add my Shock Cord Mount, a Screw Eye Bolt, and that should get me there. If I go a little over thats ok too.
I'm making a Balsa Disc out of 1/2" thick Balsa to go over the Holes where I added the Weight after the rest is put in. I'll Glue and Pin it on once I'm done adding Lead/Epoxy. My Screw Eye Bolt will go through that and into the Cone. Very Solid.
I'm making a Balsa Disc out of 1/2" thick Balsa to go over the Holes where I added the Weight after the rest is put in. I'll Glue and Pin it on once I'm done adding Lead/Epoxy. My Screw Eye Bolt will go through that and into the Cone. Very Solid.
TopRamen
SA-5
- Joined
- Aug 9, 2013
- Messages
- 9,955
- Reaction score
- 112
Sweet! Got the Lead Shot and Epoxy in the two Holes, made the Cap, and got my Screw Eye and Washer ready to go together. I'm .25oz. over the weight I have in Openrocket, which is good enough for me. I'll weigh it again when it is put together.
I put the Mark on the side of the Shoulder of the Nose Cone so that I will know where to drill for the Screw Eye Bolt and the Bamboo Pins after the Cap is in place.

I put the Mark on the side of the Shoulder of the Nose Cone so that I will know where to drill for the Screw Eye Bolt and the Bamboo Pins after the Cap is in place.

bradycros
Well-Known Member
- Joined
- Feb 13, 2009
- Messages
- 4,284
- Reaction score
- 10
Sweet! Got the Lead Shot and Epoxy in the two Holes, made the Cap, and got my Screw Eye and Washer ready to go together. I'm .25oz. over the weight I have in Openrocket, which is good enough for me. I'll weigh it again when it is put together.
I put the Mark on the side of the Shoulder of the Nose Cone so that I will know where to drill for the Screw Eye Bolt and the Bamboo Pins after the Cap is in place.
Moving right along with this build.

TopRamen
SA-5
- Joined
- Aug 9, 2013
- Messages
- 9,955
- Reaction score
- 112
Got some Primer and Paint on today! I'm loving the Weather!!!!!

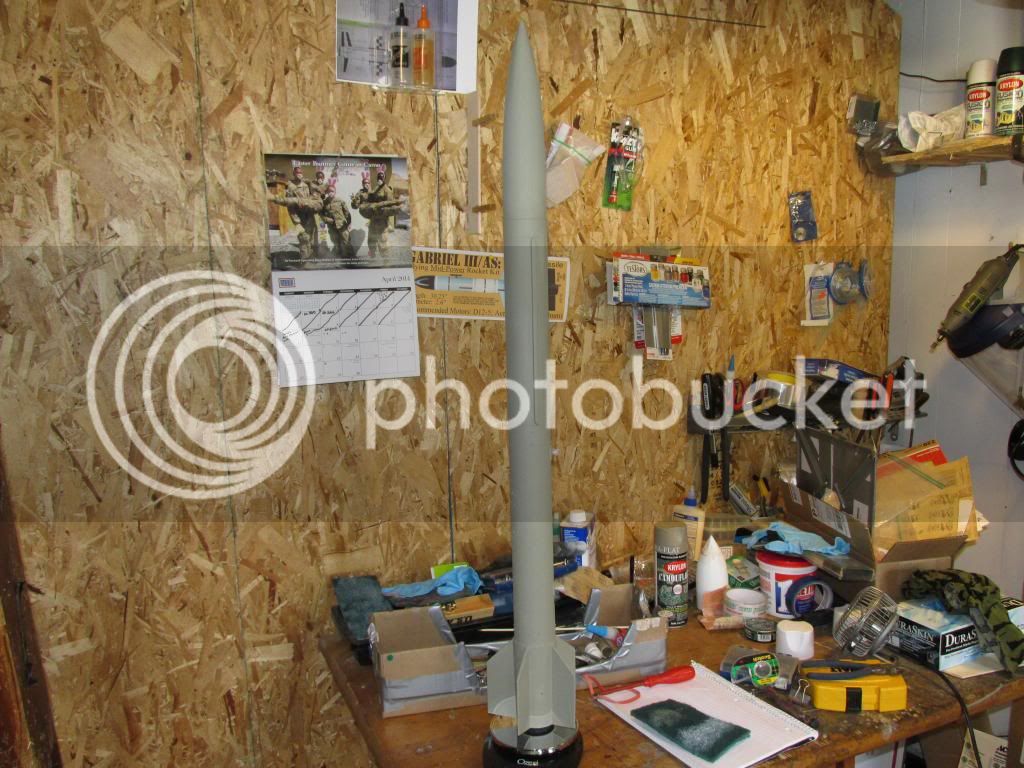
Now all that's left is to get more Paint(I'm all out), come up with a Camo Pattern and Decal Ideas, and build and install the Recovery System.
I love this Rocket because it is the first Scratch Build I've done since 2000. That one was awesome too, a stubby three Fin 4" Rocket that flew on G80s. Its fourth Flight landed it in the Trees.
Madison Alum
Well-Known Member
- Joined
- Apr 30, 2011
- Messages
- 696
- Reaction score
- 2
Great looking rocket! Should look great with camo, so post some pictures of the finished product and the launch.
TopRamen
SA-5
- Joined
- Aug 9, 2013
- Messages
- 9,955
- Reaction score
- 112
Great looking rocket! Should look great with camo, so post some pictures of the finished product and the launch.
Thank You.
I'll definitely post more Pics', and should be able to launch by June.
TopRamen
SA-5
- Joined
- Aug 9, 2013
- Messages
- 9,955
- Reaction score
- 112
Metal Foil Tape. I put it on, then burnish it with a green Scotch Brite Pad to make it look less like Foil and more like an actual piece of Metal.
Ofcourse the Rocket still needs more Paint and stuff, then Clear Coat, but I was just dying to try this out, since the last time I did this was in 2000 on my G-Force. I like this effect.

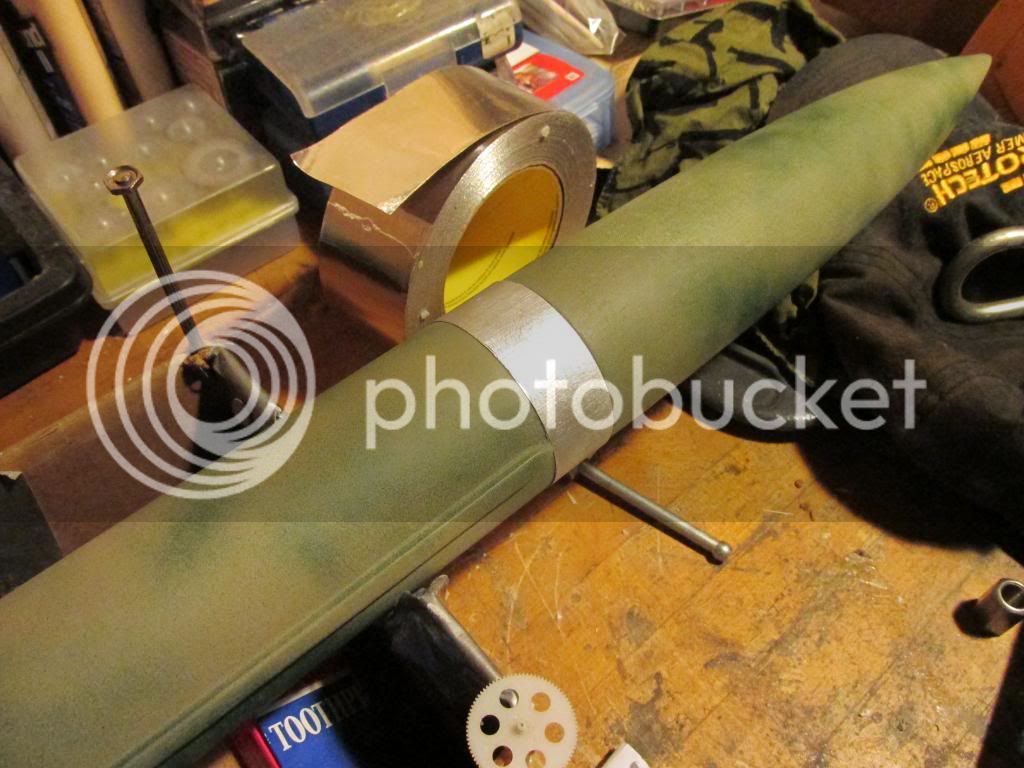
Ofcourse the Rocket still needs more Paint and stuff, then Clear Coat, but I was just dying to try this out, since the last time I did this was in 2000 on my G-Force. I like this effect.


IluvRocketry14
Active Member
- Joined
- Apr 15, 2014
- Messages
- 28
- Reaction score
- 2
That is a very awesome and nice looking rocket man!
TopRamen
SA-5
- Joined
- Aug 9, 2013
- Messages
- 9,955
- Reaction score
- 112
Thanks.
I did the Round Spot, since it looked out of Place. It's fine if it's a Pain in the Butt to mask all of the Silver Parts when I get some more Paint. I've replaced all of the Screws with the new Shiney ones I just got recently from Amazon. The cool thing about the Screws, was that they could be unscrewed/removed, allowing me to place the Foil onto the desired locations, then just use the same holes for the new Screws. Some of the Holes had developed a slight Ridge of Paint, so I gently sanded with 120 Grit before putting the Foil on.
To make the Circle of Foil, I simply set two Pieces of the Foil Tape side by side, then used Scotch Tape on the Backing Paper to hold the two tightly together. Then, I used the same Tape Roll that I had used to trace the Circle onto the Cardstock, to Trace the Circle onto the Tape.I cut out the Circle with Scissors, then place a length of Scotch Tape on the Metal Side along the Seam between the two pieces. The Backing came off in one Piece, leaving the now unbacked, sticky Foil on one piece. After placement, I peeled the Scotch Tape off the Face of the Foil Tape.
It was fun.
Then I used a tiny bit of Testors Silver with the Seam masked off on either side of it, and a fine Brush to fill in the Seam as good as I could.

Last edited:
TopRamen
SA-5
- Joined
- Aug 9, 2013
- Messages
- 9,955
- Reaction score
- 112
Thanks CRC.
The Tape would look funny if you did'nt burnish it down with the Scotch Brite Pad, because it wrinkles so easily and that makes it tricky to want to work with, but once you rub it down with a small piece of green Scotch Brite Pad it conforms nicely where it's placed and takes on the look of Brushed Aluminum. I am really enjoying working with it. I used a Band of it on the G-Force in my Avatar Pic' around the Body where it meets the Cone but that was back in 2000 when I was not big into doing Details. That is when I discovered that it benefited in appearance from the Scotch Brite Pad or #0000 Synthetic Steel Wool.
It definitely beats trying to find a Silver Paint that is user Friendly.
Similar threads
- Replies
- 4
- Views
- 612