Resurrecting The Black Dahlia

The Rocketry Forum

Help Support The Rocketry Forum:

This site may earn a commission from merchant affiliate links, including eBay, Amazon, and others.

DRAGON64

Well-Known Member
TRF Supporter
Joined
Jan 17, 2009
Messages
5,209
Reaction score
2,751
Location
Toney, AL
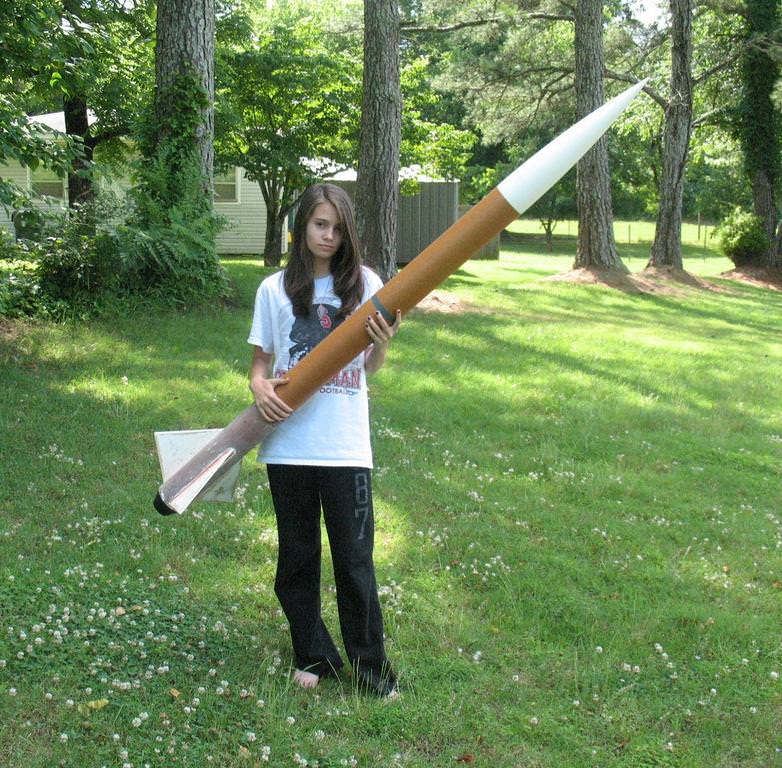
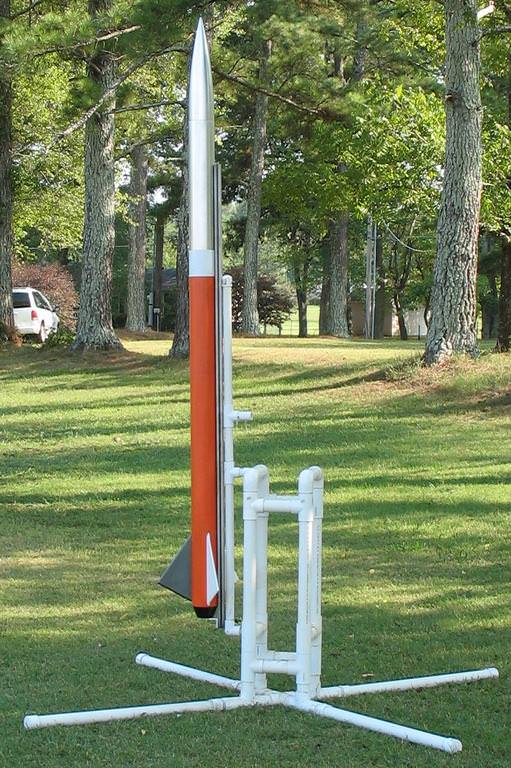
The Black Dahlia before the Rocket Godz took her from me...

GmergKt.jpg


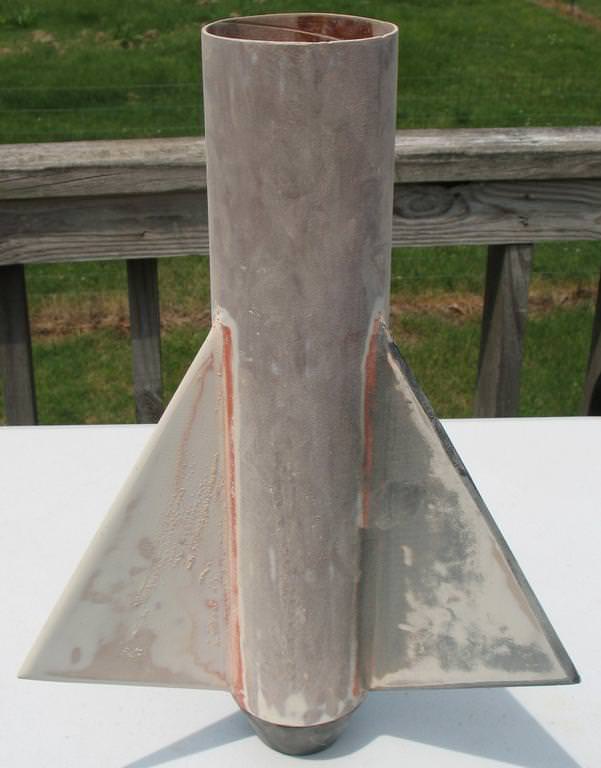
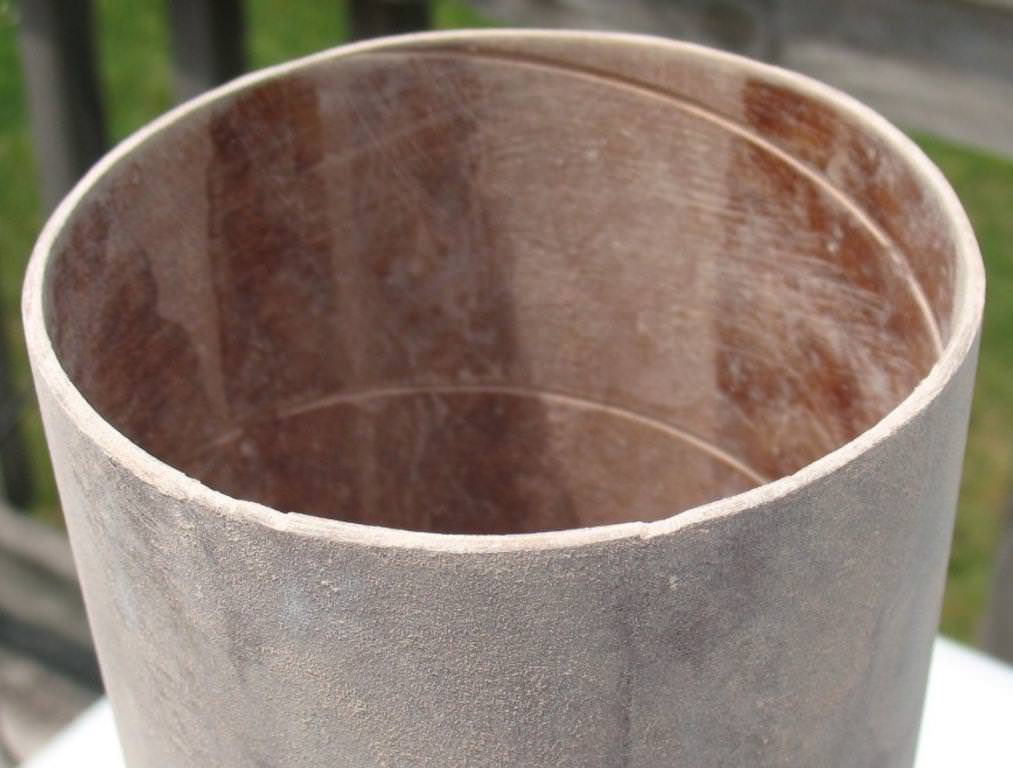
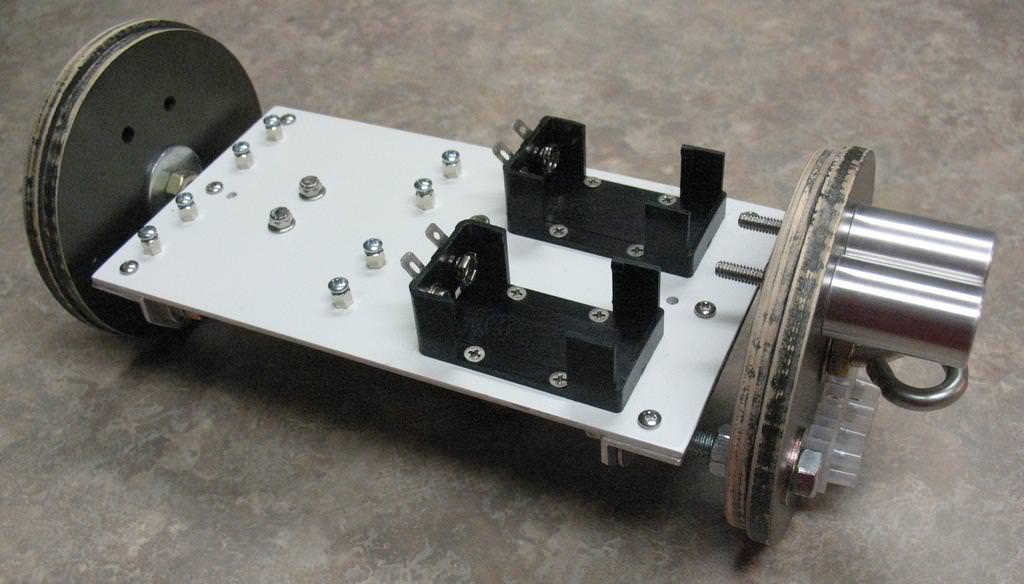
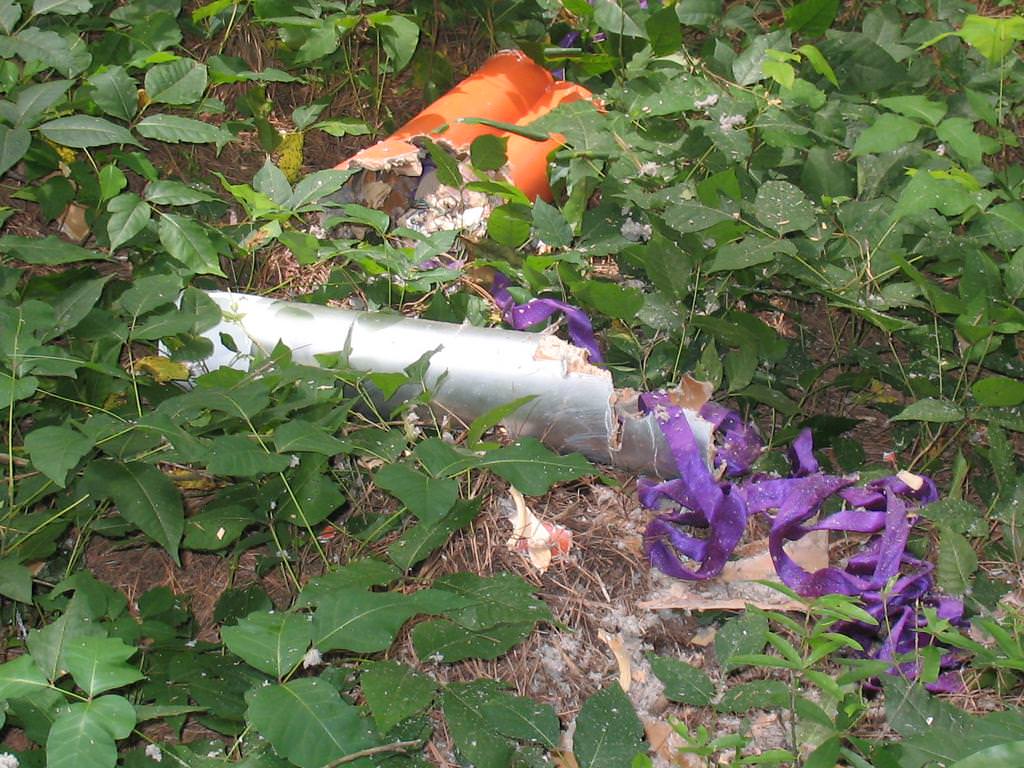
Yeah, I know, no Black paint anywhere. Here is what was left after one of my failed attempts at a parachute controlled landing...

mG4rRUK.jpg


9H91Er6.jpg


eC0Rhna.jpg


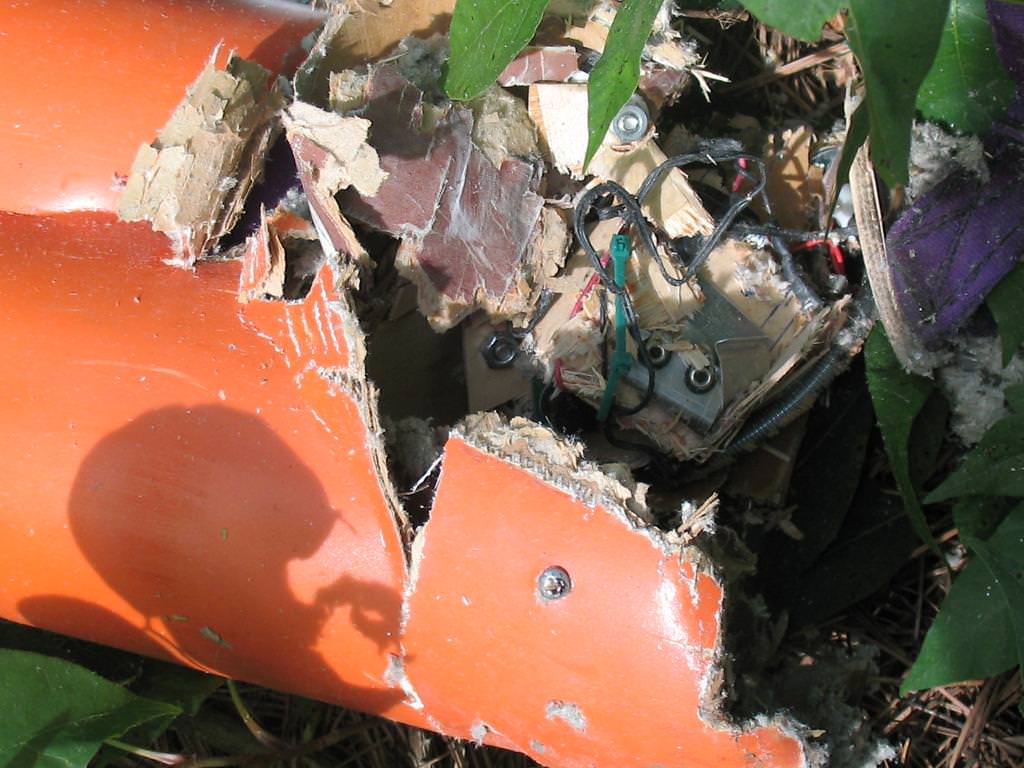
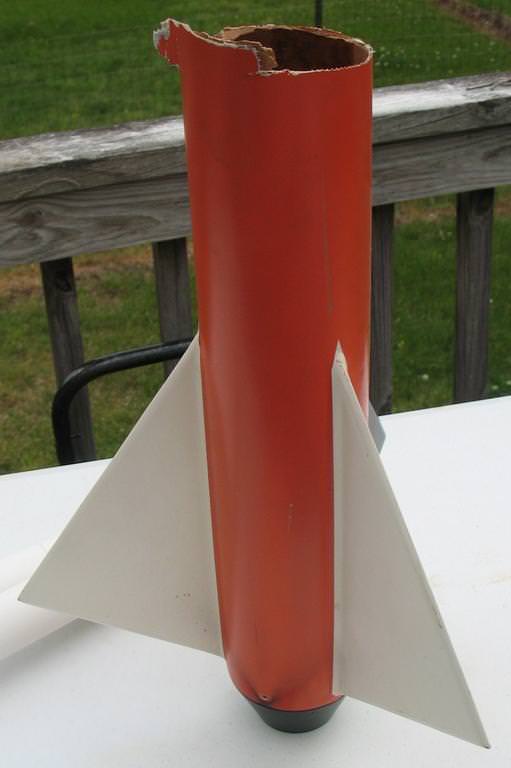
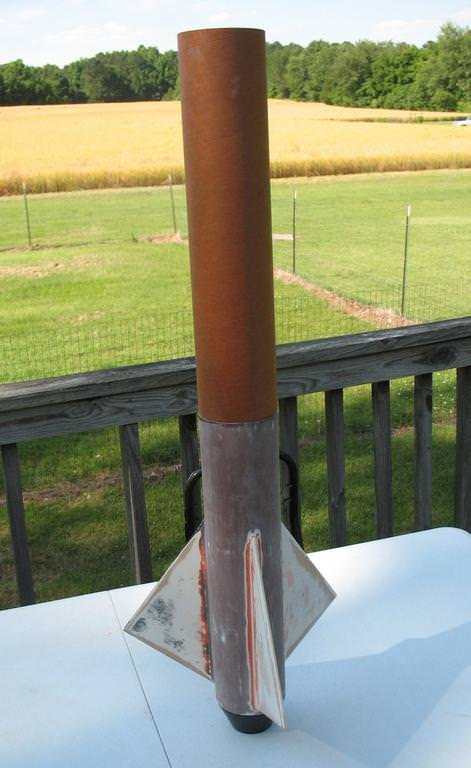
The rocket was originally an old Public Enemy 4" Extreme Performer. When I finished the Black Dahlia basically all that remained of the original kit was the nosecone and the fins... everything else was stretched and modified.

Here are my intended goals for the rebuild:

  • Build a reliable recovery system
  • Return to the dimesional shape of the original kit from Public Enemy
  • Repair while reinforcing
  • New look (I will need some help from Stickershock23 on this one)

Here is a video record of her first flight:

[video=youtube;-fyOPxCQvms]https://www.youtube.com/watch?v=-fyOPxCQvms[/video]

It is time to get busy living or get bust dieing...
 
Last edited:
looks like she was a beautiful rocket, cannot wait to see the rebuild! the first flight video was great!

:pop:
 
looks like she was a beautiful rocket, cannot wait to see the rebuild! the first flight video was great!

:pop:

Thanks soxfan... she was a looker alright... it her to watch the rocket auger in like it did. The sound was pretty sickening. I kept the fin-can all this time figuring I would eventually have to rebuild it.
 
I managed the ugly, and then began the process of old paint removal. The tube is ready to take on the coupler, and is cleaned enough to also take on a little glass toe help reinforce the new joint...

UTvMaNu.jpg


The ugly was removed with a hacksaw... not great, but I'm actually a little proud of how it turned out. A little more sanding to even the edges, and she will be good to move on with the rebuild...

uOq8YdV.jpg


With a little more elbow grease, I should have the fins stripped of paint and primer in no time!
 
Last edited:
Thinking out loud here, is there any reason not to use redundant altimeters in a 4" airframe that is I thru L capable (54mm motor mount)? I'm ordering components now and I want to make sure I have what I need.
 
Thinking out loud here, is there any reason not to use redundant altimeters in a 4" airframe that is I thru L capable (54mm motor mount)? I'm ordering components now and I want to make sure I have what I need.

Not really. 4" is easily enough for two altimeters and however many batteries they may take.
 
I'm trying to work with what I have on hand first before I order parts to complete the project... So I have this 36" piece of PML airframe in the shop.

yXCygFv.jpg


I used my wet/dry 4" table saw to cut dwon the airframe in two 18" pieces. One I will use to repair the booster, and the other will become the payload section. Looks like I will be doing some glassing this weekend...

ohleW2c.jpg
 
Last edited:
I need help from anyone who may have a Slimline motor retainer; I have lost the original snap ring and washer that was used to retain the motor. I believe I have found a replace snap ring at mcMaster-Carr, but I need more info on the ring and washer.

Specifically the thickness of the washer and the inner and outer diameters.

Here is what I have found for the snap ring:

https://www.mcmaster.com/#93576A290

Any help would be very much appreciated.
 
Alright, I have hit a little bit of luck (all good); While digging through some of my rocketry dungeons and grave yards; I happened across a PML rocket that I bought from a friend, it was a unique fixer-upper that I never did anything with... low and behold, it had a 54mm slimline retainer with the snap ring still installed... now all I need is the washer.

I also found a complete, new in bag, 4" altimeter bay kit made from Blue Tube 2.0 that fits nicely in the Black Dahlia, and tucked away in another box I found a set of airfoiled 10 series rail guides... Oh Happy Day!
 
Okay, vehicle components are ready, here is a dry assembly before I start glassing the pml airframe units. Is it me, or does the Pinnacle nosecone look rather out of scale to the build? A good paint pattern should nullify any doubt...

My daughter modeling the rocket for me...

ebTykvV.jpg
 
Last edited:
Personally, I like the long Pinnacle nose cone. Makes it look sleek. And is it just me, or does your daughter look totally unimpressed? LOL
 
I need help from anyone who may have a Slimline motor retainer; I have lost the original snap ring and washer that was used to retain the motor. I believe I have found a replace snap ring at mcMaster-Carr, but I need more info on the ring and washer.

Specifically the thickness of the washer and the inner and outer diameters.

Here is what I have found for the snap ring:

https://www.mcmaster.com/#93576A290

Any help would be very much appreciated.

I can't find my digital caliper anywhere. But according to my old school dial caliper, the washer is .049" thick, 2.278"OD, and 2.032"ID. Hope I'm reading it right!
 
I can't find my digital caliper anywhere. But according to my old school dial caliper, the washer is .049" thick, 2.278"OD, and 2.032"ID. Hope I'm reading it right!

I found the digital caliper. It was in the same drawer I looked in three times before. Stupid old worn out eyes!

Here is what I got with the digital: .0475" thick, 2.277"OD, and 2.0385"ID. I was pretty close.
 
Personally, I like the long Pinnacle nose cone. Makes it look sleek. And is it just me, or does your daughter look totally unimpressed? LOL

I have owned a few Pinnacle cones, this is my first 4" cone, and these things are beautiful for be a plastic cone... built like tanks. My daughter was trying to give the James Dean "troubled teen" look... Here is the other pic I took in the same shoot...

She has braces now with dual rubber bands, so she doesn't smile much these days.

nchWVKs.jpg


I can't find my digital caliper anywhere. But according to my old school dial caliper, the washer is .049" thick, 2.278"OD, and 2.032"ID. Hope I'm reading it right!

I contacted Ed at Giant Leap, and he says that he has plenty of spares, so I am placing an order for some back up parts. At $0.75 ea, it is cheap insurance.

I found the digital caliper. It was in the same drawer I looked in three times before. Stupid old worn out eyes!

Here is what I got with the digital: .0475" thick, 2.277"OD, and 2.0385"ID. I was pretty close.

Thanks a million for checking those components for me... I never did find a suitable wahser, so I'll just order from Ed.
 
Last edited:
Once again, that is one smexy rocket, i do agree the nosecone looks a bit out of place but I think it's just all of that white with the brown colors of the body, I do like it though, nice and sleek.
 
Once again, that is one smexy rocket, i do agree the nosecone looks a bit out of place but I think it's just all of that white with the brown colors of the body, I do like it though, nice and sleek.

Thanks soxfan121 the Black Dahlia is begining to take shape. This weekend I'll laminate the airframe with 6oz glass and a .5oz veil, and maybe get some work done on the avionix bay while the airframe cures.
 
Today I fiberglassed the PML tubing on the Black Dahlia... (1) layer of 6oz and (1) 2oz veil layer all in one process. I can't wait to trim the excess glass and start snading this rocket.

I bought this roll of 6oz fabric many many moons ago at work for $5... it has served me well...

IMG_6714.jpg

I over lapped the seam quite a bit, most of which will sand away when I start prepping the tube for paint...

IMG_6716.jpg

Not my best lamination job, but fairly condervative since I don't use a vacuum pump to pull off excess epoxy... weight is not an issue with this little power house.

IMG_6715.jpg
 
Last edited:
I have been contemplating just exactly how I would finish the Black Dahlia this time around... I never was very happy with my original paint scheme. Mark at Stickershock23 is working on a simple design for me... I was unsure for a while as to what the color would be, until I found an original picture of the Piblic Enemy Extreme Performer that I pulled from the old Public Enemy website...

kwXKtRf.jpg


Black it is... the nosecone too, as I do not care for the white cone look.

I wanted to honor the original design and see if Stickershock could also recreate the Public Enemy logo... it seemed simple enough.


0b67SiH.png


Just thinking out load here, as the airframe enters the final prep stages.

Time to look seriously at the avionics now. I want to make sure I get it right this time... main goal here is no more recovery failures.
 
Last edited:
Getting back to work on this project; A package arrived today from Dog House Rocketry... very nice! I ordered two 9v battery holders, a dual deployment wiring kit, and a few terminals for external e-charge wiring. I'm impressed, and the cost was just right. This past weekend I also played around with making some ejection charge holders for this project. They did not turn out too pretty, and therefore will not be used for this project.

IMG_6814.JPG IMG_6823.JPG IMG_6822.JPG
 
Last edited:
As the rain comes down, my thinking hat goes on for indoor work; today I am planning and laying out the avionics for the Black Dahlia. I'm also modeling the avionics in SolidWorks, to help with layout and design. I am building on the Blue Tube 2.0 avionics kit, and so far I will use most all of the components... some will be omitted, such as the sled itself. As seen in the images below, there just is not enough realestate to hold all of the components on the plywood sled. However, I do have a G10 replacement I can use.

IMG_6824.jpg IMG_6825.JPG
 
Getting back to a much overdue project, 2-years to the day, I think it is about time that I get this one finished up. My most recent work has centered around getting my avionics coupler assembly finished up... for the most part anyway, as I am needing a few small items yet; like a second SL100 altimeter and two more ejection canisters from Blastcap Rocketry...

rxX0zA8.jpg


48QBOuD.jpg


1UA05qS.jpg


ViBlqJ1.jpg


I am concerned about all of the hardware used on this assembly, as the Black Dahlia will be destined for 54mm hybrid motors, with a J being the largest flown without an airframe extension.

There is much more sanding to do, and then the airframe can go to paint... did I mention that the color is going to be Black(?)!
 
Last edited:
Getting back to a much overdue project, 2-years to the day, I think it is about time that I get this one finished up. My most recent work has centered around getting my avionics coupler assembly finished up... for the most part anyway, as I am needing a few small items yet; like a second SL100 altimeter and two more ejection canisters from Blastcap Rocketry...

IMG_8679_zpsau2bkcr4.jpg


IMG_8678_zpsobpcehfc.jpg


IMG_8673_zpsq3mgnj0e.jpg


IMG_8672_zpsrjabvdbh.jpg


I am concerned about all of the hardware used on this assembly, as the Black Dahlia will be destined for 54mm hybrid motors, with a J being the largest flown without an airframe extension.

There is much more sanding to do, and then the airframe can go to paint... did I mention that the color is going to be Black(?)!

Dragon 64
Are you concerned about the added weight of the hardware or just the complexity? If it is weight I have some suggestions but none that would reduce it by much. I am not sure how much your rocket weighs but I have launched my 7.5", 10 lb Upscale Estes Fat Boy on Aerotech J360 hybrids twice with no problems.
I like the lay out of your av bay.
In an attempt to simplify my 4" designs I have changed from the the two 1/4-20 threaded rods plus the eye bolts to a single 1/4-20 threaded rod passing through the center line and replaced the eye bolts with an Eye nut or a U bolt. I also eliminated two of the bulk plates by adding a LOC stiffy coupler that is 1/2" shorter than the standard coupler. I just use the coupler bulk plates and they sit nicely in either end. All of the force from the recovery harness goes through the central all thread. I can easily swap the electronics from one rocket to another.
End-Cap-Details-W.jpg End-Cap-Details-side-w.jpg U bolt end and side view.
100_0543.we.JPG End-ebay.25.01.jpg Eye nut end and side view.
I attach the electronics board to the one end cap and glue a piece of tubing to the back side to limit vibrations.
 
Bill,

Thank you for the tips. After reading your post, I went back to see what I could do to the current design to shed some weight, and I believe I have a minor fix. Based on how I designed this sled set-up, I can remove a good bit of the all thread as pictured (remove all-thread from inside the boxed region). My only concern would be deployment force being transferred to the sled plate itself, instead of being fully absorbed by the all-thread.

8Mnno8o.jpg
 
Last edited:
Dragon 64
Are you concerned about the added weight of the hardware or just the complexity? If it is weight I have some suggestions but none that would reduce it by much. I am not sure how much your rocket weighs but I have launched my 7.5", 10 lb Upscale Estes Fat Boy on Aerotech J360 hybrids twice with no problems.
I like the lay out of your av bay.
In an attempt to simplify my 4" designs I have changed from the the two 1/4-20 threaded rods plus the eye bolts to a single 1/4-20 threaded rod passing through the center line and replaced the eye bolts with an Eye nut or a U bolt. I also eliminated two of the bulk plates by adding a LOC stiffy coupler that is 1/2" shorter than the standard coupler. I just use the coupler bulk plates and they sit nicely in either end. All of the force from the recovery harness goes through the central all thread. I can easily swap the electronics from one rocket to another.
View attachment 266844 View attachment 266846 U bolt end and side view.
View attachment 266847 View attachment 266848 Eye nut end and side view.
I attach the electronics board to the one end cap and glue a piece of tubing to the back side to limit vibrations.

Single all-thread in the center line works as a punch to damage the fore end of a motor case...don't ask how I know... :p
 
Single all-thread in the center line works as a punch to damage the fore end of a motor case...don't ask how I know... :p

Dave
I kind of think if the single all-thread damaged your Fwd Closure my forged eye nut or the stainless u-bolt would have done the same. :wink:
 
Back
Top