Astron Sprint XL

The Rocketry Forum

Help Support The Rocketry Forum:

This site may earn a commission from merchant affiliate links, including eBay, Amazon, and others.
I figured out a simplified "Merrick Mount" for the Astron Sprint. I looked for small eyebolts that would work but no luck, so I set to simplify the design and still get the shock absorber action.

I found a ply bulkhead that would fit inside the nose cone and sit against the molded lip of the shoulder, then using a long cotter pin and a small 1 inch fender washer slipped the pin through the the washer and center hole in the bulkhead, the spring assortment I found at Home Depot had a long tapered spring that fit perfect, I put the wide end of the spring against the bulkhead then added a small #6 washer, giving just a slight push I bent the ends of the pin over to hold everything together. Trimmed off the ends with heavy cutters and it's ready to install.

It works better than I would have thought. I got curious as to weight and found out that the included clay is .45 oz, this "Merrick Mount" is also .45 oz.

Now to simply epoxy the mount into the nose cone and tie a kevlar cord to the cotter pin eyelet.

I am going to add this mount to more of my kits, it is just one of those head slapper ideas that is simple and just plain works.

Pics later, gotta head off to work.

See ya,
Rod
 
rocket 013.jpgrocket 010.jpgrocket 005.jpgrocket 002.jpgrocket 001.jpgHere,s mine..! I threw in a coupla pics of my cheapazz display stand for the heck of it! I sure hope the weather will be good Saturday!!I wanna see this go UP!!
 
little late perhaps, maybe in time for the next bird...I have made small u-bolts from 2-56 all thread push/pull rods from the rc aircraft section of the hobby shop.
rex
 
Here are the pics for the solution I came up with for this "Merrick mount" Very simple and will work great.
The pics are of the mount parts, couple steps to assemble, and compare mount to clay weight.

Will wait until I am ready to finish and have the weight right for a AT single use CG, then epoxy mount into nose cone.

Merrick Mount parts.jpg

Merrick mount 1.jpg

Merrick mount 2.jpg

Merrick mount complete.jpg

Merrick mount weight.jpg

clay weight Astron Sprint.jpg
 
Here are the pics for the solution I came up with for this "Merrick mount" Very simple and will work great.
The pics are of the mount parts, couple steps to assemble, and compare mount to clay weight.

Will wait until I am ready to finish and have the weight right for a AT single use CG, then epoxy mount into nose cone.

First off, I'm really pleased to see that you fit a Merrick Mount onto your bird, awesome! Also, thank you so much for keeping with the name "Merrick Mount", I appreciate that, and so does my son. I like your modification, and hopefully that's a stainless steel cotter pin and not an aluminum one?? I hope there's not enough force to make the washer slip over the bent tips of the pin. That was my only concern. However, you probably save a little on the weight by using the pin, so good on ya! Nice job!!!
 
It was your idea not mine sir. I just adapted it to work with my smaller models. Pin is steel and the spring is pretty soft but strong enough to hold. Kevlar cord should be fine with the mount. It's long enough that the shock might not be as severe as I think.

Painting the Sprint XL over the next few days. Think I will go with red nose and fins.

See ya,
Rod
 
I bought this model on compulsion from an online vendor where I did not notice the fairing on the boat tail to accomadate the motor retainer. I rarely build with the retainer and now need to figure a way to remove this feature... cut it off and fill with a little expanding foam & thin glass. I have always admired this design, its curves and simple paint scheme. Kickin' it oldschool.
 
It was your idea not mine sir. I just adapted it to work with my smaller models. Pin is steel and the spring is pretty soft but strong enough to hold. Kevlar cord should be fine with the mount. It's long enough that the shock might not be as severe as I think.

Painting the Sprint XL over the next few days. Think I will go with red nose and fins.

See ya,
Rod

This is what mine ended up looking like with red and black.Astron Sprint XL 001.jpgAstron Sprint XL 002.jpgAstron Sprint XL 003.jpg
 
For now I will do this here... sort of one stop shopping....
Ok???

Parts...
2013-08-24-Sprint-XL-0001.jpg

is...
2013-08-24-Sprint-XL-0002.jpg

Parts...
2013-08-24-Sprint-XL-0003.jpg

Overall the parts seem fine. The tubing is good. No dings or crumpling. The plastic parts seem well molded and the seams pretty minor. About the only thing I will add to or replace is the shock cord or the mount for the cord.
2013-08-24-Sprint-XL-0004.jpg

is okay to document here? Yes? :cheers::cool2:

 
I made my ROCKSIM file and ran into something I don't understand. Why did Estes include the two squares of clay? ROCKSIM shows there is a decent margin. Please, don't think I take its word for the balance point (CG). I don't. But I *DO* take its word on the CP. Indeed my Sim and a sim of the original gives about the same percentage. 80% from the nose on the XL and 85% on the original.

I even printed out the rocksim fin patterns and compared them to the now rounded (leading edge) fins.

Bondo sanded and the fins ready for papering.
2013-08-25-Sprint-XL-0001.jpg

My crude custom fin template from ROCKSIM
2013-08-25-Sprint-XL-0002.jpg

They do match pretty well.
2013-08-25-Sprint-XL-0003.jpg

So I'm holding off on the clay. I'll see where the CG falls in the real world and go from there.

View attachment Sprint XL.rkt

 
Dang... I wish I would have thought of checking it in openroc first. I suppose I could get most of the clay back out.
I was surprised at how heavy the nose is with the clay.
 
Well please don't. :) :bang: If I have made some error... or there is some error in ROCKSIM with elliptical fins, we'd all be screwed. :y:

I just don't see that as the case. I could create trapezoidal fins that cover approximately the same area, and it is still stable as far as I can tell with a E9. And that is with me telling ROCKSIM 1/2 an inch of motor is sticking out the back.

OTOH I can not imagine Estes either having their own program or at least ROCKSIM. Or more likely is, their lawyers tell them "Three Calibers of Margin" is required.
 
Flew mine on a D9-7 yesterday and it was a nice flight next time I will put a E9 in it. I have had some E12 blow so I am not using them no more.
 
Nothing too exciting... fins and fillets... fins sealed with Fill n Finish (old school). Rounded leading edge. Wood glue. Double glue joints

2013-08-31-Sprint-XL-0002.jpg

2013-08-31-Sprint-XL-0003.jpg

2013-08-31-Sprint-XL-0004.jpg
 
That's a wrap... all that's left is to clear coat and stuff a motor up it's hiney.

2013-09-08-Sprint-XL-0002.jpg

2013-09-08-Sprint-XL-0004.jpg

2013-09-08-Sprint-XL-0008.jpg

I resisted the urge to put any more decals. Just added a CP marker (18 inches from the tip), of course a NAR logo, and an address sticker below the lower launch lug. Oh and no matter WHAT history says, I was not putting the Estes logos on vertically. :no: Nor was I putting the Sprint logo on sideways. :no: :no: I sure I'll burn in Hell (if I believed in such things) for such travesties. :lol: Marking the CP always gives me that little assurance when loading a motor not specified in the list. :dark:

Weight w/o chute is 2.9oz. I DID add 1 pat of clay (1/4 oz?) and secured it with some gorilla glue and a few drops of water. Why? To be extra sure. I don't think it needs it, but what the hey...

 
Last edited:
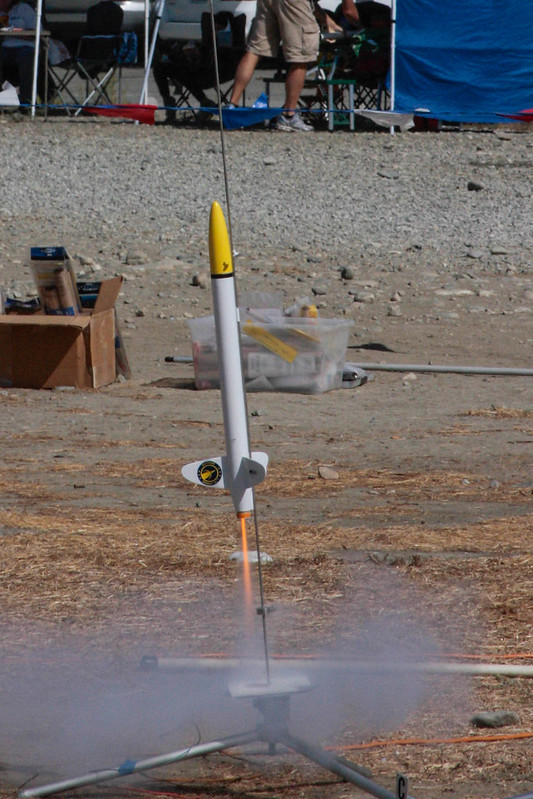
And it flies:


On a C11-7 to 710'.
Delay a bit long but that could have been the rod angle. Had it been almost vertical, it may have been just right.

9885360365_36476d28d9_c.jpg
 
And it flies:


On a C11-7 to 710'.
Delay a bit long but that could have been the rod angle. Had it been almost vertical, it may have been just right.

9885360365_36476d28d9_c.jpg

The XL prototype on a F35-11.. on its way to over 2,600'.. ROCKET AND ROLL!

IMG4174-L.jpg
 
Back
Top