What did you do rocket wise today?

The Rocketry Forum

Help Support The Rocketry Forum:

This site may earn a commission from merchant affiliate links, including eBay, Amazon, and others.
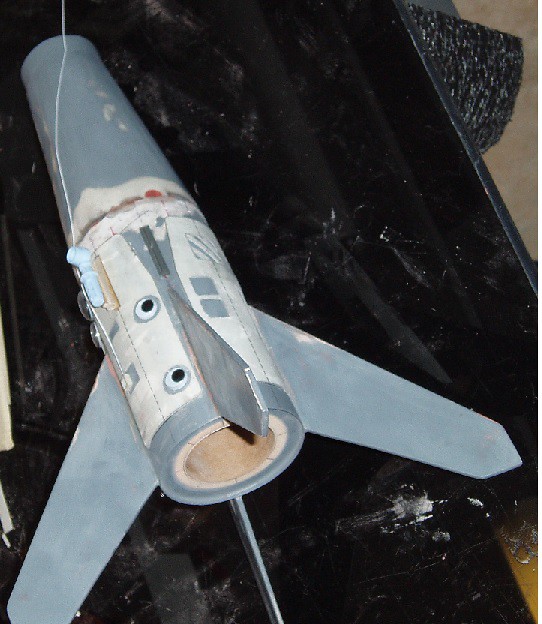
I pulled off the last bit of tape today. Have a little bit of touch up here and there. And final clear coat.
View attachment 262993

Wow that is a fantastic looking rocket, very nice workmanship.

At one point I was thinking about doing a 4" hand rolled carbon fiber version of that the Black Brant X with the terrier booster but then my rocket ADD kicked in and pointed me in another direction. But after seeing yours I feel inspired again.
 
Sent a long email to Aerotech about the lack of information on their motors and stuff for us the hobbyists, specifically lack of a single source like the 2010 Catalog. Hoping what we will actually get some movement in the direction of even a simple PDF only "catalog"
 
Painted some winter projects this weekend!

17494691236_1842994565_c.jpg

Nice job they're beautiful, is that a Wildman Darkstar Jr done up as a take on the BSD Thor.
 
I layed some fillets out on some Saucer guts..

Maybe later will try to do some internals on the Punisher i double buttered and installed fins on last night

Kenny

1431396070669.jpg

1431396090384.jpg
 
Decanted some 4FFFF into mini-centrifuge tubes for ground testing and the like.

Examined some long lead deployment charge containers I made awhile back using the mini-c-tubes and compared them to the several pairs of nitrile gloves that just happened to be laying on the workbench. Kinda like the simplicity of just using the fingertips for containers.
 
I started cutting out parts for a BT60-sized NASA Pegasus upscale. Its not a huge amount bigger than the Estes original, but enough for now. The design will be just over 2' long, and have nearly 13" wingspan. Motor mount will be 24mm. IMHO, 29mm will be overkill for this.

NASA Pegasus - BT60.jpg NASA Pegasus - BT60b.jpg
 
Today I tried a new method for prepping fins. Estes Argent. Sanded fins, coated with wood filler, sanded with 320, rounded the edges, CA'd the edges, then finished it all with 600 grit. They could pass for plastic. It was my first attempt and I am very satisfied with the results. Going to try CA'd fins on an Estes Mean Machine next.
 
Tried and failed to score an Estes Crossfire ISX and a set of Estes BT-50 nosecones from the LHS today. :sad: (I'm betting TopRamen snatched 'em up :wink:)

I'm hoping to score one and possibly upscale it to BT-55 and/or BT-60.
 
Researched some deployment charges for my Goblin 5.5 in anticipation of the ground testing I hope to get done tomorrow before the rain comes in. For a 5.38" diameter tube that 12" long, VernK recommends 2.2 grams as a starting point. Looks like I will be using the 3 gram charge well built into the nosecone alt-bay bulkhead after all.
 
Tried and failed to score an Estes Crossfire ISX and a set of Estes BT-50 nosecones from the LHS today. :sad: (I'm betting TopRamen snatched 'em up :wink:)

I'm hoping to score one and possibly upscale it to BT-55 and/or BT-60.

The Crossfire is an incredible flyer, and well worth the price of admission even if you have to buy on online and pay shipping.
I bought 4 from AC Supply and got a decent deal.
 
Prepped rockets for a launch this weekend. I built a sled for my MCR Frenzy that bolts to the nose cone and installed my Stratologger CF and added attachment points for my AltimeterThree. It'll fly motor deploy on an I216, the altimeters are just for recording. I also started prepping my LOC Warlock...
 
Finally started to pull together the pieces for my launch pad, some of which have been gestating for a little while. I also installed mini buttons on several rockets, and replaced the parachutes on Der Mean Max.
 
5x8' Nothing Fancy, but it does have 3/8" plywood walls, 3/4" floors, undercoated, LED tail lights, side vents and rear stabilizer jacks. Going to put shelves in and some rocket stands/holders. Already have the whole thing mapped out. Going to be a blessing to have for the trip to Potter for LDRS!

Trailer3.JPG

Trailer2.JPG

Trailer1.JPG
 
5x8' Nothing Fancy, but it does have 3/8" plywood walls, 3/4" floors, undercoated, LED tail lights, side vents and rear stabilizer jacks. Going to put shelves in and some rocket stands/holders. Already have the whole thing mapped out. Going to be a blessing to have for the trip to Potter for LDRS!

That's pretty sweet!
 
5x8' Nothing Fancy, but it does have 3/8" plywood walls, 3/4" floors, undercoated, LED tail lights, side vents and rear stabilizer jacks. Going to put shelves in and some rocket stands/holders. Already have the whole thing mapped out. Going to be a blessing to have for the trip to Potter for LDRS!

Nice trailer, that will also come in handy for transporting L3 missiles to the sod farm!
 
Recieved my Makerbeam Rail from EXPjawa. Thanks Rick!
Nice job packing it up!
It will live in my 1010 Rail so it will be rigid and safe from damage.
Now I can fly my minimum diameter 24mm.:clap:

2015-05-13 001 2015-05-13 002.jpg2015-05-13 001 2015-05-13 003.jpg2015-05-13 001 2015-05-13 008.jpg2015-05-13 001 2015-05-13 010.jpg
 
Today I started adding all the little surface details to my scratch lander design.

17027078104_7ef8f97093_z.jpg


Once everything is on, the entire airframe will be painted light grey. Afterward, I will add the suib-assemblies that are already painted red.
 
Today I started adding all the little surface details to my scratch lander design.

17027078104_7ef8f97093_z.jpg


Once everything is on, the entire airframe will be painted light grey. Afterward, I will add the suib-assemblies that are already painted red.

That looks quite intriguing. Are those a set of googally eyes???
Got any details about what motors it will fly on or recovery method?
 
That looks quite intriguing. Are those a set of googally eyes???
Got any details about what motors it will fly on or recovery method?

Yep, those are googly eyes. But once they are painted, they will be nice little dome shaped details.

This is a small bird, standing only 14" tall. It will have a 24mm motor mount, but this it will probably do quite well with C motors. Parachute recovery.
 
Attempted to do some ground testing today but the rain started before I was able to get the Polecat Goblin 5.5 out into the backyard. Cut some long Q2G2 igniters to the proper length to fit the nose cone alt bay set up.

Blue wires for apogee (blue sky) and green for main (green grass).

View attachment 263272View attachment 263273View attachment 263274

There are a few things I'll do differently next time but this will work.
 
It was a good days work in the shop today. Got all the Centering Rings cut and slotted for Frenzy's fins. Had to recut the NC Av-Bay centering ring since a 2 inch hole in a 3 inch NC doesn't leave enough room for the fasteners. Dry fitted the fin can assembly.

L2projectDay7-2.jpg
 
It was a good days work in the shop today. Got all the Centering Rings cut and slotted for Frenzy's fins. Had to recut the NC Av-Bay centering ring since a 2 inch hole in a 3 inch NC doesn't leave enough room for the fasteners. Dry fitted the fin can assembly.

View attachment 263275

Great minds think alike! :eyeroll:

I did pretty much the same thing with my 4" Madcow Frenzy...extra centering rings...and installed the motor mount into the airframe before adding fins. Of course this meant injecting the internal fillets which was something I wanted to try. I will undoubtedly use injected fillets again on my Wildman Punisher and Black Star.

As to nose cone av bays, in my Polecat Goblin 5.5, I made several centering ring and av-bay bulk plate combinations before I settled on a 3" opening. The hardware to secure the bulk plate to the centering ring is 10-24 stainless hex key round head machine screws through matching stainless t-nuts in the C ring. I also drove three 10-24 stainless phillips flat head screws through the fiberglass nosecone shoulder into blocks epoxied to the c-ring. Hopefully, it will keep everything in place...it's a fairly heavy chunk of fiberglass.
 
Last edited:
I put together my tripod based launch pad for the first time. I think everything important works well together. I just need to disassemble and apply some loctite in a few places. I also finished the roll pattern on my BT80-sized Astron Ranger:
WP_003207.jpg
 
It's been raining here for the past week, so no painting, no lawn work, and no fishing. :( Instead I've been binge watching Grimm, and playing around with bits of trash, er, treasure.

One large(BT80 size) Easter egg later, I have the first prototype for the Mars Eggspress. The lower body tube is a TP roll cut down to the length of the Estes Viking fins used as mounts for the legs. The legs and the centering rings are cereal box cardboard.

I sanded the ridges out of the inside of the egg so that it is a slip fit and no longer locks shut. The parachute will be inside, along with about 3 feet of shock cord.

The legs are fixed to simplify things. The motor tube is rolled from cardstock to fit a 24mm engine. 18mm's can be used with an adapter.

This model will probably fly naked. If it flies well, it may get paint and detailing, but this one was always intended to be a prototype/proof of concept.

cN2xCbC.jpg
JV1jmex.jpg
 
Back
Top