Just order a Yaesu FT2DR radio. If you are in the market for a radio with APRS and a built in GPS receiver they are only $279 after rebate from Gigaparts.com
You are using an out of date browser. It may not display this or other websites correctly.
You should upgrade or use an alternative browser.
You should upgrade or use an alternative browser.
What did you do rocket wise today?
- Thread starter BeerorKid
- Start date


Help Support The Rocketry Forum:
This site may earn a commission from merchant affiliate
links, including eBay, Amazon, and others.
michigander
Well-Known Member
- Joined
- Jul 29, 2012
- Messages
- 1,821
- Reaction score
- 2
reverse engineered my wife's smart phone
new lcd/screen and frame is due in Tuesday + replacing battery while apart
and new screen didn't work , gave up wife bought new phone
TopRamen
SA-5
- Joined
- Aug 9, 2013
- Messages
- 9,955
- Reaction score
- 112
Got the base for the bandsaw primed and painted and clear-coated thanks to the gorgeous weather we had here today.")
I ran out of the correct hardware for the motor mount, so a trip to the hardware store is in order, but it is all back in one piece anyhow for now.
Also got rid of one couch to make room for turning my house into one big ORGANIZED workspace.

Now I have to paint my drill press to match. That can wait til' next year.
I ran out of the correct hardware for the motor mount, so a trip to the hardware store is in order, but it is all back in one piece anyhow for now.
Also got rid of one couch to make room for turning my house into one big ORGANIZED workspace.
Now I have to paint my drill press to match. That can wait til' next year.
Last edited:
Got the base for the bandsaw primed and painted and clear-coated thanks to the gorgeous weather we had here today.
I ran out of the correct hardware for the motor mount, so a trip to the hardware store is in order, but it is all back in one piece anyhow for now.
Also got rid of one couch to make room for turning my house into one big ORGANIZED workspace.
View attachment 301909
Now I have to paint my drill press to match. That can wait til' next year.
Real clean work...came out nice.
TopRamen
SA-5
- Joined
- Aug 9, 2013
- Messages
- 9,955
- Reaction score
- 112
Real clean work...came out nice.
Thanks.
I was just going for something that would be easy to clean, first and foremost.
I'de been itching to use the Krylon Dual Superbond Paint + Primer "Camp Green" on something for awhile now, and I like the green on grey look.
Everything was wire brushed down first, then blasted with a non-chlorinated brake parts cleaner before a couple of coats of the basic Rustoleum Automotive Primer.
The post is just going to get scratched up everytime I move the motor for any reason, so I just rubbed the primer with a scotchbrite before clearcoating it, and was not worried about getting a very even finish, just stopping any rust. It's not a rocket, just shop equipment, and is going to get messy, so I just tried for nice.
When I'm ready to place it, the J-hook will serve to secure it just enough to prevent any accidental tip overs, and also makes it easier to mve around. I removed the roller balls from the bottom, and it will get lag bolts and washers through a solid plywood base eventually too. The threads are the same as the small square head bolt it replaces, and I added a washer and nut where it meets the threaded hole so as to not risk tearing out the threads, and to lock it in position.
Last edited:

Nick@JET
Well-Known Member
- Joined
- Sep 1, 2011
- Messages
- 1,693
- Reaction score
- 20
What am I building?
View attachment 301940
These few parts cost me $20 :surprised:. Now I need to pour through various schematics and find one that works for me.
3 bank launch controller?
dford
Tada
- Joined
- Apr 23, 2016
- Messages
- 330
- Reaction score
- 2
Finished the fin set for my Go Devil. Beveled/rounded leading edge and tip cord. Chamfer both sides of the trailing edge.
Yesterday I threw together a new fin jig. So of course today I had to bond a fin on. She won't spread her wings for a couple months and when she does she'll be ripping! A fin a day keeps the constant itch away. Or at least until more parts arrive.
Yesterday I threw together a new fin jig. So of course today I had to bond a fin on. She won't spread her wings for a couple months and when she does she'll be ripping! A fin a day keeps the constant itch away. Or at least until more parts arrive.
Cabernut
Well-Known Member
- Joined
- Oct 15, 2015
- Messages
- 1,384
- Reaction score
- 9
3 bank launch controller?
Yup. Also for 3x clusters so that each ignitor can be checked for continuity. I'm not going the twisted wire route again.
My Astron II controller isnt going to cut it anymore.
Flyfalcons
Well-Known Member
- Joined
- Apr 14, 2015
- Messages
- 2,584
- Reaction score
- 912
Edited together a video from the launch I attended last weekend.
[video=youtube;YDte1G86fAo]https://www.youtube.com/watch?v=YDte1G86fAo&feature=youtu.be[/video]
[video=youtube;YDte1G86fAo]https://www.youtube.com/watch?v=YDte1G86fAo&feature=youtu.be[/video]
dford
Tada
- Joined
- Apr 23, 2016
- Messages
- 330
- Reaction score
- 2
Edited together a video from the launch I attended last weekend.
[video=youtube;YDte1G86fAo]https://www.youtube.com/watch?v=YDte1G86fAo&feature=youtu.be[/video]
That is pretty sweet! Undeterred for sure. It was raining!
Flyfalcons
Well-Known Member
- Joined
- Apr 14, 2015
- Messages
- 2,584
- Reaction score
- 912
Now now, we don't launch in the rain, it was just "exceptionally humid".
TopRamen
SA-5
- Joined
- Aug 9, 2013
- Messages
- 9,955
- Reaction score
- 112
Started putting up my pegboard mounts in my shop rebuild.
Got these at Walmart for $1 a piece in the clearance isle.
I've had nowhere to put these til' now, and pegboard is so useful. Now to find all my hooks and assorted pegable stuff.

I also started tracing the wheel covers for the bandsaw so I can get started making my mold today.
Each cover is identical, the only difference is where you mount the hinges and lock.
A careful look at the two pieces reveal that they are cast from the same mold, so for my purposes of reproduction, a single mold will suffice. I am modifying the design slightly to make it easy to work with, and the fiberglass/metal covers will go on the saw til' I can properly restore the originals.
Thankfully, others have restored these same covers on some of the woodworking forums like Lumberjocks and such, so techniques I'll use for fixing them up have already been tried, tested, vetted by forums and found to yield good results.
As far as the piece that connects the two covers and holds the hinges, I actually have plenty of scrap steel and aluminum extrusions that have the piece in them already, simply requiring me to pick one, then cut the shape from it and drill six holes.
I'm tracing the covers on invisible grid graph paper, so as to aid in making accurate drawing and getting good measurements.
I'm going to my Mom's this morning to walk my Dog and she has boxes of unused cooking wares, like teflon coated baking sheets for pizzas and the like, from which I will select the parts to make the mold press.
I actually woke up at 2:00 this morning with the entire process visualized right in front of me.
Just making the tracings gets chips/particles of what is most likely lead based paint everywhere, so until I can get that paint stripped, the actual restoration of the originals can't begin properly.

ETA: My efforts to make a suitable substitute set of wheel covers became frustrating and a waste of my time, so I just went ahead and began the messy business of stripping the paint with Acetone, outside, and the little remaining spots can get wet sanded outside too.
I just hate having to wear all that PPE crap when it is hot out.
I'll still DIY a set of wheel covers someday, but I'll just go ahead and start the restoration on the ones I have rather than beat around the bush with my silly ideas.
Got these at Walmart for $1 a piece in the clearance isle.
I've had nowhere to put these til' now, and pegboard is so useful. Now to find all my hooks and assorted pegable stuff.
I also started tracing the wheel covers for the bandsaw so I can get started making my mold today.
Each cover is identical, the only difference is where you mount the hinges and lock.
A careful look at the two pieces reveal that they are cast from the same mold, so for my purposes of reproduction, a single mold will suffice. I am modifying the design slightly to make it easy to work with, and the fiberglass/metal covers will go on the saw til' I can properly restore the originals.
Thankfully, others have restored these same covers on some of the woodworking forums like Lumberjocks and such, so techniques I'll use for fixing them up have already been tried, tested, vetted by forums and found to yield good results.
As far as the piece that connects the two covers and holds the hinges, I actually have plenty of scrap steel and aluminum extrusions that have the piece in them already, simply requiring me to pick one, then cut the shape from it and drill six holes.
I'm tracing the covers on invisible grid graph paper, so as to aid in making accurate drawing and getting good measurements.
I'm going to my Mom's this morning to walk my Dog and she has boxes of unused cooking wares, like teflon coated baking sheets for pizzas and the like, from which I will select the parts to make the mold press.
I actually woke up at 2:00 this morning with the entire process visualized right in front of me.
Just making the tracings gets chips/particles of what is most likely lead based paint everywhere, so until I can get that paint stripped, the actual restoration of the originals can't begin properly.
ETA: My efforts to make a suitable substitute set of wheel covers became frustrating and a waste of my time, so I just went ahead and began the messy business of stripping the paint with Acetone, outside, and the little remaining spots can get wet sanded outside too.
I just hate having to wear all that PPE crap when it is hot out.
I'll still DIY a set of wheel covers someday, but I'll just go ahead and start the restoration on the ones I have rather than beat around the bush with my silly ideas.
Last edited:
TopRamen
SA-5
- Joined
- Aug 9, 2013
- Messages
- 9,955
- Reaction score
- 112
One down, one to go, but I'm loving it, so I'm saving the second cover for breakfast.:wink:
Turns out the reaction of CA with Sodium Bicarbonate is perfect for fusing pot metal, and I could not be happier!
The one on the left wa sonly warped, so I cracked it on purpose out of necessity, confident that this would work as I envisioned it. It did, and while the resulting product will be a B*&%^ to sand, it is sand-able and shapable, and will get the other prescribed methods if necessary too.
The one on the right fits back together like the day it was broken, indicating that the tool was in constant use, and well cared for at the time the damages occurred.
Sadly, the Tech to properly mend it did not exist yet, so it was riveted back together, with a copper sub-plate, which was perfectly done, and worked fine, but that must have been back in the 60's of the last century, and there is no reason given my limited skills that the thing cannot look undamaged. I do not know the story behind the damage, but when I touch things, I get a general sense of what may have happened, and none of the scenarios that are possible are good, so we must fuse the joints permanently. The things these older Tools must have seen
! Folks made their livelihoods with this tool back in the day!
Whatever happened to cause the damage must have really been a catastrophe, or, maybe back in the day you just took it on the chin and sucked it up and drove on?
Either way, it's such an honor to care for this tool and love it as much as I do, and I'm so glad to have the time finally to get it cleaned up.
Were it not for Rocketry Forum, I'de never have this opportunity, so Kudos to the Forum.
Obviously Kudos to the forum member who gave me the thing too, but I keep him informed of how much I like it via PM.
I will keep this tool forever, so any traces of it's past will be honored and respected, yet like me, it must be true to it's purpose, and look the part while doing it, even if it hides it's blemishes.
I sure do love this bandsaw, and I can only hope I'm doing it justice, but I'm doing my best, and that will have to be good enough.
I certainly am enjoying the everything out of it!
The last pic' looks good in both "Auto-Adjust" and "Revert To Original", so I share both.
It reminds me of Fossil hunting.


I'll fuse those cracks tomorrow!
I have an entire desk dedicated to the restoration of these covers.
Turns out the reaction of CA with Sodium Bicarbonate is perfect for fusing pot metal, and I could not be happier!
The one on the left wa sonly warped, so I cracked it on purpose out of necessity, confident that this would work as I envisioned it. It did, and while the resulting product will be a B*&%^ to sand, it is sand-able and shapable, and will get the other prescribed methods if necessary too.
The one on the right fits back together like the day it was broken, indicating that the tool was in constant use, and well cared for at the time the damages occurred.
Sadly, the Tech to properly mend it did not exist yet, so it was riveted back together, with a copper sub-plate, which was perfectly done, and worked fine, but that must have been back in the 60's of the last century, and there is no reason given my limited skills that the thing cannot look undamaged. I do not know the story behind the damage, but when I touch things, I get a general sense of what may have happened, and none of the scenarios that are possible are good, so we must fuse the joints permanently. The things these older Tools must have seen
! Folks made their livelihoods with this tool back in the day!
Whatever happened to cause the damage must have really been a catastrophe, or, maybe back in the day you just took it on the chin and sucked it up and drove on?
Either way, it's such an honor to care for this tool and love it as much as I do, and I'm so glad to have the time finally to get it cleaned up.
Were it not for Rocketry Forum, I'de never have this opportunity, so Kudos to the Forum.
Obviously Kudos to the forum member who gave me the thing too, but I keep him informed of how much I like it via PM.
I will keep this tool forever, so any traces of it's past will be honored and respected, yet like me, it must be true to it's purpose, and look the part while doing it, even if it hides it's blemishes.
I sure do love this bandsaw, and I can only hope I'm doing it justice, but I'm doing my best, and that will have to be good enough.
I certainly am enjoying the everything out of it!
The last pic' looks good in both "Auto-Adjust" and "Revert To Original", so I share both.
It reminds me of Fossil hunting.
I'll fuse those cracks tomorrow!
I have an entire desk dedicated to the restoration of these covers.
Last edited:
RocketFeller
Well-Known Member
- Joined
- Sep 15, 2009
- Messages
- 1,185
- Reaction score
- 74
Edited together a video from the launch I attended last weekend.
[video=youtube;YDte1G86fAo]https://www.youtube.com/watch?v=YDte1G86fAo&feature=youtu.be[/video]
Nice video! I wish I could have been there Friday, the weather looked great!
EXPjawa
Well-Known Member
Let's see, today I got a base coat of silver paint on my MAC Scorpion, and the decals for it arrived from Stickershock. Due to my planned paint scheme, I decided that the standard decal logo for it was too big, so I asked Mark to make a half-size version. I think it'll be perfect.
Also, wait for it...
...I finished the Berthasaurapod, after only six months. Most of that time was waiting to get to painting...
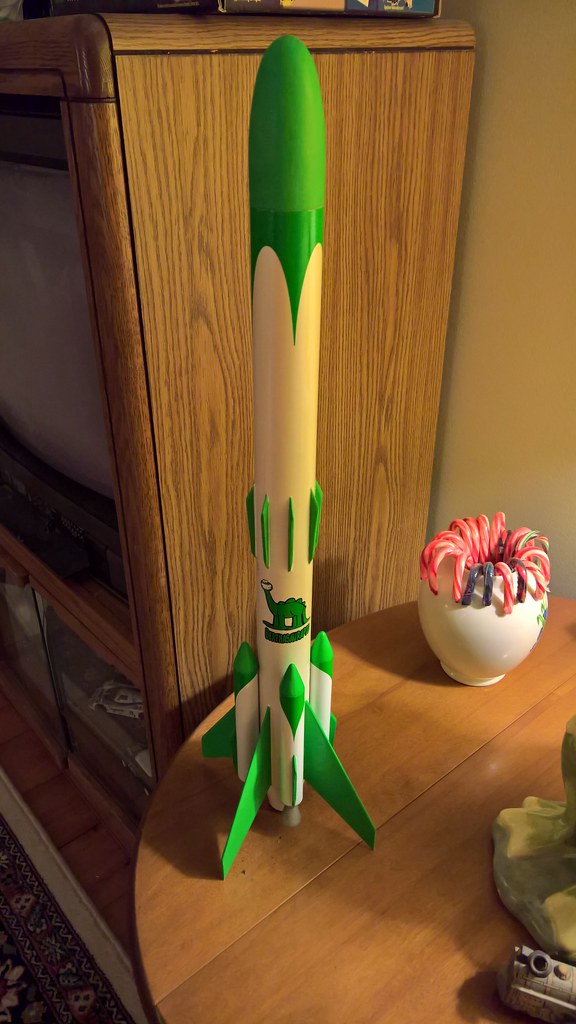
Well, I use the term "finished" loosely. It will need a clearcoat yet, since the green paint is matte and the green vinyl is glossy, and I have to put in the parachute. But other than that, yeah, finished!
Also, wait for it...
...I finished the Berthasaurapod, after only six months. Most of that time was waiting to get to painting...
Well, I use the term "finished" loosely. It will need a clearcoat yet, since the green paint is matte and the green vinyl is glossy, and I have to put in the parachute. But other than that, yeah, finished!
chrisudy
Well-Known Member
Fins attached to the Mega DRM!
TopRamen
SA-5
- Joined
- Aug 9, 2013
- Messages
- 9,955
- Reaction score
- 112
Let's see, today I got a base coat of silver paint on my MAC Scorpion, and the decals for it arrived from Stickershock. Due to my planned paint scheme, I decided that the standard decal logo for it was too big, so I asked Mark to make a half-size version. I think it'll be perfect.
Also, wait for it...
...I finished the Berthasaurapod, after only six months. Most of that time was waiting to get to painting...
Well, I use the term "finished" loosely. It will need a clearcoat yet, since the green paint is matte and the green vinyl is glossy, and I have to put in the parachute. But other than that, yeah, finished!
Very nice!!!!
TangoJuliet
Well-Known Member
- Joined
- Jun 26, 2016
- Messages
- 1,239
- Reaction score
- 13
Let's see... I assembled a 12" plastic parachute for some LPR models. Then I butt glued sheeting for the fin skins on my Mega Der Red Max. And I'm still contemplating how to address some rolled/crushed tubing on the MDRM BT . It affects about 1/2 of the circumference, and is almost 1/2" wide on the NC end. I inserted the NC upside down into that end initially to "un-curl" the tubing a little without splitting it. Rather than cut 1/2" off, I'm thinking I might be able to strengthen it with some thin CA on the inside. Filler Primer should then take care of the outside during finishing . At least that's the idea right now, but I'm open to hearing arguments against doing it that way, so long as you offer another approach with supporting argument .


. It affects about 1/2 of the circumference, and is almost 1/2" wide on the NC end. I inserted the NC upside down into that end initially to "un-curl" the tubing a little without splitting it. Rather than cut 1/2" off, I'm thinking I might be able to strengthen it with some thin CA on the inside. Filler Primer should then take care of the outside during finishing . At least that's the idea right now, but I'm open to hearing arguments against doing it that way, so long as you offer another approach with supporting argument .rharshberger
Well-Known Member
Let's see... I assembled a 12" plastic parachute for some LPR models. Then I butt glued sheeting for the fin skins on my Mega Der Red Max. And I'm still contemplating how to address some rolled/crushed tubing on the MDRM BT
View attachment 302093View attachment 302094
Actually the plan you have for the repairs should work well.
TopRamen
SA-5
- Joined
- Aug 9, 2013
- Messages
- 9,955
- Reaction score
- 112
Let's see... I assembled a 12" plastic parachute for some LPR models. Then I butt glued sheeting for the fin skins on my Mega Der Red Max. And I'm still contemplating how to address some rolled/crushed tubing on the MDRM BT
View attachment 302093View attachment 302094
If you can get the nose cone's shoulder inserted, now that you have bent it back as best as possible, you may try wrapping the shoulder and some of the exposed portion of the cone in Teflon tape and inserting it before you go around the rim with just a little CA.
I just went and tried this on a small section of a current build after peeling away some glassine just to make sure it would release, as it was just an idea.
That way you know things will fit right. Do the CA on the inside after removing the cone, and it should hold it's shape perfectly since the outside is already hardened in the right shape.
The CA did not adhere to the Teflon tape, but if it had, I would have to cut a new tube from stock, so no big deal.

TopRamen
SA-5
- Joined
- Aug 9, 2013
- Messages
- 9,955
- Reaction score
- 112
Fused that wheel cover together, and it came out better than I could have even hoped for.
No more rivet holes either.
I'll still sand it and give it a veneer of FG cloth and Bondo filler before painting, but it is usable as is, and the geometry is perfect, as it lays level on the desk.
This thing is going to look sharp! Thank goodness I gave up on trying to make entirely new parts, as I'm really going to like having it look as near to original as possible, and to me that will be more of an accomplishment than if I went and just slathered CF and FG on everything to make it look all "TopRameny".:blush:
It was missing a small chip, so I'll have to fill that in too prior to glassing, but it is one piece again, and the metal would break before my joints would, so it is better than new as far as I'm concerned.
Oh, and it is also the funnest thing I've worked on in a long time, so I'm savoring every moment of it!
I have the rest of the machine in pieces all cleaned up except for a few parts that need to go outside to get cleaned.
A trip to the Hardware store was made today, so there are some nice shiny nuts & bolts awaiting employment too.


I'll use this guys method for mounting the new tires, as it is the most sensible.
https://www.youtube.com/watch?v=j4etjdqmwz8
No more rivet holes either.
I'll still sand it and give it a veneer of FG cloth and Bondo filler before painting, but it is usable as is, and the geometry is perfect, as it lays level on the desk.
This thing is going to look sharp! Thank goodness I gave up on trying to make entirely new parts, as I'm really going to like having it look as near to original as possible, and to me that will be more of an accomplishment than if I went and just slathered CF and FG on everything to make it look all "TopRameny".:blush:
It was missing a small chip, so I'll have to fill that in too prior to glassing, but it is one piece again, and the metal would break before my joints would, so it is better than new as far as I'm concerned.
Oh, and it is also the funnest thing I've worked on in a long time, so I'm savoring every moment of it!
I have the rest of the machine in pieces all cleaned up except for a few parts that need to go outside to get cleaned.
A trip to the Hardware store was made today, so there are some nice shiny nuts & bolts awaiting employment too.
I'll use this guys method for mounting the new tires, as it is the most sensible.
https://www.youtube.com/watch?v=j4etjdqmwz8
Last edited:
SS/EA 6BBL 71 Cuda
Well-Known Member
- Joined
- Sep 18, 2011
- Messages
- 2,340
- Reaction score
- 60
Just got home from a well deserved two week vacation running around the Great Lakes (as usual) looking at Lighthouses.
That's right i spend my idle time crawling around Lighthouses wearing my pink pants because i like Lighthouses...
Not so much what i did today but, what someone else did for me-
I'd like to recognize a good friend Nick Adams aka Nick@Jet on the forum here for dropping by the Tree Farm and, dropping off some donated equipment too help Sabrina "The Wildchild" and, i have a most excellent time at Midwest Power 14!
See, were flying a 29mm Two Stage Minimum Diameter rocket and, its getting REAL TIGHT up in the Av Bay...Along comes Nick with his many, many years of experience in the RC world and, all the Lipo battery help he can tolerate me incurring/asking about.
Of consideration is also Mark Joseph of Central Illinois Aerospace fame and, of course Eric "You the Man!" Cayemberg for all their help and, listening to all my crazy questions. :smile:
Humble Thank-yous! :wave:
Tomorrow we do some Head End Ignition Testing and, bag the fin cans...No pictures yet...:no: *Secret* *Secret* :dark:
Nick? Shhhhhhh.......I did find a real nice charging lug and, power line to complete the equation on a small RC site tonight...Going to still be able to use my current Charger too! There WILL be more questions shortly...
Thanks Dude!
That's right i spend my idle time crawling around Lighthouses wearing my pink pants because i like Lighthouses...
Not so much what i did today but, what someone else did for me-
I'd like to recognize a good friend Nick Adams aka Nick@Jet on the forum here for dropping by the Tree Farm and, dropping off some donated equipment too help Sabrina "The Wildchild" and, i have a most excellent time at Midwest Power 14!
See, were flying a 29mm Two Stage Minimum Diameter rocket and, its getting REAL TIGHT up in the Av Bay...Along comes Nick with his many, many years of experience in the RC world and, all the Lipo battery help he can tolerate me incurring/asking about.
Of consideration is also Mark Joseph of Central Illinois Aerospace fame and, of course Eric "You the Man!
" Cayemberg for all their help and, listening to all my crazy questions. :smile:Humble Thank-yous! :wave:
Tomorrow we do some Head End Ignition Testing and, bag the fin cans...No pictures yet...:no: *Secret* *Secret* :dark:
Nick? Shhhhhhh.......I did find a real nice charging lug and, power line to complete the equation on a small RC site tonight...Going to still be able to use my current Charger too! There WILL be more questions shortly...
Thanks Dude!
matthewdlaudato
Well-Known Member
- Joined
- Nov 17, 2013
- Messages
- 922
- Reaction score
- 56
I did some organizing and cleanup in the garage/shop, including hanging these two LED shop lights (from Home Depot, $30 each).
Huge difference, well worth the (very reasonable) price.

Huge difference, well worth the (very reasonable) price.

NAR29996
Well-Known Member
I made repairs to my TLP Phoenix, and to my Xarconian Cruiser. Both were damaged last weekend landing on the asphalt.
smapdiage9
Well-Known Member
- Joined
- Mar 14, 2009
- Messages
- 442
- Reaction score
- 3
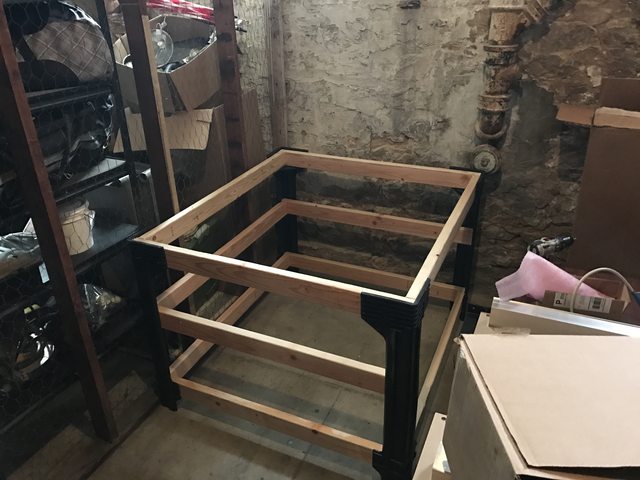
Built a new table so I could upsize my centering ring, fin, and sled manufacturing machine!

Similar threads
- Replies
- 158
- Views
- 6K
- Replies
- 5
- Views
- 297
- Replies
- 18
- Views
- 2K
- Replies
- 1
- Views
- 986