What did you do rocket wise today?

The Rocketry Forum

Help Support The Rocketry Forum:

This site may earn a commission from merchant affiliate links, including eBay, Amazon, and others.
Took a break from prepping rockets for Hellfire, we have 27 ready as of today. Sharon got frustrated with the plastic tubes that the CTI motor cases come in and ordered two sizes of tubular netting from Uline, red two inch and blue four inch. So today I pulled out all the cases that haven't been loaded into rockets and started cutting this stuff to protect our cases. This turned out to be quite a project, despite the fact that we have a bunch of motors already loaded into rockets. When I get into projects like this, I have to wonder if we might be a bit "over the top" with rocketry....
067.jpg


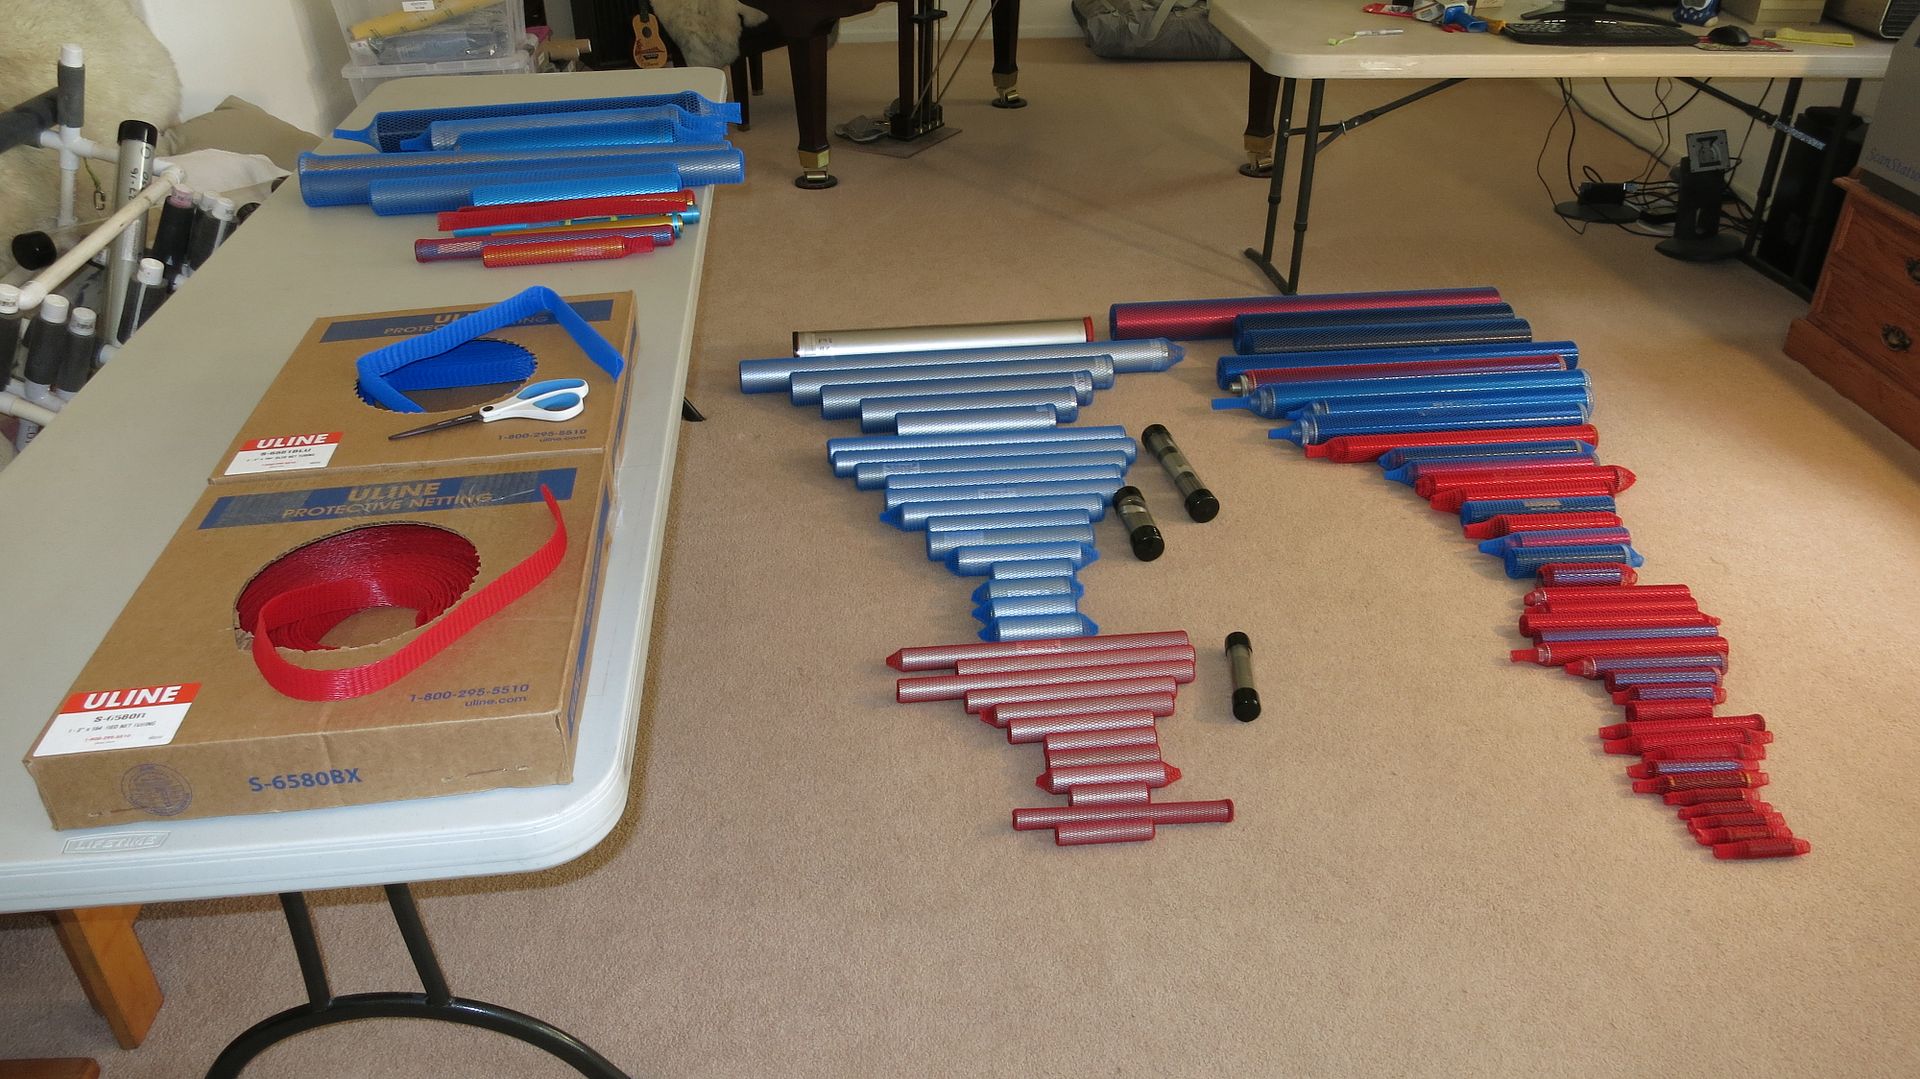
Since Sharon has started mixing research motors, we also have a few snap ring cases, they are on the table to the left. The CTI casings are in the middle, and the AT casings are on the right. We aren't planning on flying any 38mm CTI motors until they provide replacements for the forward plugs, so those casings are the complete set we have. The 29mm CTI casings are almost all in rockets, along with a bunch of 38mm AT casings. We haven't started prepping our 54mm rockets yet, and we aren't planning on flying any 98mm motors for Hellfire, since we can't take the toy hauler out onto the salt flats. It's the only way to transport the BIG rockets, and I'm still trying to recover from LDRS....
Yeah, definitely edging closer to over the top, Wayne.

Where are you buying the tubular netting in bulk?
 
Finally powered up the lathe I've been building for the past few months!!!:)
Just need to make the guide parts so I can use templates, and I'll be making cones and such!
I'm tempted to have a go at some freehand work, but my back is destroyed from something I did a few days ago, so I'm limping around and need a cane to get up or go down the front steps, so maybe not tonight.

[video=youtube;v5xgqUitNcc]https://www.youtube.com/watch?v=v5xgqUitNcc[/video]


ETA: The motor in the video turned out to be woefully underpowered, but I have a 1/3hp grinder with half inch arbors that will hold a pully and I found a pulley for a 3/8" shaft, so I'll be back in business this evening hopefully.
If I have to step up to the 1/2hp motor I have waiting to go on my drill press, I'm just going to get more 1/2" bearings and use a 1/2" rod for a spindle, but then I'll still need to make a smaller lathe for the smaller stuff, but I'm doing my research along the way and learning quite a bit from my mistakes.

I did manage to make a fine mess of the front porch and begin a 4" diameter 9" ogive cone.
 
Last edited:
Still trying to recover from the loss of my wife and I's anniversary rocket on the 9th of July (last seen headed over the woods). It was the 4th and last flight of the 3D MD (a modified Big Daddy). Will be building its replacement (3D MD II) as soon as I can get another Big Daddy and another 3"x36" BT. Also lost was the NC to my DynaStar-Stonebreaker along with my Jolly Logic Chute Release System that was attached to said NC. Although it was an expensive weekend, still managed to have some fun with family and friends.
Last photo of 3D_MD.JPG
 
Last edited:
Just got 35/35 on the Amateur Radio Technicians Exam. All tracking options are now open...for a cost, of course.
 
Finally powered up the lathe I've been building for the past few months!!!:)
Just need to make the guide parts so I can use templates, and I'll be making cones and such!
I'm tempted to have a go at some freehand work, but my back is destroyed from something I did a few days ago, so I'm limping around and need a cane to get up or go down the front steps, so maybe not tonight.

[video=youtube;v5xgqUitNcc]https://www.youtube.com/watch?v=v5xgqUitNcc[/video]


ETA: The motor in the video turned out to be woefully underpowered, but I have a 1/3hp grinder with half inch arbors that will hold a pully and I found a pulley for a 3/8" shaft, so I'll be back in business this evening hopefully.
If I have to step up to the 1/2hp motor I have waiting to go on my drill press, I'm just going to get more 1/2" bearings and use a 1/2" rod for a spindle, but then I'll still need to make a smaller lathe for the smaller stuff, but I'm doing my research along the way and learning quite a bit from my mistakes.

I did manage to make a fine mess of the front porch and begin a 4" diameter 9" ogive cone.

That is just too cool! Nice job Top!
 
That is just too cool! Nice job Top!

Thanks. The second motor made it to test fit, and hole marking, and I even ran it for a few seconds, but it got dark out, so I'll pick up where I left off in the morning.
Atleast I know everything fits and spins, and this one has more than ample power!

Now I need to design some sort of vacuum/dust collector, as this is very, very messy. Every bit as messy as I was warned it would be.
 
Painted my Madcow Lil Goblin 38. Out of 5 cans of Rusto pink fluorescent pain, two failed and began shooting pain out from under the nozzle. Third one would spray no more than 10 seconds before needing to shake the can vigorously to get the spray working again. Fourth can...almost completely empty...worked fine but ran out before the job was done. Fifth can seemed to work okay.

I saved the nozzle from almost empty can and cleaned it out with thinner. Might need it as a "known good" spare.

Tomorrow I'll be exchanging the three defective cans at Home Depot...where they came from.
 
Got my revisions done to my foam lathe, and I'm pretty certain that this time it will not be under-powered.
I don't know what I was thinking with that other set up, but this time I think I've got it set up right.
We'll find out tomorrow when I try to finish off that 4" cone for my Martel.:)


Foam Lathe V.2.0 2016-07-22 001.jpgFoam Lathe V.2.0 2016-07-22 005.jpg


[video=youtube;9nwZHdVUCX0]https://www.youtube.com/watch?v=9nwZHdVUCX0[/video]
 
When you finish with the lathe, you need to build a ball mill and make your own charcoal. :wink:
 
Freudian slip???
Nope. There were a lot of "Words Of Power" involved and the defective cans are now probably going through an industrial shred at the recyclers. Highly unlikely that Home Depot returns them to Rustoleum.

Fluoro paints in general apply blotchy, so yes, there is pain. They are extremely frustrating to apply evenly. Thinking about switching over to Ferrari Red instead of fluoro "pink" which actually finishes to a reddish orange most times. Grrr...
 
Congrats. If you want to mess around with RDF, let me know. You can play around with my Marshall stuff.

Thanks, but I'm lazy. I'm focusing on some GPS options. Really liking the BRB APRS setup as I've been thinking about trying a high altitude balloon project also. Maybe do it with the boys' elementary school...they would get something out of it, and if someone finds the payload before I get there having elementary school markings on it would probably help get it back.
 
Something was bothering me about my use of the Macklin jig, didn't feel like I was doing it enough justice.

Had some time at the hardware store, so I grabbed a cheap plastic level and some magnets.

As suspected, those fins were 1-3° off. Shouldn't ever happen again, though. :)

1469318220564.jpg
 
Today I made 5 flights at the MARS launch in Geneseo, plus my nephew launched his orange crayon 3 times. My stuff was all small low power, due to fairly high winds.

Also, I realized that I'd already created most of the standard PSII parts in Rocksim for my Cherokee G & Iroquois F, so I set about creating Rocsim files for the Argent, Partizon & Sahara. I can make the Panavia pretty easy from the existing Cherokee, and I already had a Leviathan that I reworked from a file found on RocketReviews.com, so I'll just have to do the Ventris & Scion at some point when I feel like creating the fins. To bad Rocksim doesn't have a function that reverses an existing part, like a fin or transition...
 
Let see:

Worked on two different rockets today:
Estes Partizon
- Built a baffle kit and did a test fit
- Glued the front and middle centering rings on (aft centering ring will be left off until internal fillets are done)
- Glued in the body tube couplers
- Glued together the "tea bag" shock cord mount, may not be used though

Estes Super Neon
- Joined the included shock cord with some sewing elastic to make it longer
- Glued the elastic end into the "tea bag" mount

Purchased a new "E" type launch controller and two packs of E9-4 Estes motors
 
Gave my daughter a picture of the Madcow Momba for her birthday today. (Didn't get to order it soon enough to actually show up). BUT then talked with Mark at Stickershock and got a custom decal set for her that she was thrilled with when she saw his artwork he sent! Can't wait to work through this one with her. She's really enjoying rocketry and was thrilled with the Midpower rockets from the last club launch. So while she cannot do HPR at 12, she can learn all the techniques now with this awesome Mid-power and have one of the best looking rockets in the house to boot!!
 
After sanding down the previous coat with 800 grit, laid a new white top coat on Biohazard and got the best results ever with Rusto 2x gloss white. Normally I try to do the two light coats followed by one heavy coat in one session, but I rarely get a smooth final surface. Sanding before the final coat sure makes a huge difference, although it adds (for me) a painful amount of additional time to the build.
ImageUploadedByRocketry Forum1469403198.072286.jpg
 
Messed around with the lathe and turned a practice cone to get everything running smoothly and predictably.
Once I realized I could make a faceplate from the sanding disc I had things went quite well.
I had been having an issue with the fact that I drilled sloppy holes through the foam at the center, and if I applied too much pressure while sanding, the spindle would spin in the foam. I made a sleeve from some scrap that basically stepped it from 3/8" to 1/2", then drilled 4 holes in the back of the sanding disc so I could stick nails through it and into the cone to keep it solid. It was very tricky to sand, because after the first giant foam blizzard mess I made, I decided to hold the vacuum hose to the work with one hand while sanding with the other. I'll have to make a special attachment that hold the sandpaper or tool onto the hose until I can get a dedicated set up devised for dealing with the mess.

First Turning With Lathe 2.0 2016-07-24 006.jpgFirst Turning With Lathe 2.0 2016-07-24 008.jpgFirst Turning With Lathe 2.0 2016-07-24 009.JPG
 
Messed around with the lathe and turned a practice cone to get everything running smoothly and predictably.
Once I realized I could make a faceplate from the sanding disc I had things went quite well.
I had been having an issue with the fact that I drilled sloppy holes through the foam at the center, and if I applied too much pressure while sanding, the spindle would spin in the foam. I made a sleeve from some scrap that basically stepped it from 3/8" to 1/2", then drilled 4 holes in the back of the sanding disc so I could stick nails through it and into the cone to keep it solid. It was very tricky to sand, because after the first giant foam blizzard mess I made, I decided to hold the vacuum hose to the work with one hand while sanding with the other. I'll have to make a special attachment that hold the sandpaper or tool onto the hose until I can get a dedicated set up devised for dealing with the mess.

View attachment 297683View attachment 297684View attachment 297685

Your Yankee ingenuity continues to amaze me, Top. I'm sure you already have plans to create a vacuum duct to catch all the "snow" from your turning efforts.

Are you going to use the nose cone you turned to lay up a fiberglass or carbon fiber one?
 
Your Yankee ingenuity continues to amaze me, Top. I'm sure you already have plans to create a vacuum duct to catch all the "snow" from your turning efforts.

Are you going to use the nose cone you turned to lay up a fiberglass or carbon fiber one?

I am figuring out how to properly duct the box to draw all the "Snow" into a dust trap of some sort.

I'm not sure what I'll do with this cone. I based it on the dimensions of my 4" mostly foam Martel AS37, in the hopes I could use it for that, but it was a learning experience cone, and now it is too small for that build.
I may just hang it from a wire as a souvenir of my first thing I made on my lathe.
I think I'm just going to start a new one tomorrow, and save any of the ones I make mistakes on to be able to show what I did wrong or remind myself what not to do.

I got my hot wire bow made today, so I will do the next cone with the guides I made using the nosecone template from my OR file.
then for the sanding bit, it will be easy to do the vacuum attachment, as I'll be moving in one straight line for each pass of the sanding block.:)

Martelfourwirebow 2016-07-25 001.jpgMartelfourwirebow 2016-07-25 002.jpg
 
Back
Top