Arduino altimeter - dual recovery for less than 20 dollar

The Rocketry Forum

Help Support The Rocketry Forum:

This site may earn a commission from merchant affiliate links, including eBay, Amazon, and others.
Jeff which breadboard picture?
The diagram which shows how to hook up an Arduino Uno to a breadboard with a ATMega328 for programming (downloading sketches) the AltiDuo AVR.

I am not having any luck using the cable as cerving suggested above. I have COM4 set to 9600,8,1,N and the same in the IDE. But I can not download a sketch (V1_2). I have the AtliDuo powered by the battery. I have a USB cable/serial cable hooked up with the GND to GND, TX -> RX, and RX -> TX (yes I tried the reverse as well in case I got them backwards). But no luck.

So I thought I would use my Diavolino board as a programmer as your document shows. But I need a little higher resolution diagram.

Thanks!
Jeff
 
Forgive me if I missed it, but do you have a list of the parts that you used? I am thinking that I might want to build one of these...
 

The diagram which shows how to hook up an Arduino Uno to a breadboard with a ATMega328 for programming (downloading sketches) the AltiDuo AVR.

I am not having any luck using the cable as cerving suggested above. I have COM4 set to 9600,8,1,N and the same in the IDE. But I can not download a sketch (V1_2). I have the AtliDuo powered by the battery. I have a USB cable/serial cable hooked up with the GND to GND, TX -> RX, and RX -> TX (yes I tried the reverse as well in case I got them backwards). But no luck.

So I thought I would use my Diavolino board as a programmer as your document shows. But I need a little higher resolution diagram.

Thanks!
Jeff
Jeff
I will send you a PM with the picture
 
WARNING - NO ROCKETRY CONTENT HERE EITHER... :)


Jeff:

Assuming the ATMega has an Arduino bootloader on it..

o Connect the serial cable as previously mentioned.
o Set your serial port to 115200 baud... programming at 9600 is nasty.
o Open up the appropriate Arduino environment and load the sketch.
o Go to Tools and pick the serial port, and the board type (most likely Uno).
o For programmer, select Arduino as ISP

Here's the tricky part. Shunt the RST terminal temporaily to ground, holding the ATMega chip in Reset mode. Click on the Upload button in the Arduino IDE, and as soon as it tells you the size of the sketch release the Reset shunt. This will start the bootloader and hopefully tell AVR-Dude to sync up. You may have to do this a few times to get the timing correct, but it does work... I've done this literally a thousand times.


The diagram which shows how to hook up an Arduino Uno to a breadboard with a ATMega328 for programming (downloading sketches) the AltiDuo AVR.

I am not having any luck using the cable as cerving suggested above. I have COM4 set to 9600,8,1,N and the same in the IDE. But I can not download a sketch (V1_2). I have the AtliDuo powered by the battery. I have a USB cable/serial cable hooked up with the GND to GND, TX -> RX, and RX -> TX (yes I tried the reverse as well in case I got them backwards). But no luck.

So I thought I would use my Diavolino board as a programmer as your document shows. But I need a little higher resolution diagram.

Thanks!
Jeff
 
Damn dudes... I am really getting into this. Now I want to be dangerous and learn electronics. (NOT TO WORRY! I will not fly anything that is experimental as a deployment controller!) Code I am confident I can do. Been doing it for 30+ years. Hardware, not so much!

Still I find this fascinating. First thing I was gonna do is make it buzz differently. And beep out feet. And beep out the deployment setting (meters or feet) on boot up. Then something crazy like learn how I could make it beep out the battery voltage or something nuts like that. Maybe breadboard an accelerometer and see what it does. No harm as long as I use a proven controller for deployment. All this would be would be like an experimental payload. (Pls: I know it's already been done. The idea is to tinker and learn (safely)!

cerving: I will try when I get home.
 
WARNING - NO ROCKETRY CONTENT HERE EITHER... :)


Jeff:

Assuming the ATMega has an Arduino bootloader on it..

o Connect the serial cable as previously mentioned.
o Set your serial port to 115200 baud... programming at 9600 is nasty.
o Open up the appropriate Arduino environment and load the sketch.
o Go to Tools and pick the serial port, and the board type (most likely Uno).
o For programmer, select Arduino as ISP

Here's the tricky part. Shunt the RST terminal temporaily to ground, holding the ATMega chip in Reset mode. Click on the Upload button in the Arduino IDE, and as soon as it tells you the size of the sketch release the Reset shunt. This will start the bootloader and hopefully tell AVR-Dude to sync up. You may have to do this a few times to get the timing correct, but it does work... I've done this literally a thousand times.

That worked! I can get it most of the time! Thanks. This weekend I'll start soldering up the EggTimer.

In the AltiDuo I already changed the long tone to be less grating on me (it would vibrate the screws loose!).

I added a two second delay between each series of continuity checks so now it is easy to tell which channel has no continuity. It beeps Drogue, then Main, then pauses 2 seconds, Drogue, Main, pauses etc...

Next I'll add feet and beeping out the initial main deployment setting (easy).
Too bad I can't bring more I/O pins out to a DIP switch. I could make feet/meters switch selectable...

I am just getting warmed up... :)
 
Damn dudes... I am really getting into this. Now I want to be dangerous and learn electronics. (NOT TO WORRY! I will not fly anything that is experimental as a deployment controller!) Code I am confident I can do. Been doing it for 30+ years. Hardware, not so much!

Still I find this fascinating. First thing I was gonna do is make it buzz differently. And beep out feet. And beep out the deployment setting (meters or feet) on boot up. Then something crazy like learn how I could make it beep out the battery voltage or something nuts like that. Maybe breadboard an accelerometer and see what it does. No harm as long as I use a proven controller for deployment. All this would be would be like an experimental payload. (Pls: I know it's already been done. The idea is to tinker and learn (safely)!

cerving: I will try when I get home.
Yes the idea is to be able to tailer the program to your need
You can re-use one of the altitude jumpers to be able to select between meter and feet
an acelerometer would be cool as weel but for the moment I am calculating the acceleration, this is how I am planning on doing air start on my data logger
You will see soon what I am working on at the moment; I am palying with a $20 GPS module that is feeding the board with tehe entire flight position...
I must admit I am quite happy with one I have managed to achieve in the last 8 months those little devices are really good fun
make sure you post what you have achieved
 
Thanks Bruno
I am having fun. I actually understand the schematic. Amazing. Did you layout the board? Or is there software that did it for you? (Not that I am making a board... I am 'curious'.)

Changes so far my are very small - hardly worth posting.

Please keep us informed of your progress on your endeavors. They are informative and educational.

I find both this thread, and the EggTimer thread very interesting.

I must buy a complete set of parts from you or cerving and use a breadboard to play with. :D
 
Hello
Just some pictures of my single ejection rocket payload
I am have 2 separate alti Uno using 2 different battery so that one is the backup of the other
100_7182-1.jpg100_7188-1.jpg100_7195-1.jpg
 
Hello
Just some pictures of my single ejection rocket payload
I am have 2 separate alti Uno using 2 different battery so that one is the backup of the other
<img src="https://www.rocketryforum.com/attachment.php?attachmentid=132456"/><img src="https://www.rocketryforum.com/attachment.php?attachmentid=132457"/><img src="https://www.rocketryforum.com/attachment.php?attachmentid=132458"/>

May I ask what the small boards in the leftmost picture are? The ones with a capacitor and a terminal block.

Pretty AV bay setup.
 
May I ask what the small boards in the leftmost picture are? The ones with a capacitor and a terminal block.

Pretty AV bay setup.

Those are not capacitors but screw swithes that I got from Aerocon. If you look at the rocket body tube you will see 2 holes which are used to turn the swithes on and also by the altimeters so that they can pickup pressure changes.
 
Those are not capacitors but screw swithes that I got from Aerocon. If you look at the rocket body tube you will see 2 holes which are used to turn the swithes on and also by the altimeters so that they can pickup pressure changes.

Wow... Fooled me! They really look like capacitors.
 
Hello
Just some pictures of my single ejection rocket payload
I am have 2 separate alti Uno using 2 different battery so that one is the backup of the other
View attachment 132456View attachment 132457View attachment 132458
This week end I have flown 3 rockets with 5 of my altimeters.
A couple of rocket were flown with identical altimeters and the charges went on exactly at the same atitude and time so I would advice for those doing redondancy with 2 identical altimeters to use one charge and 2 ematches
Fortunatly my rockets were strong enough this time but I am not too sure that it is good long term especially with PVC tube...
 
I have finally recieved my AVR adapter board. Those can program the ATtiny 84 and 85 as well as the ATMega 328. This is the easiest way to flash the alti Uno and mini alti Duo.
It can also flash the datalogger and alti Uno. For those of you buying blank chip who want to load a boot loader this is ideal
For those interested I have a limited number of board
101_7200-1.jpg101_7202-1.jpg101_7204-1.jpg
 
I have finally recieved my AVR adapter board. Those can program the ATtiny 84 and 85 as well as the ATMega 328. This is the easiest way to flash the alti Uno and mini alti Duo.
It can also flash the datalogger and alti Uno. For those of you buying blank chip who want to load a boot loader this is ideal
For those interested I have a limited number of board
View attachment 133029View attachment 133030View attachment 133031

OK, this was "fun" when I was an EE undergrad--not now. But hey, I wish the best to you and other Arduino developers with their versions/flavors... I'd say I'm done following here as I'm looking forward to getting my Missileworks RRC3 in a couple days. Honestly, just doesn't seem worth the homebrew stuff and doing source code debugging when you can purchase a solution for $60-$70 bucks where the developer has 20+ years rocketry/altimeter experience and it has 100's of hours of field testing behind it.
 
OK, this was "fun" when I was an EE undergrad--not now. But hey, I wish the best to you and other Arduino developers with their versions/flavors... I'd say I'm done following here as I'm looking forward to getting my Missileworks RRC3 in a couple days. Honestly, just doesn't seem worth the homebrew stuff and doing source code debugging when you can purchase a solution for $60-$70 bucks where the developer has 20+ years rocketry/altimeter experience and it has 100's of hours of field testing behind it.
Well for $70 you get 3 of mine.....
To be honest I started making my own because I was having difficulties in Europe to buy the adept 22. I am now glad I did it because I don't think that I would have been able to afford all the altimeters I have in my rockets.
Also I can program them to do exactly what I want and experiment which is fun.
I have a lot of respect for those guys who have been making altimeters for year but with open hardware if it is the same as open software I am sure that it will catch up quickly .... and if not they are good enough for my rockets and I am having fun.
 
Last edited:
OK, this was "fun" when I was an EE undergrad--not now. But hey, I wish the best to you and other Arduino developers with their versions/flavors... I'd say I'm done following here as I'm looking forward to getting my Missileworks RRC3 in a couple days. Honestly, just doesn't seem worth the homebrew stuff and doing source code debugging when you can purchase a solution for $60-$70 bucks where the developer has 20+ years rocketry/altimeter experience and it has 100's of hours of field testing behind it.

Building my ALTDuino altimeter and all the rest that goes with it has been one of the most thrilling hobby moments in my life and that's what it's all about :)
 
Well for $70 you get 3 of mine.....
To be honest I started making my own because I was having difficulties in Europe to buy the adept 22. I am now glad I did it because I don't think that I would have been able to afford all the altimeters I have in my rockets.
Also I can program them to do exactly what I want and experiment which is fun.
I have a lot of respect for those guys who have been making altimeters for year but with open hardware if it is the same as open software I am sure that it will catch up quickly .... and if not they are good enough for my rockets and I am having fun.

Actually, I get that. And I think you have achieved much. I guess the thing I have been groping for is to validate/justify the thread title "dual recovery for less than 20 dollar(s)." On your site I don't see the pricing. The pricing I can see for an Arduino-based solution is for the Eggtimer which is ~$35 unbuilt. Now the Eggtimer is more feature rich, so let's say your unbuilt board is half that--$17. The board that appeals to me is the Duo-Mini as the smaller size is compelling. But now it looks like I would be purchasing a programming board, as in post 228, to get that solution to work. Those programming boards have to be a pretty penny. Not to mention it looks like in this thread there are a number of mentions of having to tweak the code to integrate it across platforms; so even though it is open source, there is a cost to get the integration done and validated. So when you count the cost of the board/parts, assembly time, programming board, ongoing time/cost to integrate/test code, etc., what is the total cost? I would think it has to be multiple factors of the $20 advertised in the thread title. That's the rub. But maybe I am wrong. So what would you estimate as the true total lifetime solution cost for the Duo-Mini?
 
Last edited:
Actually, I get that. And I think you have achieved much. I guess the thing I have been groping for is to validate/justify the thread title "dual recovery for less than 20 dollar(s)." On your site I don't see the pricing. The pricing can see for an Arduino-based solution is for the Eggtimer which is ~$35 unbuilt. Now the Eggtimer is more feature rich, so let's say your unbuilt board is half that--$17. The board that appeals to me is the Duo-Mini as the smaller size is compelling. But now it looks like I would be purchasing a programming board, as in post 228, to get that solution to work. Those programming boards have to be a pretty penny. Not to mention it looks like in this thread there are a number of mentions of having to tweak the code to integrate it across platforms; so even though it is open source, there is a cost to get the integration done and validated. So when you count the cost of the board/parts, assembly time, programming board, ongoing time/cost to integrate/test code, etc., what is the total cost? I would think it has to be multiple factors of the $20 advertised in the thread title. That's the rub. But maybe I am wrong. So what would you estimate as the true total lifetime solution cost for the Duo-Mini?

I think you're missing something. For most people, this is a hobby - an outlet for recreation and personal satisfaction. There are a lot of avenues to achieve personal satisfaction in model rocketry - scale construction, fine finishing, odd rockets, higher power, altitude, NAR contest, and just plain thrill of seeing something you build fly. For some people, this enjoyment is manifest in different ways. For me, I'm a professional software developer, but the confines of working for a corporation does not fully satisfy my enjoyment of programming - so I contribute to OpenRocket.

These altimeter boards are pretty much purely for experimentation and education. I bought one, and plan on buying a few more because I wanted to learn another kind of software (arduino) and dabble with electronics. Fortunately, Boris had produced a collection of parts which makes this a possibility. I plan on buying a few more kits for personal use, and to hopefully jump start some high school and college kids interest in electronics, embedded systems, and rocketry. The kit I received for $20 included a completely programmed arduino chip and is a basic fully functioning altimeter. Sure there are some things I don't like about it, but I plan on working on the software some too.

If you do not want the experience of assembling the electronics and just want to fly HPR, by all means buy another commercial system. The RRC3 looks amazing and I applaud the engineering required. In fact, because of the AltDuo, I have a better understanding of what went into that product.

Kevin
 
The altimeter kits are definitely not for everyone. From my experience and from what I have seen in the postings, nobody is going to get one as their first DD altimeter... and that's probably a good idea for most people, unless they are looking at it from an electronics hobbyist perspective.

Other than having to be soldered together, the Eggtimer is pretty much complete. The microcontroller is pre-programmed, you need to do a one-time initialization to clear the memory out and set the initial settings but that's it. Once you do that, if you want to use it for dual deploy and not mess with downloading the flight data, you could actually use the pre-programmed settings and never hook it up to the cable again. I've flown it myself a few times like that just because I was pressed for time and didn't want to break out the laptop.

I think there is a slightly different focus between Boris' and Leo's projects and mine, theirs is more from an experimental perspective and mine is more as a commercial product. That fact that I use the Arduino environment in the Eggtimer is secondary, you don't need to know anything about programming or the Arduino to use it... in fact, I try fairly hard to hide all that so you don't. Writing the documentation so that everyone can understand how it works is actually the hardest part; I can change a few lines of C code and recompile in a minute, but it takes at least 10 times longer to document what the changes mean.
 
Actually, I get that. And I think you have achieved much. I guess the thing I have been groping for is to validate/justify the thread title "dual recovery for less than 20 dollar(s)." On your site I don't see the pricing. The pricing I can see for an Arduino-based solution is for the Eggtimer which is ~$35 unbuilt. Now the Eggtimer is more feature rich, so let's say your unbuilt board is half that--$17. The board that appeals to me is the Duo-Mini as the smaller size is compelling. But now it looks like I would be purchasing a programming board, as in post 228, to get that solution to work. Those programming boards have to be a pretty penny. Not to mention it looks like in this thread there are a number of mentions of having to tweak the code to integrate it across platforms; so even though it is open source, there is a cost to get the integration done and validated. So when you count the cost of the board/parts, assembly time, programming board, ongoing time/cost to integrate/test code, etc., what is the total cost? I would think it has to be multiple factors of the $20 advertised in the thread title. That's the rub. But maybe I am wrong. So what would you estimate as the true total lifetime solution cost for the Duo-Mini?
Yes you are right those are for people that know how to use a soldering iron.
I do send altimeters with the chip already programmed so that people can use them without doing any programming. However compear to commercial altimeters you can completly change the behaviour of the altimeter. You could even drive servos instead of pyro charges and use them for water rockets.....
Also I have been looking for a single deployement altimeter for years and I could only find apogee detectors. The one I have made is about 14 euros (less than 20 dollars) and can be used in model rockets. Those are very small for kits. For those interested in building the kits I can provide boards with or without the componants. If you can do the board yourself then you have all the schema, the componant list and programs on my site to do them.
For those who want to play with my altimeters and eventually contribute to make the code better send me a PM for the price list.
 
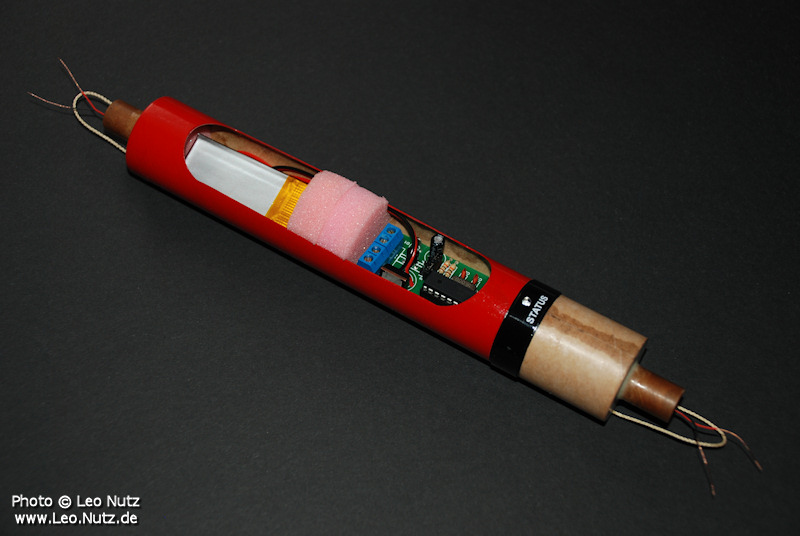
I built an e-bay for use with BT-55 size rockets.

The design is for universal use with the main requirement to be able to house a slightly modified Altiduo.

It will fly as in the pictured setup using my ALTDuino firmware as soon as I have a booster available.

BT-55_E-bay_with_ALTIDUO.jpg
 
One week ago I launched the AtliDuo in my 2.1 inch (54mm) diameter, 1lb 8oz (680gm) rocket using a CTI 207-H151RL. The launch site is about 2700' ASL (820m) and the temp at launch was about 100F (38C)


I used motor ejection. However I hooked up two Quest Q2G2s. One to each channel. There was no black powder, just the Q2G2s. When the rocket recovered both had fired.

As the video below shows, my 'sled' was crude. So crude as to be missing. Instead I put some foam between the back of the AltiDuo and the battery, and then taped the battery to the back. :blush::shock:

It works. The only 'issue' is, it read a bit lower than most sims. 690 meters or about 2300ft. There are a few things I wonder.

Does the BPM085 auto calibrate or does the library initialization (yes I have the source and I will look it up, just askin')?

Can the extreme temps make a difference?

This weekend, I stacked it up against a Stratologger, PNut, Adept Altim1, and a Missileworks RRC2 using a vacuum chamber. The AltiDuo reads consistently about 75 - 100 feet lower than the commercial units. But the report resolution is 10 meters. So that right there is +-32 feet. (I was surprised just how close all the others read.) So for $20 and dual deployment, its pretty darn good. I am curious if each unit needs calibration and a parameter(s) stored?

Due to work exploding again, I have not gotten the EggTimer finished to try that. :(

Fun stuff! I got an AVR Dragon on eBay for $24 bucks. Brand spanking new. Just hooked it up to AVR Studio. Works fine so far - all I did is update the firmware. What will I do with it? I have NO idea. :facepalm:


[video=youtube_share;wEqGSphrq-g]https://youtu.be/wEqGSphrq-g[/video]
Cool, glad it worked
I do not know about the weather condition... I have sold some in all continents so we should soon find out.
Regarding the resolution I am changing the way it is reporting the altitude in version 1.3 (I think I am going to use Leo's method) and guess what you will be able to have the altitude in feet or meters...
The egg timer is a lot more advanced, I guess it is a bit like my data logger but my datalogger is not finnished yet ...
Next you should try the Alti Uno, it is cheaper, takes 5 to 10 minutes to solder (yes I am being honest...) and replace the motor ejection delay + beep the altitude and is very small (75mm x 19 mm)
 
I built an e-bay for use with BT-55 size rockets.

The design is for universal use with the main requirement to be able to house a slightly modified Altiduo.

It will fly as in the pictured setup using my ALTDuino firmware as soon as I have a booster available.

BT-55_E-bay_with_ALTIDUO.jpg

Leo
This is a really nice design, make sure you post a video of the flight
 
This is the place I get my PC boards they take gerber files and send you boards. 3 boards minimum. Two layer is $5 a square inch and 4 layer is $10 a square inch.
 
Back
Top