My DIY 12V wireless launch controller

The Rocketry Forum

Help Support The Rocketry Forum:

This site may earn a commission from merchant affiliate links, including eBay, Amazon, and others.

jus_rockets

Well-Known Member
Joined
Jan 9, 2012
Messages
1,218
Reaction score
12
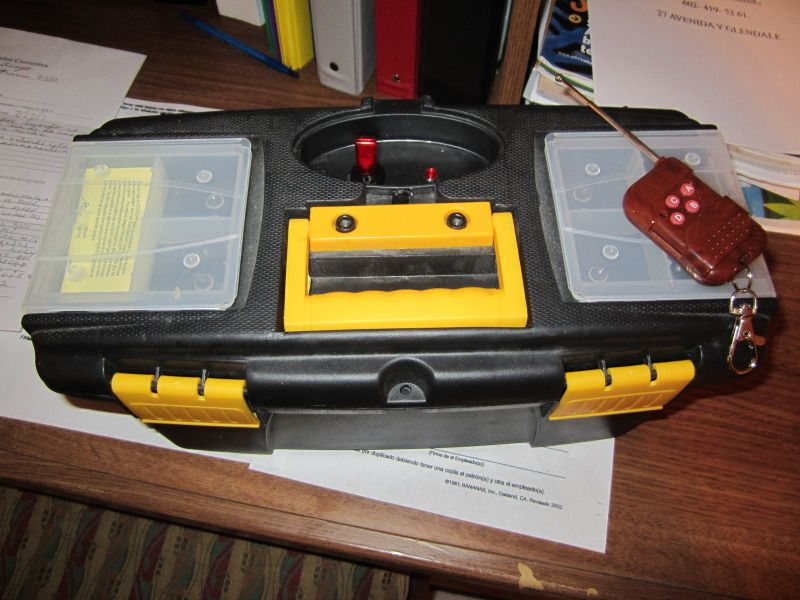
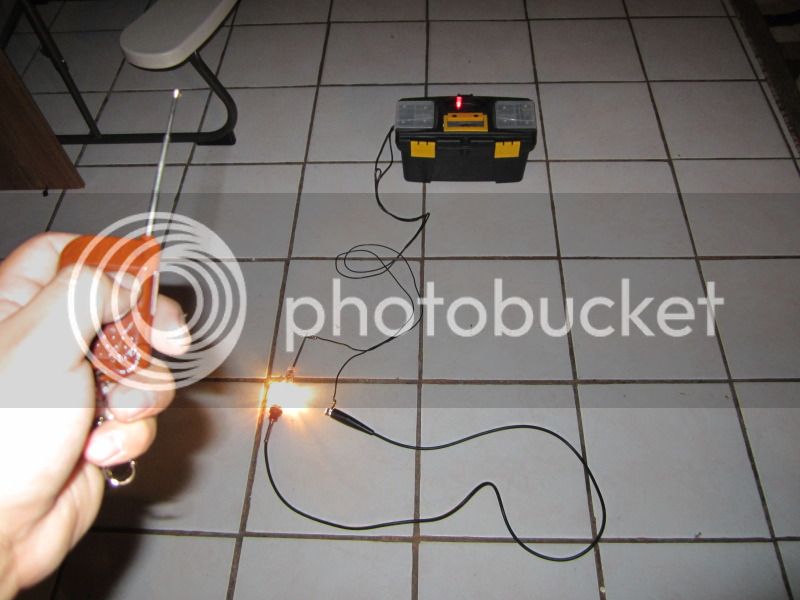
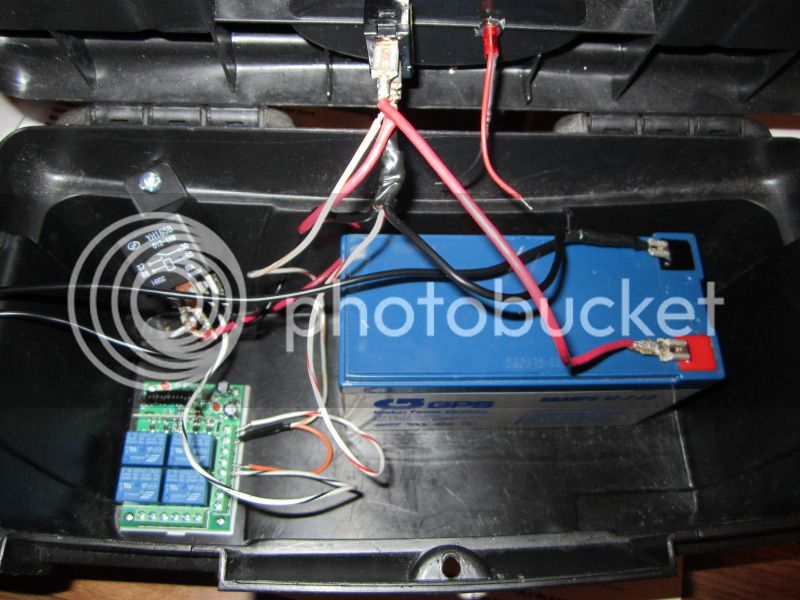
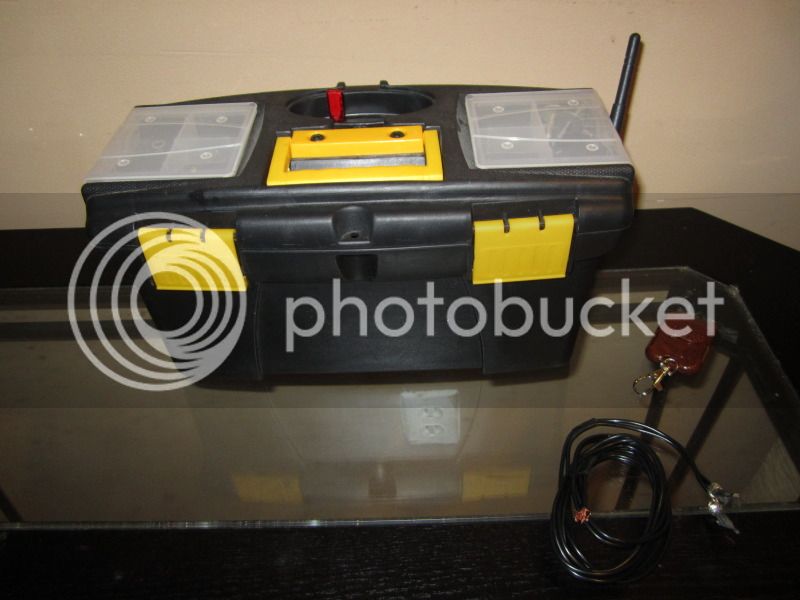
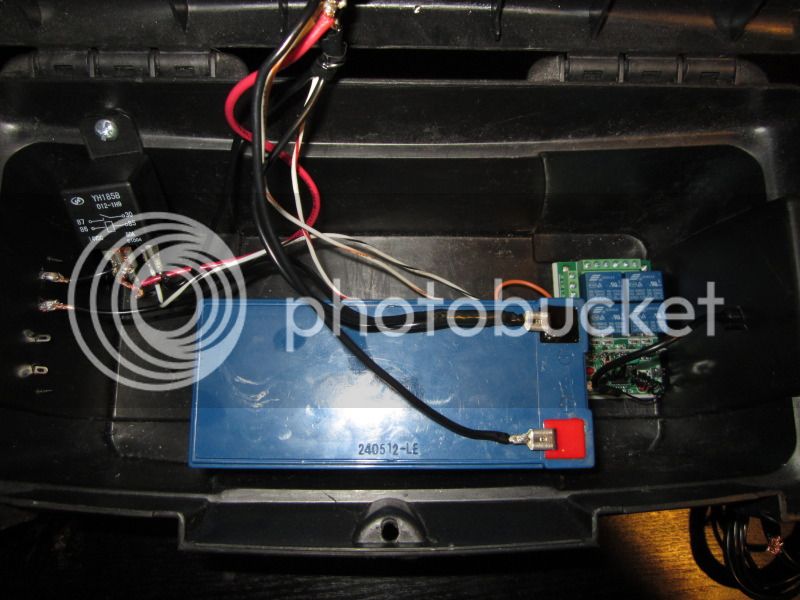
Just finished making a 12V wireless launch controller and it works great! A crapperhead did not stand a chance lol! burned super fast.This was very cheap to make and very simple, will try to make a diagram if you guys need it. Total amount invested was about $35 dollars including the 12v 7ah battery. Will know the range next month when I go to the launch. Here are some pics and will try to get a vid tomorrow.

IMG_0665.jpg

IMG_0670.jpg

IMG_0673.jpg

IMG_0666.jpg
 
Good job on getting it all together and working. A couple of suggestions, you may have already planned on:

  1. Some sort of removeable interlock for the TX. You don't want someone pushing the button at the wrong time or leaning over with the remote in your pocket and launching the rocket in your face.
  2. Cover all of the connections; potential for shorting/inadvertant firing
  3. Shorten the leads coming out of the RX terminal blocks; potential for shorting/inadvertant firing
  4. Strap the battery and the RX down so they can't slide around in the box; all kinds of potential problems
  5. Change the code on the TX/RX from the factory default; this is probably done with solder pads on each unit


You may also want to look into the protocol used by the TX/RX to make sure you are comfortable with the security/spurious signal rejection afforded. I don't know much about it other than that they typically have the ability to set "codes" of some kind with solder jumpers but I don't know how immune they are to false triggering. I have used a 2 channel unit very similar to the one you show to control a pneumatic target turner. Not a critical application so I wasn't too worried if if occaisionally glitched for the low price of the wireless. So far the user reports he has had no problem; but he is on a couple hundred acres in the middle of nowhere so not a very challenging RF environment.
 
Thank you for all your suggestions and tips. This is a fixed code system and I dont know anything about codes. The receiver and relay are turned on by the lighted switch, which will be turned on only when ready for launch. Now the transmitter has a little slide cover that slides up and covers the buttons. And the receiver is secured to the bottom and I will strap the battery down. This is my first one built and you can say it's a prototype, I am not finished with it yet.
 
Hope I am being helpful. The NAR safety code includes "a safety interlock in series with the launch switch" for added safety. It would need to be on your TX to prevent inadvertant launch between the time you arm your remote and walk back to the firing line, clear the area, countdown, etc. It wouldn't be too difficult to splice in a disconnect of some kind.

As far as coding, I've attached a sheet showing where the shorting pads are on these types of devices. The idea is that you short the jumpers in the same way on both the TX and RX to code them. Maybe you don't need to worry about it. My thought was that lots of these units are sold on ebay and probably less than 1% of users change the code from the default. By changing yours you would have a more secure/safe system.

While all the connections should be insultated, a couple in your drawing are particularly worrisome. The lugs on the bottom of the safety switch if shorted would arm the system and you may not even be aware of it. The long bare wires coming from the left side of the stand alone relay would send power to the pad if they are shorted. Likewise, the exposed wires on the RX screw terminals could trip the relay if shorted.

BTW, was there a specific design goal in using a separate relay? The relays on the RX are probably rated at 7-10A and 24-30V DC. I can see where you might have wanted it separate so it was a little easier to replace if it went bad. Just curious.

I have also attached an example of the chinese instructions for a similar unit (with translations) although it's not all that helpful. I got both of these documents by emailing the ebay seller and requesting them. I have found most of the chinese ebay dealers I have dealt with to be knowledgable and helpful and responsive to emails. With some electronics, e.g. the keychain cameras, they will even provide modified firmware on request.

T70A-Coding.jpgView attachment T80.pdf
 
Very nice. I simply attached the battery in mine with a couple large 3M command strips. I also added a jack for the battery charger so I don't have to fiddle with alligator clips to charge the battery.
Thank you for the idea and its exactly what I used.


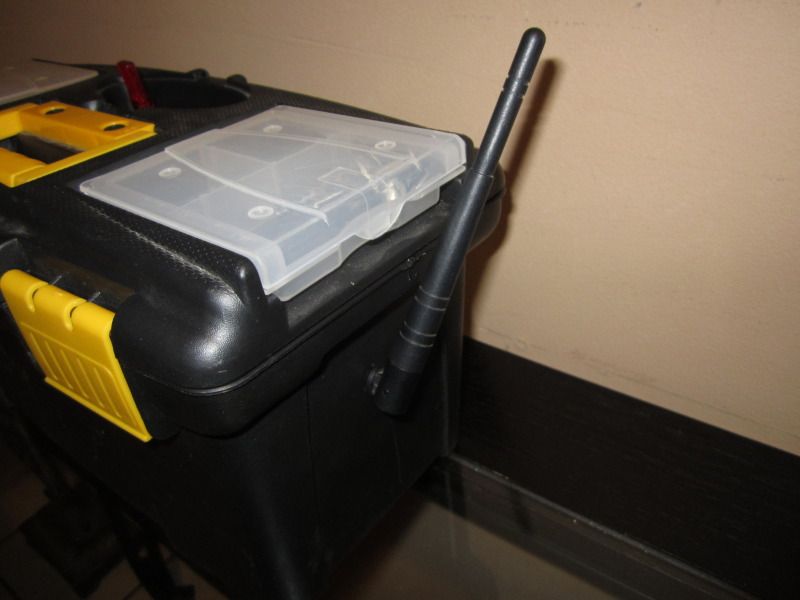
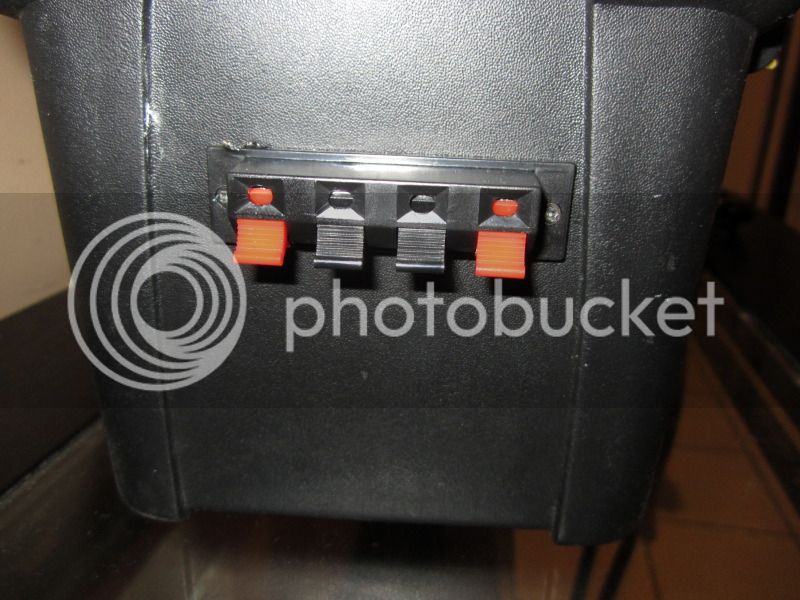
Finally got the chance to launch a rocket today with it and it worked perfectly. The response is instant and the range is about 400-500 feet. I also added an antenna and speaker terminals for quick connection of the igniter clips. Here are some pics of the final product and a video to show how it works.


IMG_0677.jpg

IMG_0678.jpg

IMG_0679.jpg

IMG_0680.jpg

WIRELESSCONTROLLER.jpg

And here is the video of the flight
[video]https://s237.photobucket.com/albums/ff142/phx602biz/?action=view&current=MVI_0674.mp4[/video]
 
Last edited:
Very neat design. as others have said, It needs a safety key.
 
wondering if you could post some info about where to get the part... for those of us not so smart... safety switch could be hardwired into key fab... thanks and love the simple parts!
 
Last edited:
Congrats on a neat and tidy design!

Couple of questions:

1) Is the receiver configured to non-latching mode? (ie: You press the transmitter button to ignite the rocket, but when you let go, the relay returns to "off"?)

2) Are any of the other channels latching or non-latching?
 
Congrats on a neat and tidy design!

Couple of questions:

1) Is the receiver configured to non-latching mode? (ie: You press the transmitter button to ignite the rocket, but when you let go, the relay returns to "off"?)

2) Are any of the other channels latching or non-latching?

Yes all the channels are set to be momentary. You can switch from latching and non-latching but that applies to all channels, you cant set each one individually. I have to press 2 buttons for the rocket to go off, so one works as a key and the other to launch.
 
Yes all the channels are set to be momentary. You can switch from latching and non-latching but that applies to all channels, you cant set each one individually. I have to press 2 buttons for the rocket to go off, so one works as a key and the other to launch.

Well, since you have to push down two buttons at the same time to launch, this would be, IMHO, a NAR or CAR allowable launch controller.
 
I had one designed the same way with 2 momentary switches but was not wireless, and never had a problem using it at my NAR club launch
 
Yes all the channels are set to be momentary. You can switch from latching and non-latching but that applies to all channels, you cant set each one individually. I have to press 2 buttons for the rocket to go off, so one works as a key and the other to launch.

Looks like the safety key to me... Thanks
 
Pm me and will be happy to help you

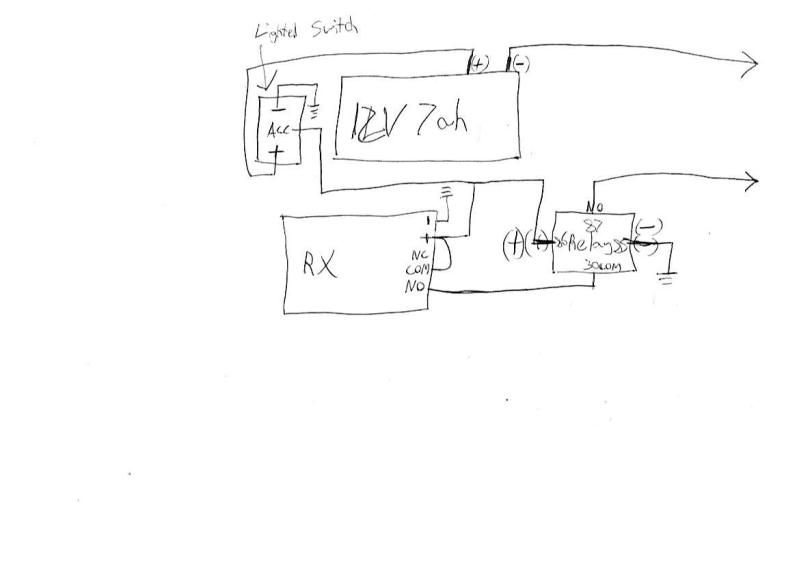
Tried to pm you but wont go through? not sure why but... so I thought I'd post a photo of my wire diagram and see if you would look it over, I'm not much of an engineer! so thanks for any comments. A few questions though... how to attach the antenee wire and will this layout be able to push one button or have the safety of needing to press both? thanks again for any help...

wire.jpg
 
Last edited:
Everything looks good, just like how I wired it. And when I posted about the using two channels to ignite the igniter I had not wired it. I wired it and It did not work because when one channel is on and you press the other it turns off the previous channel and turns on the channel you just pressed. I simply cut out a little square on the back of the controller and made a key that separates the contact from the battery. Now you have a removable key and this is NAR approved.
 
Thanks for the review and help... looks like I'll do a key on the Tx as well...
 
Last edited:
They list maximum range of 3000m, I have only tested mine to maybe about 200ft so far. Wired as follows

12v power to power inputs, 12v positive to relay 2 common, relay 2 normally open, to relay 3 common, relay 3 normaly open to positive of ignitor, negative of ignitor to negative 12v.

Hope to test a a launch this weekend, they I can incorporate the remote into a proper launch system, with automotive relays.
 
2 pad wire.jpg

Thought I see what people thought of a 2 pad wiring diagram... Hope it's right... I'm waiting to get some parts in but I'll post photos when then get here... Any idea if one antenna is better than another or just go with a metal telescoping type?
 
Sorry for the late reply but was away for the weekend. I cant really read you diagram. But instead of running the NO from channel 1 to the relay run it to channel 2 common and then NO from channel 2 to the relay. And if your receiver allows for two momentary buttons then that should work. I just used mine this weekend and was having problems with the battery and the alligator clips were dirty. I charged the battery and clean the clips and it worked perfectly and I got my Level 2 with it.
 
Thanks jus_rockets, congrats on the Level 2! Hope the GHS Memorial was a good time, sorry to have missed it but going the plaster blaster next weekend to try for level 3... I hope to have this thing wired up some time but not for this weekend and the dream is to have 2 pad support so the wires will change around depending on which button controlls which chanel...
 
Thought a nice clean copy might be nice... this will be tested, so for now treat this as a electronics fryer...12 volt  for 2 pads.jpg
 
Everything looks wired up correctly to me, please post pics and results when finished thanks.
 
Back
Top