You are using an out of date browser. It may not display this or other websites correctly.
You should upgrade or use an alternative browser.
You should upgrade or use an alternative browser.
Estes Air Commander Build
- Thread starter mjmcneese
- Start date


Help Support The Rocketry Forum:
This site may earn a commission from merchant affiliate
links, including eBay, Amazon, and others.
Right. I only did one stage at a time so that I could use both fin guides on one set of fins.
Okay I gotcha. :bangpan: Bummer, I had really good results with that method.
mjmcneese
Active Member
- Joined
- Aug 7, 2011
- Messages
- 29
- Reaction score
- 0
Don't get me wrong! This method WORKED for me. But, I think I had a bigger challenge than most because my foamcore looks like it was hacked on by a blind guy with a chainsaw on a windy day.
Gonna try 200 grit on these hardwood strips. I think it'll look quite a bit better if those strips have rounded edges, too.
Gonna try 200 grit on these hardwood strips. I think it'll look quite a bit better if those strips have rounded edges, too.
mjmcneese
Active Member
- Joined
- Aug 7, 2011
- Messages
- 29
- Reaction score
- 0
Here are some pics of the progress I've made today.

The hardwood strips came out pretty nice. Filleting done. You might notice that I ended up NOT rounding the edges. The consensus from the wife was that it looks like I really took a lot of time to just make a slight rounding towards the end of the strips so that they match up with the fins. Considering that a compliment, I left them alone.

My son checking my work on the transition from the strips to the fins.


The assemblies after one light coat of Krylon Primer. I already see a few spots that need sanded or filled.
I have a couple spots where the filleting has pit holes - like there was a bubble or something. Thought I worked it in pretty good from both directions. Nothing major to report - typical sanding and filling, another coat of primer, and then color sometime this weekend.
The hardwood strips came out pretty nice. Filleting done. You might notice that I ended up NOT rounding the edges. The consensus from the wife was that it looks like I really took a lot of time to just make a slight rounding towards the end of the strips so that they match up with the fins. Considering that a compliment, I left them alone.
My son checking my work on the transition from the strips to the fins.
The assemblies after one light coat of Krylon Primer. I already see a few spots that need sanded or filled.
I have a couple spots where the filleting has pit holes - like there was a bubble or something. Thought I worked it in pretty good from both directions. Nothing major to report - typical sanding and filling, another coat of primer, and then color sometime this weekend.
LAKingsGeek
Active Member
- Joined
- Aug 21, 2011
- Messages
- 38
- Reaction score
- 0
Hello all,
I, too, am currently building the Air Commander. I finally finished prepping and sanding the main BT fins today and glued them on. They are drying as I type. All I've got left is attaching the hardwood strips and then I'm off to painting.
I've got a question about flying this rocket. In the picture on the packaging it shows the fins from the first and second stage do not line up. The first stage fins are basically midway between the second stage fins. On all the photos in the instructions it shows the fins from each stage lining up together. Can I fly it either way?
I only just got back into rocketry for the first time since I was a kid so I'm still learning. This is my fourth build and my first beyond skill level 1. Unfortunately I haven't had a chance to launch any of them yet. Los Angeles, or California for that matter, is not the best place for this hobby :-/
EDIT: I guess if they aren't aligned the launch lug would get in the way, although I might be able to place that differently as well.
Last edited:
DAllen
Well-Known Member
I've got a question about flying this rocket. In the picture on the packaging it shows the fins from the first and second stage do not line up. The first stage fins are basically midway between the second stage fins. On all the photos in the instructions it shows the fins from each stage lining up together. Can I fly it either way?
I can't imagine it would matter however you might get slightly better performance with the fins lined up because that will be one less set of leading edges in the air stream.
mjmcneese
Active Member
- Joined
- Aug 7, 2011
- Messages
- 29
- Reaction score
- 0
All done.

I finished all of the painting prior to installing the engine mounts. Changed my choice of colors at the last minute: Kyrlon White Gloss, Dutch Boy Acrylic Gold, and the dark gray is still Automotive Dark Gray Primer from Rustoleum.
Once the pieces were painted I proceed with installing and gluing the mounts. This was a little different and new for me, being a two-stager. The extra stage's mount gets glued in first. Once that was dry, you sort of base the single-stage mount on where the 2nd stage is mounted. The kit comes with spacers the size of two C engines - they get taped together, slid into the 2nd stage mount. Put some glue in the main BT, place the single engine mount on TOP of the 2nd stage assembly, and slide it all snug into place. I know I did a horrible job of explaining it - but the Estes Instructions were easy to follow, and that assembly was a cinch.
Everything fits pretty snug. The nose cone into the BT is just a tad snug - no worries there. But, the 2nd stage fit into the BT is a little worrisome. I pretty much have to twist it off in order to release it from the BT. I did some sanding to the inside of the BT, and that helped a little. Perhaps a light sanding to the stage coupler with some 600 grit will ease the snugness a bit.
Parachute and shock cord were typical of other Estes kits. No problems there.
Then came the waterslide decals.
I had kept them stowed away in a Ziploc bag to keep them out of the way and to keep moisture out. Apparently, they came with a hairline scratch across a couple of the decals. One of the decals ripped beyond repair. Another one ripped a teeny piece off - I'll fix it with a fine point Sharpie marker. And one other thing - the "U.S. Air Attack" decals are WAY smaller than they appear on the packaging. No biggie, I guess. Just an interesting note.
So, aside from fine-tooth fitting of the stage coupler, this project is done. My son is in love. He's been talking about "Ain Commenter" all day. I'm excited to get it in the air - but a little nervous, too. This is by far the nicest rocket in our collection, and our first and only two-stager. Once the weather clears we will send her up and get some video, too.

Thanks all for your advice and tips! My finest build! Now I just need an excuse to buy my son our...I mean "his" next rocket.
I finished all of the painting prior to installing the engine mounts. Changed my choice of colors at the last minute: Kyrlon White Gloss, Dutch Boy Acrylic Gold, and the dark gray is still Automotive Dark Gray Primer from Rustoleum.
Once the pieces were painted I proceed with installing and gluing the mounts. This was a little different and new for me, being a two-stager. The extra stage's mount gets glued in first. Once that was dry, you sort of base the single-stage mount on where the 2nd stage is mounted. The kit comes with spacers the size of two C engines - they get taped together, slid into the 2nd stage mount. Put some glue in the main BT, place the single engine mount on TOP of the 2nd stage assembly, and slide it all snug into place. I know I did a horrible job of explaining it - but the Estes Instructions were easy to follow, and that assembly was a cinch.
Everything fits pretty snug. The nose cone into the BT is just a tad snug - no worries there. But, the 2nd stage fit into the BT is a little worrisome. I pretty much have to twist it off in order to release it from the BT. I did some sanding to the inside of the BT, and that helped a little. Perhaps a light sanding to the stage coupler with some 600 grit will ease the snugness a bit.
Parachute and shock cord were typical of other Estes kits. No problems there.
Then came the waterslide decals.
I had kept them stowed away in a Ziploc bag to keep them out of the way and to keep moisture out. Apparently, they came with a hairline scratch across a couple of the decals. One of the decals ripped beyond repair. Another one ripped a teeny piece off - I'll fix it with a fine point Sharpie marker. And one other thing - the "U.S. Air Attack" decals are WAY smaller than they appear on the packaging. No biggie, I guess. Just an interesting note.
So, aside from fine-tooth fitting of the stage coupler, this project is done. My son is in love. He's been talking about "Ain Commenter" all day. I'm excited to get it in the air - but a little nervous, too. This is by far the nicest rocket in our collection, and our first and only two-stager. Once the weather clears we will send her up and get some video, too.
Thanks all for your advice and tips! My finest build! Now I just need an excuse to buy my son our...I mean "his" next rocket.
Last edited:
LAKingsGeek
Active Member
- Joined
- Aug 21, 2011
- Messages
- 38
- Reaction score
- 0
Looks great! I've finished painting the nose cone and upper body area on mine. I'm building this with my girlfriend and she didn't like the gold so we went with an army green color. I think i prefer the contrast of the gold and black but I didn't fight it.The cone and first stage will both be a "NATO black". Still haven't decided whether to do gloss or semi-gloss white for the body.
I've run out of primer so I won't be able to finish until later in the week. The small "U.S. Air Attack" decal is a little disappointing but no biggie. I haven't even really looked at my decals yet.
I've run out of primer so I won't be able to finish until later in the week. The small "U.S. Air Attack" decal is a little disappointing but no biggie. I haven't even really looked at my decals yet.
mjmcneese
Active Member
- Joined
- Aug 7, 2011
- Messages
- 29
- Reaction score
- 0
I was having a hard tim finding a gold color that I liked. I nearly gave up on gold and was gonna go with a neon lime green - thought it might have looked neat with the white and charcoal. Had to get the Gold Dutch Boy Acrylic at a Seats Hardware. I really like the way the Acrylic looks on rockets. Very smooth, realistic sheen.
hcmbanjo
Well-Known Member
- Joined
- Jan 18, 2009
- Messages
- 2,460
- Reaction score
- 423
mjmcneese,
Great job on the Air Commander!
It does have the Centuri throwback look.
On the Air Commander the front "B" part of the fin is inset into the leading edge of the "A" fin.
I found this on the Lil' Huster instructions from Jim Z's.

Great job on the Air Commander!
Nice job! I love that design, it has "Centuri throwback" written all over it. Tempting to mod it with a fatter payload section for a Centaur/Hustler look.
It does have the Centuri throwback look.
On the Air Commander the front "B" part of the fin is inset into the leading edge of the "A" fin.
I found this on the Lil' Huster instructions from Jim Z's.
mjmcneese
Active Member
- Joined
- Aug 7, 2011
- Messages
- 29
- Reaction score
- 0
Finally got to go out and put Phoenix Bird in the air tonight. Made a perfect flight - the rocket never even twisted in the air!

Thanks to my lovely wife for taking some great shots of our launches tonight.
Still need to get some bigger engines to get Air Commander going.
Thanks to my lovely wife for taking some great shots of our launches tonight.
Still need to get some bigger engines to get Air Commander going.
Fred22
Well-Known Member
- Joined
- Jan 5, 2009
- Messages
- 2,460
- Reaction score
- 7
Finally got to go out and put Phoenix Bird in the air tonight. Made a perfect flight - the rocket never even twisted in the air!
Thanks to my lovely wife for taking some great shots of our launches tonight.
Still need to get some bigger engines to get Air Commander going.
Great picture of a well made rocket
") Thanks for an awesome thread.
Thanks for an awesome thread.cheers
fred
[POW]Eagle159
Well-Known Member
- Joined
- Jun 27, 2011
- Messages
- 1,467
- Reaction score
- 1
What engines are you gonna use for a first flight..B6-0 to a A8-5..orA8-3???
Scotty Dog
Well-Known Member
- Joined
- Mar 1, 2010
- Messages
- 7,451
- Reaction score
- 302
Just read thru this thread.Very nice job on the Commander and build thread.Is that a Chocolate Lab in the picture?Here are some pics of the progress I've made today.
The hardwood strips came out pretty nice. Filleting done. You might notice that I ended up NOT rounding the edges. The consensus from the wife was that it looks like I really took a lot of time to just make a slight rounding towards the end of the strips so that they match up with the fins. Considering that a compliment, I left them alone.
My son checking my work on the transition from the strips to the fins.
The assemblies after one light coat of Krylon Primer. I already see a few spots that need sanded or filled.
I have a couple spots where the filleting has pit holes - like there was a bubble or something. Thought I worked it in pretty good from both directions. Nothing major to report - typical sanding and filling, another coat of primer, and then color sometime this weekend.
mjmcneese
Active Member
- Joined
- Aug 7, 2011
- Messages
- 29
- Reaction score
- 0
[POW]Eagle159;228604 said:What engines are you gonna use for a first flight..B6-0 to a A8-5..orA8-3???
For Air Commander? Estes suggests C11-0/C11-5 for the first flight...and that's what I have.
Scotty, yes, that is my 5-yr old chocolate pointing lab, Cade. He's a fantastic pup.
Yours turned out real nice!
My kit came in today.
I wanted a 2 stage D engine size rocket for dual deploy using my homemade altimeter.
This is a real nice rocket and I look forward to building it.
However, it comes with issues.
Flimsy engine tubes and couplers.
The decal is real bad:
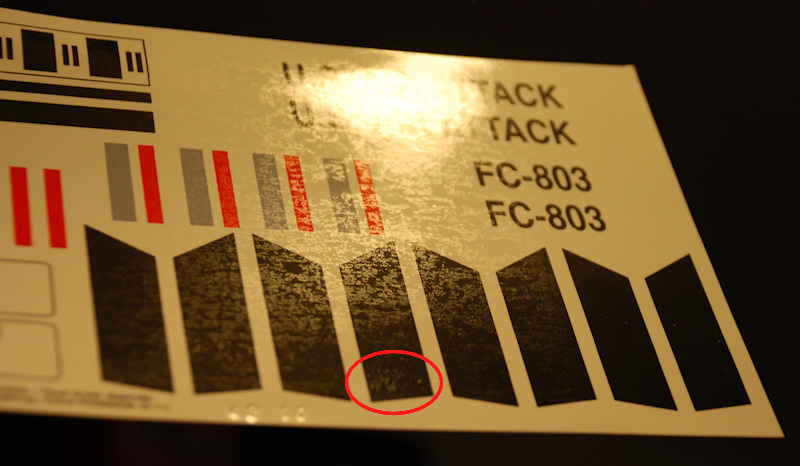
As noted before the U.S. AIR ... letters are way smaller than pictured on the facecard. As if the Chinese didn't have the font and just used a standard one and no one at Estes had a look at it. Dunno...
Even worst is the quality, at least with mine. The whole decal has these mat spots that I can't get rid of.
And for toppers I have 2 manufacture date imprints on the decal, one on the black fin section (see red circle). A real shame...
My kit came in today.
I wanted a 2 stage D engine size rocket for dual deploy using my homemade altimeter.
This is a real nice rocket and I look forward to building it.
However, it comes with issues.
Flimsy engine tubes and couplers.
The decal is real bad:
As noted before the U.S. AIR ... letters are way smaller than pictured on the facecard. As if the Chinese didn't have the font and just used a standard one and no one at Estes had a look at it. Dunno...
Even worst is the quality, at least with mine. The whole decal has these mat spots that I can't get rid of.
And for toppers I have 2 manufacture date imprints on the decal, one on the black fin section (see red circle). A real shame...
LAKingsGeek
Active Member
- Joined
- Aug 21, 2011
- Messages
- 38
- Reaction score
- 0
Anyone have a rocksim file for the Air Commander?
- Joined
- Jun 27, 2012
- Messages
- 5,439
- Reaction score
- 121
I picked up one of these kits and bashed it into this. Plan to fly it with a E9 to D12. Haven't launched it yet maybe this weekend.

Christopher
Member
- Joined
- Jan 14, 2017
- Messages
- 12
- Reaction score
- 0
Hello,
I recently got back into rocketry after a 47 year hiatus. Damn, that make me old. I found the Air Commander on Amazon 2 weeks ago and wanted it right away. I have already built and flown a Yankee as an entry vehicle back into this sport. I searched for building ideas for this rocket and I found this almost 6 year old post. I have read it twice as I found the information valuable. I decided to but the Estes Fin guide and make the mods to it that I also found on this forum. Thaks for all of you who had input into this thread and I am sure I will make a build to be proud of.
I recently got back into rocketry after a 47 year hiatus. Damn, that make me old. I found the Air Commander on Amazon 2 weeks ago and wanted it right away. I have already built and flown a Yankee as an entry vehicle back into this sport. I searched for building ideas for this rocket and I found this almost 6 year old post. I have read it twice as I found the information valuable. I decided to but the Estes Fin guide and make the mods to it that I also found on this forum. Thaks for all of you who had input into this thread and I am sure I will make a build to be proud of.
rocketron1948
Well-Known Member
- Joined
- Jan 19, 2009
- Messages
- 152
- Reaction score
- 2
This is great kit. Flew mine for the first time last year on a C11-0/C11-5 engine combination. It should really get up there on D12"s.
Rocketron
Rocketron
Similar threads
- Replies
- 12
- Views
- 343
- Replies
- 5
- Views
- 548
- Replies
- 5
- Views
- 535
- Replies
- 7
- Views
- 292