Madcow Momba Build - In Pictures

The Rocketry Forum

Help Support The Rocketry Forum:

This site may earn a commission from merchant affiliate links, including eBay, Amazon, and others.

Tobor

Get your peanuts....
TRF Supporter
Joined
Oct 8, 2016
Messages
2,834
Reaction score
1,210
I've been working (slowly) on this Momba build since the end of January, due to eating up my rocketry budget with a few unplanned (read: impulse) purchases. :facepalm:

Anyhoot, I've bee taking pictures along the way but skipped a lot of the basic stuff.

Note: not all the pics follow the build chronologically due to "10 attachment limit per post". Sigh...

Momba Design.jpg
The plan (Needs updating)

Madcow Momba Paint Scheme.jpg
The goal!


Nose Cone Mod-Small.jpg Ballast Hardware-Small.jpg Bulkhead+Ballest Assembly-Small.jpg History-Small.jpg Lead Fragments-Small.jpg Fragment Placement-Small.jpg NC Epoxy Cure_Small.jpg NC Mod Complete-Small.jpg
Nose cone mods for adjustable ballast.
 
Airframe-Small.jpg
Airframe ready for fins

Fins Attached_B-Small.jpg Fins Attached_C-Small.jpg
JB Weld + Estes Fin Jig FTW!

Forgot to take pics of the Aeropoxy internal fillets before attaching rear CR. :(

Momba 1st Epoxy Fillets-Small.jpg Momba Fillets Complete-Small.jpg
First time ever for external epoxy fillets. Turned out fairly well. :)

Momba Paint Selection-Small.jpg
Rust-Oleum - Chevy Red-Orange p/n: 248947
Krylon: Blue/Gray p/n: 1625

Gotta wait till things warm up outside.... :(
 
I had time on Wednesday afternoon to apply 2nd coat of primer on the Momba and Big Daddy.

Momba 2nd Primer Coat-Small.jpg
 
Last edited:
Had some time yesterday to get more color on the Momba

Getting close.....

1st Coat
Momba Airframe 1st Coat-Small.jpg

2nd Coat for NC
Momba NC 2nd Coat-Small.jpg
 
Last edited:
Made more progress last Friday.

Final coat on NC. Applied Frosted Pearl Clear to add a little character.

Momba NC Final Coat-Small.jpg


2nd coat on airframe.

Momba Airframe 2nd Coat-Small.jpg
 
Decided today that the Momba does not need another coat of paint.

Momba Colors Complete-Small.jpg

Now I just have to work up the nerve to spray the decals. I'm nervous because I'm not really good at detail work, but it will happen regardless.
 
What did you use inside the BT to secure the upper airfoiled rail button so that it doesn't mess with the laundry?
 
What did you use inside the BT to secure the upper airfoiled rail button so that it doesn't mess with the laundry?

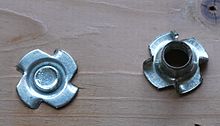
I used a "T-Nut"

220px-Inslagmoer.JPG


I used a pair of needle nose pliers to remove the prongs, wiped it down with some isopropyl alcohol and sanded both sides of the flange with 100 grit to give the epoxy something to grab. I also had to shorten the rail's screw a bit. Used a Dremel with an emery cut-off wheel for that.
 
Back
Top