Binder Design Excel Dual Deploy L1 Cert Build

The Rocketry Forum

Help Support The Rocketry Forum:

This site may earn a commission from merchant affiliate links, including eBay, Amazon, and others.

conwayte

Well-Known Member
Joined
Nov 29, 2016
Messages
68
Reaction score
0
Hello!
I’m currently building a Binder Design Excel w/ Dual Deploy. My plan is to use this for my Level 1 certification when the club launch season starts up. Possibly use it for Level 2 later on as well?


After reading through many of the existing Excel build threads, I decided to go with the 38mm motor mount. There are enough loads from the various manufacturers in that diameter to get me up through level 2 if that’s the direction I decide to go (I have a feeling I may end up building something new for L2 but who knows?)


My plan is to build basically stock--the one exception is the addition of a Onebadhawk harness. Part of my decision-making process included the business's presence on TRF. It’s nice to get a feel for them through their posts. Mike at Binder and Teddy at Onebadhawk are both great to work with and are as helpful as their posts suggest.


The Excel arrived within days, was excellently packaged and I’m very impressed with the instructions--very thorough. Separate instructions for each sub-component as well--avbay, motor retainer, etc.


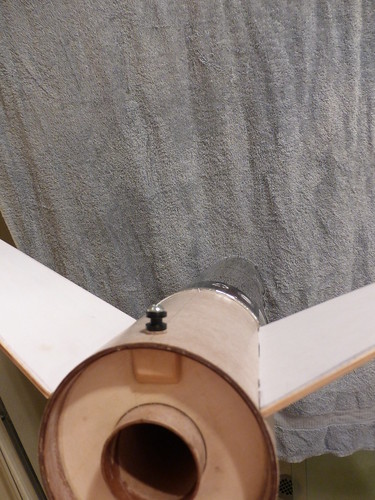
First picture is assembly of the motor mount. I’m using some hardware store 15 minute epoxy for most of this. I scuffed up the glassine layer and am using my high-tech pressure inducing devices for clamping the aft centering ring and thrust ring :).
IMG_20170304_134050666_HDR.jpg
 
Thanks-and thanks for your build thread--it was one of the first I read when I started thinking about this model!
Tim
 
While the aft motor mount parts were curing, I decided to start shaping the fins. My first thought was to do a cool diamond-shaped bevel like I’ve seen on some builds but that went out the window quickly and I decided to simply round the edges. These still need a little work but it’s a start.
IMG_20170304_141126157.jpg
 
The avbay is up next. Pretty good sized--looks like I’ll have to buy a lot of gadgets to fill it up! Here are the two sections of coupler epoxied into the 4 inch switch band along with the two end caps clamped up and curing.
IMG_20170304_144642693.jpg
 
I'm in... :pop:

I've also got a .ork file for the kit if you're interested...

24457511365_d2bbdbcaaa_o.png
 
Thanks K'Tesh! I just downloaded it! My school is on spring break this week and I've declared it "Rocket Week!"
Tim
 
The avbay is up next. Pretty good sized--looks like I’ll have to buy a lot of gadgets to fill it up! Here are the two sections of coupler epoxied into the 4 inch switch band along with the two end caps clamped up and curing.
View attachment 314024

I like the way you are going with this. I did DD with my L1 cert and would never discourage anyone from doing the same.

Just a couple of things I would suggest. If you can do the 54mm MMT, do so. It's not a big deal if you have the 38mm, but just realize that with a 38mm MMT, the rocket is a L1 rocket and you will probably want to build a 54mm or even a 75mm for your L2. Yes, I know you can get L2 motors in 38mm, but those are only J motors. If you want to fly L2, you have to be able to fly K and L motors. Those will require 54mm for the K and 75mm for the L motors.

What I think you will have a lot of fun learning, is the difference between the various L1 motors. The amount of impulse from a baby H like the AT H128W and a big I motor like the I600 is a lot. Until you actually fly those motors you really don't appreciate the difference. It's one thing to read the specs, but a whole different experience when you see your rocket scream off the pad like it never did before.

When you start on the L2 path, the differences are even more. I would highly recommend building a true L2 rocket to cert with instead of using a L1 rocket with a baby L2 motor that is near the upper limit of what the rocket can handle. You will end up building a true L2 rocket anyway, why not do it right away.

The other thing you will learn when you start flying L1 is how to fly the field and conditions. Of course that depends on where you fly, but field size, wind speed, wind direction, flight profile of the rocket, etc. all play a part. That is why I never load motors the night before, because I never really know what the conditions will be.

Oh, and one suggestion, I would put bolts/screws through the holes on those end caps when you glue them. You can use the clothe pins to clamp the edges, but the screws will keep the holes aligned. It's not how they are aligned when you first glue them, it's how they are aligned after the glue has set.
 
Handeman-thanks for the ideas and points to ponder!
I'm already building it with the 38mm mount. There is a lot I have to learn as I go along. I think that's what I've been enjoying most about this hobby, learning so many new things--this forum and the people on it have been extremely helpful so far. I'm also looking forward to getting out to the local club launches and meeting up with folks.
With the end caps--I had the bolts/all thread in them when I glued and clamped them then pulled them as the epoxy started to cure so they wouldn't get stuck; I should have mentioned that as even when clamped the two pieces can slide a bit if the pressure is uneven.
Tim
 
I’m assembling the fin can next. I dry fit a centering ring on the motor mount to keep things lined up and slid the motor mount assembly in. Then applied some epoxy to the root edge of each fin and carefully slid them through the fin slot. Using the supplied alignment guide I lined each one up and secured with tape.
As each set up, I moved on to the next one. The tape will stay in place overnight while the epoxy cures. Then the procedure will be t cut the small piece of body tube aft of the fin slots and slide the fin can out to apply the internal fillets.

With the fins set aside for curing, I drilled a hole in the 3rd centering ring and installed the eyebolt. I deviated slightly from the instructions here and oriented the eyebolt as shown. I’d seen this orientation in one of John Coker’s videos and it made sense to me with regards to being able to more easily attach a quick link to it. I also put some epoxy on the threads to lock the nut on.
IMG_20170304_213724399_HDR.jpgIMG_20170304_214657483_HDR.jpg
 
I presume you're referring to the aft CR being dry fit. However, it might get epoxied in place if you leave the fincan in a nose up, upright position, while the epoxy cures.

Presuming you didn't glue the aft CR in place yet, you can then pull it out (I now use a couple of screws to give me grips), and apply your internal fillets without having to cut slots out of the body tube.

A suggestion for future builds would be to use a fin alignment guide downloaded from payloadbay.com (and glued to cardboard or foamcore) to hold the alignment of the fins while they cure. Less fuss, less muss than taping the fins in place. If you're not interested in preserving the the alignment guide from the instructions, you could use them instead of the payloadbay guide.

15592981811_6c3f6af2e3_c.jpg


For even better results cut little notches out of the bodytube/fin joint areas to prevent yourself from accidentally gluing the guide to the rocket (which I didn't do to the guide shown in the photo above).

Another trick is to add a scrap of ply, or basswood to a small section of the CR to give yourself a "fudge" factor when it comes time to drill the hole needed for the rail button. This prevents a slight error in placing your hole from blowing out the ply holding the screw in place, and strengthens it against a possible hard knock.

15156539447_c81e834e2d.jpg
 
K'Tesh-thanks for the ideas! I've seen the types fin alignment guides you show in other build threads but opted to go this way this time-it's definitely a bit more "putzy"--I had to tend to things as the epoxy cured and I can see the benefit of using such a guide in the future. I will take your advice about adding a piece of blocking for the rail buttons that certainly makes sense to beef that area up.

Here is the completed fin can. I cut the little tabs at the aft end of the fin slots with an exacto knife and slid the fin can out. After I took the picture I did smooth out the fillets--not that it matters too much since they will be hidden from view but I was able to pull off a little excess epoxy. Everything looks lined up pretty well--the Binder fin slots were right on the money and when the fins were inserted to the motor mount, there was very little play even before the epoxy cured.

I’m still on the fence as to whether I like this method of building the fin can or what I’d done before, and what K'Tesh mentioned above, which is to dry fit and then pull the aft centering ring off and reach in with a dowel to do the fillets. With a 38mm motor mount and 4” body tube there definitely would have been room to work in there. This method did allow me to get good epoxy coverage pretty easily. Being my first HPR build, I'm intentionally sticking to the instructions as close as possible--hopeful that I'll have many more builds to work on different techniques!
Is it wrong that as I build this one, I'm browsing around for my next?:confused:

IMG_20170305_155541891_HDR.jpg
 
Looks great so far!

A few thoughts:
I wouldn't plan on doing your L2 on the same rocket as your L1. Is it possible? Of course. Are you going to be wanting to build an even-bigger rocket soon? Of course...
I think you did well removing the fin-can for construction. I have done the majority of my high power rockets this way and it works really well.
Mike and Teddy really are as good to work with as everyone says. Mike has been active in the high-power and experimental rocketry scene for about twenty years and is one of the most knowledgeable people you are likely to find in this hobby. He is also an all-around nice guy. I've yet to meet Teddy in person, but the effort he put into helping us design the recovery harness for our upscale Dragonfly was above and beyond expectations.

I like the Spring Break as "Rocket Week" idea! Our break isn't until the end of the month, but I hope to get some rocket flights in if the weather eases up. We are starting our rocket club the week after break, but I have been meeting with students to pick out their rockets. We order from a place called Belleville Hobby and they are located in Illinois, which means long shipping times. I would encourage you to check them out - 41% off retail, huge selection, and excellent service (I have ordered from them for seventeen years now).

One thing that I would recommend for your rocket club is to build some stands for the students' rockets. A really simple way is to drive a large 20P nail into a block of wood. A short piece (maybe 10") of 1/2" CPVC (3/4" for 24mm rockets) goes in the motor mount and then slides over the nail. We use these to hold the motor mount at first, then the rocket as you attach fins, and finally for painting. Make enough for the whole club, it will make life much easier for everyone.

Another rocket club tip is to really stress organization of parts - large ziplock bags or small plastic totes are helpful to keep all the bits and pieces from getting lost/mixed after the bags are opened.

Best of luck and keep us posted on your progress!
 
Hey Dan! "Rocket Week" has been hit and miss. Haven't been able to launch anything as the winds around here have been howling. I've been getting some time to work on this build but have been up at school most days--taking today and tomorrow off if all goes well--as an Asst. Principal seems like there are plenty of things to do even when the kids aren't around!
I'll definitely check out Belleville Hobbies--being in Wisconsin, the shipping time won't be nearly as long for me:). I've been snagging some kits on sale here and there for the kids that I think they might like. The Tech Ed teacher who is doing the club with me has come up with some ideas for some side projects such as building a multi-rocket launch pad and controller. I like the idea of stands for the kids--really almost a must. Shouldn't be too hard to have the kids put them together. Holding the club in the woodshop will definitely have its benefits!

I get why folks would do L1 and L2 on the same rocket but I'm not in too big a hurry. I'll hopefully fly the heck out of this thing and do a lot of learnin' in the process.
Take care,
Tim
 
I get why folks would do L1 and L2 on the same rocket but I'm not in too big a hurry. I'll hopefully fly the heck out of this thing and do a lot of learnin' in the process.
Take care,
Tim

Whatever brings you the most enjoyment is the right thing to do (as long as its soundly built of course).

I had big plans to do my L2 immediately, but then I realized: there are a lot of cool L1 motors to fly, and electronics to practice with. When I do L2 it'll be a very different rocket instead of shoving a barely J into my L1 rocket.
 
Presuming you didn't glue the aft CR in place yet, you can then pull it out (I now use a couple of screws to give me grips), and apply your internal fillets without having to cut slots out of the body tube.

That's the old school way. These kits are better engineered than that. They have a modular approach to the fin can construction that doesn't result in having to reach inside the airframe with a long stick to slop epoxy everywhere.
 
I’m still on the fence as to whether I like this method of building the fin can or what I’d done before, and what K'Tesh mentioned above, which is to dry fit and then pull the aft centering ring off and reach in with a dowel to do the fillets.

This method translates to even the highest impulse rockets and is the preferred method for strength. The other method is a hold over from model rockets.
 
That's the old school way. These kits are better engineered than that. They have a modular approach to the fin can construction that doesn't result in having to reach inside the airframe with a long stick to slop epoxy everywhere.

I learned something... Thanks! :)
 
This method translates to even the highest impulse rockets and is the preferred method for strength. The other method is a hold over from model rockets.

Thanks Mike. That's good to know! From just a thoroughness aspect, it was nice to be able to really inspect all the joints and make sure everything gets covered.
Tim
 
Hi Tim,

Wanted to drop in and say "lookin' good"! The Excel is an excellent choice for a L1, L2, and all around sport flying rocket...great pick!!!

Where are you in Wisconsin and will you be at the TWA launch on Sunday?

-Eric-
 
Thanks Mike. That's good to know! From just a thoroughness aspect, it was nice to be able to really inspect all the joints and make sure everything gets covered.
Tim

Where this approach really comes in handy is when you move to fiberglass rockets it allows for fiberglass cloth to be laid over all the joints. Thanks for the business, looks like you are coming along nicely.
 
Thanks Mike--I've been very impressed with your product!

Working on the external fillets--my first time making external fillets with epoxy. Previously I’ve used the Titebond No Run No Drip. For these I used Loctite Heavy Duty 5 minute epoxy. I thought the use of 5 minute epoxy vs something with a longer working time might be a little sketchy but I did some test runs and found that if I worked in a reasonably deliberate fashion and tended to the flow of epoxy I had plenty of time to work with it. This worked well and self-leveled quite nicely. I used a gloved finger tip dipped in rubbing alcohol to feather the edges a bit more. Finally, I glued on the tabs that were cut from the aft end of the fin slots, zip-tied around the base to clamp and set it aside to cure.

extfillets.jpg
 
Whatever brings you the most enjoyment is the right thing to do (as long as its soundly built of course).

I had big plans to do my L2 immediately, but then I realized: there are a lot of cool L1 motors to fly, and electronics to practice with. When I do L2 it'll be a very different rocket instead of shoving a barely J into my L1 rocket.

Yes--so many different aspects of this hobby to work at gaining some level of competency at. As an example, I've been fiddling around with some electronics to use for this rocket. I haven't done any soldering in years and wasn't very good at it then but it's been fun to do. Of course every time I turn around I'm buying new "stuff" for rocketry. Obviously I need a 3rd hand and fume fan for soldering, right? :)
Tim
 
I did a round of spiral filling (no pun intended, but it WAS around and around...) with Elmers CWF. Not my favorite part of building but I want to try and get a relatively smooth finish. The method I worked out is to thin the CWF with water until it’s just a little thinner than peanut butter and used a plastic spoon to run a thin line of filler along a section of spiral. I then took a used-up plastic gift card and smoothed the line out.
Here’s a dry fit after some sanding and a closer-up view of a fin with a thin coat of CWF.
exceldryfit.jpgexcelfin.jpg


I also worked a little on the nose cone. I washed it down with hot soapy water then did some light sanding with 220 grit. The mold lines on this nose cone are pretty minimal, which is nice.
excelnose.jpg
 
I am currently building a Binder Tyrannosaur. I have had nine kinds of hell with mine, but they were pretty much self inflicted. With the problems I had with this one, it's a wonder I have had a rocket make it off the ground. LOL. The kit itself is top notch; and the most complete kit I have ever received. I have emailed Mike several times in the past and he has always been helpful and always answers any silly questions I may have.

I have contacted Teddy for a couple of builds and it always ends with him saying he doesn't do custom work in the sizes/lengths/materials I wanted. Kinda curious the difference between what you (and everyone else for that matter) and I requested. So I gave up on him altogether and found others who were all too happy to help, and they don't even advertise custom harnesses. :confused2: I will one day go for Level 3 and will need a harness for that, I now have two other sources I will turn to when the time comes. Everyone else has good luck with him, but not me. Anyway...

Every time I try to get something done on my Tyrannosaur it starts raining. I got some "rocket time" now, but it is raining and I am at the prime/sand phase on it and need to cut and drill on my other build; my shop is a pine tree and I have to drag everything out of the shed and set it up.

Mikey D
 
I got the rail buttons installed and taped off to shoot some primer. I discovered Duplicolor filler/primer this past summer when my son and I were working on his car and really liked it. It's more expensive than a lot of other primers but is worth it to me. Here's a shot after I sanded the first coat of primer down and used some Bondo glazing and spot putty to start working on trouble areas. I'll get the Bondo sanded down and hit it with another round of primer then see where I'm at.
IMG_20170312_142737220.jpg
 
... I discovered Duplicolor filler/primer this past summer when my son and I were working on his car and really liked it. It's more expensive than a lot of other primers but is worth it to me.

I found that too, several years ago and bought it until my store of choice stopped carrying it. Since then I've gone to Rustoleum Filler Primer I get in the Auto section at Walmart. I think it work just as well as the Duplicolor. But it has to be the Filler Primer.
 
The Bondo and Duplicolor filler primer along with plenty of sanding are starting to do their thing. Only a couple more rounds to go I think!

1489856359847.jpg

1489856374860.jpg
 
School got going again after spring break so it's been 10 minutes here 30 minutes there for building. I've been able to get some finish coats on. Rust-Oleum 2x lays down very nicely over the duplicolor primer.

1490826271121.jpg
 
Back
Top