

grouch
Well-Known Member
Awesome job!!
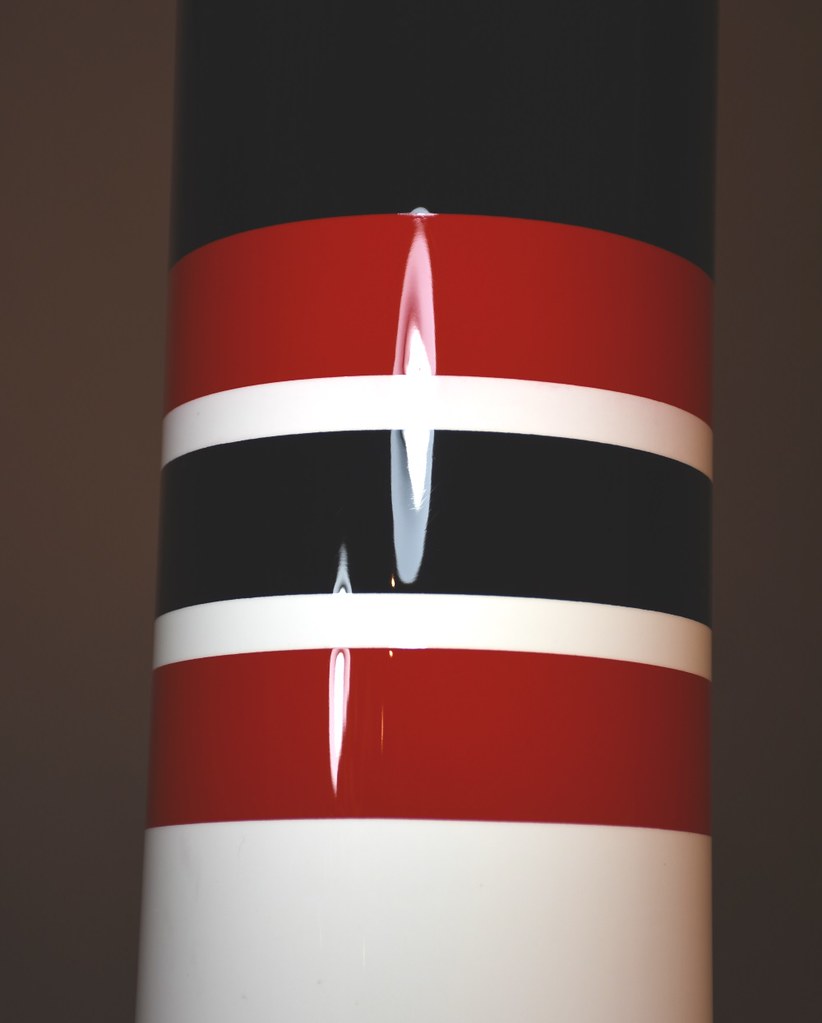
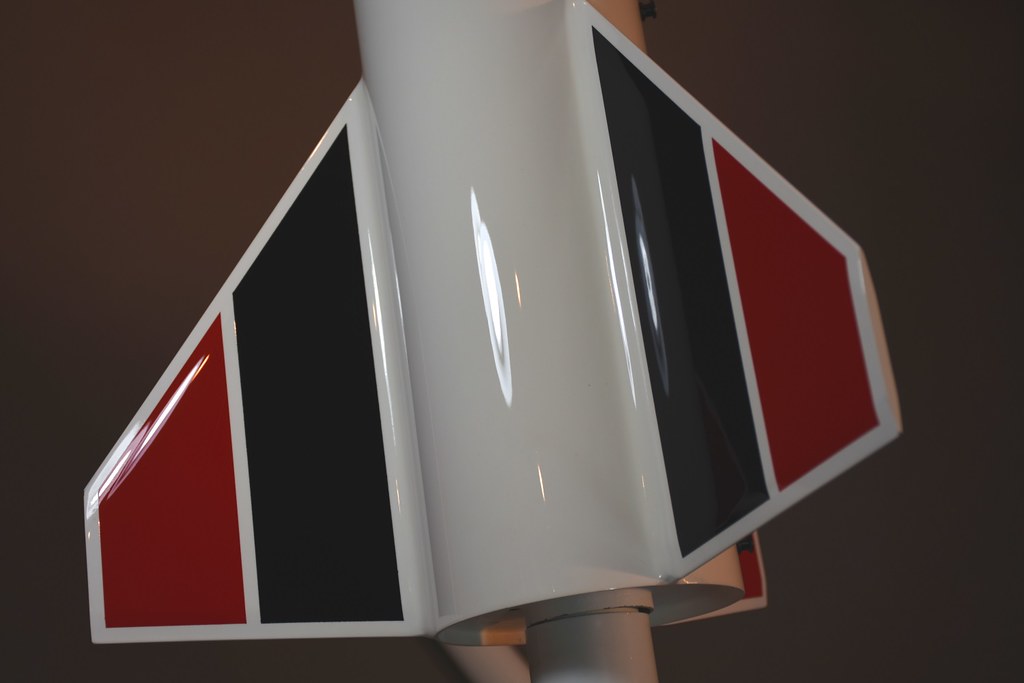
After 4 hours of wet sanding with 1000 grit and 2000 grit. I haven't sanded the nose cone yet so this picture shows the difference before and after wet sanding. Wet sanding the clear coat makes it perfectly smooth, and then polishing will bring out the high gloss in the next step.
Next step, wet sand the nose cone and then start polishing.
That is beautiful and you have far more patience than I ever could with painting...
Or I, or most anyone.
I often wet-sand but have never tried polish-and-wax for the final finishing steps. One day I need to try it (though I shan't be doing four hours of it, nosirree).
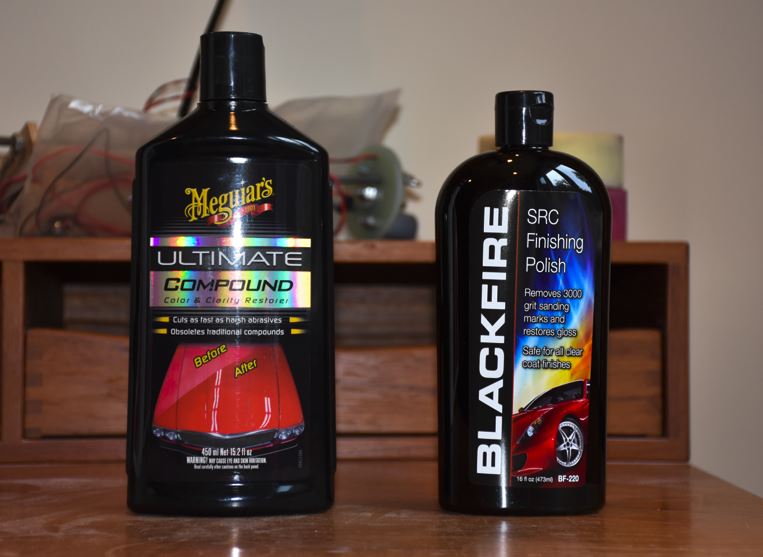
Nathan, I'm sure you've said it before but exactly which polish and wax do you use? I see the Meguiar's in your picture there but don't know what the whole sequence is.

") .
.Hi Nate.
When I spray on my clearcoat (HLVP Gun and automotive clear 4 to 1 hardener) it comes with orange peel but if I spray heavy enough it still looks like shiny glass just orange peel. It's when I try to buff out the orange peel with wet sand 1000 then 2000 then swirl remover then polish that it just doesn't seem as glassy, however it feels very smooth where the orange peal does not. Once I'm finished I can see reflection well and smooth just doesn't have hat wet glassy look that it had before.
Not sure if I'm explaining it , but it's almost like I'm trading the smoothness for dullness. Could be my product (turtle medium swirl remover - then Meguires Polish) or could be my polish stage needs to be longer. Any thoughts on that or can you get more specific on what you are looking for for each stage to finish...beside patience
Also do you use an applicator - a polishing rag or a buffer.
I am doing the swirl remover with a buffer and the polish with the same buffer - maybe I need a second applicator or different buffing head
Hi Nick, it sounds like you're probably doing a good job with the wet sanding and the problem is with the polishing step.
First about wet sanding: When you begin wet sanding the painted surface is shiny but has some amount of bumpy texture (orange peel). As you wet sand, the there will be tiny shiny spots remaining which are the low spots in the orange peel texture that haven't been sanded out yet. The trick is to sand with 1000 grit until you get most of the shiny spots. Then switch to 2000 grit and keep sanding lightly until all of the shiny spots are gone. At that point the surface is perfectly smooth.
Then you're ready to start polishing. I do it it two steps, first rubbing compound then finishing polish, but the process is the same for both steps: For large rockets I start with a dual action buffer (Porter Cable 7424) with foam pads. Be sure to polish with foam pads, NOT with a wool buffing pad. I use Lake Country CCS foam pads. After I get it about half way polished I switch to hand polishing with a small foam polishing pad. Polishing pads come in various grades with the firmer pads being used for more aggressive polishing, softer ones being used for finishing polishing, and the softest ones being used for applying wax. So be sure to use the right type of pad for what you are trying to do. Each of the polishes (compound and finishing polish) both require several passes with the machine and several more passes of hand polishing. After each each polishing, wipe it clean with a dry cloth and inspect your progress. Keep polishing with the rubbing compound until it is scratch-free, glossy, and looks almost perfect; if you switch to finishing polish too soon you will never get a glass like finish. The finishing polish will make it shinier but it won't take out 2000 grit scratch marks so if you can see any scratch marks at all then you are not done with the rubbing compound yet. I can't say exactly how many iterations of polishing it will take but typically I polish with rubbing compound by machine 2 or 3 times, then rubbing compound by hand another 3 or 4 times, then finishing polish by machine 2 or 3 times, then finishing polish by hand another 3 or 4 times. Wish I could be more precise but it varies, sometimes it starts looking good quickly and sometimes it just takes more polishing.
As a general rule, if your arm doesn't hurt then you're not done yet.
but maybe I'm not able to polish out the other scratches.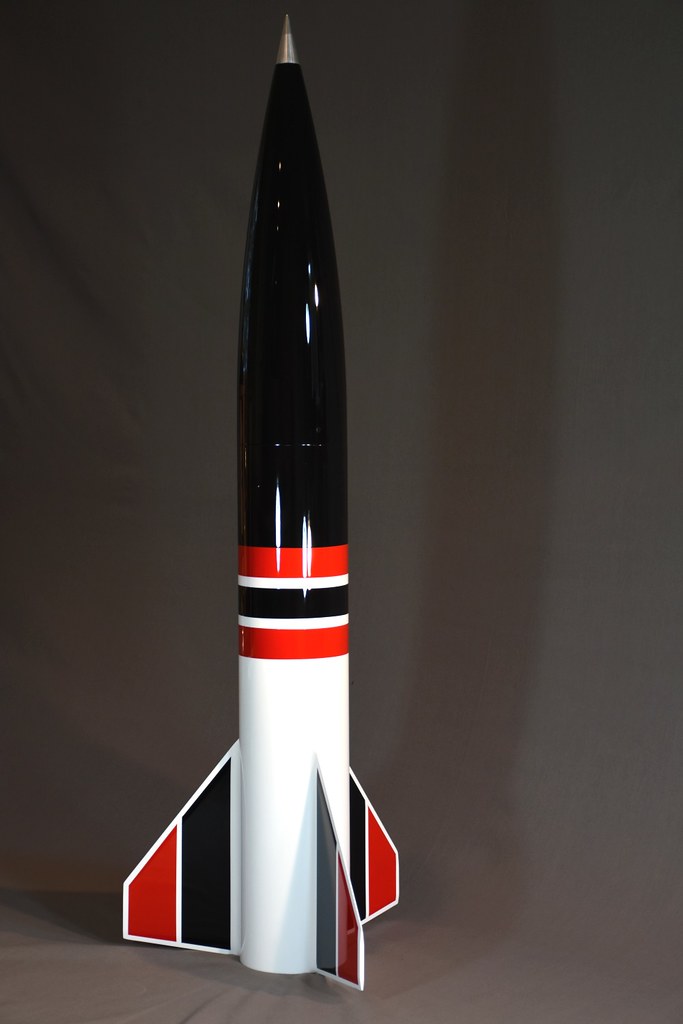

Holy smokes, that looks like your best work yet!! I'm in the polish phase and I'm way more than 2 hours and I'm not even in the same ball park...7424 ordered
Great job Nathan thanks for sharing,
I think Nathan enjoys the challenges of painting and finishing his rockets to perfection and they are definitely one of a kind, but you are right about being flyers Kurt... they do get dinged up. I had a few nice rockets that came in ballistic and after that I told myself never again. I'll go as far as shooting a nice clear, but I won't bother with wet sanding and polishing the finish off. I don't even bother masking my paint jobs...I just do blends. Its faster and they give off a cool color. The only exception is if I'm building a scale model and I need to mask and show more detail, but flyers get the blend and clear and I'm done and over it.
BTW Nathan another beautiful paint job!!
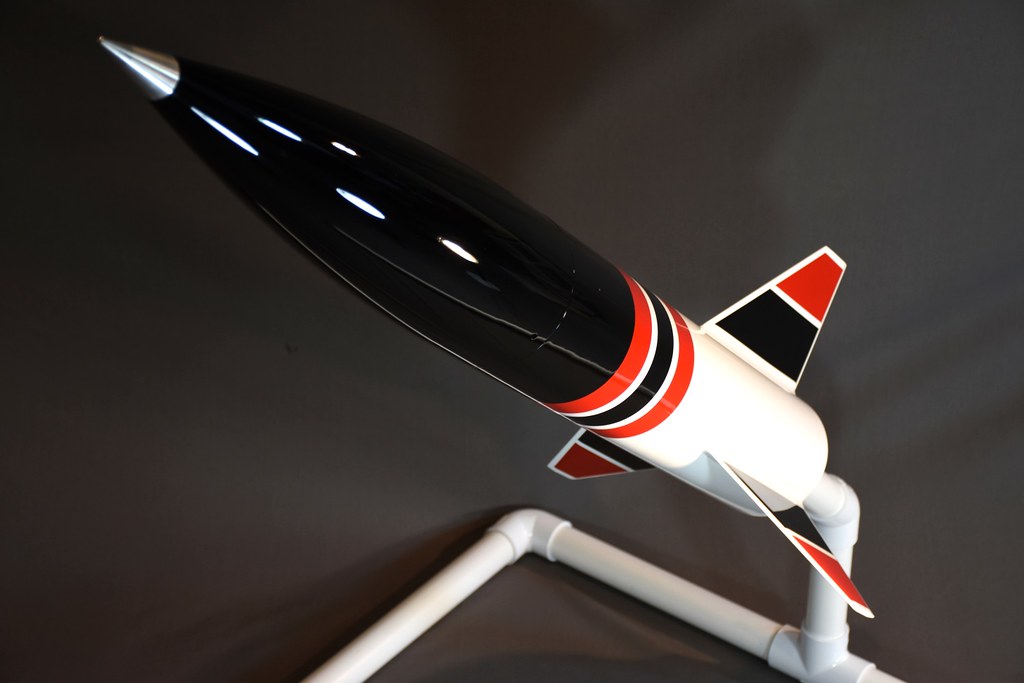
There's only one little problem with a nice paint job. If the rocket is a flier, it's going to get dinged up. If there is a mishap, it'll get "really" dinged up. . .
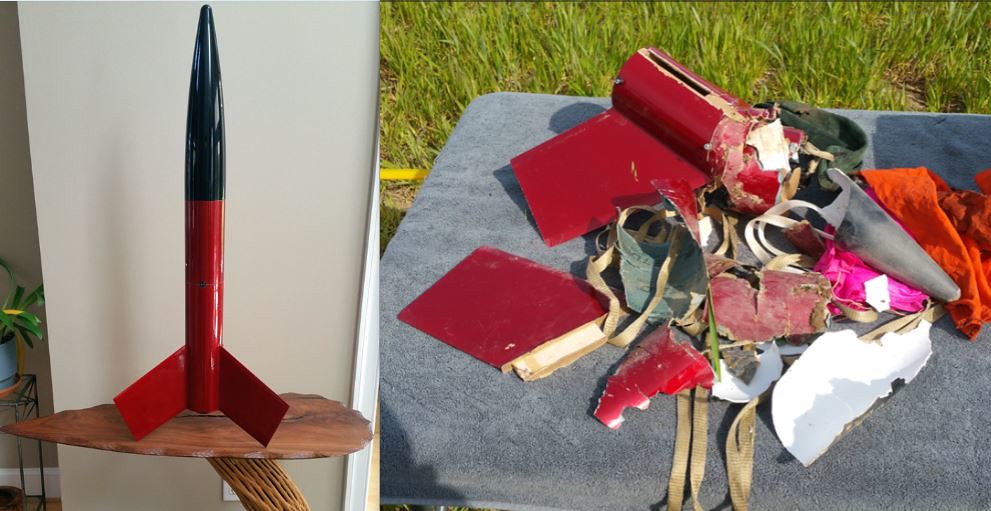
You mean like my Mega Der Red Max clone?
Hi Nate.
When I spray on my clearcoat (HLVP Gun and automotive clear 4 to 1 hardener) it comes with orange peel but if I spray heavy enough it still looks like shiny glass just orange peel. It's when I try to buff out the orange peel with wet sand 1000 then 2000 then swirl remover then polish that it just doesn't seem as glassy, however it feels very smooth where the orange peal does not. Once I'm finished I can see reflection well and smooth just doesn't have hat wet glassy look that it had before.
Is this rocket going to fly at Battle Park this weekend?
Is this rocket going to fly at Battle Park this weekend?
theres a lot that goes into getting clear to lay like glass and even the pros don't get it glass smooth every time. if youre getting OP even on heavy coats it could be either the pressure at the gun is too low or the gun may not be atomizing the paint well enough.
one thing I do that helps is over reduce my clear 10%.
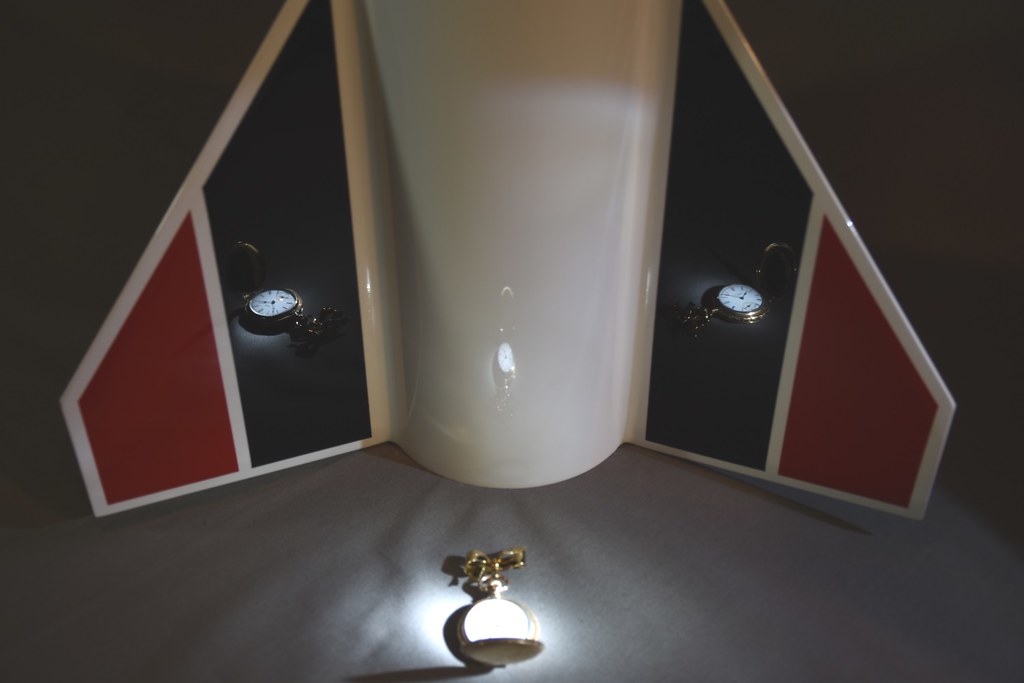
That finish boggles the mind. Absolute perfection -- that would put a lot of custom show cars to shame.
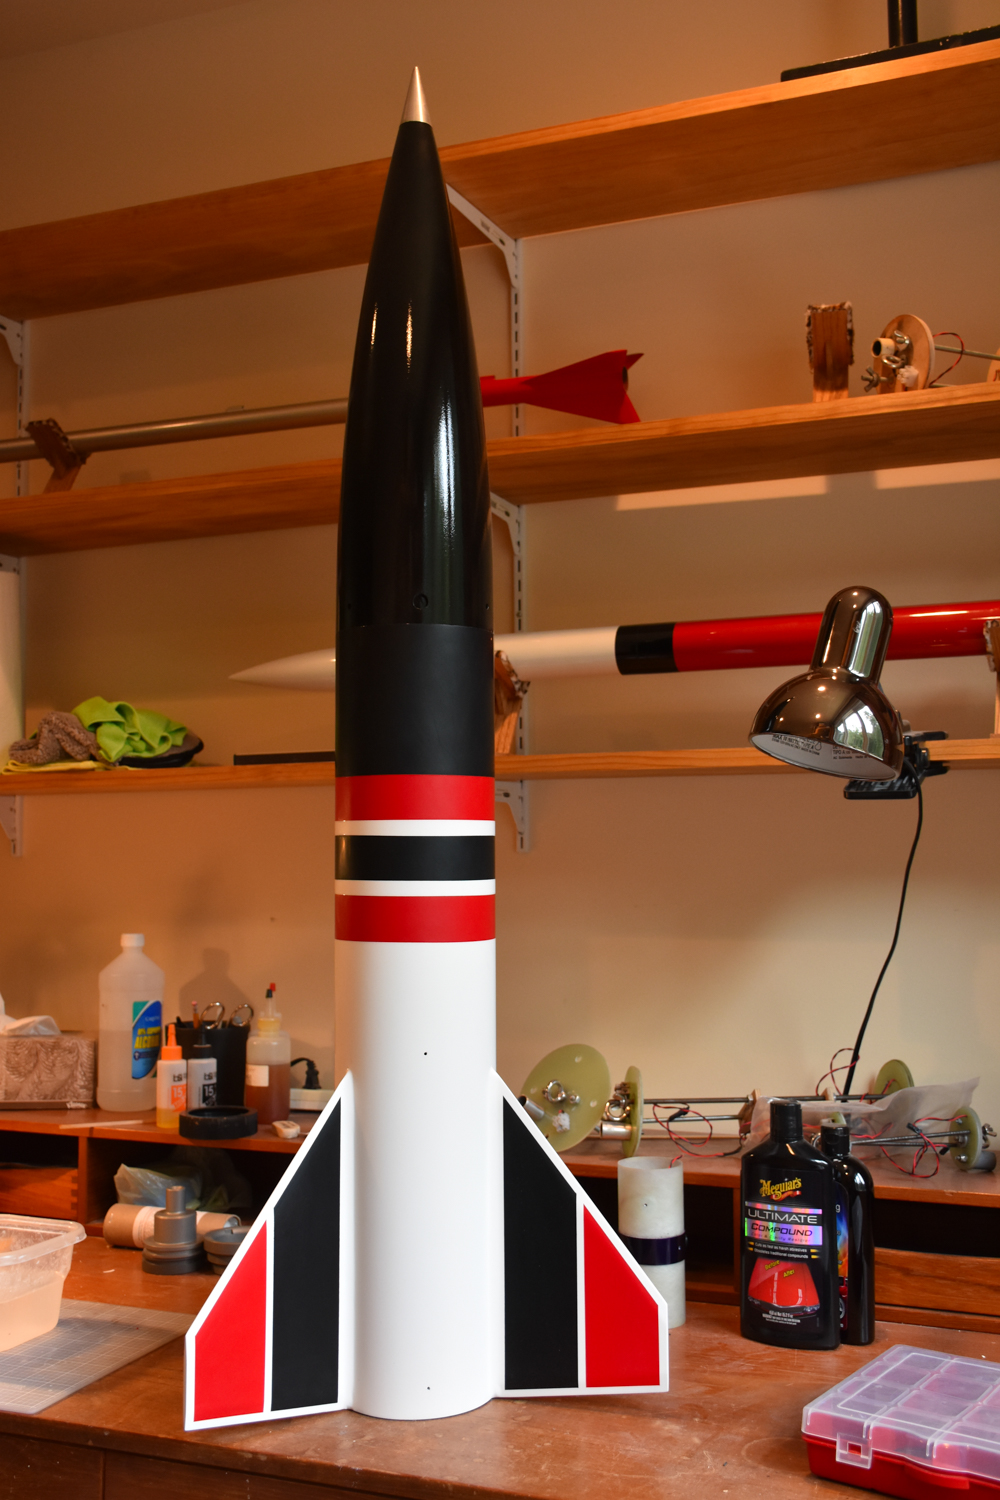
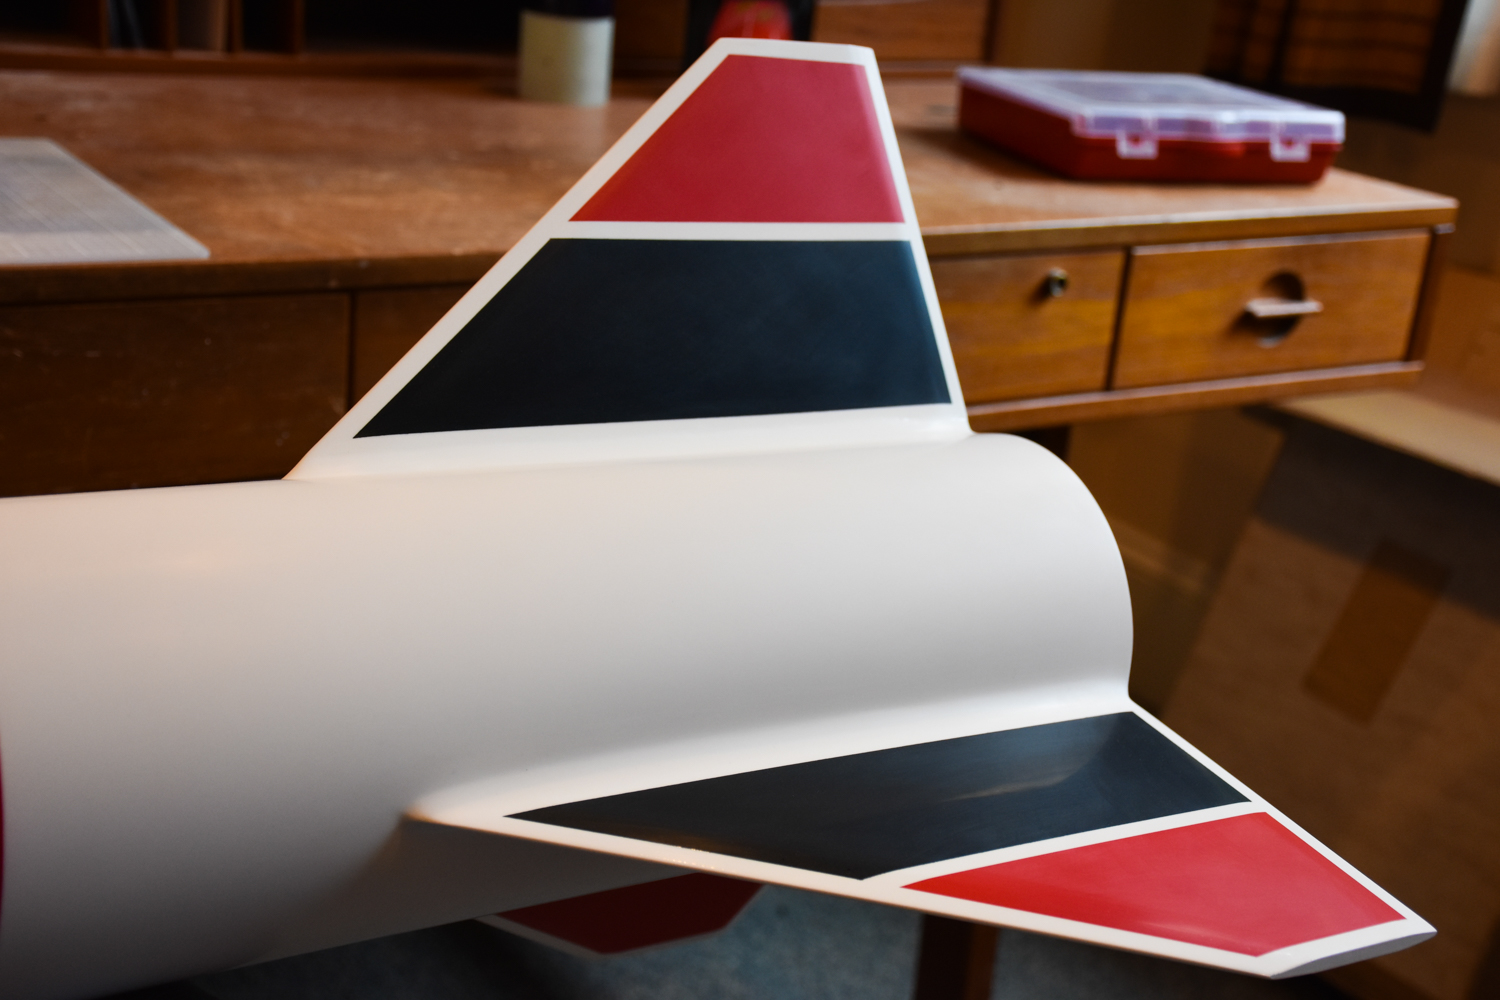
FINISHED! This time I did all the polishing with the machine (Porter Cable 7424) instead of by hand and that worked pretty well. Total time spent polishing was about 2 hours. After that was a coat of Blackfire Wet Diamond sealant and it's done . . .
I’m going to ask an obvious question, basically to validate my desire for one.... not rattle can but air brush?
I’m going to ask an obvious question, basically to validate my desire for one.... not rattle can but air brush?
Enter your email address to join: