MADCOW 4" FRENZY CARDBOARD ROCKET... A BUILD THREAD #1

The Rocketry Forum

Help Support The Rocketry Forum:

This site may earn a commission from merchant affiliate links, including eBay, Amazon, and others.
Thrustcurve has the published pre-and-post weights. Some dowels & allthread and other long skinny things could be trimmed to length and taped together. Straws filled w/sand and hot glued?

Admittedly the CG won't be millimeter accurate, but I suspect you're not planning to shave it that close.
 
Just enter the CG without motor as override in Openrocket and then add the motor, it will tell you were the CG with the motor is.
I think this simply assumes that the CG of the motor is in the geometric center.
 
Last edited:
The problem with using openrocket, or any 'other' software and/or data bases is that I'm not quite sure of the true weight of the materials in my fin can, nor how those masses are actually distributed along the length of the can. There would be a lot of guesswork involved and the true CG would still be somewhat uncertain. Being the 'hair-splitting' perfectionist that I am... I want to be a bit more certain than an educated guess. I called Scott, from Loki Research. Had a very nice chat with him. Great guy, very, very informative... he told me everything that I need to know in order to get these two rockets well balanced prior to my heading for Kansas! "I knew that there was something that I really liked, about Loki, before I ever placed an order or made a single phone call!" "Thanks, Scott!"
 
Last edited:
Getting soooooooo close, now. Paint goes on this weekend, deployment cannons get attached to av-bay bulkheads and wired up... then the BP ejection charge tests begin. I'll get my motor retention clips fabricated next week and then all will be done except for getting things properly balanced. This has so far been a really enjoyable, educational and intriguing endeavor. It will continue to be such until all is said and done and I have my cert(s). Fun stuff, Great fun!... to be continued.
 
You do not have to know the mass of anything in the fin can, to use open rocket to calculate the shift of the CG.
You just override the rocket mass and the CG with the ones you measured without a motor installed.
Then you choose a motor in OR and it will shift the CG.
 
The problem with using openrocket, or any 'other' software and/or data bases is that I'm not quite sure of the true weight of the materials in my fin can, nor how those masses are actually distributed along the length of the can. There would be a lot of guesswork involved and the true CG would still be somewhat uncertain.

That is true which is why I weigh my final build without motor as well as calculate the CG without motor. Then you simply put the CG & weight in the "over-ride" & OR will calculate the new weight/CG based on motor of your choice (assuming you are not using any motor spacers & in the case of Loki it is a moot point).
 
Positive motor retention problem solved!!! Very simple solution. No brackets to machine, no clips required, no 'nothing' but some good ol' fashioned aviation safety wire and a set of safety wire pliers! I'll post a photo as soon as I can remember where I put those dang pliers! :facepalm:
 
Seeing how's I'm going with electronic deployment and not likely to 'ever' use motor delay deployment... is there any reason why I shouldn't just seal up the ejection end of my motor mount tube? This would eliminate any back pressure on the motor case when my drogue deployment charge fires. If I don't need it, why not just plug it?
 
1) it would preclude any possible use of motor as a third backup for drogue deploy. and 2) limit your choice of motors. however it is your choice to make.
Rex
 
I would leave it alone. Like Rex said, nothing wrong with motor backup but it may limit your motor size down the road.
 
That's very true, plugging the MM tube would indeed limit my future motor choices, however. The motor mount tubes are already way, way longer than my current cases, or needs. Still plenty of room for expansion/longer motors in both this Frenzy, as well as the Super DX3. I'd still have room enough to punch some serious holes in the sky, after plugging the tubes, while using longer cases. Not worried about a motor backup. I'm using redundant computers/altimeters. That should cover the backup, unless I'm totally missing something that I should be made aware of. Another thing to consider is the fact that these are my first two HPR rockets. My main goal for these two rockets is to simply become certified for L1 and L2. After 'that'... it'll be time to experiment and start messing with new rockets, new designs, etc.! I already have new rockets and new goals in my sights! Very good advice, though! Advice well taken! :cool:
 
Gonna start on my black powder recovery charge cannons, tomorrow. Who's got a link to a BP charge chart, or a calculator? I had one, but lost it somewhere in the mix of this build thread. I need to know how long to cut my 1/2" PVC pipe to insure that the lengths will be at least long enough to hold enough powder and dog barf to do the job...?
 
1/2" PVC BP cannons. I filled the bottom of the PVC cannons with epoxy to seal them up. I'll next drill a small hole in the side of each cannon, close to the bottom of each tube, for the e-match wires to enter. I intend to use CJ's 'finger-tip' glove method, however. Being a cardboard rocket, and the charges being placed close to the body tube... I'm trying to avoid scorching the body tube with the BP flash. These cannons will hold the glove tip charges and hopefully keep any direct 'burn' away from the cardboard body tube. I'll see how this works during ground testing...

BP Cannons.jpg
 
Last edited:
Av-Bay complete! The 'other' end looks just like this end.
The wires you see going into the PVC cannons are just 'dummy' wires that allow me to see the big picture while arranging/mounting things. Those dummy wires will be replaced with e-matches on launch day... unless I forget that they aren't real! "Yikes!"

Deployment Wiring Complete.jpg
 
Last edited:
Time to start painting! I'm starting with the Av-Bays for this Frenzy, as well as the DX3. The weather has been really rainy/Humid so I'll wait for the weather to dry up before painting the booster and the payload sections. The Av-Bays are small enough for me to go outside for a quick coating, then bring indoors to dry in a less humid climate. I'm using 'grey' RUST-OLEUM Automotive primer (thanks Rex!), and RUST-OLEUM Lacquer for colors. Perhaps tomorrow will be better suited for painting the large sections...

Starting Paint.jpg
 
Primed with a couple of small accents added. Now, what other colors/accents should I add to my paint palette to complete the portrait? "Hmmm"...

Primed and Ready.jpg
 
I've been following this thread from the beginning and everytime I see your avatar profile picture thingy I smile TMJ.
Wanted to throw that out there.
Of course, I like your build also. Legitimate to the max, almost as if you already know what you are doing building your rockets.
 
I've been following this thread from the beginning and everytime I see your avatar profile picture thingy I smile TMJ.
Wanted to throw that out there.
Of course, I like your build also. Legitimate to the max, almost as if you already know what you are doing building your rockets.

Many thanks. I actually know very little about HPR. High Power is new to me. I started this thread for two reasons… #1 to learn what is truly needed to build a ‘solid’ high power rocket, worthy of successful certification, the ‘FIRST’ time, without failure. #2 reason was to share what I learn, as I go, in hopes of helping other HPR newbies get a good grasp of needful things, techniques, etc. from my own personal journey. Needful details and important considerations seem to be a bit hard to come by, even on this forum. Too many issues to consider and lots of important questions that new folks (myself included) simply don’t even know to ask until ‘after the fact’… when it might be too late. A lot of what I do is based upon previous experience with low/mid power rockets, R/C pylon racers and ducted fan models. I know how to build strong! LOL
HPR is a different animal. A lot more power and stress involved. Dual Deployment is also new to me. A good portion of my work is strictly ‘empirical’, based upon past ‘non-related’ experience, however. I need to give most of the credit for my HPR build methods to the great advice offered to me by some fine folks here on the forum. Special thanks go to ‘Crazy Jim’ Hendricksen and David McCann. I’ve learned ‘VOLUMES’ of extremely valuable advice from these two guys. If not for ‘them’, I’d surely not be ‘confidently’ finishing my L1 and L2 builds at this time! Huge thanks to the both of you!!!
 
A little more paint and an Aerocon Systems parachute anxiously waiting to get stuffed inside...

Bottom Fins Painted.jpg
 
for cert birds, a nice high vis color with a high contrast to the local(to the launch site) vegetation. for Wisconsin floro pink works wonders, for tracking against most sky conditions the lower third(roughly) a dark color(black works mostly). from observation neon blue works nicely for the vegetation(very few flowers if any, are long and skinny) but trying to track it against a clear sky is problematic at best. some what surprisingly black & white roll patterns are nice camo (it breaks up the outline, see also 'dazzle camo'
Rex
 
I actually know very little about HPR. High Power is new to me.
I think that this border is artificial. Some practically identical rockets with the same device. If it's solid fuel what's different in a small and a larger rocket? If there should be separation it should be a rocket engine used solid fuel rocket engine using liquid fuel, etc.When will the flight?
 
Forward Fins White.jpg
I know how I want to finish this thing, now. Gotta go get some paint...
 
View attachment 299664
I know how I want to finish this thing, now. Gotta go get some paint...


Heads UP if you are bringing these to Airfest for maiden flights:
Don't waste your time with a good paint job!!!!

There is a "thing" that ruins the lives of many newbies to Argonia, it's called Argonia Road Rash.

It's usually VERY breezy out there and more common than not, to have your rocket dragged across great distances in plowed dirt, rendering decals,vinyl & good looking paint jobs to the trash. Wind inflates chutes after landing...pulling them across the gritty dirt.

Light coat of high visibility color for finding & protecting surfaces.
Do a great job when you get back home.

Thanks for the "Heads Up" about paint, Jim. The Frenzy was already painted, only waiting on trim work. I'll not do that, now. It's not bright, but it's quite light in color. The DX3 is getting its clothes put on now. John Deere yellow and 'yes'... John Deere Green to cover the airframe, of course. The DX3 should feel right at home in Argonia! LOL

Frenzy and DX3 getting Clothes.jpg
 
I've heard/seen ways to blow half the shrouds on landing..... looking into it after getting dragged half a damn mile....
 
I've heard/seen ways to blow half the shrouds on landing..... looking into it after getting dragged half a damn mile....

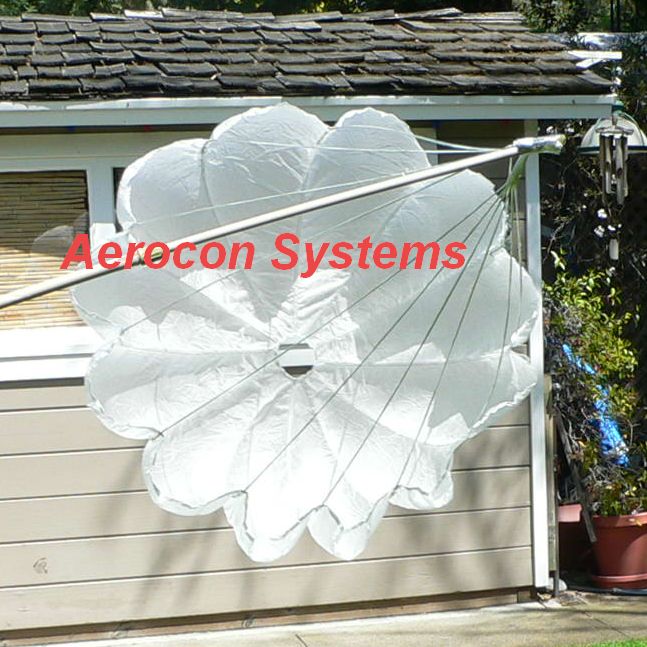
These are some of the chutes that I have. I was told that these style chutes will deflate once they touch the ground. Is that 'true'? This isn't a 'plug' for Aerocon. This is just the only good image that I have.

David, I'd really like to know if you come up with details as to how one can lose half the shroud lines upon landing. I actually thought about that way back when. The only thoughts that I could come up with involved the use of R/C equipment and would need to be 'manually' actuated after 'seeing' the rocket touch down. A bit sketchy, at best, especially if the rocket lands a long ways away/out of sight!

par60white.jpg
 
'Airfest' colors! Nothing 'fancy', strictly utilitarian. Ready to be blown around, dragged through the dirt... and even plopped into some mud, if it rains. "Kansas certification rocket skins!"

Airfest Colors.jpg
 
As soon as the paint totally dries, on the John Deere, I'll stuff all the recovery gear inside 'both' rockets, along with my dummy bates grain weights, batteries, etc. Flight ready weight(s). It'll then be time to balance these birds. After the balancing act, it will be time to start ground testing my ejection charges. 'Tick, tock'... 'Tick, tock'... 'Tick, tock'....... "I'm running out of time!" We're also expecting more rain, here, which might hurt my ground testing abilities. I'm beginning to think that I might possibly be doing some last minute pre-flight work/experimentation/preparations 'after' arriving in Kansas! "Arggghhh!" Oh well. "It 'is' what it 'is'!" :bang:
 
I’m trying to balance the rocket, however, I’m also having issues with ‘Open Rocket’. Need some help/advice here.
What I did was download the sim file from Madcow. I then had to change the length of the motor mount tube to match the tube that came with the kit. I also had to add a 1.25” body tube ring between the booster/payload sections to account for the removable av-bay upgrade. Last, but not least… I also had to stretch the length of the av-bay/coupler to match what came with the kit. This gives me the true empty airframe, etc.
I ‘then’ began to weigh ‘ALL’ internal components, do mass overrides on the weight of everything and put those items exactly where they would be, inside the real rocket during launch and on the way up. I also weighed my complete rocket including batteries, motor loads and all (actual flight ready weight).
According to Open Rocket, my rocket should weigh 14 ounces more than it truly does in the real world. Open Rocket ‘also’ shows that with that extra 14 ounces of weight I would be over-stable at 2.3 cal.
Something’s amiss, here. My true values are not adding up in Open Rocket, making me nervous/leery. The 1.25” stretch, via the av-bay upgrade, shifted the CP .4375” towards the tail. I’m not sure if ‘that’ is correct, but it feels good enough to work with. If I can keep my stability around 1.0-1.5 the shown CP shouldn’t really be an issue, even if Open Rockets theoretical CP is off a bit.
What scares me is how can I plug in ‘true’ weight values and Open Rocket makes the thing 14 ounces heavier than it really is?
Unless someone has some better advice concerning this curious matter… I’m just going to go with the estimated Open Rocket CP (it’s only .4375” south of Madcows’ original design location) and balance the thing @ 1.25-1.5 cal…
 
Back
Top