MADCOW 4" FRENZY CARDBOARD ROCKET... A BUILD THREAD #1

The Rocketry Forum

Help Support The Rocketry Forum:

This site may earn a commission from merchant affiliate links, including eBay, Amazon, and others.
Frenzy redundant electronics.
This is the first arrangement that comes to mind, however. This arrangement would also put the batteries well off of the centerline of the rocket. Maybe I could mount the batteries on the 'underside' of the sled for something more close to centerline weight distribution/balance? If mounting the batteries underneath, I could also pull the two RRC's closer together, towards the center of the sled, leaving just enough room between the boards to allow for fore/aft strap ties for securing the batteries on the back side of the sled... if 'that' makes sense? Any 'other' suggestions are more than welcome...

Electronics Arrangement~1.jpg
 
Last edited:
You're going to like this part :)

In cardboard it's best to back the tubing with some metal flashing to help shear the pin without tearing the cardboard.

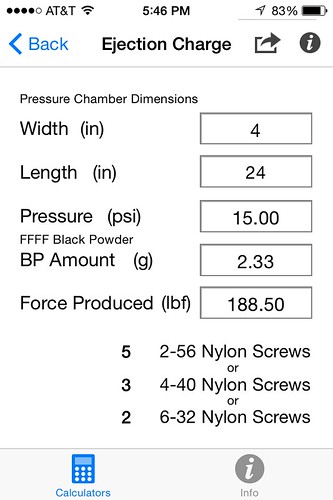
Looks like a pretty long payload bay. Now it'll be full of stuff, but I tossed in 24" here just for giggles. I'd start ground testing around 1.5g and see where that takes you. I'd personally do 3 pins, but 2 will be sufficient.

28492159526_325db831ee.jpg

What application is that and where can I find it please?
 
My recommendation is the batteries on the back of the sled and each battery having 3 zip ties securing it to the sled, 2 across the width of the battery and 1 along the length. With the batteries on the back of the sled if.for some reason they get loose on the flight your electronics have less chance of being damaged.
 
My recommendation is the batteries on the back of the sled and each battery having 3 zip ties securing it to the sled, 2 across the width of the battery and 1 along the length. With the batteries on the back of the sled if.for some reason they get loose on the flight your electronics have less chance of being damaged.

I agree with everything you say. It makes sense. One zip tie to maintain the battery connection and two others to keep the battery in place on the sled. I'll be adding a 'stop', also, that the batteries butt's will rest upon during launch. That wasn't shown in the photo 'cause I've not gotten there, yet and the batteries 'will' likely be mounted on the flip side, as you mention, for the same reason that you mentioned. The kit came with only one stop, but it's in the wrong place and also needing two, for two batteries. Thanks for the input! Well received!!!
 
Last edited:
Stops are good ideas but I have had them break. I use double sided sticky tape now along with the zip ties. It would take an act of congress to dislodge it now.
 
Stops are good ideas but I have had them break. I use double sided sticky tape now along with the zip ties. It would take an act of congress to dislodge it now.

Hmmm, okay. That's 'more' good food for serious thought! Thanks!
 
I see an awful lot of un-used real estate inside your bay, that tiny sled short changed ya!

You could add longer plate on top & gain 50% more usable room & not be so cramped, or ditch that one and make a sled that fits proper, utilizing ALL the interior space
 
I see an awful lot of un-used real estate inside your bay, that tiny sled short changed ya!

You could add longer plate on top & gain 50% more usable room & not be so cramped, or ditch that one and make a sled that fits proper, utilizing ALL the interior space

:wink: Hmm... "Like minds at play, here!" Hehehe
I've actually entertained the idea of totally 'ditching' it and replacing the manufacturers sled, entirely, using a new one with a bit more land to build upon! As per the manufacturer's instructions, I believe that I am about 4 ounces under the advertised weight spec's of an empty airframe. If so, that gives me a bit of wiggle room for expansion. I only wish that the av-bay was located a bit further north so as to reduce the amount of 'deadweight' needed for final balance. Maybe a horizontal camera platform/camera/battery, etc. mounted in the pointy end will make for some good additional live weight, as well... :confused2:
 
Last edited:
Speaking of 'live' nose ballast... I'm also considering placing an additional 'centering-ring' with gussets (strength) and some wire mesh flooring/baffling up towards the nose, just far enough south of the NC to allow room for the main chute, shock cords, etc. This would shift the CG forward while also preventing my recovery gear from slamming down upon the forward av-bay bulkhead upon launch. Same weight, per se, just locating it further north for balance! This would also put all the main recovery gear right at the mouth, easy to spit out when the charge fires...
 
Last edited:
This reminds me of a story!
Way back when, when I was young and single... a friend of mine suggested that I take up selling home related products, door to door, in order to meet girls. Cheaper than going to the bars and I might actually make a dollar or two while doing so. The more I thought about it, the more I liked the idea. I decided to give it a shot. “What the heck!” Well… things didn’t work out as expected. I spent half of the morning getting doors slammed in my face and had no orders on my ‘order-sheet’. Didn’t have a single phone number, either. It was getting depressing. Couldn’t figure out what I was doing wrong. I thought I’d give it just one more try before giving up. I approached a door, got myself prepped and ready to deliver my ‘pitch’. Just before my finger touched the doorbell button… I heard a voice call my name, from behind. I was shocked to see my district manager standing there. She started to chew me up one side, and down the other. Started screaming at me about complaints and demanded that I turn in my sales sheet and samples. It was very demeaning and insulting. Feeling 'shamed'... I decided, right then, that perhaps this was not the best way for me to meet women, so. I did the ‘noble’ thing. The only thing that I could do. "I pulled my pants back up and went home!" :confused2:
 
Last edited:
Have any of you folks used a 'shop-vac' to ground test your electronics and deployment charges? I'm getting real close to 'that' stage of my build. I wouldn't mind hearing about how you folks ground test your deployment configurations...
 
Last edited:
Have any of you folks used a 'shop-vac' to ground test your electronics and deployment charges? I'm getting real close to 'that' stage of my build. I wouldn't mind hearing about how you folks ground test your deployment configurations...

I use a Foodsaver marinade container to test my altimeters, instead of e matches I use incandescent christmas tree bulbs. The altimeter, battery and everything goes into the container and is powered up, I put the cover on it and attach the Foodsavers hose to the container, pull a vacumm, then when the apogee light fires I vent the container via the knob on top and watch for the main light to fire. By doing it this way I can confirm my setup works without subjecting it to the shock of ground testing. For ground testing I simply run a long wire through the static port hole and wire the charge as normal I can then fire the charge with a battery or a Estes type controller. I have found it much easier than the vacumm cleaner method.

foodsaver-system-3.jpg
 
I use a Foodsaver marinade container to test my altimeters, instead of e matches I use incandescent christmas tree bulbs. The altimeter, battery and everything goes into the container and is powered up, I put the cover on it and attach the Foodsavers hose to the container, pull a vacumm, then when the apogee light fires I vent the container via the knob on top and watch for the main light to fire. By doing it this way I can confirm my setup works without subjecting it to the shock of ground testing. For ground testing I simply run a long wire through the static port hole and wire the charge as normal I can then fire the charge with a battery or a Estes type controller. I have found it much easier than the vacumm cleaner method.

View attachment 297985

Sorry Rich, but you kinda lost me there. Not exactly sure as to what you said. Remember... I'm new to this game! My needs for ground testing are two fold. #1) I need to see how much separation of components I'll get via 'X' amount of powder charge used for a given internal area. This will help me to determine what length of shock-cord will be best needed. #2) My BP burns a bit faster than the commercial stuff. Commercial manufacturers use hardwoods for their charcoal. I use willow. Makes a big difference. That being said. The calculated figures typically used for commercially manufactured BP calc's will surely give me much more of a 'pop' than if I were using commercial Goex, Swiss, etc. I need to find the proper ratios for 'my' homemade BP to volume.
What I intend to do is to pack my rocket, but 'not' attach the shock cords. I'll use the shop-vac to take it up in altitude, kill the power, and see how far the payload bay shoots away from the booster. I'll then do the same with the main chute components/nose. I'm not sure if I'm explaining this very well, but I'm trying! LOL
 
I do not use vacuum cleaners for testing charges. The altimeters I use have test modes.
If you use a vacuum cleaner make sure you are in a safe distance to the rocket. The easiest way is tape the cleaner on the rocket and plug it in. Do not hold it to the rocket.
 
I do not use vacuum cleaners for testing charges. The altimeters I use have test modes.
If you use a vacuum cleaner make sure you are in a safe distance to the rocket. The easiest way is tape the cleaner on the rocket and plug it in. Do not hold it to the rocket.

No worries. The ground testing won't 'get' me, nor anyone else. The taping will need to be tight enough to create a seal, initially, but not so tight as to prevent the payload section from easily separating from the booster. When all's said and done, the payload section/booster will be separated and the taped vacuum hose will have been dynamically disconnected and will be laying on the ground.
 
Last edited:
Test mode (no BP) verifies ematch/altimeter/battery setup works

28606043776_24976cc660_c.jpg


For BP charge sizing, I run wires through a vent hole in an empty av-bay, with the charges packed in the usual location. I use dummy cords and t-shirts for parachutes, no need to burn up the real deal. Just connect to a 9v and BANG, tested. Be sure to plug the booster with an EMPTY motor casing with bulkhead in place.


Two step testing is much safer, and valid. If you want to test the barometer on the altimeter, a vacuum chamber is great with some xmas lights-

[youtube]qHfL20o2RaU[/youtube]

(i built that chamber using a gladware food bin and an IV trap, sucking the air out by mouth :) )

Thanks, David. Good info!
 
If you are ground testing charges to ensure proper deployment, use an Estes launch controller. Put the charge in the canister and connect the e-match. the wire leads that normally would be connected to your altimeter are instead fed through one of your vent holes. Connect the alligator clips to the leads...making sure your safety key is not in the launch controller. Do a countdown and insert your safety key at zero. E-matches ignite at very low current levels so half the time the charge will fire them. If it doesn't push the launch button and it will fire.

The 15' of wire the launcher gives you is enough to keep you safely away. The video has the ground tests of my L3 project.

[YOUTUBE]jRxx_pmIEHg[/YOUTUBE]
 
If you are ground testing charges to ensure proper deployment, use an Estes launch controller. Put the charge in the canister and connect the e-match. the wire leads that normally would be connected to your altimeter are instead fed through one of your vent holes. Connect the alligator clips to the leads...making sure your safety key is not in the launch controller. Do a countdown and insert your safety key at zero. E-matches ignite at very low current levels so half the time the charge will fire them. If it doesn't push the launch button and it will fire.

The 15' of wire the launcher gives you is enough to keep you safely away. The video has the ground tests of my L3 project. The first day, the angle of the rocket was too high and when the nose came down it dislodged the aluminum tip. I decided to keep testing, then repaired it over night. That's why the angle was much shallower the second day of testing.

[YOUTUBE]jRxx_pmIEHg[/YOUTUBE]

Very nice, Evan! I like it!! The only reason that I was going to use the shop-vac was to kinda-sorta check the altimeter, itself, to insure there were no defects... while also getting used to operating it before using it for real. :) Should my ejection charges be only strong enough to belch out the chutes, or strong enough to 'also' extend my shock cords a certain percentage of their lengths?

Thanks for the video. I always like to see things in action!
 
I'm getting a lot of inputs on shock cords, rigging, etc., however. I still have questions. Maybe my drawing will help clear things up for me.
I can see three different methods of rigging. 'A', 'B', and 'C'. I'm preferring 'B', but not real sure. Let me know what experience has taught you guys to be the best system.
Also, I'm still puzzled as to the length of the cords running from booster to the drogue, and the length of the main shock cord. I hear 3-5 times the length of the rocket, 6 times the length, etc. Too long is supposed to be bad, too short 'also' bad. How does one determine what is truly correct for a specific rocket? If I go by some of the 'rules of thumb', heck. That means some of you L3 guys need to be using steel cables a couple hundred feet long, LOL. That's why I am confused. What works best, for you guys in DD?
The drawing is not to scale. For reference only...

Rigging Configurations.jpg
 
Last edited:
A is obviously bad because the parts will hit each other under drogue.
B has the advantage that the nosecone is fired in free space, but has a change of entanglement of the main with the booster section
C is less sensitive to entanglement but you could eject the nosecone in the booster, this can be avoided with a very long shockcord to the booster


From the shown I would choose C, but serial deployment with separate recovery of the nose is even better.
 
Separating the nose has always confused me. why have more stuff to look for?

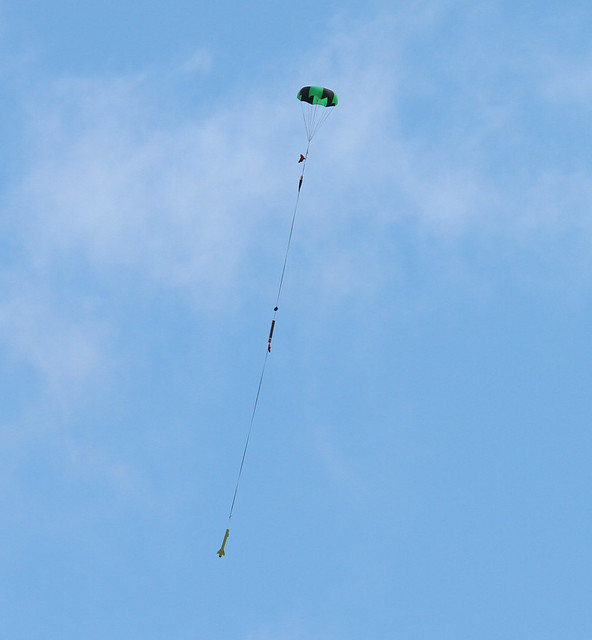
Put the chute on the end of the line. 3-4 feet down, loop the nosecone in.

Nothing will bang into each other, and nothing will windmill.

26587924976_b91cb9fd6b_z.jpg
 
The reason for recovering the nose separately is to reduce the necessary direction changes and passings of parts.
The picture you showed has no drogue so it is unclear which part is where when the main is ejected.
Probably the booster is above the upper part since it has a higher drag.
Then the nosecone is ejected downwards. And the parachute plus the nosecone have to pass the upper part and the booster.
Finally the upper part also has to pass the boster.
 

Latest posts

Back
Top