TRF Summer Build Off: the "Maximilian"

The Rocketry Forum

Help Support The Rocketry Forum:

This site may earn a commission from merchant affiliate links, including eBay, Amazon, and others.
We have a fabric store near by, that sells this little open spool of elastic thread for about 1-2 bucks. I use it on both of my heli rockets and it's amazing. This is better than using regular string because the tension on this thread pulls it out of the way once burnt. String is likely to just hang there.

Elastic Thread.jpg
 
This stuff has about a 2 pound breaking point. Better than sewing thread for sure. I know there are stronger strings available, but personally, I don't need the overkill on my heli jobs. That should be enough to hold a couple of booster pods in place, (given the designated D & F motors he mentioned.) I mean really.....how much strength do you think is necessary?
 
Will fine elastic like that really have enough tension to hold the boosters in place during boost? I have doubts.

Yea that's my concern as well.
(Mind-sim along with thrust curves and a calculator)
If B6s are used in the boosters with an F15 in the core, the difference in peak thrust along with drag could produce an outward pull. If the elastic stretches, pivots the booster out a degree... Hmm

The F15 slowly comes up to peak thrust(~25N) at ~0.4s, where the B6 reaches 12N before 0.2s.

So... if the thread attachment point is ~6x the distance between the pivot point and the nozzle, then... at 0.2s the upward force at the booster is 12N, core is at 8N, difference of 4N, with leverage equals an inward force of 0.6N. Then at 0.4s, the booster is at 5N, the core is 25N, difference of 20N, with leverage equals an outward force of 3.3N or 12oz.

Therefore, the thread wether nylon, cotton, or elastic has to be able to hold 12oz without budging - much.

Now, my math may be way off as it's been forever since I've had a math or physics class, but I think I'm close. Thoughts?
 
Yea that's my concern as well.
Thoughts?

Given that your attachment rig holding the pods on the airframe are going to take the most of the brunt...80-90% wind pressure/air speed....MAYBE? The string/elastic (which ever you decide upon), won't have to be too terribly strong. It's just there to keep the pods in place, right? I use this same elastic to hold down three heli props measuring 30" each, flying said heli bird on an F-44. Hard to say how much resistance the elastic is taking from nearly 5' of expanded prop and the motor combined, but I'd say it's working harder on my rocket than it would be on yours. Those props are pretty poppy once that elastic burns through. Thems my thots an eye stiken to'em.

Cloud Chopper Base Paint.jpg
 
At first I was thinking that elastic made sense; however thinking it over more, it may not be good given the booster design. For the copter rockets, it makes sense since the rotors are held downwards and the bands pull them upwards. With the boosters, they're being held together sideways and they fall apart in an arc off to the sides. This means that if the elastic isn't strong enough or the motor is very strong, there is a chance of the boosters being pulled to the sides by the acceleration of the main rocket...if this happens even a bit, it could start failing rapidly as the boosters are leveraged outwards and the main rocket boosts upwards leading to a very loopy flight....so says my WCGW (What Can Go Wrong) Mindsim. :wink:

FWIW - I don't have copter rocket experience; however in those cases it seems that the boost and airflow applies force in a direction to help keep the rotors down. You can probably launch the rocket fine without the elastic in place (albeit recovery will be quite quick).

Feel free to bash me over the head with a BT50 if I'm wrong on this. :)
 
At first I was thinking that elastic made sense; however thinking it over more, it may not be good given the booster design. For the copter rockets, it makes sense since the rotors are held downwards and the bands pull them upwards. With the boosters, they're being held together sideways..............

The bands pulling the props out are ordinary large rubber bands. The elastic is holding them down sideways just like it would be used holding the pods, pulled tight enough so there is little or no stretch left, and tied off. I am guessing on the strength of this elastic since I just broke a piece by hand. But it seems likely, that there should be different strengths available. Just in case someone needs to harness an anvil in addition to securing a couple of booster pods.
 
Fow what little it's worth, I have two lines of thought.
  1. As long as the boosters stay tight against the main tube there should be very little moment pulling them away, but if they begin to move away then that force will be increased rapidly as a gap develops. So the elastic has to be stretched until all the give is used up. That much has already been said. In the present configuration, I'd be concerned about crushing the tubes whenn pulling the elastic that tight.
  2. We're probably all overthinking this, and any reasonable soulution would probably be fine.
And my first thought on the subject, some days ago, was that you should use cotton string that's been treated with a nitric/sulfuric acid mixture to turn it into low grade gun cotton; it would then burn through very easily and not leave anything dangling. But there are all sorts of reasons that that is not a good idea.
 
Last edited:
I tested a few different rubber bands and some thread that I had around the house and I found a kind of thread in my wife's sewing box that's perfect. In testing it's strong and breaks instantly at the first sign of flame. Not sure what material but it works great!

I drew up exact dimensions of all the internal parts in RockSim as well as OR so that I could get a good idea of how everything fits together. Building will commence soon!

... also I really appreciate all of the input/mindsimming. :)
 
Will fine elastic like that really have enough tension to hold the boosters in place during boost? I have doubts.
You can tie it as tight as you can with thread. The advantage comes after you tie it. Ever tie something tight with thread, and then minutes later it has a little "shimmy" in it (something shifted)? That doesn't happen with this.
As far as net strength vs newton force, you would have to compare the breaking strength of the thread with strength of your cotton burn thread. Cotton burn thread isn't all that strong either.

I use elastic #18 rubber bands for rotor retention on my helicopters, also goes around the engine sticking out the back. Haven't had any problems with premature breakage yet. In any case, if I understand your design, the thread is used to hold the boosters laterally, so it is providing CENTRIPETAL force, there is some other support to keep them from moving forward or back. Poster is correct, elastic may not hold against forward and backward forces, but I don't think cotton threat would be any more reliable.

In any case, your design is cool, and I wish you a good flight.
 
Not to beat a dead horse, but after losing two rockets yesterday due to elastic breaking, I'm a bit leery of using it in anything at the moment.

Anyways, I was actually considering incorporating helicopter recovery in either the main or the boosters, which would reflect Maximilian's main weapon: spinning metal blades. That would be really cool. However after thinking about it, I'll save that for a later design as it would make this one a bit too complicated.

Speaking of, I was thinking today about a design that would deploy a "satelite" that would helicopter down on it's solar panels on it's own while the rest would parachute down as normal... I think I'll keep that in the idea bin for another time. I need to get crackin' on building this thing so I have time to launch it a couple times this summer.

Wow! Those are some really cool ideas! :cool:
 
I'm trying to take as many pictures as I can to document the build in case I want to build another one - or a second iteration.
Before I started cutting tubes and whatnot, I had to plan out the order in which parts would go together since there are some complicated bits that need to line up correctly.

I started with the boosters. Instead of regular BT-50 I'm using the tube at the center of an aluminum foil roll since it's exactly the same ID as BT-50 but is a very thick walled tube. I printed out nose cone templates (in OR as a transition down to 0.001) and cut out the shapes from cardstock. Rolled carefully and used thin CA to glue together and to the tube and to harden up the paper.

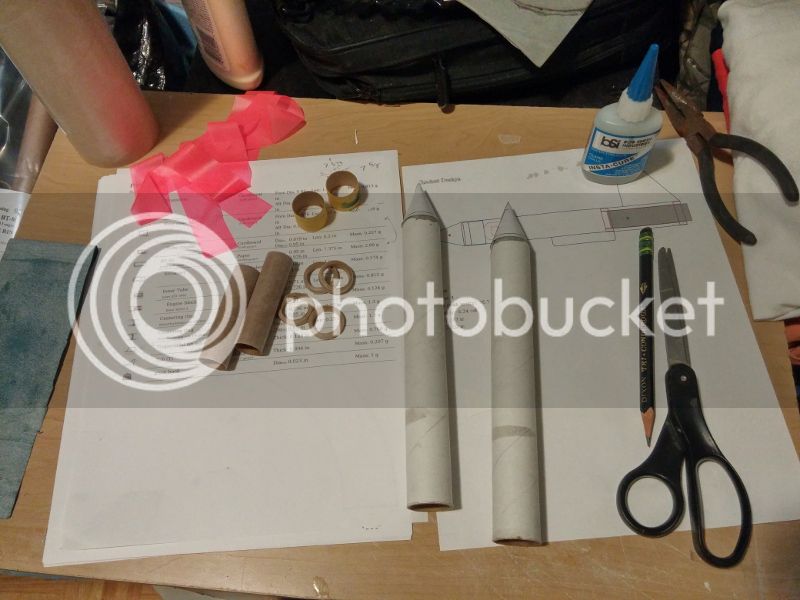
Getting started with parts ready.


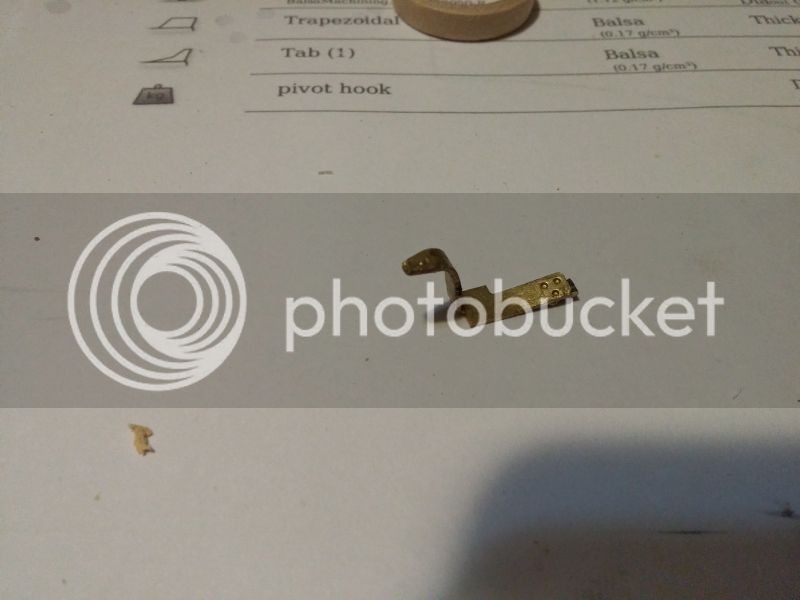
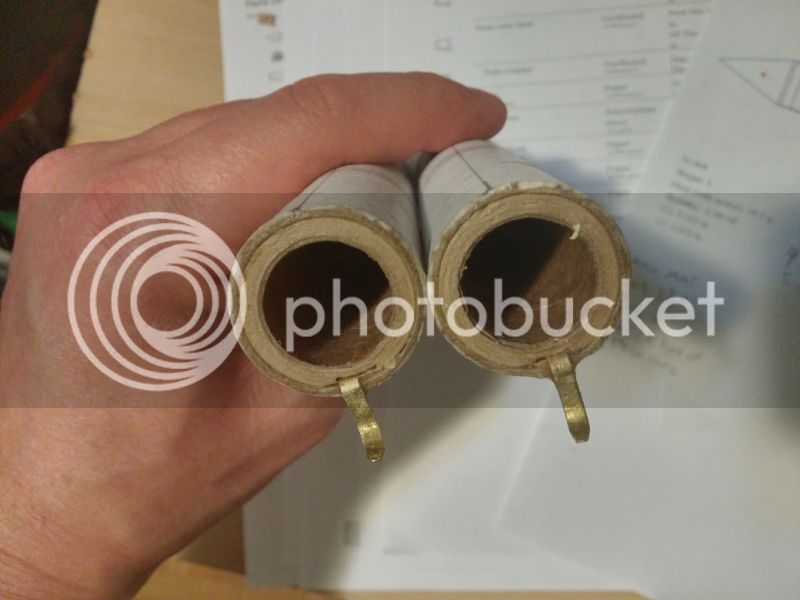
Here is one of the little pivot hooks, made out of a brass(?) contact from a relay of some sort..


18mm motor mounts with just the front CR glued in place...


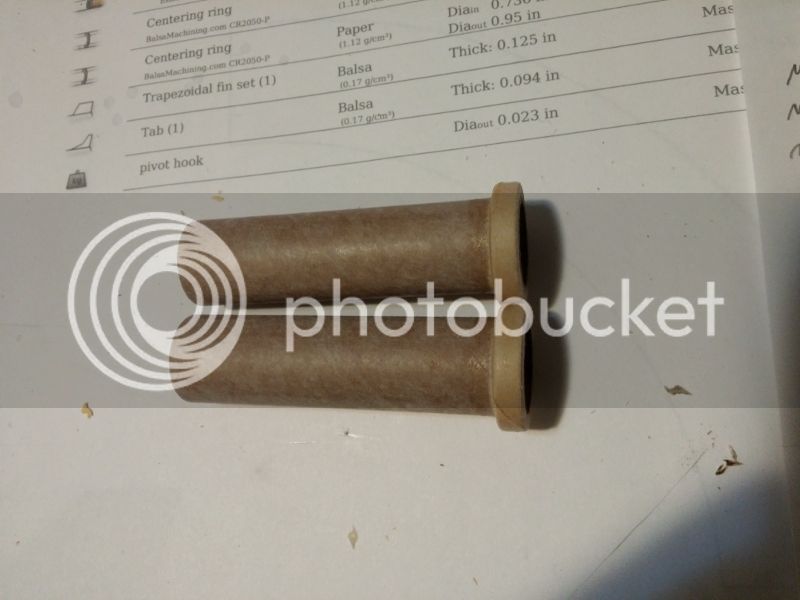
And glued in flush with the end of the tube.


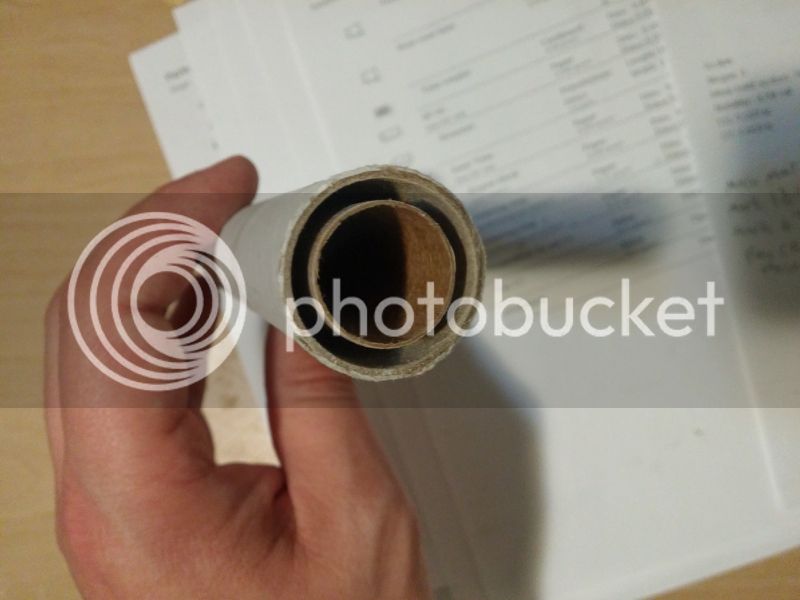
Then the rear CRs have a bit cut out to make room for the hooks. Nice and solid.


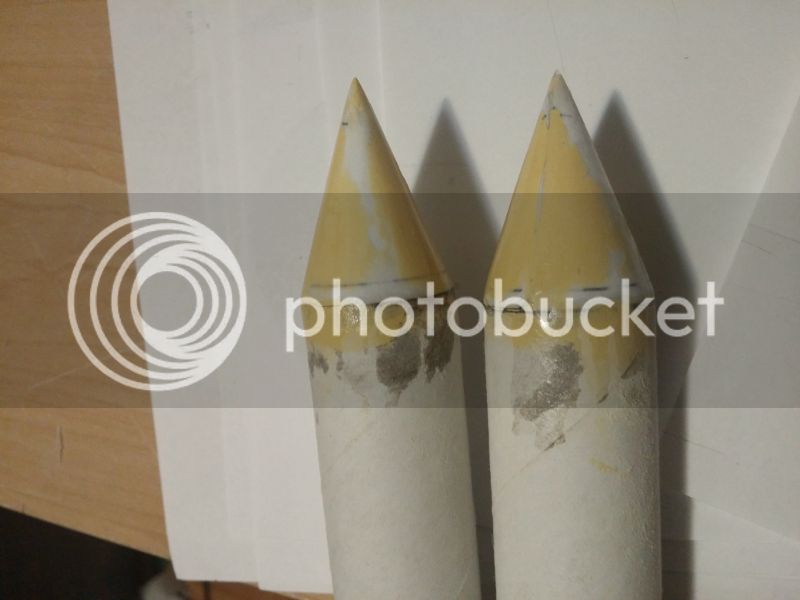
Sanded the nose cones, filled with CWF, sanded and filled again before applying a final coat of thin CA, then sanded with 400 grit to smooth out.


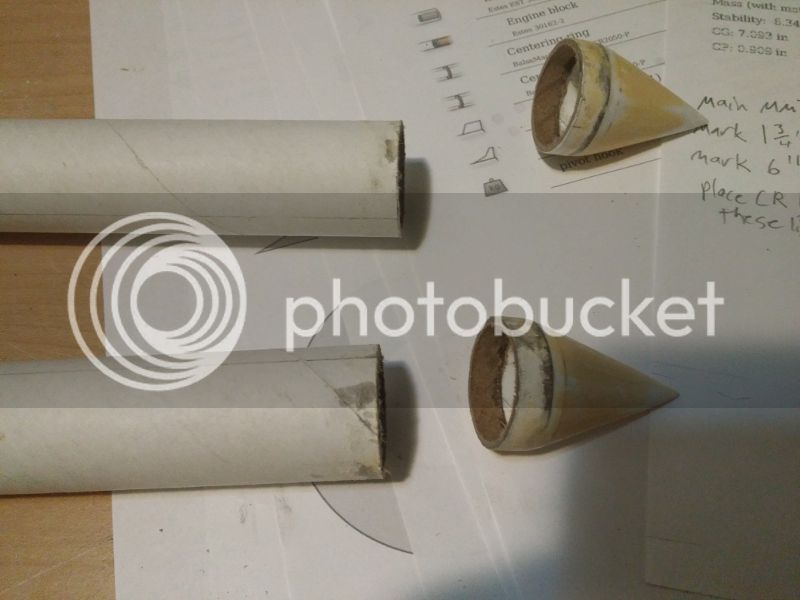
Then I cut the nose cones off with a bit of the tube so that I can easily glue in a small coupler to make the shoulder.


I also got started on the main motor mount but didn't get any pictures yet. I chose a 15" motor mount tube so that it can act as a stuffer tube as well as provide some structural support for the relatively thin BT-80.
 
Here is the motor mount - without aft CR, which will go on after fins and internal booster tab slots are in, but before the lower pivot supports.
I have also added a small screw-in brass-plated eye bolt for attaching the recovery leader.


Progress thus far: Boosters nearly complete, MMT epoxied in place, body tubes with thinned CWF for filling spirals, rear tail cone cut from cardstock and carefully curved into shape

 
Work has been busy so not much build time, however I have been able to make some progress.

For the main fins, I cut them from basswood as a 3-part fin. You can see where the parts joined. The point at the tip needed a different grain direction or it would have snapped if you breathed on it.


Cutting the slots for the booster attachment points.


Here is the internal support for the booster tab, cut from some spare 3/32 balsa. I also sanded a slight curve on the bottom side using sandpaper inside a spare BT-80 tube, so that there would be a flush fit with the interior.


Here is where it gets glued into place. This was tricky to line up and not have glue going everywhere but using needle nose pliers and a steady hand helped.

 
The point at the tip needed a different grain direction or it would have snapped if you breathed on it.

It looks like you did it right...IIRC with multi-piece wood fins, you orient the grain of each piece which isn't against the bt, to the glue edge (almost like that edge was the body tube) instead of orienting all pieces vs. the body tube.

Great progress!
 
I agree that the grain looks right, and I'm sure you don't need us to tell you so. To me, that piece looks precarious anyway, with that much length dangling from that short edge-butted glue joint. Are you considering papering it? Or am I making a mountain out of a mole hill?
 
FWIW - Since they're basswood, I don't think papering would make any significant diff (and I"m one who normally papers all my wood fins). Besides, that part is pointing upwards, so it's less likely to get landing damage. Reminds me of the funny long piece at the top of the rudder on a Dynastar Firefox:
attachment.php
 
Last edited:
I agree that the grain looks right, and I'm sure you don't need us to tell you so. To me, that piece looks precarious anyway, with that much length dangling from that short edge-butted glue joint. Are you considering papering it? Or am I making a mountain out of a mole hill?
I appreciate the raising of red flags of any sort. Feel free. I agree though, it does make me a bit nervous. I had considered papering using thinned elmers and copy paper, but with that there's a risk of warping. I even tried a bit of CWF(for finishing not strength) on one side of one fin and the next day it was warped. I did the same to the opposite side of the fin and it flattened back out. Whew!

FWIW - Since they're basswood, I don't think papering would make any significant diff (and I"m one who normally papers all my wood fins). Besides, that part is pointing upwards, so it's less likely to get landing damage. Reminds me of the funny long piece at the top of the rudder on a Dynastar Firefox:
attachment.php

Actually I was originally thinking of adding something very similar, guns or antennae-like things but decided I'd make them triangular for at least some strength. In the end it looked way better, more blade-y. I was going to sand those triangular pieces to be more sharp but that seemed potentially disastrous for their strength.

As of this morning, the fins are all on. I'm leaning towards finishing them with Aero Gloss. All wood glue internal fillets. Just need to clean up some wood glue drips on the back end and then glue in the rear CR. Then the supports for the booster's pivot hooks, then I think I'll add a motor retainer and then the rear tailcone. (Darth Vader voice) My journey towards constructing the fin can will be complete. Haa prrrr.

This build has been very complex - as in the order in which parts go together. Might be a cakewalk for some folks, but for me, I'm learning to slow down and think through each step.
 
Making progress even though work has been busy. I haven't taken as many pics towards the end but it's now nearly complete sans finishing.

Here is a pic of the support for the tailcone. The two small supports for the booster hooks didn't seem enough so I glued in sections of mailing tube cardboard and beveled them for plenty of surface area to attach the tailcone.


Once the tailcone was on and glue dry, I coated it with thin CA to stiffen it up as it will likely take a couple hits, being at the bottom end.

TODO: attach chute and drill holes for burn thread. Then sand/prime/paint.

I may actually get to launch it this Saturday... Will have it construction phase complete tomorrow. We'll see.
 
Last edited:
Ready for a shakedown in it's raw, unfinished glory!

Here is the tail cone attached with motor retainer in place - as well as side boosters. I tried my best so far to get the cardstock evenly curved by rolling it over increasingly smaller diameter objects. Turned out pretty good I think. I'm happy with it.


I also added thin hardwood strips to the edge of the main fins to give a bit of sturdiness to those points. Feels much more solid and not so prone to snapping off - which one of them did already.


I ran burn thread through each booster and straight through the main body. A bit tedious getting through the internal motor mount tube and out the other side, but a long needle and needle-nose pliers helped. Pulled around and tied snugly against the side, then taped the knot down like so:


Here is a side view of where the thread goes through the booster and wraps around to be tied.


Recovery system consists of 10ft of kevlar cord attached from the anchor to the nose cone, a 24" nylon(Estes PSII) chute and 12" chute protector. The chute protector already has a couple small ~1/8" holes burned through, but I'm sure it will be fine once packed in.


Here it is, fully prepped for a possible flight tomorrow. :fly: Just need to pick up a pack of F15-6s and B6-2s on the way to the field. Then hopefully the RSO has no objections as it's an untested clustered design.


Once it's flown successfully(I hope), I'll go ahead with the fill/sand/prime cycle followed by a mostly red paintjob with some silver here and there.
 
Loaded up with an F15-8 and two B6-2s. I should have used an F15-6 but an -8 is all they had at my LHS on the way to the launch this morning. The recovery system is strong so an extra 2 seconds delay won't be too bad.


Here's the flight! Really cool liftoff! One thing though is that it appears one of the boosters stuck on until the main eject. You can see both boosters on the ground at the end of the video.

[youtube]75BjG-gEg98[/youtube]


Now to give it a nice coat of paint and get ready for the next flight! One thing I'll examine is how the boosters are tied with the burn string maybe that's why one of them hung on a while. I was going to use my 808 cam to be able to see the separation but happened to forget it at home... Good thing I recorded in 4K, I'll have to frame-by-frame it later to see how to improve the separation.
 
Thanks!

I just noticed Youtube's stabilization made the video look like wiggly Jello. I'll turn off the stabilization and see if it's better albeit a bit shaky. Too much coffee :caffeine:
 
Back
Top