Tie Men A BoddL [ TRF Summer Buildoff ]

The Rocketry Forum

Help Support The Rocketry Forum:

This site may earn a commission from merchant affiliate links, including eBay, Amazon, and others.

dhbarr

Amateur Professional
TRF Supporter
Joined
Jan 30, 2016
Messages
8,993
Reaction score
3,518
When I'm not feeding or changing the baby, I'm mostly fiddling with imaginary rockets. So, a little of column A, a little of column B!

Super rough eyeball sketch so far, haven't even taken measurements.

boddl_02.png
 
Should end up as a finless spin-stabilized cluster with through-body launch lug and a Special Secret Surprise.
 
Should end up as a finless spin-stabilized cluster with through-body launch lug and a Special Secret Surprise.

We do love us some Special Secret Surprise!!!:clap::pop::w:

If you can pull that design off as a flyable model it will be pretty EPIC!!!!

Best of luck on the build, and we'll all learn some valuable lessons if it flies well!
 
Wow, that's really out there! :pop:

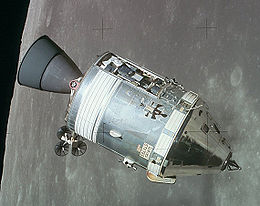
If you can make this one fly you can maybe build an Apollo Command and Service module! :grin:
260px-Apollo_CSM_lunar_orbit.jpg
 
And I thought that I had dreamed up a challenge! I've got to see how this turns out.
 
Ooo... Neat! Reminds me kinda of the old (big) Star Wars R2-D2 though he didn't spin. Looking forward to seeing this fly! :)
 
Cool, weird, sleep deprived. Who knows, but this buildoff is awesome!

Deployment should be electronic after I run a few tests and consult the budget.

OAL should be approx. 6 in., bt70-bt80 or so.

Debating on turning the nose and details on a lathe, or casting / vac forming.

What say you, peanut gallery?

To me it seems like it would be easier on a lathe to match/express the detailing you have in the 3D drawing.

BTW, loving this contest as I'm following all the (crazy) entries.
 
Last edited:
To me it seems like it would be easier on a lathe to match/express the detailing you have in the 3D drawing.

BTW, loving this contest as I'm following all the (crazy) entries.

they're all pretty unique! Some are a little more out there than the others haha.

dhbarr how is it spin stabilized? Canted motors?? Or That special secret surprise?
 
I haven't forgotten about this build. Lathe & drill press access should be secured this week on an ongoing basis.

Six 18mm motors in a bt80. Was originally going to use reloads, but didn't get enough 18mm together in time.

Probably two each c6-3,5,7 to ensure recovery goes as planned. But I do have this pile of d21's....
 
Last edited:
Talk about cutting it close! I would usually have trouble gluing fins and a nose cone to a case in three days:wink:
 
It was a good thing I finished the laundry before lunch ; there was a break in the rain so I zoomed over to the park to get a flight before the evening storm.

It flies! My thumb was over the lens for much of the video, but I'll try and extract some frames. As only 3/4 motors lit, I award myself 75%.

Recovery was as expected, pics to follow.
 
Last edited:
Hrmm, not much summer left ; I wonder if there's a non-spinning rocket hiding in this balsa block?
IMG_20160828_144348.jpg

... or maybe there's two?
IMG_20160828_144746.jpg

Definitely at least one in there.
IMG_20160828_152349.jpg

Yup.
IMG_20160828_152811.jpg

YUP!
IMG_20160828_153429.jpg
 
As we can see, access to neither a lathe nor a drill press materialized, so I'll have to freehand. Everything.
IMG_20160828_161219.jpg

Some glue and some screws, that balsa keeps trying to get away!
IMG_20160828_162814.jpg

Hrmm, not too shabby ; let's compare vs. the full-sized article.
IMG_20160828_171653.jpg

Stole this 2" tube from a PSII kit, should be just about right. No coupler, so I made a full-length one.
IMG_20160829_112120.jpg
 
Dimensions are getting pretty close, I'll just have to turn some add'l details. The bottom ring is sliced off of a 2" mailing tube, pretty near a perfect fit.
IMG_20160829_123830.jpg

4x motor mount tubes don't quite fill the inside tube...
IMG_20160829_120143.jpg

... the solution is rather depressing, I'm afraid.
IMG_20160829_114340.jpg

All glued together, slide it into the bottle for an exact test comparison.
IMG_20160829_133845.jpg

.... aaaaaand, this oddroc is now an unplanned plastic model conversion. Try as I might, I could not get that body tube to come out; and it was the only 2" tube I had!

So, explain to the wife that we're short one baby bottle ; and scramble to think how to finish this thing.
 
Spinning got dropped in the interest of time ; we'll sub in a drag plate instead, shown here for dry fit. It's just a 3.9" CR that I went at with a hole saw and sand paper.
IMG_20160830_160505.jpg

Since I hadn't exactly -planned- to be sending up the original bottle, I'm a bit worried about the attachment. Glass & Epoxy to the rescue!
IMG_20160830_123546.jpg

I laid tape over the glass, then used my rotary cutter to trim 1" strips. Did I mention this is my first time playing with glass ( thanks for the samples TopRamen! )
IMG_20160830_124228.jpg

Trim, fit, trim, fit some more ; the idea here is that I'll affix them on the interior, remove the blue tape, then overblob again with more epoxy.
IMG_20160830_162640.jpg

Yes, I'm using these tiny clothespins completely backwards; but they applied pressure in all the right places!
IMG_20160830_204312.jpg
 
The original nosecone a) isn't going to work with our unplanned plastic model, and b) came out a bit lopsided. New / better chuck, just go straight for the through-lug!
IMG_20160830_112354.jpg

Not bad. You'll notice no baseplate here ; that's because the nose and the plate were going on side by side, working on each part while the other cured / dried.
IMG_20160830_120252.jpg

At this point I started to really believe I could make it; probably the primer and epoxy fumes.
IMG_20160830_202447.jpg

NOT BAD!
IMG_20160831_003934.jpg
 
I thought I had grabbed pictures of the laundry getting tied, but apparently not. Here you can see I've come through the whole tube; knot secures the cord, loop goes around all four d21-4's. :shock:
IMG_20160831_090020.jpg

I stuffed one wad in each paper powder cup before inserting the motors, and another in each thrust ring for good measure.
IMG_20160831_101103.jpg

Something something something go-time.
IMG_20160831_114231.jpg

Rocket goes up...
rising_smoke.jpg

... rocket comes down ...
falling_smoke.jpg

... never a miscommunication.
IMG_20160831_114432.jpg

Peace out, TRF ; I'm so exhausted I'm going to wait until tomorrow to start building my Summer Santa present, which I will then take to Airfest.
 
Well done! I can barely manage to get an Estes skill level 1 build done that quick.
 
Back
Top