phenolic repair

The Rocketry Forum

Help Support The Rocketry Forum:

This site may earn a commission from merchant affiliate links, including eBay, Amazon, and others.

watermelonman

Well-Known Member
Joined
Sep 22, 2014
Messages
2,597
Reaction score
10
I feel extremely comfortable with cardboard, wood, commercial fiberglass, and cloth. However I still have yet to work with blue tube, quantum tube, sonotube, phenolic, or canvas. In fact, I may not have even broken those down correctly. Apologues if so and please feel free to correct me.

I understand that some of these substances do not take well to epoxy and fiberglass cloth. I think that repairing phenolic with fiberglass cloth is fine? I inherited a rocket with some damage that looks an awful lot like this -
26XltnE.jpg


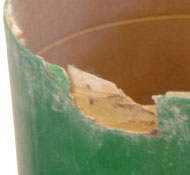
My plan was to sand down the paint, use some chunky epoxy filler, apply fiberglass cloth, then fill to smooth before painting over it all. Is that a good plan? When and where should I avoid adding fiberglass to tube damage?
 
Why not just cut it off? Doesn't look like much damage unless there is more you are not showing.
By the way, Sonotube is a brand name which is basically big cardboard tube used for concrete forms.
 
Oh this is a rocket that cannot afford to lose length, because all of the compartments butt up to each other. There is a separable payload bay that goes right to the nose shoulder.

Thanks for the sonotube definition!
 
I start with a thin layer of glass applied to the interior of the tube as a support for an exterior patch. The method below will create an interior repair that should still allow the coupler to fit into the body tube with minimal additional sanding of the coupler. Then external layers of glass can be added to build up the wall thickness.

  • Clean up the edges as best you can and sand off all the paint in the area with plenty of margin
  • Cut a coupler lengthwise with a relatively thin saw blade and cover in mylar or other thin nonstick material
  • Cut a square of 2oz cloth large enough to cover the damage plus about 1-2" to the sides and below
  • Sand the interior of the tube in the area of the repair to provide tooth
  • Do a test fit of the fiberglass between the coupler and the body tube - put the glass in place, then carefully squeeze the coupler to decrease its diameter then slide it into the tube and let it 'spring' open to hold the fiberglass in place (essentially an interior form) - ideally you should be able to open the cut coupler enough to so the edges butt against each other to provide pressure to hold it in place - you may have to sand the cut edges to get the right diameter
  • Once you are comfortable with everything, use thin laminating epoxy and apply the patch and hold in place. Blot excess epoxy on the outside of the tube
  • Once cured, sand the outside of the tube and apply a heaver patch (6oz) over the repair area to build up the tube - I'll use smaller patches over the repair area and then larger ones to blend the repair
  • One all is cured you can trim the excess fiberglass to the top of the tube, fill the weave, sand, and repaint
I've also done the interior repair on smaller tubes using a balloon to hold the fiberglass in place. I'll hold the balloon in the tube and fill it using a can of compressed air (the kind with the little red tube used for cleaning.) Use a balloon clip to close the balloon.

I have used this on a variety of tube sizes - up to 6" and it works well. The key is to keep enough pressure on the interior repair so it stays thin. You may have to sand the area and coupler tube a bit to get a good fit - if so index the coupler to the body tube.

Good luck,


Tony
 
Last edited:
Back
Top