Saturn 1B - 1/23 Upscale

The Rocketry Forum

Help Support The Rocketry Forum:

This site may earn a commission from merchant affiliate links, including eBay, Amazon, and others.
Unless someone takes a measuring tape to the airframe they are not likely to notice the extra diameter, especially if everything flows properly from one transition to the next. A half inch extra might be noticeable on 5" to 8" but most people aren't likely to notice, as the rocket will look great, the desire for perfection is what drives us to obsess over something like this. I like perfection too, unless it will cost a lot of extra time or money to correct, then make it close but look good, unless you are planning to enter the rocket in a scale competition (they have measuring tapes there :y: ).
 
I'm always impressed how solid this thing is when it is done.
Guess those NASA/North American design guys figured out how to make this thing structurally sound, even the little model of it feels very strong.

I saw a Peanut Scale model of a Saturn 1 at NARAM once. When I asked the owner what the tower was made of, he said "wire wrap wire". Tower was stiff as all get out, so yes, those engineers knew how to do it right! :wink:
 
I saw a Peanut Scale model of a Saturn 1 at NARAM once. When I asked the owner what the tower was made of, he said "wire wrap wire". Tower was stiff as all get out, so yes, those engineers knew how to do it right! :wink:

That's amazing...that LES tower in peanut scale.
I can't even imagine building that...that small.
Builder must've used those magnifying goggles and tweezers.

Which reminds me of another story...Thanks Mark!
 
Last edited:
In the category of the incredibly small - fine scale model building...I'm always reminded of seeing this one, close up.

I sometimes dabble in scale plastic model building and go to the local IPMS events.
Often there is always a "wow" factor entry, be it a U boat as long as the entire table, or a huge armored vehicle with panels removed.all the detailing revealed
One year there was this, .................sitting on a small square mirror at the back of the hall, huge crowd gathered around.

Don't think I need to say much, except when I saw that the jet engine actually gimbaled, my mind was blown.
...it's 1/48 and not very big about 6.5" long, 4" wide and 3" high. Conservatively, it has 2,414 pieces in it. The engine was built with 584 pieces, and it gimbles in 2 axes as the original.

llrv7.jpg

llrv4.jpg

More pictures:
https://www.ninfinger.org/models/html_pix/llrv.html
 
Last edited:
Unless someone takes a measuring tape to the airframe they are not likely to notice the extra diameter, especially if everything flows properly from one transition to the next. A half inch extra might be noticeable on 5" to 8" but most people aren't likely to notice, as the rocket will look great, the desire for perfection is what drives us to obsess over something like this. I like perfection too, unless it will cost a lot of extra time or money to correct, then make it close but look good, unless you are planning to enter the rocket in a scale competition (they have measuring tapes there :y: ).

Thanks...since this isn't a scale model entry - I'm going with your advice.

It will be easier to do a main airframe BT on the sonotube as is, and not mess around with cutting it down to make it narrower, and just make the fin can "ring" a little larger by adding a layer to the sonotube.
Will also make the transition shroud a little wider - to match the 11.75" airframe width.
Rainy and Humid today - and this weekend - might just go ahead and start mixing the large batch of epoxy this weekend.
 
I tend to use smaller quantities of finishing resin for most projects.
Mixing at a one to one ratio is kind of a no brainer, in small measuring cups, when you do small layups.

But for something large, the West Systems product line is real good, although a tad expensive.
The one to five mixing ratio is made much easier with their one shot pumps, which dispense the correct amount of epoxy and hardner for you.

They carry a line of hardners for various cure time and temperature conditions.
They have a large selection of micro light fillers and fairng compound, which I've used for fin fillets to good effect.
resizedimage467600-productselectionguide.jpg

Their product line here:
https://www.westsystem.com/ss/assets/HowTo-Publications/User Manual 2015.pdf

WestSystemEpoxy.jpg

hardner-chart.gif
 
Last edited:
Spent most of the afternoon prepping the sonotube for the main airframe layup.

Applied the mylar barrier, sealed up the overlaps.
Set masking tape wrap at the 33.1 inch mark lengthwise, which is the overall length of this body tube.

This component is a bit too large for my den/work area and it is bound to get messy wetting out this epoxy - so I moved this part of the operation to my back yard work shed.
Found out the wife has just scheduled some home improvements - and it seems we have a contractor that will be doing some interior trim and molding soon. Appears he needed my shed to stage the work.
Fortunately he has been delayed with other work.
His saw horses will come in real handy for my project, but I had to move a lot of his stuff out of my way.

The shed has a ceiling fan and track lighting - but I needed to get a window AC moved in and running as it is hot and humid.
I'm going to let the AC run this evening while I rest up. Besides, The Martian is coming up on HBO in an hour .
I feel like taking a break.

Workshop 1.jpg Workshop 2.jpg Workshop 3.jpg
 
Last edited:
Put the first CF wrap on the sonotube mandrel.
Everything went smoothly - pun intended.


I'd post a picture or two but the camera battery is recharging at the moment.
I didn't take near as many pictures on this layup, as the last thing I wanted to do is epoxy the shutter button while my hands were messy.

I can say that I learned a few things on this exercise.

- SETUP EVERYTHNG IN ADVANCE. Can't say enough about proper preparation beforehand, as you do not want to be looking for tools or stuff when you are racing against the cure as you could say. More on that later.

- MIX MORE RESIN/HARDNER THAN YOU THINK YOU"LL NEED. As expensive as resin and hardner is, there is a temptation to not mix as much and end up wasting it. I've read this over and over and still resisted. I had to mix more while I was working.

- GLOVES (some of us don't fear the epoxy sensitivity syndrome and take our chances) aside from protecting your hands and skin, wearing gloves will allow you to use both a brush - and your fingers to reposition the CF weave and wetted out CF fabric and
smooth it out.
The heavy weave of this CF twill was much more unforgiving than the regular tighter, finer weave fiberglass I am used to working with. Being able to use gloved hands really saved the day.

- PEEL PLY - Great stuff. Really shows where you missed areas on the wetting out process on the CF fabric. And now I know why some people iron out their peel ply. Darn creases from the packaging folds. More on that later.
 
Last edited:
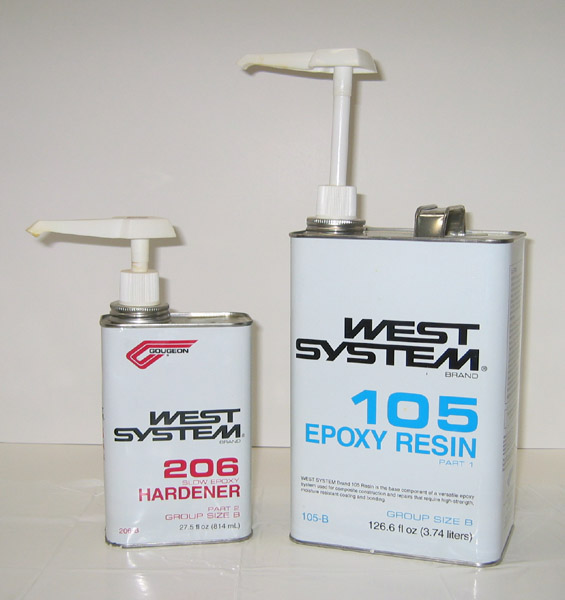
First step this afternoon was installing the one shot dispenser pumps on both the epoxy and hardener containers.
Then you have to prime each pump so they dispense the five to one ratio amounts correctly.

Pulled the caps and noticed these metal covers.
Each says to cut the metal covers out.

Not having a tool for that, I grabbed a screw driver, figured I'd just punch the tops in and pull them.
They were hard to punch out, third try did the job, but notice how small that hardner container is...I almost rammed the screw driver right through the bottom of the small container.
That would have ruined my whole day.

Once the epoxy containers were set up I measured out a batch...nine shots on each - resin and hardner...very easy to do, as pumps dispense the correct proportions for you.
Applied about a two inch wide strip of epoxy along the length of the mandrel then pulled up the CF fabric and evened it up and laid it down on the epoxy.
Having the premeasured CF fabric beneath the mandrel makes the process go fairly quickly as you just roll the CF fabric up on the mandrel and brush on the epoxy as you go.

Hardest part was seeing if the CF was wetted out, being black it is not easy to see.
The whole process was done in about 20 minutes and then it was time for peel ply.

Unlike the CF fabric, peel ply turns dark grey when wetted out, so you can see any areas that are not fully wetted out very easily as lighter whitish looking areas .
Working those white areas with an epoxy loaded chip brush took care of those.
Overall it worked out pretty well.
Two things.... this 2x2 twill has a heavy weave, and invariably you will get stray strands that come loose...pulling the strand out sometimes begins to unravel even more strands...so, I decided to let several of them stay...but they gather an air pocket around it when the peel ply covers it. I figure I can sand that area down to get rid of it.

Also, you can see the imperfection in the peel ply picture, there was a fold in the peel ply that I couldn't wet out to eliminate.

Now I know why some guys iron their peel ply fabric.
Not sure I wanted to try that one out with the spouse's iron w/o testing it out first.
No telling what the wrong setting might do to the iron's surface.

Tomorrow I'll pull the peel ply and see how it looks.

I'll be setting this component aside as I will need to order more peel ply and CF fabric to do additional layers on this main airframe part.
I may have enough leftover mylar, CF fabric and peel ply to get the 6 inch wide fin can ring done.
Will need to add some scale width to the fin can ring part of the mandrel to get it in proper proportion to the main airframe before I do that layup.


A West Systems 1.jpg A CF Layup1.jpg Peel Ply wrap A Peel Ply 1.jpg
 
Last edited:
While the main airframe section is curing and I'm waiting for more CF fabric, I've taken another look at the internal design/structure.

The airframe seperation points for DD and parachute and bridle attachment points were illustrated in post # 25 & 26 .
I've begun a parts list for the internal structure which will be the structural backbone for this project.

I'm looking at a Rohacell order soon for possible CF lamination of structural bracing in key locations.

What I need to do prior to finalizing that effort is determine a good location for the Av Bay/electronics.
I had several possible locations when I began, now I 'm thinking of considering more and would like some advice from you all.

Each location has some advantages, and some have distinct disadvantages, but we're still early in the design - so I think some accommodations can be made.
(My apologies to Chrysler/NASA if I'm referring to these components incorrectly).

A. Service Module BT - This might be a good location for an Av. Bay - but I had planned on reserving this area for as much lead ballast/weight for CG adjustment as possible. This would also require very long wiring leads to reach the fin can for airstarts, and they would have to detach upon separation. Maybe..there could be a seperate electronic unit in the fin can just for outboard airstart motors. On the positive side, access to an Av Bay in the SM could be just like a traditional mid frame Av. Bay. - using a coupler and bulkheads.

B. Transition - For access I could have a shroud panel open just like on the real thing - but I've never heard anything good about vent holes on a surface area that was slanted.

C. Main Airframe - After spending so much time getting a nice CF tube, the last thing I want to do is start cutting a panel into it. Might affect the structural integrity. However, it is mid point in the overall airframe which is traditionally a reasonable place to put an Av Bay.

D. Tube Tank/Fin Can - This appears to offer the least viable opportunity for sticking an Av. Bay for DD function, given this component is pretty much nothing but a cluster of 3" dia. tubes around a central core tube (for a 54mm MMT). At least four of the outer eight tubes were planned for 29mm and 38 mm outboards. That leaves four empty tubes, but again, working from the back to the front for wiring for DD is problematic, particularly for a main deployment after seperation and droque deployment.
Likewise for anything in the fin can ring itself. unless I put a dedicated electronic unit in the fin can ring just for airstarts on first motion.


Possible Av Bay locations.jpg
 
Last edited:
Is the peel ply your using the one from applied vehicle technologies? It looks like a nylon based peel ply.

Also yes, Iron it, I have done it and it works. Keep the settings low and if you see that doesnt work, turn it up one higher setting at a time.
 
Is the peel ply your using the one from applied vehicle technologies? It looks like a nylon based peel ply.

Also yes, Iron it, I have done it and it works. Keep the settings low and if you see that doesnt work, turn it up one higher setting at a time.

Thanks for the info.

I believe this is the original peel ply I got years ago with the vacuum bagging system from Aerospace Composite products - item V-18 60" wide x 1 yd.
the peel ply came folded, not on a roll, - unfortunately.

A check of their website does show a peel ply with product number V-18 -1 at 60" wide by a the yard lengths.
Treated Polyester
https://www.acpsales.com/OnlineStore.php?cat=4892

I'm ready to try something else if it is better ...and on rolls!
 
Last edited:
Spent most of the afternoon prepping the sonotube for the main airframe layup.

Applied the mylar barrier, sealed up the overlaps.
Set masking tape wrap at the 33.1 inch mark lengthwise, which is the overall length of this body tube.

This component is a bit too large for my den/work area and it is bound to get messy wetting out this epoxy - so I moved this part of the operation to my back yard work shed.
Found out the wife has just scheduled some home improvements - and it seems we have a contractor that will be doing some interior trim and molding soon. Appears he needed my shed to stage the work.
Fortunately he has been delayed with other work.
His saw horses will come in real handy for my project, but I had to move a lot of his stuff out of my way.

The shed has a ceiling fan and track lighting - but I needed to get a window AC moved in and running as it is hot and humid.
I'm going to let the AC run this evening while I rest up. Besides, The Martian is coming up on HBO in an hour .
I feel like taking a break.

View attachment 293034 View attachment 293035 View attachment 293036

Is that a Snarky hanging up? Looks like its been upscale?
 
Is that a Snarky hanging up? Looks like its been upscale?
Good observation.
I was at a meet years ago and the club had laid out a bunch of parts for sale - someone had left the hobby and donated the parts to the club.
I had just built and flown the Snarky kit.
Saw the makings of a 4" Snarky laying there so I bought the parts.

I saw later that the "Rocket Reverend" Brad Wilson (he had appeared on numerous Discovery channel shows like the three part "The Rocket Challenge" had also made an upscale 4" Snarky that did not fare so well in flight, so mine has become more of a workshop decoration.


image-biography-photo-080112114617352.jpg
 
Last edited:
How about that upscale Comanche 3 peeking out right below it, nice upscales both.

Right on both counts gentlemen.
Boy, you have good eyes Rich.

I can't take credit for that upscale project.
That was a purchase from Mr. Jeff Taylor of Loki.
He had brought a bunch of his stuff to sell at a Red Glare launch years ago.

I recognized that very upscale Comanche from one of Point 39's videos of an LDRS launch, Orangeburg - IIRC.
In the video Jeff got a great three stage launch on three H motors, the third stage being an outrageously long burn H that just seemed to burn forever.

Video showed Jeff walking to the launch pads with this huge Commanche (although Jeff told me he was actually returning from the recovery field in that vid).
How he ever got that third stage back is beyond me.

Anyway, in my book it was a piece of rocketry history, and I just had to have it. $75.
No electronics, I think it originally had some sort of horizon detection device in it.
It is not flyable in its present condition as it need some interstage repair.
Had a hard life I guess.
But it is impressive when assembled.
 
Last edited:
Thanks for the info.

I believe this is the original peel ply I got years ago with the vacuum bagging system from Aerospace Composite products - item V-18 60" wide x 1 yd.
the peel ply came folded, not on a roll, - unfortunately.

A check of their website does show a peel ply with product number V-18 -1 at 60" wide by a the yard lengths.
Treated Polyester
https://www.acpsales.com/OnlineStore.php?cat=4892

I'm ready to try something else if it is better ...and on rolls!

Thanks, hm thats weird. On one of your pictures it looks like a nylon type, not polyester.

I will have to buy me a yard to check it out. Is it difficult to peel off?
 
Thanks, hm thats weird. On one of your pictures it looks like a nylon type, not polyester.

I will have to buy me a yard to check it out. Is it difficult to peel off?

I thought it was easy to pull off the small piece, but quite difficult to pull off of the large sonotube.
It was difficult to start an edge, and begin lifting.
Then the Peel Ply actually tore in the middle trying to remove it.

But I'm no expert...this is the first peel ply I've used, so I've nothing to compare it to.
Seems to me a Teflon treated peel ply should come off easier.
 
Last edited:
I thought it was easy to pull off the small piece, but quite difficult to pull off of the large sonotube.
It was difficult to start an edge, and begin lifting.
Then the Peel Ply actually tore in the middle trying to remove it.

But I'm no expert...this is the first peel ply I've used, so I've nothing to compare it to.
Seems to me a Teflon treated peel ply should come off easier.

I've used many types of peel plies. The teflon is perhaps my favorite, but at the same time not so much, because it leaves behind the coating that prevents other adhesives from bonding to it. You have to sand it first before attaching fins and such. I've been looking for a peel ply that leaves behind that secondary bonding and all at the same time is not such a pain in the neck to remove.


Alexander Solis - TRA Level 1 - Mariah 54 - CTI-I100 Red Lightning Longburn - 6,345 Feet

You might want to try this stuff, surface seems to ok for bonding w/o much work.
 
You might want to try this stuff, surface seems to ok for bonding w/o much work.

I'll have to get me some later on. Priced at $1 the yard aint bad.

Keep up the good work, project looks awesome.


Alexander Solis - TRA Level 1 - Mariah 54 - CTI-I100 Red Lightning Longburn - 6,345 Feet
 
Great project MaxQ - thanks for sharing it :cool:

Regarding the placement of your electronics - you could place them in each section, nothing says they all have to be in the same place...
 
I'll have to get me some later on. Priced at $1 the yard aint bad.
Keep up the good work, project looks awesome.

Thanks much.
Hey, on that Peel Ply..............I think it was the 2 inch peel ply "tape" (item V-19) that was $1.00 a yd.
The full width (60" wide) stuff is $8 /yd , - if I read the weblink correctly.
https://www.acpsales.com/OnlineStore.php?cat=4892

I need to order some more peel ply real quick ...like to try something different...who do you recommend?
 
Last edited:
Great project MaxQ - thanks for sharing it :cool:

Regarding the placement of your electronics - you could place them in each section, nothing says they all have to be in the same place...

Great to hear from the land down under, I need to visit Australia someday.

Yes, the more I thought about it, the more I like the idea of electronics in the fin can dedicated to air starts and droque deployment, with motor ejection back up for the droque.

Main Airframe electronics - still pondering that one.
 
Thanks much.
Hey, on that Peel Ply..............I think it was the 2 inch peel ply "tape" (item V-19) that was $1.00 a yd.
The full width (60" wide) stuff is $8 /yd , - if I read the weblink correctly.
https://www.acpsales.com/OnlineStore.php?cat=4892

I need to order some more peel ply real quick ...like to try something different...who do you recommend?

Oops thanks for noticing that. Thats right the 60" is $8 and to be honest thats too much for a peel ply.

Give the one from applied vehicle technologies a shot and let me know how it is. I've tried so many peel plys except that one you just used and the way you descbried the issue of removing it, matches the issues I had with other peel plys. The one from AVT is also a peel ply I have not tried.

I believe jim jarvis uses that peel ply and I dont know if he uses the light one or the heavy one. Maybe Jim can give us a hint as to how it feels to remove that peel ply.

Heavy peel ply

https://www.avtcomposites.com/cgi-bin/commerce.cgi?preadd=action&key=PEELPLY

Light peel ply

https://www.avtcomposites.com/cgi-bin/commerce.cgi?preadd=action&key=LWPEELPLY

Dont get the bleeder lease B peel ply as it has a silicone coating that can cause bonding issues. Even AVT says its not recommended for secondary bonding.


Alexander Solis - TRA Level 1 - Mariah 54 - CTI-I100 Red Lightning Longburn - 6,345 Feet
 
I use the AVT heavier material. I think the heavier type gives a flatter surface if it's covering a tube for example It's a little work to get it off, but it doesn't ever not come off.

Jim
 
Oops thanks for noticing that. Thats right the 60" is $8 and to be honest thats too much for a peel ply.

Give the one from applied vehicle technologies a shot and let me know how it is. I've tried so many peel plys except that one you just used and the way you descbried the issue of removing it, matches the issues I had with other peel plys. The one from AVT is also a peel ply I have not tried.

I believe jim jarvis uses that peel ply and I dont know if he uses the light one or the heavy one. Maybe Jim can give us a hint as to how it feels to remove that peel ply.

Heavy peel ply

https://www.avtcomposites.com/cgi-bin/commerce.cgi?preadd=action&key=PEELPLY

Light peel ply

https://www.avtcomposites.com/cgi-bin/commerce.cgi?preadd=action&key=LWPEELPLY

Dont get the bleeder lease B peel ply as it has a silicone coating that can cause bonding issues. Even AVT says its not recommended for secondary bonding.


Alexander Solis - TRA Level 1 - Mariah 54 - CTI-I100 Red Lightning Longburn - 6,345 Feet

Ok...my order is in...Applied Vehicle Technology...heavy peel ply 46.
When it gets in, I'll give it a go and report on it.

I will definitely iron out the peel ply this time. Getting closer to having the exterior finish so don't want any creases molded in the finish.

I'm moving back to the interior structure next, fortunately I have a cache of parts to proceed with some of it, but I will need to place an order for some Loc P. tube couplers and centering rings to really get on with that effort.
 
I use the AVT heavier material. I think the heavier type gives a flatter surface if it's covering a tube for example It's a little work to get it off, but it doesn't ever not come off.

Jim

I'll be honest, but my real complaint with secondary bonding peel plys is how MaxQ stated on his second layup is getting that seam to lift up in order to remove the rest. Once you lift up that seam the rest is easy.

Is lifting that seam up difficult on your fingers or does it lift up quite well?


Alexander Solis - TRA Level 1 - Mariah 54 - CTI-I100 Red Lightning Longburn - 6,345 Feet
 
Ok...my order is in...Applied Vehicle Technology...heavy peel ply 46.
When it gets in, I'll give it a go and report on it.

I will definitely iron out the peel ply this time. Getting closer to having the exterior finish so don't want any creases molded in the finish.

I'm moving back to the interior structure next, fortunately I have a cache of parts to proceed with some of it, but I will need to place an order for some Loc P. tube couplers and centering rings to really get on with that effort.

Cool, I hope its not that difficult to remove. There was this one peel ply that I had to yank on it in order for it to peel away. I was sweating bullets trying to get it off.

There was actually one cool one from Airtech called Stitchply G, it was white with black strips. That one was actually awesome to work with, but alas, Airtech only accepts a minimum of 20 yards or so and I dont want that much and costs a lot for that amount.

This is why I continue to search for a peel ply that I wouldnt mind using.


Alexander Solis - TRA Level 1 - Mariah 54 - CTI-I100 Red Lightning Longburn - 6,345 Feet
 
Back
Top