Madcow "Level-2" Build, 4" Fiberglass Airframe w/54mm Motor

The Rocketry Forum

Help Support The Rocketry Forum:

This site may earn a commission from merchant affiliate links, including eBay, Amazon, and others.
I ordered the following this morning for about 150 with tax and shipping:

Qty 1 - Eggfinder LCD Starter Set-Includes Eggfinder TX & Eggfinder LCD Kits
Qty 1 - External Antenna and RP-SMA Connector Combo

I hope to have it built and installed in less than 2 weeks... not that I have any flights planned. LDRS is a long drive... so not sure I'll be there.

With that, I'll feel a bit more comfortable flying a Full J to low L impulse motor.
It would seem that that I'll need to go with Cesaroni hardware if I want to try an L. AT doesn't appear to be producing 54mm L's currently.
 
Last edited:
Makes sense. I watched the video series for "How to build a high power rocket," I think it was called, with the young lady building a Madcow kit from Apogee. And I considered buying it just so I could follow the video explicitly. But then I decided to go L1 with my Sumo, because I already had it.

I ordered the following this morning for about 150 with tax and shipping:

Qty 1 - Eggfinder LCD Starter Set-Includes Eggfinder TX & Eggfinder LCD Kits
Qty 1 - External Antenna and RP-SMA Connector Combo

I hope to have it built and installed in less than 2 weeks... not that I have any flights planned. LDRS is a long drive... so not sure I'll be there.

With that, I'll feel a bit more comfortable flying a Full J to low L impulse motor.
It would seem that that I'll need to go with Cesaroni hardware if I want to try an L. AT doesn't appear to be producing 54mm L's currently.

And so the race for space begins!! �� awesome man!
 
I noticed a crack and chip in my nosecone paint the other day. I learned that the paint cracked/chipped due to a soft spot in the nosecone's fiberglass. Just after the body tube shoulder, where the fiberglass layup should increase in diameter to 4.03", I was able to depress the side of the nosecone much easier at the location where the paint was cracked/chipped. Further investigation found that there were 2 layers of fiberglass that had an air bubble between them, and thus a "soft spot" that depressed relatively easily and cracked the gelcoat and paint. Today, I drilled out a hole to access the void and fill it with epoxy. The epoxy is curing now. Here's some shots:

IMG_1310.jpg

A little pressure dents in the outside of the fiberglass, but the internal glass doesn't move since there's air between them:
IMG_1313.jpg

I drilled out just the outside surface since I couldn't reach inside to do this:
IMG_1316.jpg

Here's a closeup showing just how thick the air gap was and how thin the glass was:
IMG_1318.jpg

I carefully poured/wicked 20 min finishing epoxy into the void and pumped the air bubbles out until it was full:
IMG_1319.jpg

I expect it will sand flush easily (finishing epoxy is great for this)
I should have it primed and painted by tomorrow.

I still need to put my second paint color on... soon.
 
I noticed a crack and chip in my nosecone paint the other day. I learned that the paint cracked/chipped due to a soft spot in the nosecone's fiberglass. Just after the body tube shoulder, where the fiberglass layup should increase in diameter to 4.03", I was able to depress the side of the nosecone much easier at the location where the paint was cracked/chipped. Further investigation found that there were 2 layers of fiberglass that had an air bubble between them, and thus a "soft spot" that depressed relatively easily and cracked the gelcoat and paint.

I'd be contacting Apogee for a new nose cone. Definitely seems like a manufacturing defect.
 
I'd be contacting Apogee for a new nose cone. Definitely seems like a manufacturing defect.

It was definitely a manufacturing defect. I'd guess that a good number of these nosecones have the same defect. I think it will be better than new, given the original defect, once I finish this effort. The darn epoxy won't be sandable until tomorrow.
 
Last edited:
Filled the air pocket with 20min finishing epoxy and let cure overnight:
IMG_1319.jpg

Sanded it smooth:
IMG_1320.jpg

Primer:
IMG_1327.jpg

A few coats of paint:
IMG_1330.jpg

After a quick wet sand with 600, 1500 then 2000 wet/dry sandpaper, then a short buff with a rag:
IMG_1332.jpg

If the light hits it just right, the extra layer of paint can be detected as a little wave in the gloss, but it looks pretty good as-is. I may get a small sanding block and the 2000 grit out again to take out few not-absolutely-perfect surface highs:
IMG_1333.jpg

I still plan to wet sand the whole rocket and apply a "V2" alternating orange pattern, followed by clear coat over all.
Here's the Open Rocket Texture mapped model. I'll likely alternate the fin colors too.. but I'm not OpenRocket savy enough to model that.
Orange&White90DegStaggered.jpg
 
Dang Kevin. now you have me wanting to go push all over my nosecone(s). s because I bought the 5:1 for the electronics. the seam edges of that one didn't quite line up with the body tube; but I've got them squared away now. However........
 
Filled the air pocket with 20min finishing epoxy and let cure overnight:

I still plan to wet sand the whole rocket and apply a "V2" alternating orange pattern, followed by clear coat over all.
Here's the Open Rocket Texture mapped model. I'll likely alternate the fin colors too.. but I'm not OpenRocket savy enough to model that.
View attachment 292611

talk to K'tesh. He's a MASTER of OR.
 
Dang Kevin. now you have me wanting to go push all over my nosecone(s). s because I bought the 5:1 for the electronics. the seam edges of that one didn't quite line up with the body tube; but I've got them squared away now. However........

If you do have a "soft spot" it should be fine left alone.. as long as you don't push on it too hard or bump your nosecone while ground handling. I didn't have a crack in my finish until the day after my L2 cert flight. I don't think the flight or landing caused the chip.. I'm guessing it was ground handling.. perhaps I squeezed the nosecone a bit too tight on the soft spot when I removed or installed shear pins.
 
Last edited:
I received the Eggfinder TX and Eggfinder LCD tonight. I had planned to build them this weekend, but my plans were foiled. The Eggfinder LCD kit was missing the Circuit Board. Damn. I have a message in to Cris, who is pretty quick to reply. So, perhaps I could have it in time for next weekend at best.
 
I received the Eggfinder TX and Eggfinder LCD tonight. I had planned to build them this weekend, but my plans were foiled. The Eggfinder LCD kit was missing the Circuit Board. Damn. I have a message in to Cris, who is pretty quick to reply. So, perhaps I could have it in time for next weekend at best.

Is this for LDRS? What altitude are you planning? If it's below 3000' I wouldn't worry about tracking out in the desert.
 
Is this for LDRS? What altitude are you planning? If it's below 3000' I wouldn't worry about tracking out in the desert.

My wife is not receptive to my attending LDRS given the distance and that I have only the weekend.. so I'm not sure I'll be able to swing it. However, I wanted to be ready to put the biggest motor I have in.. which is only a 54/1280 at this time. Depending on which of the AeroTech 54/1280 reloads I fly, OpenRocket sims my setup up to 4600 ft.

Cris sent me a message that the Eggfinder LCD circuit board is going out today.. so if the stars align I might make it.. else I'll have to start thinking about the Black Rock launches... which I need to read up on.
 
Here's some OpenRocket screen captures of my empty and motor-loaded configurations.
Without Motor (but the weight and CG effect of an AeroPack 38mm to 54mm Adapter is included)
MadcowApogee Level2 Build L2 Cert CG&CP wAeroPack38-54adapter.jpg

With an AeroTech RMS 38/720 J350W Motor:
MadcowApogee Level2 Build L2 Cert CG&CP wAeroPack38-54adapter and AT RMS 38_720 J350W Motor.jpg
 
My wife is not receptive to my attending LDRS given the distance and that I have only the weekend.. so I'm not sure I'll be able to swing it. However, I wanted to be ready to put the biggest motor I have in.. which is only a 54/1280 at this time. Depending on which of the AeroTech 54/1280 reloads I fly, OpenRocket sims my setup up to 4600 ft.

Cris sent me a message that the Eggfinder LCD circuit board is going out today.. so if the stars align I might make it.. else I'll have to start thinking about the Black Rock launches... which I need to read up on.

I'll be there Thursday-Saturday, so if you fly Saturday you are welcome to borrow my Eggfinder if yours isn't ready. Also, you probably don't need the tracker if you are flying to 4600'. The J401 might be a lower option in that case-I don't know what your sim predicts for that motor, but it should be quite a bit lower than something like a J415.

One other note, 4600' does seem a bit high on a 1280 case. I've flown a K360 (1281 ns) in the cardboard Frenzy I showed you and only got 5279'.
 
Thanks Benno.
I'm not sure how much to trust my Open Rocket simulation results. My L2 flight was lower than predicted, but the winds were pretty stiff when I launched late Saturday.

Here are the numbers I'm getting for Full J reloads in the 54/1280 motor:

J800t-14: 4574 ft
J1999N-P: 4502 ft (not sure this reload is available)
J415W-14: 4297 ft
J540R-14: 4129 ft
J401FJ-14: 4037 ft

Here's a screenshot of my OpenRocket Simulation results.. not sure how readable the numbers will be:
MadcowApogee Level2 Build with AT RMS 54_1280 J800T Motor.jpg

And the simulation plot for the J800T-14 (delay is a bit too short)

MadcowApogee Level2 AT RMS 54_1280 J800T Motor Simulation Plot.jpg
 
Last edited:
Nice! Looks like any of those would be a good flight. Those altitudes seem like a good estimate, might be a bit lower or higher-Lucerne Lake is at elevation (2,851′) so you might get a bit more altitude than you would at sea level.
 
I managed to solder up the Eggfinder Tx last night. Initially I had a problem, but quickly found a very small hidden whisker of solder across 2 GPS pads. Once that was fixed, it started transmitting and the GPS found a position solution within a couple of minutes even inside my house.
I cut the single wire monopole antenna to 82mm, which is 1/4 wave at it's 915 Mhz frequency. However, the eggfinder assembly instructions say to cut the wire to 80mm. I figure I'd ask a few questions about monopole antenna design and implementation before I cut it down shorter. I may jump threads to run this to ground. =]

Update, I received confirmation that the 80mm is what I should use for antenna length, so I've cut the stock antenna to 80mm from the edge of the circuit board. I do have it soldered all the way to the edge. Now if only I had a receiver... Perhaps later in the week if I'm lucky.
 
Last edited:
I received the Eggfinder TX and Eggfinder LCD tonight. I had planned to build them this weekend, but my plans were foiled. The Eggfinder LCD kit was missing the Circuit Board. Damn. I have a message in to Cris, who is pretty quick to reply. So, perhaps I could have it in time for next weekend at best.

Cris sent me a message that the Eggfinder LCD circuit board is going out today.. so if the stars align I might make it

Thanks Cris... Cris at Eggtimer Rocketry did an amazing job of getting the Eggfinder LCD Rx circuit board to me. It was waiting for me when I came home from work tonight. I sense a late night with the soldering iron. =]
 
Last edited by a moderator:
you new solderers out there may also want to try either a table mounted or head mounted magnifier; if it's lighted that's a bonus!!!

here's an example or two...

https://www.amazon.com/dp/B003UCODIA/?tag=skimlinks_replacement-20

https://www.amazon.com/dp/B00PEV59Z6/?tag=skimlinks_replacement-20

fm

fyi... retired navy avionics tech

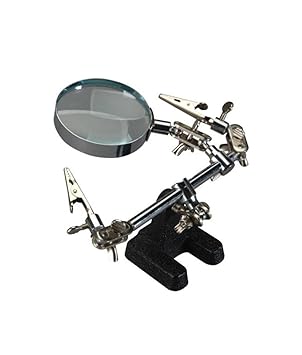
Good suggestion. My soldering gear needs a better magnifier for sure. Currently I have two different helping hands with relatively low power fixed magnifiers. I found that for the really hard to see items... I just put the two magnifiers in series.. and put my glasses on too. lol. I need a good head mounted setup.. I'll have to look into a decent pair that can go from 1.5 to 15x or so.
 
Last edited by a moderator:
Thanks Cris... Cris at Eggtimer Rocketry did an amazing job of getting the Eggfinder LCD Rx circuit board to me. It was waiting for me when I came home from work tonight. I sense a late night with the soldering iron. =]

I went ahead and soldered up the Eggfinder LCD this evening. While not mounted in the box yet, I'm happy to say that the Eggfinder Tx is transmitting to the Eggfinder LCD, and I think I have over 9 satelites while indoors under a concrete tile roof. The number on the right started at 4, then went 5 then 6 .. 7 .. 8 .. 9 and now it's a *. I'm guessing that * is for ">9" satelites. i'm not sure what the bottom right number is .. it says 260 right now. I plugged the lat and lon into Googlemaps and it's right on top of me. Nice. Now I need to mount the Tx in the nosecone with a 2S LiPo, and the finish mounting the LCD in the stock case.
 
I went ahead and soldered up the Eggfinder LCD this evening. While not mounted in the box yet, I'm happy to say that the Eggfinder Tx is transmitting to the Eggfinder LCD, and I think I have over 9 satelites while indoors under a concrete tile roof. The number on the right started at 4, then went 5 then 6 .. 7 .. 8 .. 9 and now it's a *. I'm guessing that * is for ">9" satelites. i'm not sure what the bottom right number is .. it says 260 right now. I plugged the lat and lon into Googlemaps and it's right on top of me. Nice. Now I need to mount the Tx in the nosecone with a 2S LiPo, and the finish mounting the LCD in the stock case.

Well done my friend!
 
Thanks Kevin. I'm feeling very fortunate. I used temperatures between 599 and 680F, with quick applications of heat and plenty of cooling off time. My eyes struggled to see the smaller stuff, even with the magnifiers. I think I need to order some smaller tips for the Weller soldering pencil. It was a bit on the clumsy side when mounting the smaller items.

I've ordered a couple of HC-06 Bluetooth Modules that I hope to integrate simply with pre-fabricated wires. I may need to gin up a new battery connection for it, else a power supply of some sort. I think one is arriving today.. so perhaps I'll have some wireless connectivity to my Android Tablet and/or Laptop tonight. I'm looking forward to seeing how well it works with the Rocket Locator App.
 
I use this type of magnifier when soldering...

51lA1sw-EsL._SY355_.jpg
 
Well, I received two HC-06 Bluetooth Modules last night from Amazon. I picked these up so that I could connect my Eggfinder LCD via Bluetooth to a Tablet and/or my Laptop. This would enable me to use real-time position plotting applications for tracking/finding my rocket.

The bad news...
I've spent far too much time fussing with them trying to get them to work with my Windows 10 Laptop. I can get them to pair and connect, then stay paired. However, I cannot seem to extract the NMEA 0183 GPS data from them using MapSphere. I have for a brief flash, seen MapSphere recognize a GPS connection at just 4800 baud, but then it fails and doesn't come back unless I reboot and perform a ritual that varys each time. I also found that I had been creating dozens of "ghost" Comm ports.. and was up to Comm 40 before I used a 3rd party tool to clean them up via Registry Surgery. So, I have given up on my Windows 10 Laptop for now. Perhaps there's an Eggfinder LCD Bluetooth Windows Guru out there who can tell me what I'm doing wrong. ;-)

The good news...
My old Android Tablet, a Samsung Galaxy III, is working nicely using either of the BT modules. I was able to pair with both HC-06's, and using an app called Bluetooth GPS, am able to get Eggfinder LCD GPS position data at roughly 1 Hz. I had my daughter run around the neighborhood and It tracked her nicely. I also installed Rocket Locator which initially did not work, and merely would display my position using WiFi to estimate my position. I don't think this inexpensive tablet has it's own GPS receiver. However, I learned that there is a option in the Bluetooth GPS app that allows you to "Enable Mock GPS Provider". With this enabled, Rocket Locator would then use the Eggfinder Bluetooth data.. and would track the position of the Eggfinder Tx nicely. I'll need to play with both of those apps to see what is most useful.
 
Last edited:
Glad to hear you got it working. Sorry to hear it didn't work with the Windows 10 laptop. Wish I had one so I could play with it myself and see what's going on. In time.
 
Well, I received two HC-06 Bluetooth Modules last night from Amazon. I picked these up so that I could connect my Eggfinder LCD via Bluetooth to a Tablet and/or my Laptop. This would enable me to use real-time position plotting applications for tracking/finding my rocket.

The bad news...
I've spent far too much time fussing with them trying to get them to work with my Windows 10 Laptop. I can get them to pair and connect, then stay paired. However, I cannot seem to extract the NMEA 0183 GPS data from them using MapSphere. I have for a brief flash, seen MapSphere recognize a GPS connection at just 4800 baud, but then it fails and doesn't come back unless I reboot and perform a ritual that varys each time. I also found that I had been creating dozens of "ghost" Comm ports.. and was up to Comm 40 before I used a 3rd party tool to clean them up via Registry Surgery. So, I have given up on my Windows 10 Laptop for now. Perhaps there's an Eggfinder LCD Bluetooth Windows Guru out there who can tell me what I'm doing wrong. ;-)

The good news...
My old Android Tablet, a Samsung Galaxy III, is working nicely using either of the BT modules. I was able to pair with both HC-06's, and using an app called Bluetooth GPS, am able to get Eggfinder LCD GPS position data at roughly 1 Hz. I had my daughter run around the neighborhood and It tracked her nicely. I also installed Rocket Locator which initially did not work, and merely would display my position using WiFi to estimate my position. I don't think this inexpensive tablet has it's own GPS receiver. However, I learned that there is a option in the Bluetooth GPS app that allows you to "Enable Mock GPS Provider". With this enabled, Rocket Locator would then use the Eggfinder Bluetooth data.. and would track the position of the Eggfinder Tx nicely. I'll need to play with both of those apps to see what is most useful.

UPDATE to the above post:
Last night I was able verify that my Windows 10 Laptop was connecting via Bluetooth to the Eggfinde LCD. I used a terminal program to watch the NMEA 0183 GPS data pulsing in with each beep of the Eggfinder LCD. I then again tried using MapSphere and it worked! I then found if I tried to use the MapSphere "GPS > configure.." menu item, that problems would begin and the Comm port that the Bluetooth GPS data was feeding would become unusable until I closed MapSphere, turned off power to just the Eggfinder LCD to kill the Bluetooth connection, then turned it back on and let it negotiate a connection automatically.
I can now simply turn on my Eggfinder Tx, LCD, allow a short time for the Bluetooth to connect, then start MapSphere and select "GPS > connect" and it automatically determine which port to use and voila.. real time gps position on whichever map I have configured in MapSphere.

I'm not sure what actually resolved the problems I was having. It likely was related to reinstalling Bluetooth drivers and not touching the MapSphere "GPS > configure.." option, using only "GPS > connect".

Now to design, fab and mount the Eggfinder Tx with Battery. I think I need to have a switch in there that I can access through the lower nosecone bulkplate vent hole. Else I'll have to remove and replace 6 screws every time I need to turn it on/off.
 
Last edited:
Kevin,
So I ran over to Radio Shack and picked up a small micro toggle switch, drilled a 3/16" hole through the bulkhead and screwed that in place. Then took a pair of clippers and cut the stem short so it wouldn't get caught up in any of the recovery gear/links and get switched off during recovery. Backside is soldered between the battery and Eggfinder (and one between a battery and Bigredbee). Works great. I'll post a picture later as I realize I haven't taken any of that project.
 
Back
Top