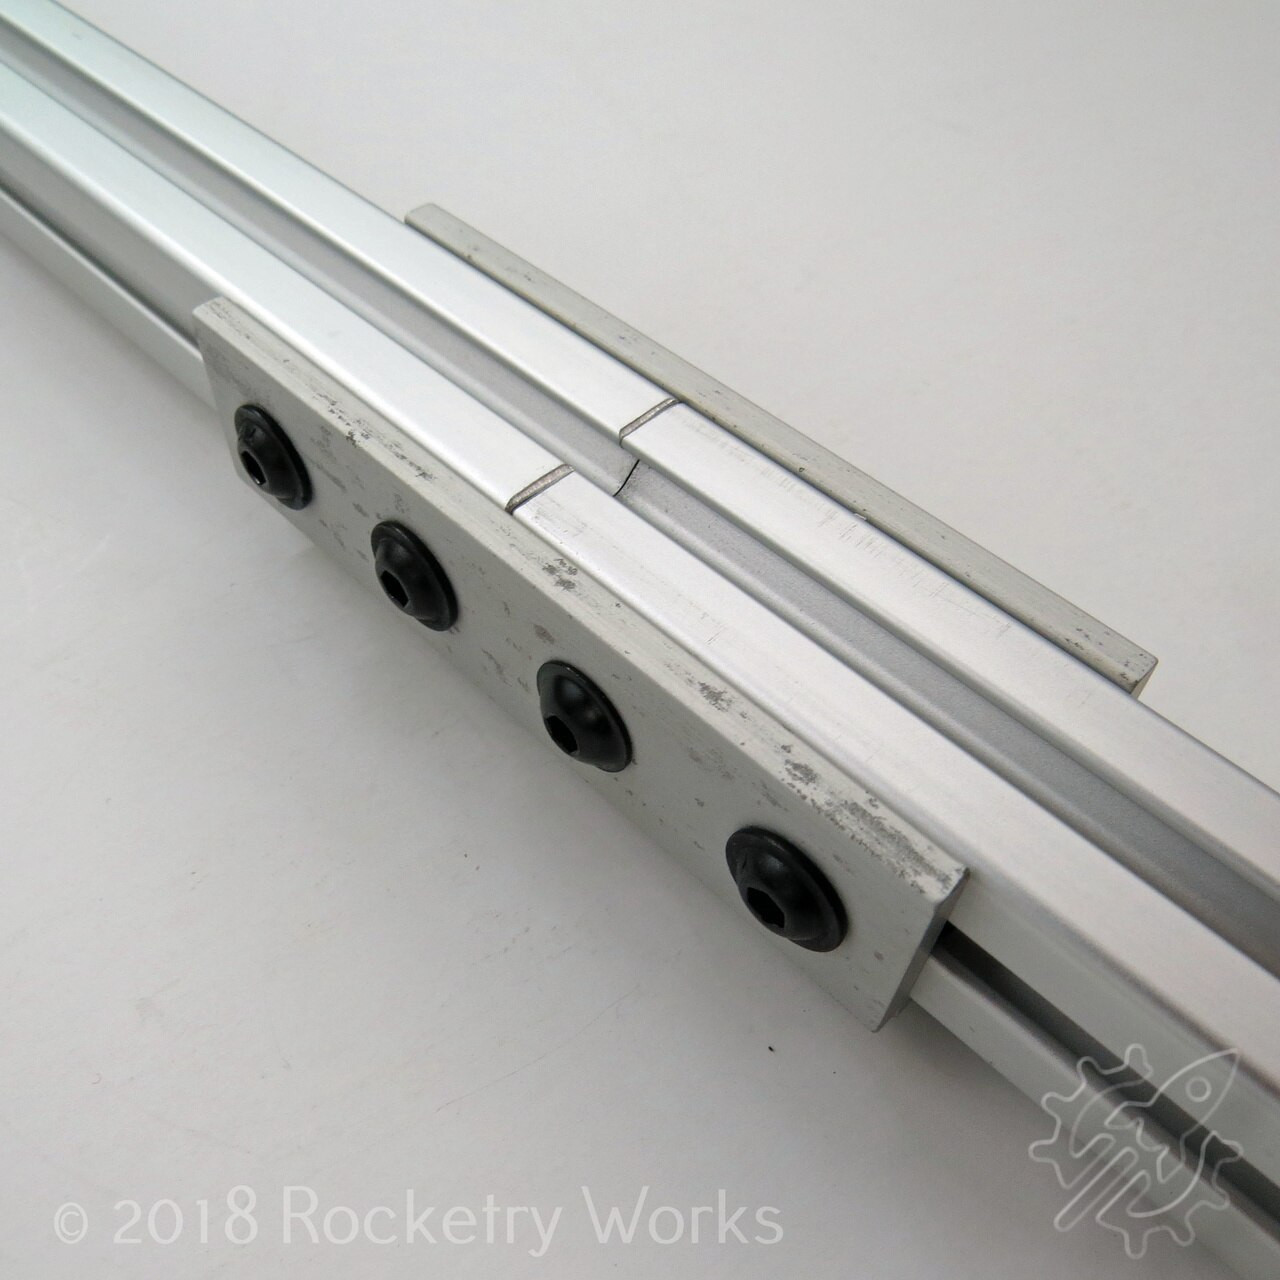
I finally got enough of the pieces to build my Jawstand Launch Pad. The Current configuration is a 6' x 20mm Mini Button Rail with a 5' x15mm Makerbeam Micro button rail. Eventually I will add a 6' 1010 Rail to the pad. Blast Deflector is a $1.99 Dewalt metal cutting blade that with a little grinding on the arbor hole now fits perfectly around the 20mm rail. The 2x4 is temporary until I get the 1010 rail and the parts I want to mount it, then the 20mm rail will be fitted with 1010 rail buttons and changing the rail will be as easy as slipping the 20mm on to the 1010 just like the 15mm is currently mounted to the 20mm rail, there are stop screws top and bottom to keep the 15mm rail from sliding out of the 20mm rail if a rocket were to hang up for some reason. The way the rails are set up now I can fly Micro buttons off one side and Mini buttons off the other. I will be bringing this pad with me for use at our future launches.
Parts purchased from:
Rail-buttons.com for all my rail buttons needs Randy has great service.
80/20 Inc 20mm t-slot 1825mm long via Amazon ( $28.00 of which half was shipping)
Makerbeam B.V. (via Amazon) 15mm rail x 1500mm length ($25.00 for two iirc)
Richland Griggs Ace Hardware and the pieces/parts Hillman Fasteners section (who knows how much I spend there, they have screws from smaller than #2 and larger, dig around long enough and I can do anything in rocketry there...almost).
Lowes for the Aluminum 1"x1"x36" angle and the blast deflector/blade ( $12.00).
Northern Illinois Rocket Assembly and Test Facility (NIRATF)
Posts
1,967
A very simple adapter... the plate is doubled 3/4" ply, with a 1-1/2" x 1-1/2" added to stand rail further away from plate. blast deflector is steel sheet mounted on arms bent 45°. The 8' 1010 rail is overkill, would have been fine (and easier to transport) with a 6 footer.
Proud member of WOOSH, FVR, IR, QCRS, (RC)2
2013 APCP: 48,397.3 Ns (18% P)
Highest altitude achieved: 21,981' AGL
SMR you method looks nice and simple but you lose a lot of rail. If you use the 2x4 attachment method shown above you can practically use the entire rail.
I've found this to be important when trying to minimize altitude but get the rocket off rail with enough speed to be stable.
I use Thrust Curve which allows you to change the rail/rod length so that you can optimize your motor selection, be it minimizing or maximizing altitude.
Northern Illinois Rocket Assembly and Test Facility (NIRATF)
Posts
1,967
Originally Posted by Lowpuller
SMR you method looks nice and simple but you lose a lot of rail. If you use the 2x4 attachment method shown above you can practically use the entire rail.
I've found this to be important when trying to minimize altitude but get the rocket off rail with enough speed to be stable.
I use Thrust Curve which allows you to change the rail/rod length so that you can optimize your motor selection, be it minimizing or maximizing altitude.
Nah, its just not a very good picture. Here I blew it up and tried to enhance the settings to bring out detail. Not much better. I do use the whole rail. Note the rail stop, which is at the very bottom of the rail. The rail itself is on a standoff, the width of the rail, which moves it away from the attachment to the tripod, allowing the fins to clear and the rocket to slide all the way past the attachment structure. (Very similar to the 2" x 4" method.)
Proud member of WOOSH, FVR, IR, QCRS, (RC)2
2013 APCP: 48,397.3 Ns (18% P)
Highest altitude achieved: 21,981' AGL
Your launch pad looks nicely built, but it has a very narrow footprint. Be careful that side thrust as a result of the angled blast plate doesn't cause it to tip.
Steve Shannon
L3CC, TAP, Director, Tripoli Rocketry Association
Northern Illinois Rocket Assembly and Test Facility (NIRATF)
Posts
1,967
Originally Posted by Steve Shannon
Your launch pad looks nicely built, but it has a very narrow footprint. Be careful that side thrust as a result of the angled blast plate doesn't cause it to tip.
Yes, I agree. It is my lightweight pad, with self imposed limit on weight and impulse. I have other pads for heavier rockets.
The Rockwell Jawstand (core topic of this thread) has another feature not often mentioned... holes in each foot allow it to be staked out.
Proud member of WOOSH, FVR, IR, QCRS, (RC)2
2013 APCP: 48,397.3 Ns (18% P)
Highest altitude achieved: 21,981' AGL
I just stumbled upon this thread and I have to say the Jawstand is a great idea for use as a launch platform. I like it so much that I dug around the Net and found a really decent price for one. $54.99 w/Free Shipping (FedEx SmartPost). Placed my order just before posting this. Looks like it will arrive on the 28th.
If anyone is interested, you can find it on eBay (Here). Btw, the seller is RockwellTools who I believe is The Rockwell Tools, as in the people that make the Jawstand.
Great find. There's even one for $50 in the "also viewed" list. I love mine.
Yeah, the $50 one is the model 9033 which does not have the hand crank for height adjustment. But since I have (or will have) to justify this purchase, I bought the other model as it will double as a tool/helper/third hand when doing home remodeling/repair work on the side.
My JawStand arrived today. Much quicker then eBay estimated (Nice change of pace). So here it is....
Edit: One thing to note about seller. Although the package arrived in one piece, it was shipped using only retail box. No shipping carton was used, not even wrapped in heavy paper. Just be aware of this if you buy from RockwellTools
Looks good. Update us when you decide on your rail configuration.
Well, I already have my rail. It's the 1" x 97" 80/20 rail I purchased from Steiner Electric for under $25 w/Tax. Steiner has several local brick-n-mortar locations in my area so I didn't have to shell out coin for shipping.
As to mounting the rail, my plan for now is to use a short length of 2x6 and use 3x 6.5"~8" carriage bolts through the 2x6 to attach the rail. As I wish to use the full length of the rail, My blast deflector will be mounted to the 2x6 and the rail stop anchored near the very bottom of the rail. I'll post my AutoCad drawing as soon as I finish it.
I'll take better pictures of mine but right now it has worked with everything I've used it for up to G and H motor 3 inch models. I just used two 7/16" hex head bolts slid into a rail channel and mounted through pre-existing holes on one side of the clamp where one of the plastic bumpers was. Works well and is height adjustable by loosening the bolts and sliding the rail up or down.
Blast deflector is a cake scoop thing from amazon: