Dynacom 4.1" Scorpion Build Thread (bonus Python data too!)

The Rocketry Forum

Help Support The Rocketry Forum:

This site may earn a commission from merchant affiliate links, including eBay, Amazon, and others.

patelldp

Well-Known Member
Joined
Jan 23, 2009
Messages
5,647
Reaction score
101
I finally got my hands on a Dynacom rocket. I have been aware of these kits since back when I entered into the hobby in 1999-2000 timeframe, but I never had the money to buy one and never came across anyone with one in the North East. Dynacom went away sometime around 2001-2002 and Air-X emerged as a streamlined product line from the same production entity (Eric Haberman). Production of those kits would cease a handful of years later, leaving behind very little documentation of any of the combined Dynacom/Air-X offerings.

Fast forward to 2014 when this thread emerged on TRF. Eric's appreciation for the nostalgic offerings of Dynacom/Air-X resulted in a sweet build thread of the Air-X Delamar, showing how kits used to be made. I share the same appreciation!

I was able to find an individual with many of these gems in his possession. Said individual was willing to part with his 4.1" Scorpion kit for a fair price and I couldn't say no. That brings us to yesterday, when I received the following:

UU1ngJQl.jpg


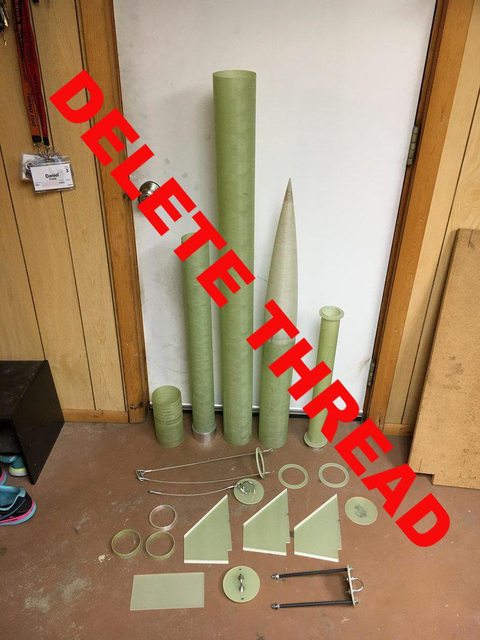
That's a kit...here's some highlights:


  1. Pre-slotted and drilled main body tube and payload tube
  2. Precision cut fins that come beveled
  3. Centering rings and bulkheads, including two stepped bulkheads for the altimeter bay
  4. Shock cord leaders to prevent cord scorching
  5. 54mm motor adapter
  6. 76mm and 54mm cir-clip (similar to slimline) motor retainers
  7. FWFG nose
  8. All necessary spacers for using both snap ring and AT/CTI type motors

This build will be a "labor of love," meaning it will be slow and methodical. I want to do it right as I'll likely never have another shot at it.

For those of you wishing to see larger pictures or follow along outside of TRF, you can view the album here: https://imgur.com/a/94z3i
 
Last edited by a moderator:
Doing some digging on the internet, specifically in the doldrums of RMR, uncovered the old Dynacom web domain of www.Dynacom-Inc.com. Plugging that into archive.org resulted in a nice history of the page. I dug a little further and found the specs on the Scorpion:

Yj340O2l.png


I think that my kit may be newer than the version shown on this October '00 archive of the site, as mine includes a 76mm motor mount with 54mm adapter. Otherwise, it looks to be pretty spot on. One output of this build thread will be an Open Rocket file that documents component weight and dimensions.
 
Nice, Dan! Thanks for posting this and letting us come along for the ride! Great design; and happy to see you got the later version with the 3" mount...it deserves it!
 
Too cool. I was a big Dynacom fan way back when but never could afford it (read: convince my parents it was worth the money :)). Thanks for posting!
 
Here's the instruction manual that comes with the Dynacom Python...which I also managed to track down and a partially built one should be on its way to me soon!

Python Instructions (thanks John Coker!)

I intend to buy Loctite E120-HP to build the Scorpion with. This (coupled with a slight modification to the tail end) should result in a robust fin can that should handle just about any motor I can throw at it.
 
As someone who's only ever seen "modern" kits.... This is an interesting build to me. There are several things I see that I really like.... Looking forward to watching this one, thanks for sharing the trip.
 
Man, I am jealous. I would love to have a Scorpion kit.

I would also love to have the Scorpion Darrell Mobley built back in the day with the ROL paint job. Call it a sentimental wish.

Dynacom kits were spot on. Stuff just fit correctly.
 
Man, I am jealous. I would love to have a Scorpion kit.

I would also love to have the Scorpion Darrell Mobley built back in the day with the ROL paint job. Call it a sentimental wish.

Dynacom kits were spot on. Stuff just fit correctly.

I am pretty sure that built rocket is available...JDcluster has it and has tried to sell it in the past. I bet you could make him an offer he'd accept.
 
Here are a few more pictures of dry fitting the parts. First up is the booster. Everything fits together really, really smoothly, unlike any glass kit currently available. The closest thing on the market today with respect to quality, workmanship, and appeal is from MAC Performance Rocketry.

CmS5s4jl.jpg


Here's a dry fit looking up the end of the motor tube. Again, snug fits that lead to easy picture staging. Those fins aren't epoxied, but they're not falling out of the slots!

o994PGtl.jpg


Last but not least, a full mock up. The lines on this rocket are very simple, yet very appealing. Forget all the recent buzz about split fins, rounded fins, etc...this design is simple and effective.

tcPIZlul.jpg
 
Dynacom has always suggested the use of Loctite E-20 epoxy for their builds. Keeping with the nostalgic aspect of this project, I bit the bullet and bought the system. I've always had a bit of a curiosity about what is included, so here it is.

f26d7IXl.jpg


The gun (McMaster 74695A71) comes with the gun body and 1:1 and 2:1 ratcheting plungers. You can either buy the mixing tips (McMaster 74695A12) or dispense and hand mix. The tips are handy, but likely result in a significant amount of waste. Finally, the E-120HP epoxy (6430A24) was chosen in lieu of the E20 due to the longer pot life, higher viscosity, and better strength.

I plan to weigh the mixing nozzle before and after use to see just how much gets caught up in there. This epoxy will be used with the mixing nozzles to tack fins, and do external fin fillets. I plan to do internal fillets with RocketPoxy with tab-to-tab carbon or FG layups.
 
Nice score Dan.. I have a Dynacom Bull-Pup that needs a fin repaired---haven't flown that rocket in almost 15 years... I guess I need to get busy.. If your acquaintance has an unbuilt Dynacom Python he is willing to part with, I'm in the market...:grin:
 
Way cool. When Dynacom were being produced I was one of many who could not afford it.
 
I have a Dynacom single deploy Black Widow. Never flew it on a very big motors. Now with the Jolly Logic chute release I am go for bigger motors.
 
I can no longer say I have a completely unbuilt Dynacom Scorpion...

Today I scuffed the motor tube and aft centering ring with some 40 grit sand paper and thoroughly cleaned with isopropyl alcohol. The motor retainer is the stop for the CR, so I covered that with masking tape to keep the epoxy from getting on it. I then mixed up a small batch of E-120HP and applied it to the motor tube where the ring will go. Finally, I pressed the ring into place.

At the 90 minute mark of the 120 minute cure time (sounds a lot like Dogfish Head's IPA line) I'll remove the masking tape and any excess epoxy.

It has begun!

hO4mneyl.jpg
 
One thing you may have noticed in the kit pictures is that the fore edge terminated at a point at the root of the fin. This point is internal. I personally prefer to have the fins terminate at a square tab so that the CR fore of the fins can butt up against them. This will allow for a strong fillet at the front and back of the tab, as well as along the root.

This was performed on my Dewalt 12" mitre saw with an abrasive blade. Overkill, but repeatable and square.


3FmZPJFl.jpg
 
I constantly struggle with keeping CR's square during rocket builds. The aft CR in this build is super easy as it butts against the machined retainer, but the mid CR is a challenge. To fix this issue, I grabbed a piece of scrap hardwood dowel out of my garage and cut three lengths that are ~7.55" long, slightly longer than the 7.5" long fin tabs. Because I don't want to epoxy these dowels to the motor mount, this CR will be prepped, set in place, and then CA'd to tack in place. All of the strength will come when I fillet both sides of it and fillet the CR to fin joint.


uVHdOEUl.jpg
 
Here's my "jig" in place. Simple, but effective. Right after this photo was taken, CA was applied to the upper side of the CR at the motor tube to CR joint to keep it in place.


QXhRuyql.jpg
 
E-120HP epoxy added in a fillet to the fore side of the CR. This epoxy is much less viscous than I anticipated, which is kind of a bummer. The epoxy is settling a bit as it cures, leading to a smaller fillet than anticipated. Not a big deal.


nH60PW3l.jpg
 
Another "jig" to accurately space the fore centering ring. This is made very quickly from a piece of 1/4" plywood. The notches are to allow the steel shock cord anchors to pass through without affecting the position of the ring. The steel standoffs are 1/2" long and make sure the ring is accurately spaced and not canted on the motor tube.

b763CjFl.jpg
 
Last edited by a moderator:
Here's the CR jig in action. This shows the steel leaders passing by the jig and the ring sitting on the standoffs. The ring is perfectly placed and ready to be epoxied on. Unlike the mid-CR, this ring will be adhered and filleted with E-120HP.

The jig plate is sitting on a 12" long piece of 76mm FWFG tubing to allow the leaders to relax and not impart any force that may negatively affect the position of the ring.

djYzo2dl.jpg
 
Last edited by a moderator:
Epoxy applied to the motor mount tube slightly closer to the end of the tube than where the ring will ultimately rest to allow the ring to push the epoxy and create a small fillet. Here you can see the steel leader termination that will be eternally sealed inside of the rocket (or so I hope...).

I'm traveling for work until Wednesday, so you all will have time to digest the amazing techniques that you've just witnessed and the epoxy will have time to cure next to my boiler. Cheers!

gJ9bxWJl.jpg
 
Very neat build Dan! if you happen to bring it along to an URRG launch I would love to check it out!
 
Nice to see there are still a few of these kits left and congratulations on snagging one!

For those who aren't familiar with Dynacom, it was the company that gave fiberglass kits the reputation they still have (despite the fact that the current offerings are not of the same precision).
 
Got back from traveling and applied the fillet to the fore CR. This locks the cables in place and significantly improves the strength of the CR for deployment load purposes.

rCipo5Hl.jpg


Things start to get a little more exciting at this point! Next I need to drill holes for the rail buttons, extend the fin slot to the rear of the body tube, and ultimately epoxy the motor mount into the main body tube. Through all of this I plan to emphasize being neat with the epoxy, we'll see how that goes...
 
Hi Dan,

It's looking great so far. Eric's kits were always a step above the competition. If you don't have them already buy some PEM nuts. They make the cleanest rail button installations. It looks like that epoxy could use some thickening. Try using West Systems 404 High Density Filler. That'll keep the fillets from sagging. I wouldn't use it anywhere you might need to sand though.
 
Nice to see there are still a few of these kits left and congratulations on snagging one!

For those who aren't familiar with Dynacom, it was the company that gave fiberglass kits the reputation they still have (despite the fact that the current offerings are not of the same precision).

Thanks, John! I'm pretty pumped about it.

You're right on your point...There's more to the quality of a kit than just the tubing material. You can tell that Eric test fit all of the components and inspected everything before it went out the door...a poorly fitting coupler in a cone or body tube, or poorly cut CR's (like here:https://jcrocket.com/punisher.shtml). That attention to detail could also be why it took him forever to ship a kit...

I meant what I said before, you need to go to MAC Performance these days to get the same precision as Dynacom.
 
Hi Dan,

It's looking great so far. Eric's kits were always a step above the competition. If you don't have them already buy some PEM nuts. They make the cleanest rail button installations. It looks like that epoxy could use some thickening. Try using West Systems 404 High Density Filler. That'll keep the fillets from sagging. I wouldn't use it anywhere you might need to sand though.

Good thinking. I have a good amount of 8-32 PEM nuts that will be used for rail buttons and coupler retention screws.

I agree with thickening the epoxy, too. A majority of the strength of the motor mount assembly is derived from the fin attachments to the motor tube and to the body tube. This epoxy will be used without filler to install the motor mount, attach the fins, and internally fillet the fins. I think I'll use RocketPoxy on the external fillets to prevent sagging or running at the ends of the fins. That, or I'll grab some 404 and use the Loctite...thanks for the tip!
 
Back
Top