Estes Leviathan Build

The Rocketry Forum

Help Support The Rocketry Forum:

This site may earn a commission from merchant affiliate links, including eBay, Amazon, and others.

danielsadjadi

Well-Known Member
Joined
Feb 21, 2016
Messages
368
Reaction score
1
Hi everyone,

Today I finally received my Estes Leviathan ordered from AC Supply, and after ripping the box open I couldn't wait to start building it. I hope this build thread helps others who are making this rocket, and helps me get a better understanding of the tips and techniques to making a model rocket.

20160224_172516.jpg
 
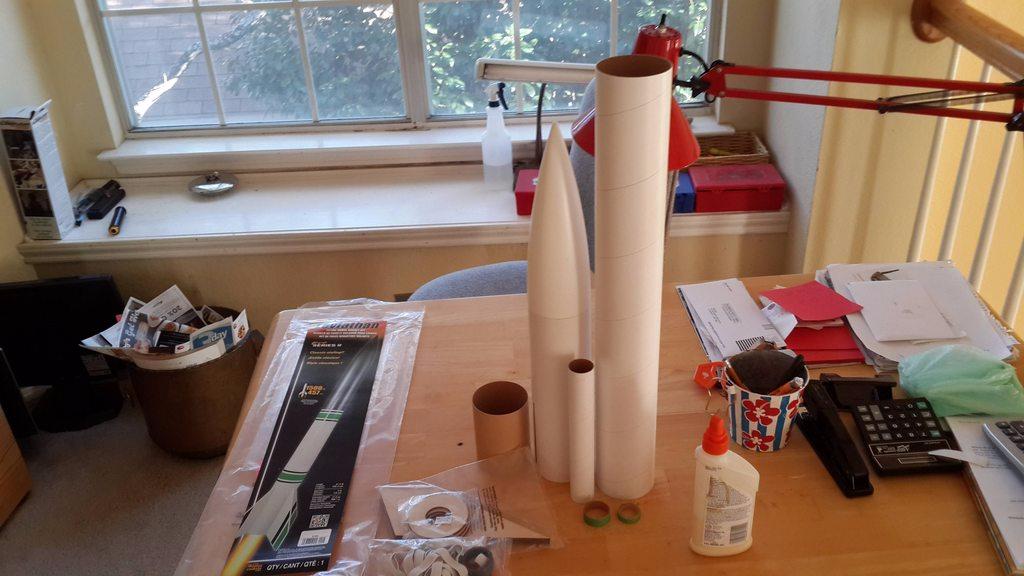
So let's get started! Here are all the components:

LH5JviP.jpg


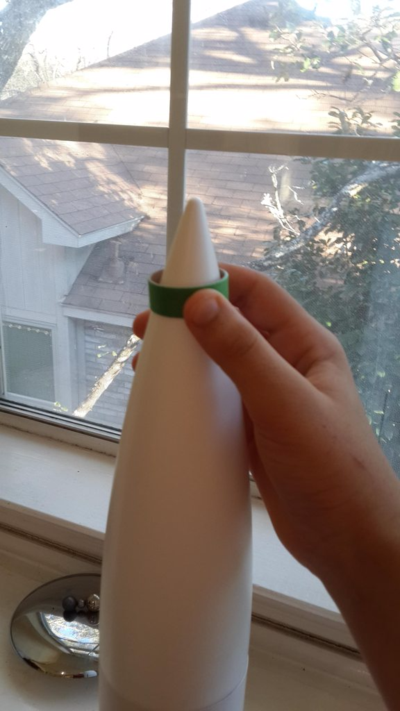
I first start by stretching out the spacer ring over the nosecone, to allow it to fit over the motor mount tube.


xhNv0rP.jpg


After doing that, I put in one of my centering rings, and put my space in before that, making sure the spacer is flush with the end of the tube.

20160224_173140.jpg

20160224_173804.jpg

I then put a ring of wood glue around the inside of the centering ring and body tube. I used a small paintbrush to do this, and it worked really well to get the glue in those tight cracks.

20160224_174156.jpg
 
Are you going to do internal fillets? If so, you'll need to leave off the aft CR so you can access it.
 
Are you going to do internal fillets? If so, you'll need to leave off the aft CR so you can access it.

Well, the Leviathan instructions are saying to run wood glue down the outside of the fin, then smear it into the fin so it goes through the cracks. I guess internal and external?

EDIT:

Now I see what you are saying, fillets from the inside of the tube. No, I don't since I already put wood glue on that little connector while putting the fin into place, then run down wood glue on the sides. So it's not really necessary.
 
Last edited:
Now I put in the other centering rings, I used a fin to get the distance between the first and second centering rings, then tack glued them into place. I then smeared wood glue on the end of the MMT, on the inside of the spacing ring, then put the centering ring on the top of the MMT and pushed the spacing ring onto it until it is flush with the end of the MMT. Wood glue is then applied to all the joints.

20160224_184028.jpg

20160224_184103.jpg
 
Next I push the motor mount assembly into the lower body tube, and make sure the MMT is flush with the end of the lower body tube. A ring of glue goes around the top of the upper CR, I am saving the lower CR for epoxy as I put my motor retainer in.

20160224_195317.jpg

20160224_195309.jpg
 
Now we add the coupler tube, a little glue around the rim and the tube is pushed in 2"

20160224_205521.jpg

20160224_205515.jpg

These motor retention thingies are a real stroke of genius, that motor is going nowhere.

20160224_205433.jpg
 
Before I do my fin fillets, do you think it is a good idea to use epoxy or wood glue? I don't care about the extra weight since I am launching this on a G80, but I want to know which one is stronger/more effective in keeping the fins nice and secure.
 
Epoxy will not shrink on you like wood glue. If you use wood glue, you will need to cover your filets with CWF and sand them, if you want them to look smooth.
 
I am assuming CWF is Carpenters Wood Filler? The instructions call for nothing but wood glue. I am definitely not the guy looking for dirty work with spackle-like CWF, so I am considering epoxy.
 
That's right, Elmer's Carpenter's Wood Filler. Don't get any of the fancy stuff, just the plain stuff with the orange lid. It can be used to cover almost any blemish.
 
That's right, Elmer's Carpenter's Wood Filler. Don't get any of the fancy stuff, just the plain stuff with the orange lid. It can be used to cover almost any blemish.

.....and is known to crack and flake out on a hard landing where epoxy will not. YMMV.
 
Go with Epoxy. This kit tends to land on its fins, and as others have noted, this will jar out any wood filler. Wood glue will hold them in place, but the paint would be ruined. Plus, you will want the extra strength since you did not do internal fillets.

For future reference, internal fillets are always a good idea because they lock the whole tail into place on the motor. As a general rule, if the kit is through the tube, plan on doing fillets. It adds a ton of strength and resilience to the kit. MPR and HPR are not really Estes focus, and the instructions for the kits tend to reflect this.

If you use Epoxy, you will be fine. If you don't, but stay in Mid Power, you will more than likely also be fine. Just beware of hard landings.
 
Also, one more note on the Estes PSII Kits. They tend to be VERY conservative on the estimated weight. Any kit I have built using just wood glue and filler typically comes in well below the estimated weight. With the Leviathan, they estimate 17.5oz. I used epoxy on everything, with internal fillets on both the MM and BT, and beefy ones externally. In addition, added a baffle and eyebolt, plus wood blocks to attach rail buttons and I came in just a hair over 20 oz. Don't worry at all about the epoxy adding weight. You have some room or safety here.
 
Sounds good. I will use JB Weld Clear Epoxy for the retainer, fillets, and to secure the lower CR in place.
 
I'd recommend epoxy for strong pretty fillets. It's messy stuff and if you don't clean up any and all loose ends you'll be upset later. When doing external fin fillets, mask of both the fin and BT with low tack tape about the width of the expected fillet apart. Then after applying, letting it soak into the (roughed up) BT, and shaping the fillet, remove the tape and the edges will self level over some time. Some additional smoothing might be required on the edges, if the tape was placed a little too close together.

Epoxy really is quite magical stuff, though not always necessary. I happen to prefer it.

Also, it's funny that you're making the leviathan when I have a half finished scion sitting on my build table.
 
Sounds good. I will use JB Weld Clear Epoxy for the retainer, fillets, and to secure the lower CR in place.

Not that it's likely to be an issue here, but for future builds, JB Weld Twin Epoxy is the stuff that I think you might want to invest in for the Motor Retainer. IINM most people use this due to it's ability to hold up to heat. It doesn't set in 5 minutes like the Clear Epoxy, and has a heat resistance to 550ºF.

FWIW I use Bob Smith's 30 minute epoxy for fin fillets. I don't need to be in the middle of something and have the epoxy kick off before I can finish it.

As Is, YMMV.
 
Last edited:
Not that it's likely to be an issue here, but for future builds, JB Weld Twin Epoxy is the stuff that I think you might want to invest in for the Motor Retainer. IINM most people use this due to it's ability to hold up to heat. It doesn't set in 5 minutes like the Clear Epoxy, and has a heat resistance to 550ºF.

FWIW I use Bob Smith's 30 minute epoxy for fin fillets. I don't need to be in the middle of something and have the epoxy kick off before I can finish it.

As Is, YMMV.

I want to do most of my epoxy at once, and since the retainer calls for epoxy I am using JB Weld. Saves me a little $$
 
I want to do most of my epoxy at once, and since the retainer calls for epoxy I am using JB Weld. Saves me a little $$

Sounds like you are using the syringe of JB Weld. You can get the same thing in Pro size and in the long run, you save A LOT of money. The 2 x 4 oz size has lasted me 4 rockets. Not sure you will have enough in the syringe to get the 8 external fillets you will need and at the right thickness. I have found that mixing what you need for 1-2 applications, waiting for it to cure, then moving on gives you a much better build because you will not feel rushed. 5 Min Epoxy sets up FAST and most kinds are a bit runny. Even if you don't see it running, you still want gravity to hold it in place so you get the best possible bond.

Taking just the retainer / rear section for example, I typically do that in 2 separate applications. Fillet the centering ring to the BT and a very thin fillet to the MM, stand the tube with the aft end up. Once that sets, I apply the thin layer to the end of the MM (not to the edge, you do not want epoxy in the MM tube), slide on the retainer and then stand it on the retainer. This gives you a little fillet forward of the retainer too.

Quick note using epoxy, tape is your friend. Tape the retainer before sliding it on. The last thing you want is stray epoxy (and it strays. The stuff is sticky) getting into the threads. Just remember to remove it before the epoxy sets. I use the mixing cup as my guide. Once it starts to get really tacky and especially if it starts to get stringy, I remove the tape immediately. Same goes for fillets. Tape is cheap. Epoxy is great stuff, but it can ruin a build if you don't police it.

Also, get yourself some of this: https://www.walgreens.com/store/c/w...l-first-aid-antiseptic/ID=prod6056576-product 16 oz of 91% Isopropyl Alcohol. Much cheaper and more concentrated than the pads you can buy. That and some paper towels can fix most minor epoxy issues provided you catch them early enough. This works even if the epoxy has started to set, but only in that initial cure period. Once it cures, it is there for good. 91% is the best stuff, 70 is ok, and anything below that (there is a lot of 50 and 30% especially in pads) is crap. Isopropyl is cheap. You are mostly paying for packaging and as long as you keep it capped, it is good for a long time. But keep it capped. It is very volatile. Put some on a paper towel, mix your epoxy, apply, make sure it looks nice, remove tape, recheck that it looks nice. Rinse and repeat.

Sorry for the longer post. I went through what you are doing a few months back and had to learn the hard way.
 
I want to do most of my epoxy at once, and since the retainer calls for epoxy I am using JB Weld. Saves me a little $$

Just remember, once it's mixed, you've got 5 minutes. Saving a little money in the short term might cost you big if something goes south on you.
 
You don't have to worry about the fillets too much. Leviathan is very light, and the failure mode will be that you will crack off the trailing edge corner of the fins on a hard landing, not lose the whole fin.
You could try to reinforce those corners a little, and/or oversize the chute and use Chute Release (not just trying to plug my product, though I guess that just happened).
Leviathan was one of my main test rockets during Chute Release development, by the way. It's a sturdy workhorse that tumbled down many times without a parachute and is still flying.

Strangely enough, the JL Alt 3 and Chute release were the reason why I built mine the way I did. Took the extra tube from a scion and made an extended dual deploy version. I wanted to use this kit to gear up for higher performance kits that need electronics, so mine is very overbuilt, but as you said, because it is so light, it still flies very well.

Tested it with just motor eject on a few H motors last weekend, but next launch will be full dual deploy testbed mode. Nice to know it works well!
 
You don't have to worry about the fillets too much. Leviathan is very light, and the failure mode will be that you will crack off the trailing edge corner of the fins on a hard landing, not lose the whole fin.
You could try to reinforce those corners a little, and/or oversize the chute and use Chute Release (not just trying to plug my product, though I guess that just happened).
Leviathan was one of my main test rockets during Chute Release development, by the way. It's a sturdy workhorse that tumbled down many times without a parachute and is still flying.

IMG_0314.jpg

:wink:
 
Alright, thanks for all the advice guys. After digging around the house I found this:

20160225_170124.jpg

It's JB-Weld Automotive and Industrial Epoxy. It's the black stuff heavy-duty stuff meant for metal, which can withstand 4000 PSI and 600 degree heat (more than I ever need, lol). Should I use it on the retainer and lower CR? If it works I'll do it. I will save the fillets for clear epoxy, and yes I know that the syringe doesn't have a lot. I will probably buy a bottle.
 
Alright, thanks for all the advice guys. After digging around the house I found this:

View attachment 283382

It's JB-Weld Automotive and Industrial Epoxy. It's the black stuff heavy-duty stuff meant for metal, which can withstand 4000 PSI and 600 degree heat (more than I ever need, lol). Should I use it on the retainer and lower CR? If it works I'll do it. I will save the fillets for clear epoxy, and yes I know that the syringe doesn't have a lot. I will probably buy a bottle.

Thats the stuff you want on the retainer, you can also coat the lower CR to give it some protection.
 
Looking at your second post, it doesn't look like you sanded the MMT tube prior to gluing the CRs on. Hopefully you did. The outer layer of those tubes is pretty shiny, and with the minimal amount of wood glue you used to do those internal joints, I would be worried about the motor and MMT tube just tearing right out of the centering rings and promptly ruining your day.

BC

I applied several more coats of glue after that, it's pretty solid.
 
Okay, I applied the JB Weld to the retainer after sanding it down, and I pushed it in, I used a tissue to wipe away the excess epoxy in the tube. I put a ring of JB-Weld around the CR without wood glue.

20160225_182506.jpg
 

Latest posts

Back
Top