12 Volt LED question

The Rocketry Forum

Help Support The Rocketry Forum:

This site may earn a commission from merchant affiliate links, including eBay, Amazon, and others.

Flash

Well-Known Member
Joined
Jan 22, 2009
Messages
639
Reaction score
48
Has anyone used these 5/8" mount hole size LED's for ignitor continuity tester on launch controller? Don't want to have the LED fire the Estes or Aerotech first fire ignitors. They are rated at 15 milliamp draw from what I am reading. They meet the 12 volt requirement to. I'm getting ready to build a homemade launch controller. The last one I built, I used all radio shack stuff with regular 12 V low milliamp incandescent bulbs. It worked great, finally sold it to a boy's scout group because I wasn't needing anything but a single launch pad controller, but now I'm taking the lead with my elementary school two or three times a year, so I have a need for one that can handle four rockets at a time.

I also enjoy the build to, so I'm not interested in a factory model.

I'm going with the tried and true simple design based on the Estes type of controller but with a few extra safety items.

I'm going with what I call aircraft style flip switches, one for main power and one for each of the four launch pads. When you flip the main, a radio shack door chime alone with a LED Light will light up showing the controller is Armed, they you flip each of the launch pad switches for each pad that has a ready to fly rocket on it, at which time the LED continuity light will come on, all is needed then is push the fire control button.

I attached a picture of the LED's in question, as mentioned, they are rated at 15 milliamp draw. Any parts recommendations would be great to. I will post a list of some of the main parts I'm looking at using for any thoughts.

Thank you!

image.jpg
 
Here is the Fire Buttons I'm looking at using, again 5/8" size mount hole. Here are the specs: - Cut hole size = 16 mm in diameter
- Stainless steel metal. Resists rust and corrosion
- Rated PI67 waterproof.
- Can be exposed to heavy rain, splashes, etc. without damage.
- Great to be used on boat horns, starter switches, and other applications
- Provides temporary activation of an electrical current
- Faceplate/Button Diameter: 18mm
- Operation Type: Momentary (Activates when pressed, deactivate when released)
- Max Switch Rating: 3A/250V AC
- Terminal Type: Screw
- Body Material: Stainless Steel
- Button Material: Stainless Steel
- Waterproof Rating: IP67 (may be fully submersed in water without damage)
- Operation Temperature: -20C to 55C

Any thoughts would be great!

Pushbuttonswitch.jpg
 
Here is the project box I'm looking at using, reminds me of the old radio shack box which came with a metal face. This one is all plastic and I'm looking at going with gray. It only cost $10+ dollars. It's the model S-17.
Here are some specs:
* Two-piece design with slanted top
* 6.89" Long, 4.89" Wide
* Back Height 2.45", Front Height 1.53"
* Recessed top for label
* Circuit board mounting bosses
* Assembly with four screw
* Available in Black, Almond or Gray

Any thoughts would be great!

Projectbox.jpg
 
Here are the flip switches I'm looking at using. The are rated at 12 Volt 20amp.

Again, any thoughts would be great!

Flipswitches.jpg
 
Here is the door chime I'm looking at using. It's $10.99. I used it in my old control box. What I like about it is, it's rated at 12+ volts, and it chimes and don't buzz. Another thoughts would be great!

Doorchime.jpeg
 
Okay, the above items are what I'm considering using in this build along with 16ga wire, house whole electric outlet to send the ground and power out to the four pads on regular plug in drop cords which also makes setup and tear down easier. They will plug into the outlet on the controller and also plug into the electrical boxes at the pads. There will be two 50' drop cords, each cord will carry the positive power to it's pad when the fire button for that pad is pressed and there will be one share ground for each two pads, that way, if something happens to the ground, I would only lose two pads, not all four.

Then I plug the female in onto a pig tail coming from the pad box, then I will have two short twin wire cords from the box to the top of the pad to hook to the ignitors.
I'm going with a saw horse launch pad, not sure if I'm going to make the 1/8" rods adjustable or not. I could adjust the whole pad and put some adjusters on the legs for tilt.
Feed back and thoughts would be great!
 
I think you've got a fine selection of parts. I'd actually considered using the same ones on the launcher I'm working on building. One risk you might have is LED brightness - when you're out in the sunshine, you need bright LEDs. Order them and test them out, but be ready to get something else if they're not as visible as you'd like. You know how to limit the current to 15 ma, right?

With all that extension cord, it's going to be a heavy setup. But, it'll be bulletproof and easy to build/understand.

Good luck,

/frank
 
I was doing more reading on the subject of LEDs and noticed that maybe a LED with only 15mA draw maybe not be bright enough?

Also, to be truthful, didn't realize about needing to add a resister to limit the current to match the LED so it doesn't burn out. I've taken a look at the math for figuring the resister size to.

So it looks like I would put the resister in the right direction and mount it between the power source and the LED?
 
Brightness will depend on the specific LED. There are plenty of LEDs available that are blindingly bright at much less than 15mA. But without anything resembling a part number it is impossible to tell how bright this particular lamp is.

An LED panel lamp that is rated for 12V will include a current limiting resistor suitable for that voltage.
 
I'll agree with UhClem - if they're sold as a dash lamp (as the listing indicates), they'll already have the dropping resistor, and you don't need to worry about it. My bad for bringing it up.
 
No problem, I had meant to ask that question and forgot.

I like the way the wires hook to this LED and I like the larger size of it. Guess I will have to be the Ginny Pig and give them a try.

So is there a danger that this LED might pass on to much voltage and fire the igniter?

Thanks
 

Attachments

  • image.jpg
    image.jpg
    55 KB · Views: 35
Last edited:
Go to ledcalc.com. It's a simple calculator where you put in the source voltage (your battery), the forward voltage of the LED, and the LED current. It spits our resistor values for you. Note it also works for multiple LED configurations, so set the calculator to 1 LED. This app also has good info on forward voltages for different color LEDS. I used a really big blue LED in one Estes controller because it fit the bulb opening very well, but it had a higher forward voltage, so be aware of this. Most LEDs should have info for forward voltage and current draw.

I've bought bare LEDS and installed them in several Estes controllers, with resistors for using the internal 6v power from AA batteries, and also using external battery clips to hook up to a 12V gel cell battery. No reason you could not use a 2S (7.4V) or 3S (11.1V) LiPo battery either. It just means you will need the appropriate resistor value.
 
Last edited:
So is there a danger that this LED might pass on to much voltage and fire the igniter?
Not if it has a built-in resistor. Try it the first time with no ignitor (short the ends of the wires). One of three things will happen: 1. Nothing, which means you don't have everything wired correctly, or perhaps you have the LED backwards 2. The LED pops and lets out the magic smoke. This means that it didn't have a resistor built in, and you should yell at the seller. 3. The LED lights up, and everythings happy.
 
Here is the Fire Buttons I'm looking at using, again 5/8" size mount hole. Here are the specs: - Cut hole size = 16 mm in diameter
- Stainless steel metal. Resists rust and corrosion
- Rated PI67 waterproof.
- Can be exposed to heavy rain, splashes, etc. without damage.
- Great to be used on boat horns, starter switches, and other applications
- Provides temporary activation of an electrical current
- Faceplate/Button Diameter: 18mm
- Operation Type: Momentary (Activates when pressed, deactivate when released)
- Max Switch Rating: 3A/250V AC
- Terminal Type: Screw
- Body Material: Stainless Steel
- Button Material: Stainless Steel
- Waterproof Rating: IP67 (may be fully submersed in water without damage)
- Operation Temperature: -20C to 55C

Any thoughts would be great!
3 amps is not a sufficient current rating. You will draw I = 12 / R ohms per igniter. If R~1 ohm, you will draw 12 amps when you push the button. Look for a switch rated for 20 amps at 12 Vdc.

Bob
 
Here is the door chime I'm looking at using. It's $10.99. I used it in my old control box. What I like about it is, it's rated at 12+ volts, and it chimes and don't buzz. Another thoughts would be great!
What is the current rating? If it's more than 20 ma, its' too much.\

Bob
 
Door chime specs: Typically used in car alarms, the 80dB Chime operates on 6-18VDC, carrying 125mA current at 12V. I've used one of these for years but was wondering about some other choices to look at.

I'm a little confused with Bob's post. A lot of people to include me have used the radio shack 2750011 push button switch also rated at 3 amps, 250vac for years with no problems in my case. The terminal blades on that switch are very thin and small as compared to the switch I mentioned above. With the 12amp math which seems high for Estes, Quest and Aerotech first fire igniters, but with me knowing for sure, just saying.

That brings up another question, how does amp rating needs compare to the speed of load from igniters during ignition?

They do make a 30amp version of the same switch, which would increase my cost to around four times more.

Thank you
 
Last edited:
Door chime specs: Typically used in car alarms, the 80dB Chime operates on 6-18VDC, carrying 125mA current at 12V. I've used one of these for years but was wondering about some other choices to look at.

I'm a little confused with Bob's post. A lot of people to include me have used the radio shack 2750011 push button switch also rated at 3 amps, 250vac for years with no problems in my case. The terminal blades on that switch are very thin and small as compared to the switch I mentioned above. With the 12amp math which seems high for Estes, Quest and Aerotech first fire igniters, but with me knowing for sure, just saying.

That brings up another question, how does amp rating needs compare to the speed of load from igniters during ignition?

They do make a 30amp version of the same switch, which would increase my cost to around four times more.

Thank you
Below are two piezo buzzers that draw 10 ma and 20 ma respectively. (They are current limited and can be used in series with any led without a current limiting resistor.) These can be used in series with any continuity circuit without worrying that the current might fire the igniters. 120 ma is enough current to trigger some igniters and flashbulbs.

https://www.allelectronics.com/make-a-store/item/sbz-417/12vdc-piezo-audio-alert/1.html

https://www.allelectronics.com/make-a-store/item/sbz-416/piezo-beeper-pulse-tone/1.html

The issue with using a 3 amp switch is the lifetime of the switch. Igniters have a resistance between 0.8 ohms (Estes) and 2 ohms (slightly higher than the Quest Q2G2). The current draw of the circuit I is V/R = 12/0.8 = 15 amps to 12/2 = 6 amps. Your switch will work, but it will not work for it's rated lifetime because the make/break currents exceed the 3 A current rating and that's what erodes the contacts with time. If you fire a few rockets every time you use it and you use it a dozen times a year, you may get years out of it. If it's gong to be a club launcher and launch several hundred rocket a day a dozen times a year, you'll get a few years out of the switch.

https://www.allelectronics.com/make-a-store/item/16bk-250/16/2-black-zip-cord-250-roll/1.html is a good price for 250' of 16 gauge zip cord.

Consider using red and black Anderson Connectors for the launcher connectors. Sexless high current connectors that are really cheap. Once you use them, you will not use anything else. https://www.andersonpower.com/us/en/products/powerpole/index.aspx Used on the Apollo/Soyuz program so no matter how things got wired up, they would mate and go together......

https://www.google.com/search?sourc...lz=1T4ADFA_enUS376US376&q=anderson+connectors

https://www.powerwerx.com/anderson-powerpoles/powerpole-sets/

https://www.powerwerx.com/anderson-...15-amp-red-black-anderson-powerpole-sets.html

https://www.powerwerx.com/anderson-...bonded-red-black-anderson-powerpole-sets.html

Bob
 
Thank for all the great information and the even more detailed math. Also the links to recommended parts.

The last launcher I built with all radio shack parts handled from 50 to 150 launches a year before I sold it thinking I don't really need it any more only to run into a need later with my present elementary school. We did 122 launches on June 2015.

I will give careful consideration to your advice.

Thank you once again!
 
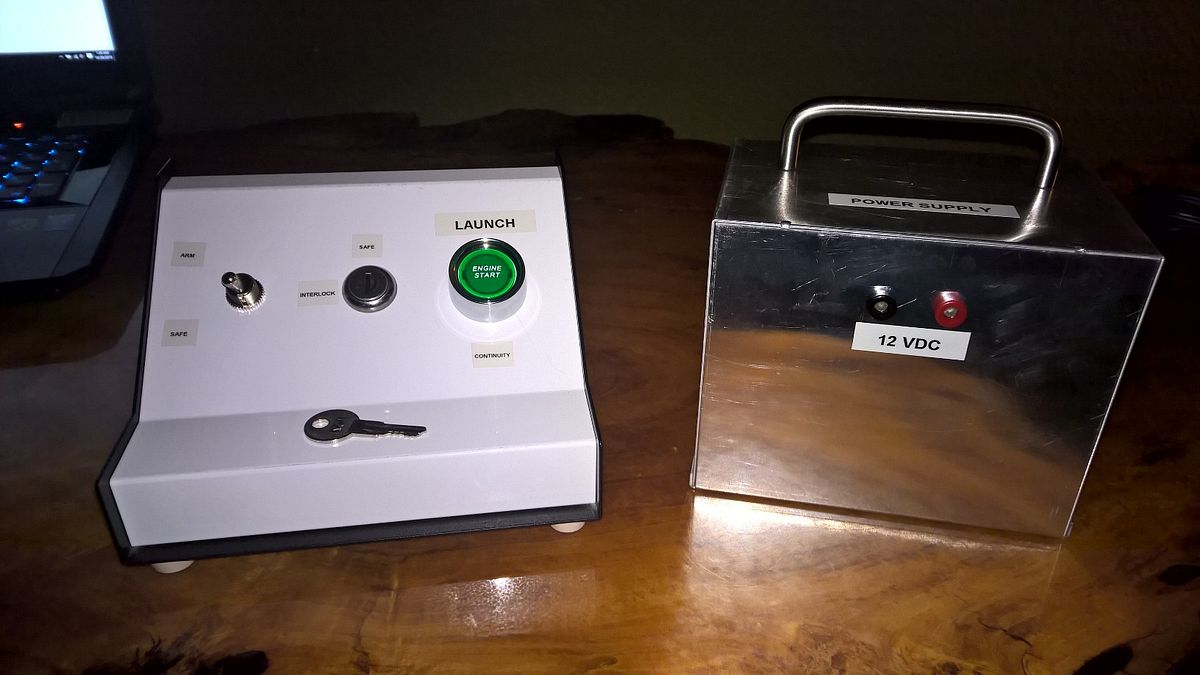
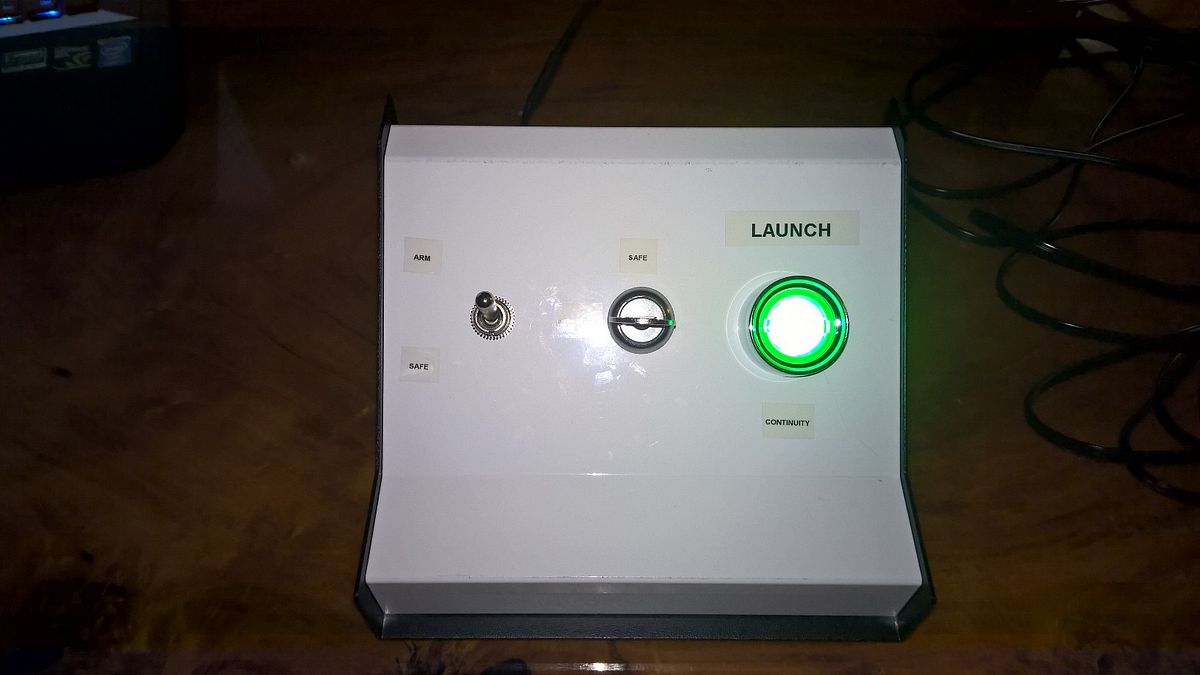
You could combine the Continuity light (LED) with the launch button. Here is the setup that I built. The Launch (Engine Start) push button switch is rated for 50A at 12VDC continuous. I'm going to be building a relayed version of it in the next 2-3 weeks. You will be fine if the forward current of the LED is 15 milliamps. I actually just read a report yesterday by a guy, on igniter testing for the purpose of determining safe current for continuity tests with various igniters to include Estes, Quest, Copperhead, etc. The range of current that caused the pyrogen on Estes igniters to flash was about 907 milliamps to 1.2 amps. The Quest was significantly lower being around 250 to 350 milliamps. He did do a bench test experiment on multiple of all of them to determine maximum safe continuity current. It's actually very informative and well done. I'll post a link to that article as well.

https://www.psc473.org/howto/Igniter.pdf


Last edited:
Thank for all the great information and the even more detailed math. Also the links to recommended parts.

The last launcher I built with all radio shack parts handled from 50 to 150 launches a year before I sold it thinking I don't really need it any more only to run into a need later with my present elementary school. We did 122 launches on June 2015.

I will give careful consideration to your advice.

Thank you once again!
For your number of launches per year, you'll be fine for a number of years. We use a momentary toggle switch rated ~20 amps for our club launcher and have replaced it twice IIRC in 15 years launching ~5000 rockets per year....which is about 30K+ launches per switch (not counting misfires, and tests).

Bob
 

Latest posts

Back
Top