First RocketPoxy Fillets

The Rocketry Forum

Help Support The Rocketry Forum:

This site may earn a commission from merchant affiliate links, including eBay, Amazon, and others.

kcobbva

Well-Known Member
TRF Supporter
Joined
Nov 8, 2015
Messages
1,401
Reaction score
78
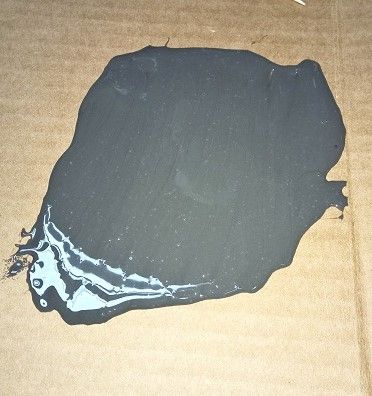
So after reading tons of threads on TRF, I did my first RocketPoxy fillets on my Tomach 2.6 fiberglass rocket today. I am curious if from these pictures anyone sees anything I've not done correctly or could do better. They appear good to me, but I've not gotten the "trained" eye yet; at least as trained as a majority of you.


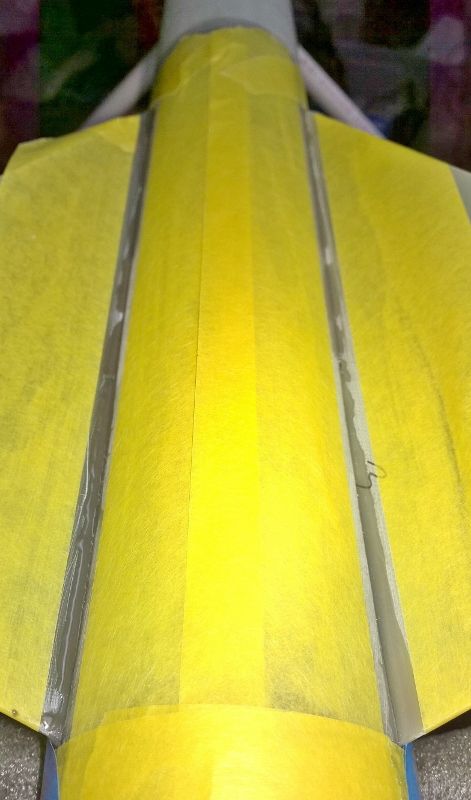
Anyway, here goes: masking prior to fillets. Tip one picked up of the threads!
WP_20151218_22_32_47_Pro%20471x800.jpg


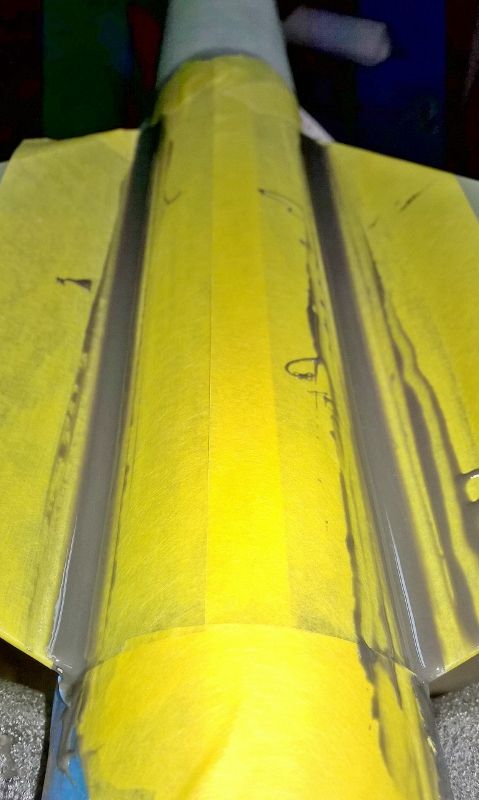
Using a Popsicle stick, drug out excess epoxy after about 20 minutes
WP_20151218_23_05_35_Pro%20479x800.jpg


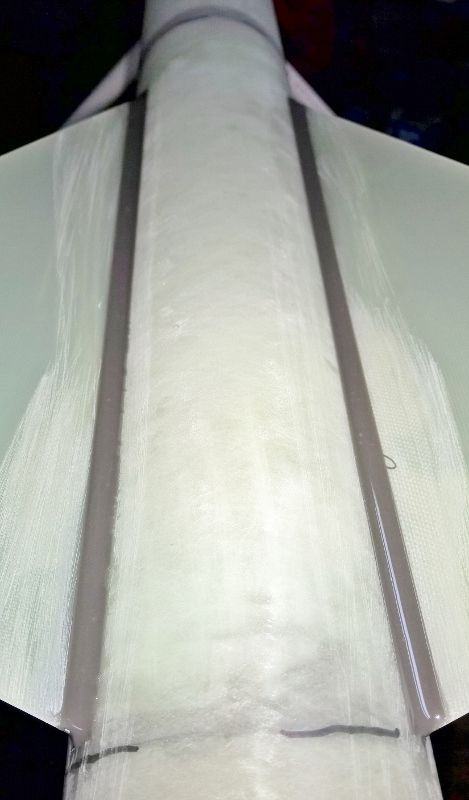
After another 10 minutes, I covered a small diameter PVC tube in Isopropyl Alcohol and drug across the fillets three times, then after another 20 minutes I removed the tape (Rear shot)
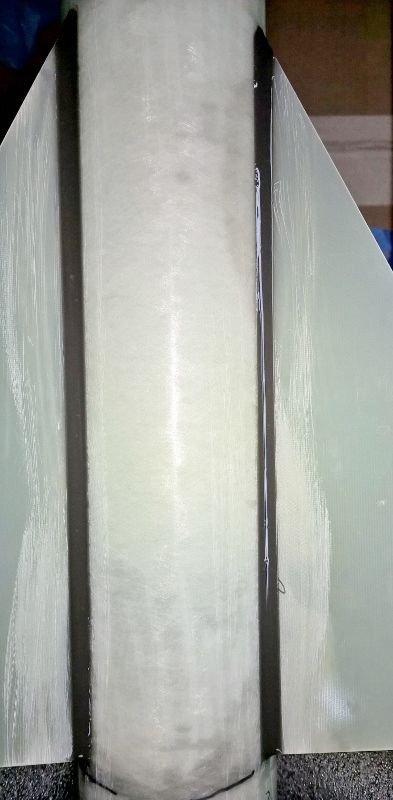
WP_20151218_23_19_45_Pro%20469x800.jpg


Top View
WP_20151218_23_21_45_Pro%20393x800.jpg


I'm open to any suggestions, criticism, anything as I'm always learning and wanting to do better! Thanks!

Kevin
 
Did you tape over the areas that did not need filleting?
 
thanks. I appreciate that. definitely trying, and thanks to this board, doing a whole lot better than I have in the past. Always used Fix-it epoxy; but after the discussions of that being brittle later on, I'm branching out.
 
The fillets look great!

Thanks. Also gotta say I'm so glad we have RTF. I'm aching to keep going, but I have to let the epoxy firm up. So I mix, come back and read some threads. Lay it out, come back and read more threads. initially form, then read some more threads. Waiting now to use the pvc. I don't want to rush, but I just enjoy doing it! So glad we have RTF to keep us occupied during times like this!
 
They look fine, so if it works for you, keep doing it. I will say that the 20+10+20 = 50 minutes before pulling the tape seems like a long time to me. Did you have any problems with the epoxy pulling up with the tape? The first time I used RocketPoxy (RP) I mixed it up and let it sit for 20 minutes. Then I applied the RP to the rocket and let it sit for 5 more minutes. Then I used an alcohol soaked Popsicle stick to draw out the fillets. There were a couple of air bubbles so I poked those with a toothpick. I waited 5 more minutes and pulled the tape. Some of the RP from the fillets came up with the tape. Also, the air bubbles I popped didn't really seal back up well.

After that I decided to reduce my times. I now mix and let it sit for 10 minutes, then I apply the fillets. I let it sit for 5 minutes after applying it to the rocket to let it fill down into the corners, then I pull the fillets. If there's any air bubbles I pop them, then I immediately pull the tape. By doing it a little sooner, the bubbles fill back in better after I pop them, and the RP doesn't stick to the tape. Also, since the RP hasn't completely set up yet, it has a chance to smooth out a little where the tape line was. Even though I'm doing it a little quicker now, I don't seem to have any problems with it running out the back or front of the fins.

Also, I don't really think that drawing the fillet out more than once does much for you. I just do it one time and I go slow. Again, everyone's techniques are a little different and the key is find out what works best for you.
 
Last edited:
So I guess I may have made nice fillets; but I'm ashamed to say I definitely lost focus! When it was all said and done I went back to fin alignment and I totally messed up. I thought I'd been very diligent in checking everything so I'm not sure where I missed this; although I didn't have a good guide other than the Estes yellow fin alignment jig. I'd measured but...nuts!

Am I done here? Here's a drawing of what I found
badfinalignment.jpg

that won't matter at all as long as the fins are straight in line with the body tube.
 
Fin alignment is most important along the longitudinal axis of the rocket, not so much with the perpendicular axis. Since your rocket has fin slots and through the wall construction, the important alignment (longitudinal) will be good as long as the slots were cut strait. Good choice of epoxy too, I use Rocketpoxy for most of my builds. One tip I will give you though, if you spread it out on a piece of cardboard nice and thin, like frosting a cake, most of the bubbles will disappear. I describe this process in my latest build thread here:
https://www.rocketryforum.com/showthread.php?130487-Wayco-s-RW-Mongoose-54-build
Madcow makes great kits, and your first fillets look great. Don't worry, be happy, and enjoy!

Like this?
smooth.jpg


I found your thread two days ago and absolutely used that. after mixing in the bowel, I poured it out and spread it out. This picture was just after spreading. I found after 5 minutes 90% of the bubbles were gone! Thanks after the fact for great advice!!
 
I always create a fin guide and use it to initially glue the root in place.

https://www.payloadbay.com/index.php?page=Tools&action=FINGUIDES

Once dry I can then handle without any fear of messing up the alignment. It's pretty much fool proof way to set your alignment correctly. Here's proof that it works
[video]https://youtu.be/NOh5KL_NYXo[/video]

Thanks. AFTER making my mistakes, I found a thread pointing out the payloadbay site today. I WILL be using this for my Level-2 rocket and all future rockets!! I appreciate that advice as well as it appears to be 100% better than what I'd done previously!

Wow. That rocket goes absolutely STRAIGHT! I'd be scared to post mine with that alignment. I might make everyone SICK! :) Well done!!
 
I love the payload bay fin guides and ond other tools, I print them out label them and glue them to 1/4" foam board . Making sure to cut the joint between the fin and airframe enough to clear the glue at the root edge.
 
Like this?
smooth.jpg


I found your thread two days ago and absolutely used that. after mixing in the bowel, I poured it out and spread it out. This picture was just after spreading. I found after 5 minutes 90% of the bubbles were gone! Thanks after the fact for great advice!!


If you just mix on the cardboard....forget about bowel/cup, there will be even fewer bubbles to deal with.
Just lay out 2 equal lines of resin & hardener, add equal drops of color to each.
Almost [close enough] as accurate as weighing.
Then combine and mix to a uniform color without streaks and your done!
 
I love the payload bay fin guides and ond other tools, I print them out label them and glue them to 1/4" foam board . Making sure to cut the joint between the fin and airframe enough to clear the glue at the root edge.

Rich - I think this is a great idea and one that I will replicate! So the joint you mention, just take a 1/4" triangle cut at the end of each finally so it initial epoxy wont touch while the guide remains firm on the fins, right? Then put a hole at the top and stick them on the wall as made for an eventual collection of pre-made jigs. I am definitely doing this!
 
If you just mix on the cardboard....forget about bowel/cup, there will be even fewer bubbles to deal with.
Just lay out 2 equal lines of resin & hardener, add equal drops of color to each.
Almost [close enough] as accurate as weighing.
Then combine and mix to a uniform color without streaks and your done!

Is it mixing in the cup, or just the mixing process itself that creates the bubbles. I thought it was the latter.
 
Rich - I think this is a great idea and one that I will replicate! So the joint you mention, just take a 1/4" triangle cut at the end of each finally so it initial epoxy wont touch while the guide remains firm on the fins, right? Then put a hole at the top and stick them on the wall as made for an eventual collection of pre-made jigs. I am definitely doing this!

Pretty much that how I modify my finguides.

As for the bubbles in the epoxy, by mixing on a flat surface you also pop more of them as you mix.
 
I think I read somewhere on here, that using a tin pan to mix was advisable. Now that mixing on a flat surface is advisable, maybe that's a better alternative than a box, for clean up and reuse. Granted I got my fair share of black Friday boxes, but they are starting to disappear after each use.

Thanks for all the pointers, and setting me at ease about the fin offset!!
Kevin
 
I lay out the 2 parts of epoxy on a piece of cardboard than mix very well and let it set for 10-15 minutes than start doing the fillets. Most of the time I have no air bubbles. I do pull tape after I swipe the fillet. It might be the way I do it but if I let epoxy set to pull the tap the epoxy seems to pull up.
 
I just did my first Rocketpoxy fillets and I got to say Im impressed. I had never done colored fillets
before unless you count black, but these yellow fillets look kinda cool. I cant wait to see some of the
red or yellow fillets on a black rocket. Lots of different color patterns to choose from.
I choose the yellow for this rocket just because I wanted to do something other than black.
GEDC0030.jpgGEDC0042.jpgGEDC0043.jpgkorop.jpg
 

Latest posts

Back
Top