Binder Design Exocet

The Rocketry Forum

Help Support The Rocketry Forum:

This site may earn a commission from merchant affiliate links, including eBay, Amazon, and others.
Haven't stopped work on the Exocet and probably will move over into a more formal thread at a later date, but a couple quick items. I have decided to laminate the body so cannot finish final base shape on the nose cone as of yet, but am getting closer. Also just today in doing other laminating was able to get a nice swatch of 8.5oz Kevlar inside the shoulder and extending into the main nose area. Since this nose cone is an "antique" originally built as a proto from Scotglas, it look likes they had to do quite a bit of "rework" with a flapwheel to get the O.D. to match the I.D. of a 4" tube. In any case, the shoulder seemed thin in a number of patches. Adding the Kevlar makes me feel more confident as, 1) this small NC weighs almost 2 lbs, and 2) all my dual-deploy electronics will be resident right here utilizing a Defy Gravity tether/d-bag and the APE Engineering av-sled setup so last thing I want to see is a crack on landing or some other "negative event."

IMG_2350.jpg IMG_2351.jpg

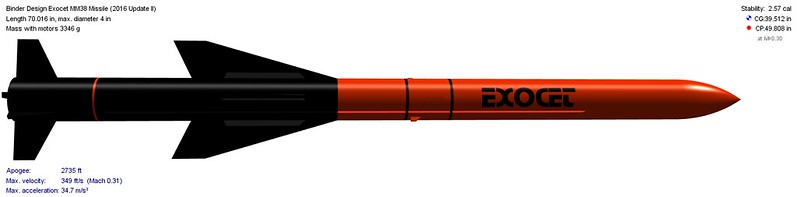
Oh, and finally, although considering the vinyl provided by Mike that came with the rocket, I decided to find a more true scale version of the markings. Mark Hayes was nice enough supply my request and to work with me in getting the "ball" logo just right.

IMG_2352.jpg
 
Last edited:
Here's a pic of the fins...let me know if you also need rings; however I'm figuring that one isn't necessary. :)

Ok... Now I'm re-doing the .ork file to correct the missing conduits, and the add decals to it. As I was working it, I noticed that the parts list says that it shipped with 4 centering rings, but the instructions clearly only show 3. Does anybody want to confirm one, or the other (or perhaps both (e.g. different variants)). I'd also like to verify CR and fin thicknesses

Thanks!
Jim

I can only speak to what Mike shipped me. It was a special OOP kitting, so not sure what is standard. I got four, of what I believe are 3/16" ply CRs, and 1/4" fins made from his super high-quality aircraft ply. He also included a full length MMT so I can cut to fit as I choose.
 
Last edited:
I can only speak to what Mike shipped me. It was a special OOP kitting, so not sure what is standard. I got four, of what I believe are 3/16" ply CRs, and 1/4" fins made from his super high-quality aircraft ply. He also included a full length MMT so I can cut to fit as I choose.

Thanks for the info!

Did your instructions match the ones that were posted in this thread earlier, or was it updated to show the additional CR and fin thicknesses?

Thanks Again!
Jim
 
Matched the instructions. But I believe those instructions were done by Scott Binder many moons ago. As Mike was assembling he likely saw a gap or two that he simply filled.
 
I just threw in extras. I may have included a thrust ring too. Can't remember.

Funny story about the thrust rings.....I started throwing these in for free for all of our older kits. I started having a ton of angry customers contacting me saying that I cut one of their rings to the wrong size and could I please send a new one out. So I did this on my dime, even several international shipments which cost me a bit of money. Then it dawned on me....they were referring to the free thrust ring! Doing people a favor really ended up costing me a bit of money.

Sometimes I'm my own worst enemy.
 
Thanks for the info about the extra CRs and maybe the TRs Mike.

Here's what I came up with so far... I'm calling it the 2015 Revision to differentiate it from the one based on the March 1996 instructions.


Now that I've heard about the possible thrust ring, I realize that I may have the back end all wrong.


I've been honing my skills in OR, and now am getting the hang of the decals, so I've stopped using Internal Body Tubes to sim bands of color on the rockets. If I could only figure out what the font was for that "EXOCET" decal was, I'd include that too.
 

Attachments

  • Binder Design Exocet MM38 Missile (2015 Revision).ork
    5.5 KB · Views: 41
Based on what I know of Mike's kits, I've re-worked the 2015 revision into what I think a Re-Release of the Exocet would be issued as. Basically, the forward Body tube gets shortened by 5mm, and everything gets shifted back 5mm (or so).

[EDIT] Image below has been with one that has a yellow arrow pointing to the "slight orange band" mentioned below. I now know how to correct that.


It would be ever so slightly heavier (longer fin tabs, and the thrust ring), but indistinguishable from the 2015 version I cooked up, except when viewed from the back end.
The slight orange band right next to the actual rear of the rocket is an artifact from OR, and obviously wouldn't exist on the real thing.

View attachment Binder Design Exocet MM38 Missile (2016 Update).ork
 
Last edited:
The slight orange band right next to the actual rear of the rocket is an artifact from OR, and obviously wouldn't exist on the real thing.

I went into the OR file to see what was up, and realized I don't know what orange band you're talking about. The one orange band I see is the one between the two fin sets, and that is part of the decal, so it's clearly intentional.

One thing you should change is to set the "Repeat" option to "Clamp Edge Pixels". That'll get rid of the fine black line between the two body tubes. I'm going to add a post (soon) to the decal tutorial to explain the function of the different "Repeat" options, but for what you're doing "Clamp Edge Pixels" will usually be the correct choice.
 
Nice. What weight of fiberglass did you use and which brand of epoxy did you go with?

Single layer 5.7 oz with my standard US Composites 635/medium resin-hardener combo.

BTW, just repeating, not done for strength. The aircraft ply that Mike Fisher is shipping with his kits is extremely nice. He can give you the details, but a 1/4" piece looks like it has 9 or more plies.
 
Single layer 5.7 oz with my standard US Composites 635/medium resin-hardener combo.

BTW, just repeating, not done for strength. The aircraft ply that Mike Fisher is shipping with his kits is extremely nice. He can give you the details, but a 1/4" piece looks like it has 9 or more plies.

IIRC he said he uses 12 ply for the fins.
 
Single layer 5.7 oz with my standard US Composites 635/medium resin-hardener combo.

BTW, just repeating, not done for strength. The aircraft ply that Mike Fisher is shipping with his kits is extremely nice. He can give you the details, but a 1/4" piece looks like it has 9 or more plies.

Cool, thanks.
 
Ok... Mike remembered the font used... I've updated the 2016 version to include this. Also managed to adjust the locations of the black bands to something that more closely matches the instructions's locations.


Thanks Mike!

[EDIT] I missed neal_w's advice on "Clamping Edge Pixels" until after this post was made. Changing that eliminated the very thin band of black at the joint of the two body tubes, and the very very faint orange one at the back of the fin can.
 

Attachments

  • Binder Design Exocet MM38 Missile (2016 Update).ork
    12 KB · Views: 41
Last edited:
Whada ya kno, a bit a progress on the Exocet with fins tacked into booster and internal fillets comin' up!

ImageUploadedByRocketry Forum1456624215.255252.jpg
 
Completed the internal fillets and installed the t-nuts for the railbuttons. The booster on this thing is definitely top heavy with the large forward fins. Building this type of rocket before (my L3), you have to be cognizant of forward airframe strength as the boosters tend to rotate, even flip, upon landing. I decided to move to a closed coupler forward termination on the booster. To help in this area I laminated the inside of the coupler and have two short pieces of all thread back into the fore CR on the MMT. This helps to distribute the load on the forward most bulkhead which I didn't want to leave alone to take the brunt of the heavy booster and spent motor during recovery. In addition, I rethought the av-bay. The nosecone on this thing is very short, and although the electronics would fit, I don't feel comfortable putting sampling ports in such a short nosecone. Thus I am moving to an embedded av-bay that will be glued into the payload airframe with removable bulkheads (akin to Polecat's typical setup but without any of the bay exposed). I think all this will become more obvious as I post build pics. In the meantime, below is the updated Rocksim snapshot. Note that compared to K'tesh's post (#105) which reflects the dimensions of the original prototype, my build is some 8" shorter to more closely match the actual rocket in scale. This shortening is primarily in the payload length and is easily accommodated given the av-bay's forward position (extra fore weight). Oh, and decided not to take off any span on the rear fins. Visually amounted to very little change removing the 0.3" or so and wanted to err on the side of stability. As you can see, I'm a sport scale builder vs true scale builder (per my comments over here).

Exocet_Binder4_v4.jpg
 
Last edited:
Well got a little ahead of myself on the airframe. Lots of little attachments needed--strakes, triplers, conduits, vents, etc. After measuring two or three times and checking drawings, I made my cuts. Some were harder than others like cutting the triplers in half lengthwise. (Note these changes are not due to the proto kit or the way Mike Fisher cut/assembled parts, but due to my adjustment of length to get closer to scale and the way I changed my build plan). Anyway, now all the pieces are there and I can move on to external fillets. I will make these small so as not to detract from the scale look of the overall rocket. I still have to cut two coupler plates for the AV-bay as designed and I am almost done with reshaping the nosecone (YEAH!) where all of this started.

ImageUploadedByRocketry Forum1457873403.301610.jpg
 
Last edited:
Well got a little ahead of myself on the airframe. Lots of little attachments needed--strakes, triplers, conduits, vents, etc. After measuring two or three times and checking drawings, I made my cuts. Some were harder than others like cutting the triplers in half lengthwise. (Note these changes are not due to the proto kit or the way Mike Fisher cut/assembled parts, but due to my adjustment of length to get closer to scale and the way I changed my build plan). Anyway, now all the pieces are there and I can move on to external fillets. I will make these small so as not to detract from the scale look of the overall rocket. I still have to cut two coupler plates for the AV-bay as designed and I am almost done with reshaping the nosecone (YEAH!) where all of this started.

View attachment 284848

It's coming along nicely Tim.
 
It's coming along nicely Tim.

I'll second that!
huge-thumbs-up-smiley-emoticon.gif
 
Thanks guys.

First shot of filler-primer on the NC. Not yet perfect, but shaping up nicely. No longer a Hershey's kiss shape. Took multiple layers of fiberglass plus another four layers of Super-Fil to get it to this spot.

IMG_2666.jpg
 
It took way longer than expected, but the nose cone is finally done. In the end it came down to me rotating the nose with one hand while using the palm of the other to feel the exact shape to identify any flat spots or undulations. I'm sure it isn't perfect, but much closer to pictures of the real rocket vs the TLP and Estes kit versions.

ImageUploadedByRocketry Forum1459031845.425284.jpg
 
It took way longer than expected, but the nose cone is finally done. In the end it came down to me rotating the nose with one hand while using the palm of the other to feel the exact shape to identify any flat spots or undulations. I'm sure it isn't perfect, but much closer to pictures of the real rocket vs the TLP and Estes kit versions.

attachment.php


Looking good! Now, get that into the paint barn. :D
 
I would love another BDR Exocet rocket kit. I certified level 2 with one years ago on a J-90W. That was the perfect motor for that kit.

Cool to hear that there are still some out there. We have no plans to bring the exocet back into production. Scale kits have always been our poorest sellers.
 
AND I SCORE ONE!!! Perhaps the *VERY* same kit I found in Tammie's Hobbies all those years ago.

61652503_10158602233098696_6301080729652559872_n.jpg

Photo credit: Josh (Outfielder) Stanley

I was on FB, and Josh (Outfielder) Stanley posted that he had scored one at an estate sale. I commented on it, and he offered it to me. You bet I snatched it up! He's in Oregon, and my mom was up visiting my niece for her 18th birthday (and graduation), and happened to be passing through his town on the way home. She's home with it now, and I should have photos soon.

Contacted Scott Binder, and determined that this was one of the dozen or so that he made before Mike bought Binder Design. It one of the very few that came with a fiberglass nosecone.

My plans are to build it to modern Binder Design building standards (read adding a thrust plate), I also might add in an AV bay and a baffle, and I'm thinking about using a Starlite coating for flame protection. Hmmm... Perhaps I should add a gyroscope, and (single) party snap "warhead".
s-l300.jpg


How's that for reviving a Zombie Thread?
 
Last edited:

Latest posts

Back
Top