My newest paint...can you guess what it is?

The Rocketry Forum

Help Support The Rocketry Forum:

This site may earn a commission from merchant affiliate links, including eBay, Amazon, and others.
Sorry for the long wait...this one is my SMP (Slow Moving Project). I'm guessing it's no longer "my newest paint". :wink:

I had shelved it for a while since the blue tape I had used on the beak and some other areas had started lifting up the paint as I tried to remove it. One of those :facepalm: moments. Well, being sick at home while on vacation, I decided I should try to start up this puppy again...time to face my fears.

I figured I'd continue with the rest first since it was already masked. I was divided on whether I should bother with the bit of orange on the edge of the feathers, but finally decided that if it's worth the effort, it's worth the effort to do it right. I then masked, laid down the orange, more masking, laid down the blue, more masking, laid down the black. With each color, I was worried the paint would not react well (bubbling, wrinkling or orange peeling); however I was lucky and didn't really get that.

2016-07-07%2012.28.45_1.jpg


2016-07-07%2018.03.14_1.jpg
 
I then started removing the many layers of tape and paper. Funny thing is that I had something like 4 different types of tape on there. Of note is some blue tape that stuck really well...so well it likely was the cause of the paint lifting off and also some Scotch Blue 2080EL low tack professional tape I had gotten for making motors and figured it was lower tack and would be better (however that one seemed to mar the finish of the paint...maybe I didn't let it dry long enough - no matter, it's going to get a clear coat.

Sorry, no pics of the removing the tape...it was a private moment. :wink:
 
Well, here's the reveal. It looks pretty good at first, but there's many small places that will need touching up and additionally, there's a lot of yellow paint lifted off where it meets the red. There's also some white paint lifted off the bottom where it meets the blue.

2016-07-08%2011.26.52.jpg


2016-07-08%2011.26.32.jpg


I decided to assemble it and see how it looks even though it still needs some decals added. Looks pretty good. However this rocket is longer than it looks to me...I managed to jab the ceiling with it and also it fell over while I was trying to take a pic of it on my dock (excuse the ugly dock...overdue for stain).

2016-07-08%2011.45.41.jpg


2016-07-08%2011.46.51.jpg


I'll have to shelve this again for a bit, but I promise to finish it this year. :)
 
Ken what I found that helps with the tape from being so sticky. I would clean the glass on my coffee table real good, then I would take my tape and stick it to the glass before I would apply it to my work that I was taping off. It would just remove some of that glue from the tape and make it less sticky.
 
Holy crap that is impressive. You definitely take the award for the most complex masking job. Well done.
 
Ken what I found that helps with the tape from being so sticky. I would clean the glass on my coffee table real good, then I would take my tape and stick it to the glass before I would apply it to my work that I was taping off. It would just remove some of that glue from the tape and make it less sticky.

Thanks for the tip! I didn't think the blue tape stuck so much at first; however it seems to have sealed down more over time, which I didn't expect. I recall a house painter once telling me that they're really meant to be removed after a few hours.
 
One strange thing I found with the Scotch Blue 2080EL tape is that while it lifted off fairly easily, it would leave little bits of blue specks behind. The specks appear to be adhesive; however they were somewhat hard and had to be scratched/scraped off. Very unusual to me and I don't think I'll use it again to mask for spraying paint.

Also forgot to note I used Rusto 2X sprays on this one...my favorite paint to date.
 
Ken,,
That just came out insane man..
Kudos to you, what a cool paint job..
Halfway through this thread this reminded me of my
favorite cartoon when I was young,, probably about 4..
"Speed Racer"...
That's also how long it's been since I've seen Greenwood lake,
A vacation spot my family went to when I was little. ..
What a blast from the past and a fantastic paint / tape job...
Thanks everybody,, lol....

Teddy
 
Wow! Blast from the past! I had nearly forgotten about that cartoon, but as I recall it was also one of my favorites at the time (maybe 12'ish years old). You really did an outstanding job in replicating the color scheme. Congratulations :clap:. In the future, for masking, you may want to look into the Tamiya Tape (https://www.tamiyausa.com/items/pai...supplies-62000/masking-tape-refill-18mm-87035) used in the plastic modeling world. It's paper tape engineered specifically for paint masking and comes in rolls of various widths for use on models. It is the best I've used for this kind of work.
 
Thanks guys! :)

Ken,,
That just came out insane man..
Kudos to you, what a cool paint job..
Halfway through this thread this reminded me of my
favorite cartoon when I was young,, probably about 4..
"Speed Racer"...
That's also how long it's been since I've seen Greenwood lake,
A vacation spot my family went to when I was little. ..
What a blast from the past and a fantastic paint / tape job...
Thanks everybody,, lol....

Teddy

Yes, SpeedRacer was also one of my favorites; however the reception and timing of the show often wasn't that good for me. Ah...days of aerial antennas, 7 channels with only about 5 that work well (of which two were PBS or similar). While I do miss those cool cartoon memories, boy, don't I miss the "tech" from those days. :wink:

Wow! Blast from the past! I had nearly forgotten about that cartoon, but as I recall it was also one of my favorites at the time (maybe 12'ish years old). You really did an outstanding job in replicating the color scheme. Congratulations :clap:. In the future, for masking, you may want to look into the Tamiya Tape (https://www.tamiyausa.com/items/pai...supplies-62000/masking-tape-refill-18mm-87035) used in the plastic modeling world. It's paper tape engineered specifically for paint masking and comes in rolls of various widths for use on models. It is the best I've used for this kind of work.

I've built many models in the past (including much Tamiya), but strangely have only used Tamiya tape on rare occasion...this is because I found the cheaper stuff works to my level of satisfaction (including scotch tape for serious small scale fine detail work); however in this case I think it was more the plastic in the nose cone...from what I've heard, it doesn't take to paint so well and also is too soft, resulting in the paint often flaking off. If I can't rescue what's left of the yellow portion (maybe brushing it on will re-adhere the paint to the surface?), I may sand it off and try one of those plastic fusion type sprays.
 
Wow. Just wow! That's awesome! I've never attempted such a complex paint job. I don't have the eye/brain/hands for it.

Thanks Marc! Actually it may not be as complicated as it seems...it's more being patient and careful on each step. In fact, I just realized I should detail the steps since this is the Techniques thread.
 
Last edited:
Here's some detail on how I did this...

1) First off, I found the image/design I wanted to duplicate. Finding something to copy makes things easier than designing from scratch and in this case I was planning on copying anyway. Since I had found the kit, I figured I could either make a copy of the box art and enlarge it to size and use that as a template or...

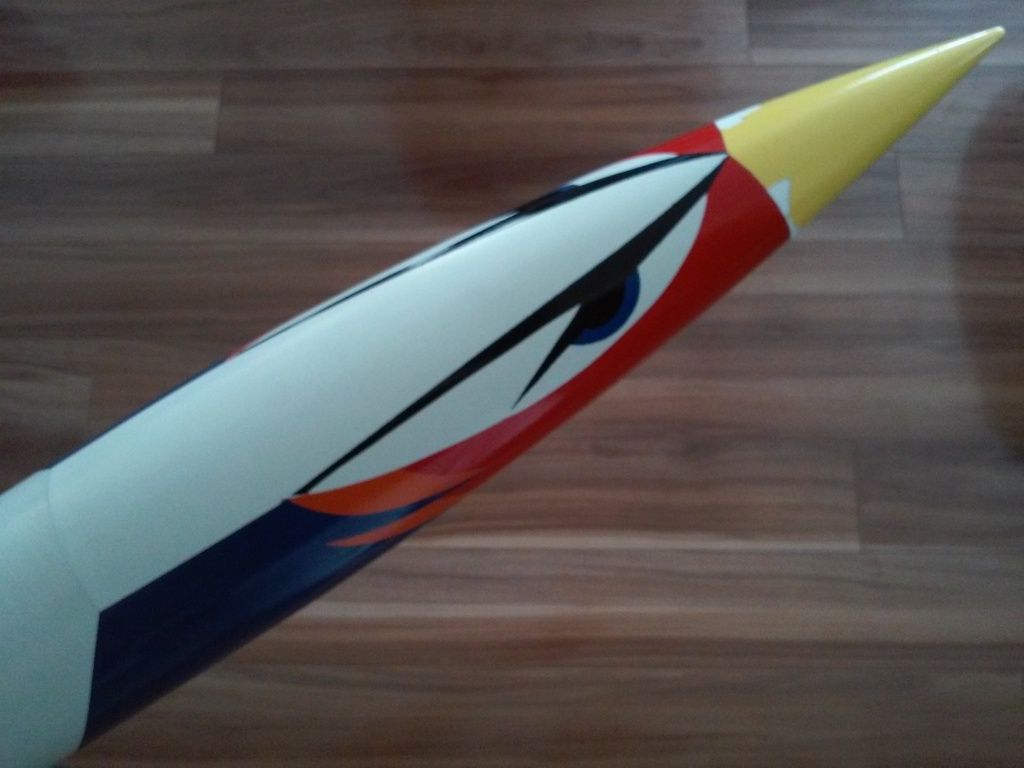
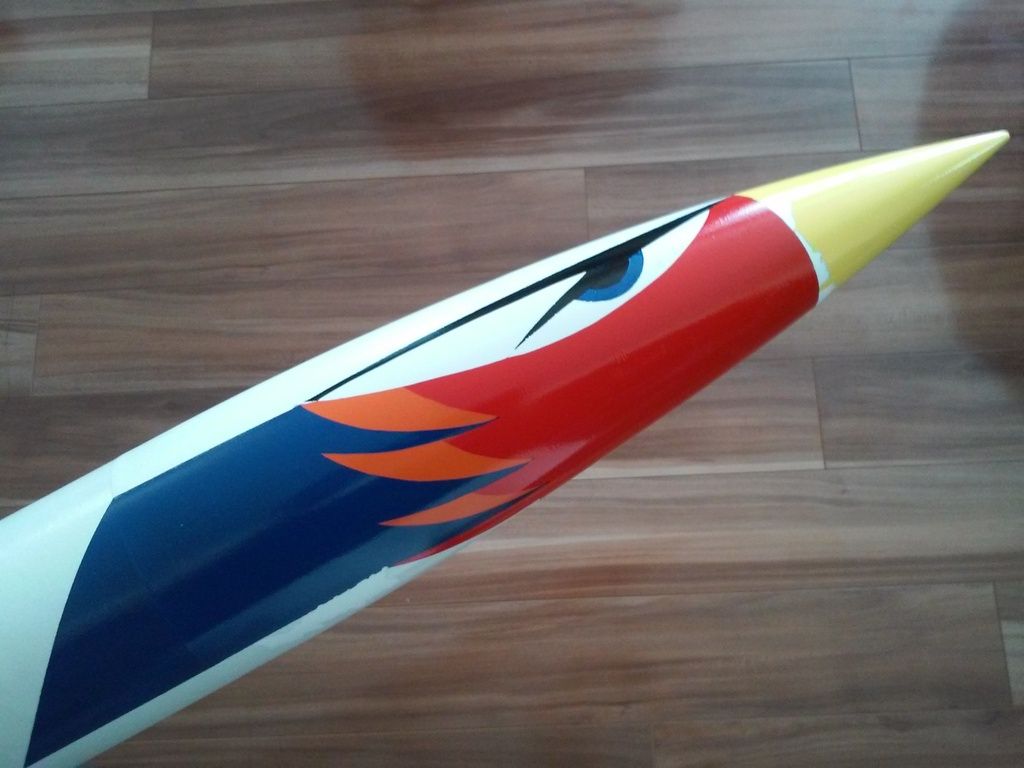
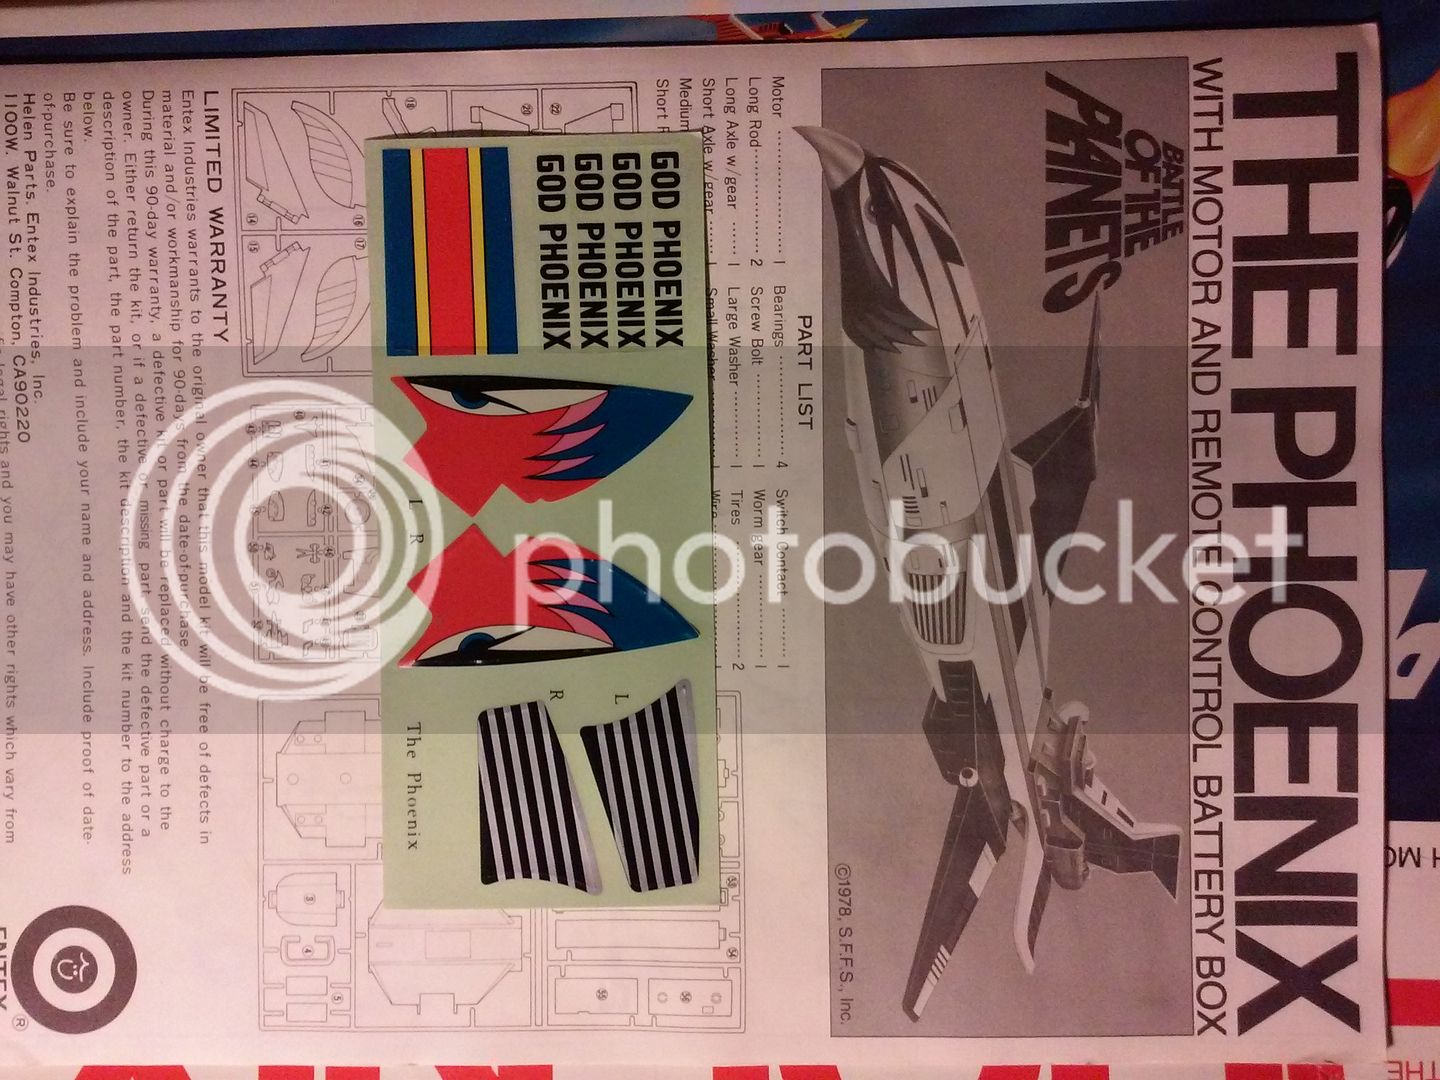
1A) Find the kit and copy the decals! I was in luck since I had great interest in the kit after finding out it was the same as the one I built as a child and even luckier, I found on on Ebay for a low Buy It Now price (half of what others were charging...quite a steal!). Here's a pic of the decals as it comes from this circa 1979 kit:

2016-07-09%2019.47.34.jpg


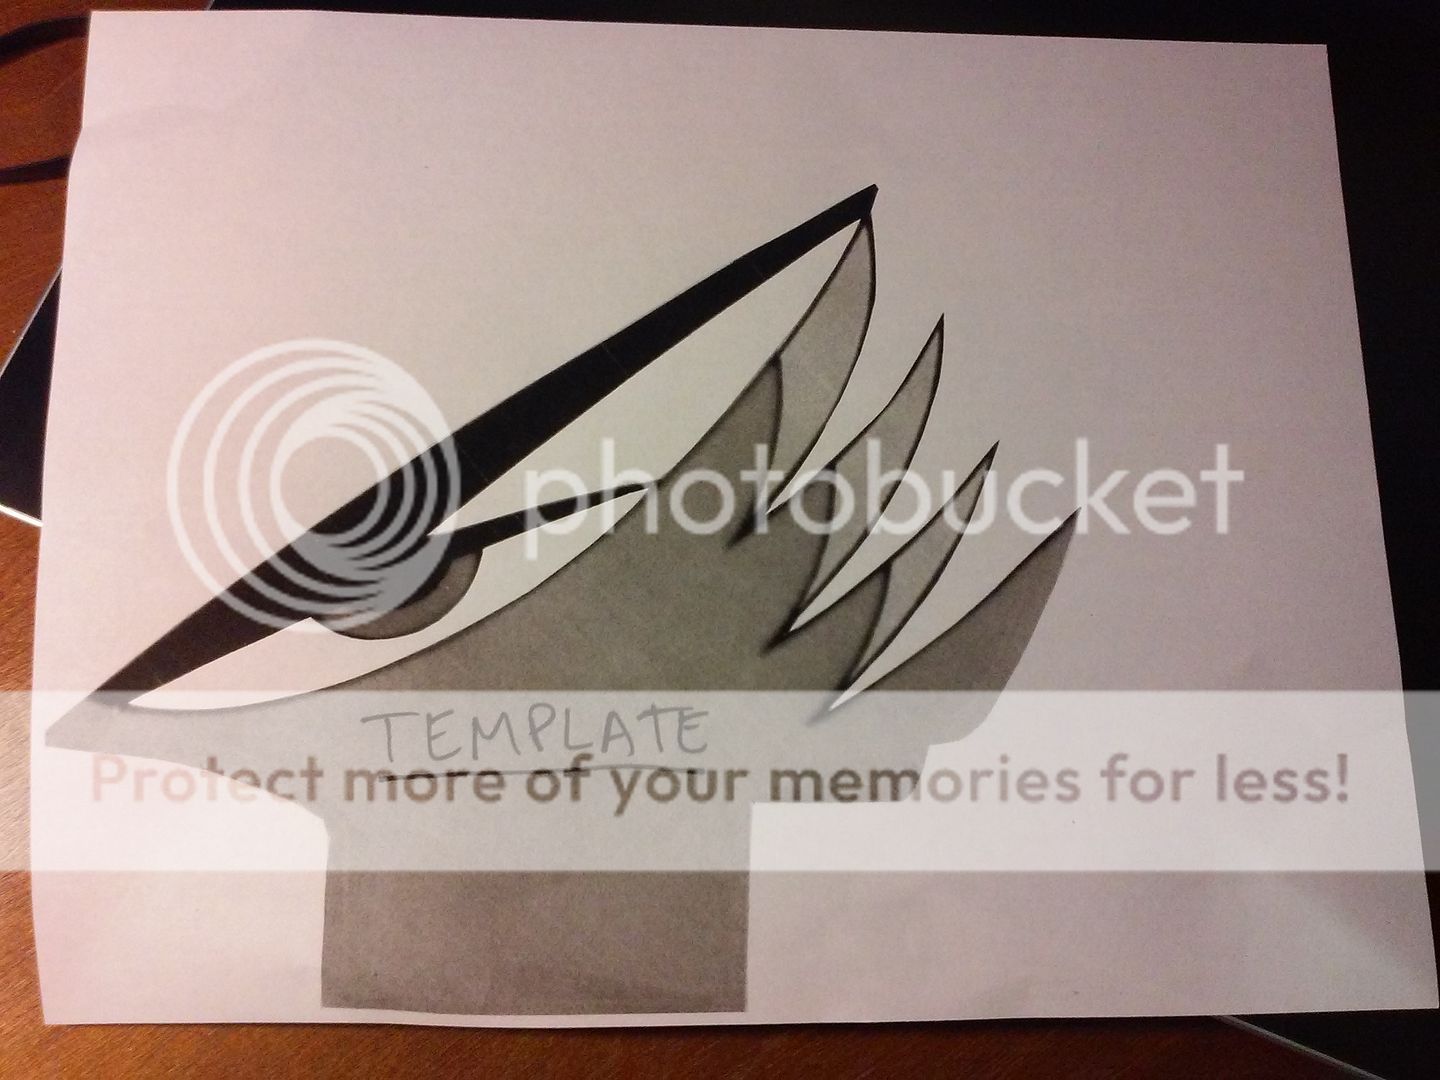
2) I then scanned the image, enlarged it to the right size and printed out (showing one of the two sides):

2016-07-09%2020.27.55.jpg


3) I then cut them both out, taped them together and checked it against the nose cone to see how it fits and how it looks.

4) Once I felt it looked good and it was the right size, I cut one of the templates out - all white areas were removed with an X-acto knife (I only needed to do this once since I can later flip that one over to use for the other side).

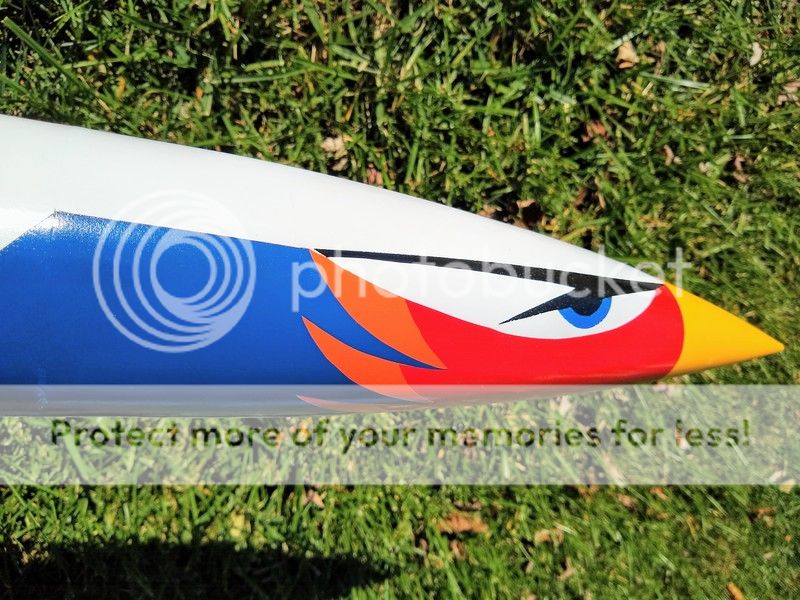
5) Then I laid the cut template over the nose cone and using a pencil, made reference marks in different places (ex. corner of the eye, tips of the feathers) so that I would have markings to tell me where to lay the masks.

6) This is the trickiest part...you'll have to preplan your colors and what parts need to be separate masks. I had a base of white, so it was a bit easier since I knew I had to have a separate mask for anything left white. I knew I wanted the brows black, so that had to be separate as well. The feathers I wasn't sure about, so I left them as one piece, figuring I could cut them later if I decided I wanted to. Sorry, no pics from here on, but you might be able to see some of the maskings by looking at the earlier pics.

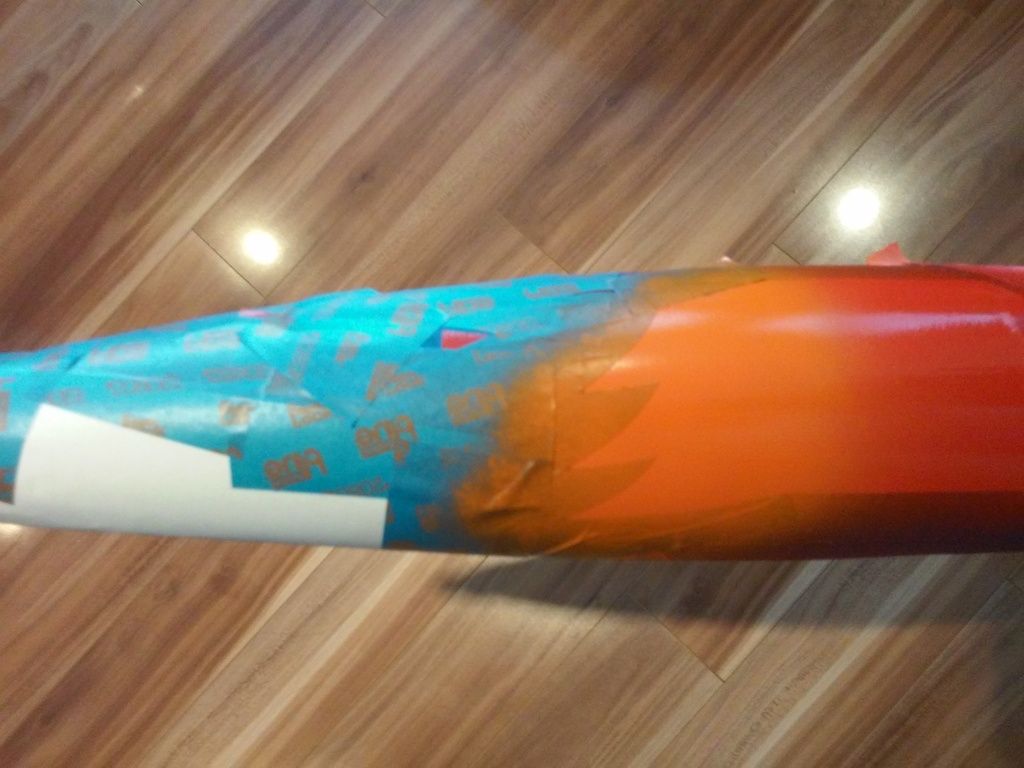
7) Next I laid down strips of blue tape onto a cutting mat with a very slight (1/16") overlap. Once it was enough for the template, I traced the design onto the masking tape and then cut it out using an X-acto knife. I did this once for one side, then flipped the template over and repeated for the other side.

8) Using the reference pencil marks, I laid down the masking tape pattern on the nose cone. This was the time consuming and tricky part, but it just takes patience and making sure you don't go sticky-nuts. I was also mindful of the order and colors I would be painting...generally go from light to dark since in this case I'd be overlapping paint and dark covers light much better than the other way around. I ended up painting these colors in this order: White, Red, Orange (decided to use later on, but ideally would've been before red; however it's close enough to red to not be a big isse), Blue, Black. I also made sure to always second check before continuing/painting since a mistake is very hard to fix if you lay down the wrong color in the wrong place or paint some area you shouldn't have.

9) Made sure to rub down all the edges. This one is very important! An edge that isn't fully down may allow paint spray/drips underneath and extra time spent burnishing down the edges is much better than time spent sanding off extra paint spray and re-spraying color(s).

10) Add additional masks to cover anything not being sprayed the chosen color. You'll have to think again each time for each color to make sure you cover everything you don't want that color!

11) Paint! I used the paint I had experience with, so I knew how it would flow and what distance to spray it to get even coverage. I also made sure to keep the cans together so I wouldn't end up later grabbing a newer/older can which may not react the same with the other paint (I've heard this does happen and have had some cans of "bad" paint). I also made sure to not spray paint too heavily in the areas where the masking tape edges were...preferring to aim the spray at an angle slightly away from the edge (rather than towards) whenever possible.

11) Remove the masks. I did this as carefully as possible; however there was still some paint peel due to the notorious nose cone (which seems to not allow paint to adhere as well as others and is a bit too flexible) as well as the tape I was using sticking more than I had wanted (it didn't help that I left it on for weeks/months).

12) Fix-ups & touch-ups. It would be too good to be true if you didn't have to do this part! :wink:

Recalling from memory/practice, I think these are all the steps I did, but I'll update/edit if I recall something not listed. Sorry for no pics on the rest, but feel free to let me know if you have any questions.:)
 
Great work mate, what a brilliant way to paint a rocket. I think I'm going to to have to give this a try and see how much I can stuff it up.

Would you have less lift up if you put the tape onto your arm before applying to the rocket to take some of the take off and also add a thin layer of oil to the tape? I often do this when painting and also remove the tape before the paints fully cured so it doesnt break off but peels cleanly at the tape edge.
This is my scratch built 3" Black Brant, was taped off with painters tape using the above method and didnt have any peel off luckily.

20160607_173052-2.jpg
 
Great work mate, what a brilliant way to paint a rocket. I think I'm going to to have to give this a try and see how much I can stuff it up.

Would you have less lift up if you put the tape onto your arm before applying to the rocket to take some of the take off and also add a thin layer of oil to the tape? I often do this when painting and also remove the tape before the paints fully cured so it doesnt break off but peels cleanly at the tape edge.
This is my scratch built 3" Black Brant, was taped off with painters tape using the above method and didnt have any peel off luckily.

View attachment 296703

Thanks Luke! Your BB looks great!

In my case it was a combo of the very old "left on" blue tape along with the G-Force Nose cone being notorious for sub-optimal paint adhesion and being soft. Either one alone wouldn't normally be an issue, but both combined was bad mojo.
smile.png
I had used the same method for the bottom half (shown at the first post) and didn't have any trouble at all.

Just realized I posted this last year:

Here is the front half I'm in the process of masking; however I've already had a bit of trouble. The plastic nose is so soft that while masking, I may have squeezed it a bit too much and some spots have paint lifting off with the tape (I did sand well and prime). I've already fixed one spot, but I'm seeing a few others, which I may fix after I finish the mask and other paints.
 
That makes sense, you can sort of see where the paint has cracked when it was squeezed. Still an incredible bit of art on your rocket. Have you done alot of this sort of painting in the past?

I may have missed it but what brand and type of primer and paint did you use? I had a similar problem with a LOC plastic nose when I used Tamiya primer and paint but I didnt use the one meant for plastics, I then found out that they make a specific paint and primer for plastic that bonds better and has some flex to it that allows for deforming of the part with handling, expansion or contraction due to hot and cold and the forces you get on your nose cone. After I changed to the plastic specific paint I had no more problems. Like you said it was a combination of things, I'm just curious to see if the paint could have played a part :)


Would you have less lift up if you put the tape onto your arm before applying to the rocket to take some of the take off and also add a thin layer of oil to the tape?

View attachment 296703

Sure ya didn't use some of that "Jack" to lubricate the tape?

Ya can always tell when an "Ozzie" posts pics....there's usually some form of "lubrication" next to the rocket. :lol:
 
Dont give away all our secrets CJ.. one for the rocket, one for me.. our version of an alcohol fuelled rockets :cheers:
 
That makes sense, you can sort of see where the paint has cracked when it was squeezed. Still an incredible bit of art on your rocket. Have you done alot of this sort of painting in the past?

I may have missed it but what brand and type of primer and paint did you use? I had a similar problem with a LOC plastic nose when I used Tamiya primer and paint but I didnt use the one meant for plastics, I then found out that they make a specific paint and primer for plastic that bonds better and has some flex to it that allows for deforming of the part with handling, expansion or contraction due to hot and cold and the forces you get on your nose cone. After I changed to the plastic specific paint I had no more problems. Like you said it was a combination of things, I'm just curious to see if the paint could have played a part :)

I used the same method as on most of my rockets...wash (nose cones); sand, prime with Rustoleum gray Filler Primer, sand, first cover coat of Rusto 2x (I sometimes use Krylon, but the two don't mix and while the Krylon looks to be a finer finish, the Rusto seems to go on smoother and thicker). After the cracking, I was thinking the same as you...maybe I should've used the new paints meant for the softer plastics. Of note is that I haven't had any issue with other nose cones before this.
 
Have you done alot of this sort of painting in the past?

I forgot to answer that part. I grew up building models as well as RC cars, so I had experience with masking and paint/spray paints. Nothing as complex as this; however this is really just a bunch of masking steps...each just a bit complex. Like you, I like pushing myself to try something new/harder. :)
 
You mean people build without being drunk... learn something new every day :gavel:

We dont have Krylon here but I have used rustoleum a few times but never on plastic before. I had a case of cracking on my Estes ventris nose cone and that was the one with the Tamiya, but have had others with tamiya turn out fine and no cracking at all.. sometimes tyou get bad cans of paint and get those problems.

If you have any left it might be worth doing a test on some scrap cardboard tube and giving it a squeeze to see if it cracks. Then you will know if its the paint or the nose cone.

sorry im sure you know all this, Just putting my 2c :bangpan:
 
Hi Everyone! This one was always on the back-burner, but never forgotten...almost like a pain on the side that you know you should eventually care for...
So the paint was really wrecked in some places...the yellow nose especially - I had to basically scrape and sand all of it off (oof!). I also had some heavy white paint chipped off where there is a line with the blue and even after scraping away some of it and repainting, the repaint lifted up! I then tried to CA the edge down and it actually worked. =P

So here it is...I FINALLY have it almost done, but the basic paint is down and I've added some decals. I wanted to take some pics before trying a clear coat in case the is some hideous reaction to the clear coat.

2018-11-04%2010.10.15.jpg

2018-11-04%2010.12.01.jpg

2018-11-04%2010.04.28.jpg

2018-11-04%2010.13.01-2.jpg
 
Back
Top