Estes Mercury Redstone #1921

The Rocketry Forum

Help Support The Rocketry Forum:

This site may earn a commission from merchant affiliate links, including eBay, Amazon, and others.
The new one is made in Guangdong China.


Major differences:
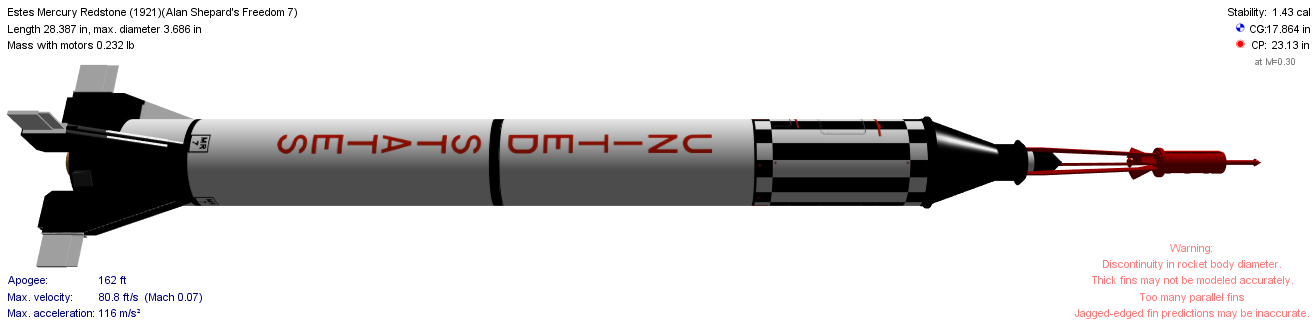
Like you've been told already, the new version has a one piece body tube, instead of the old two piece body tube arrangement. The 2 piece body tube arrangement was fraught with problems from the (IMHO) too short tube coupler (I had two end up crooked). It has decals for Gus Grissom's Liberty Bell 7 (MR-8), whereas the old version was for Alan Shepard's Freedom 7 (MR-7). The older version's instructions were clearer, however both versions have problems with proper decal and painting instructions. Older version also has differences in the MMT's construction and the shape of the engine hook (no finger tab). The new version has laser cut fins instead of diecrushed. New version comes with 4' of shock cord, and one 18" parachute, older version had two 12" parachutes, along with two shock cords (one was 12" long (attached to the capsule), the other was 18" long (attached to the main rocket body). Centuri's method of returning the capsule was better than Estes' method as it reduces the odds of the tower being damaged on landing. Both Centuri, and old Estes' methods of bringing down the capsule separately have resulted in lost capsules. The new version could be modified to combine Centuri's tower tilted up return, with the new Estes, everything is together (lose all or none).

Minor differences:
The new one has slightly smaller launch lugs/launch lug standoffs (1/2" instead of 5/8"). The older version had plastic Pull Out Lugs, the newer has you make these out of balsa and cardstock. The plastic capsule is the same as the Centuri Kit, and the older 1921 version. However, the colors of the plastic has changed a few times (white, black, and (at least) two different shades of red). New version uses cardstock instead of thin ply for the End Plate Fins. The leading edge of the main fins has been widened to 1mm (was 1/32").

This kit lends itself well to being adapted for 24mm (D/E) motors (you can buy parts from eRockets.biz/Semroc), as the C6-3 motor can be a tad underpowered according some people. Though there are lots of positive reports of it using C6-3's on RocketReviews.com

You can download my .ork file for the older version here: https://www.rocketryforum.com/showthread.php?123564-K-Tesh-s-OpenRocket-files&p=1600644#post1600644

Damon bought Estes in 1969, and in 1972 bought out Centuri. Centuri was then discontinued as a separate line back in 1983.
 
Last edited:
one more difference, the bt is not a bt60 nor is it a bt70(it is a hair smaller), and the finished bird is 1/36 scale.
Rex
 
one more difference, the bt is not a bt60 nor is it a bt70(it is a hair smaller), and the finished bird is 1/36 scale.
Rex

Rex, the Estes Mercury Redstone (1921) kit has always had the 2.04" OD ST 20 tubes. They also had the much older BT-60 based K-41/1241 kit, but those weren't being compared. The question was about the 1980's kit number 1921 and the recent re-release of it.
 
Last edited:
I can not wait to build this kit! I just got it last week and I am going to start it after I finish my new STM-012 and Nike Smoke
 
That is absolutely the way to get clean lines. Either clear or the base color. Just follow the instructions on the can to make sure all of the paints are compatible. Just tape, spray with the base color (or clear), wait 15-30 min, spray with the new color, and then remove the tape.

I know this was posted a while ago, but that is brilliant. I'm mad I never though of it... No bleeds...
 
I'm gong to blow my own horn here a bit...

I have built quite a number of Mercury Redstones over the years (my first being the original Estes K-41 in 1969) ranging in size from 1/96 scale up to 1/12 scale. I won't Team Sport Scale at the NARAMS in 1998, 2000, and 2002 with Mercury Redstones. Believe it or not, I really don't "prefer" the MR as a scale subject but I just kind of ended up building a bunch over years.

View attachment 285183 View attachment 285178


For the past couple of months I have been producing very thin printed vinyl "skins" for the Centuri/Estes Redstones. The roll patterns are sharp and to scale and the "UNITED STATES" is corrected. Though not "3D" just about every rivet, panel, weld line, panel line, vent, hatch...and whatever is printed on the skins. They are self-adhesive with a permanent adhesive. These are NOT the thick heavy clear stretchy vinyl that you see as self-stick decals in many kits. They are less than half the thickness and opaque. The model is pretty much completely "wrapped" completely hiding any body tube sprirals and the wood grain on the fins. They are very easy to apply (the body tube wrap is applied in four sections). There's no need to mark the body tube for the fins or launch lugs as those locations are part of the skins.

The skins are intended to be applied as you build the model but several modelers have easily applied them to already built models. Also, if you have "messed up" in painting and decaling your model or if it is simply showing the signs of age and many flights, you can "refresh" it by applying the skins over your existing paint job. Just make sure it is clean and smooth.

Since taking the photos here, I have made the surface details, particularly the weld lines, a bit more subtle and not so "in your face."

The skins won't stick to bare wood so a couple of coats of something to seal the wood and sanded to take off roughness or irregularities is needed. You don't have to fill all the wood grain...just provide a smooth surface to which the skins can "stick". If you aren't sure you have your wood parts smooth enough, just cut a scrap of the skin sheet on which the skins are printed and do a "test stick" to the desired surface. The skins can be applied to a bare body tube though the will stick better to a painted surface. Also, due to the thin nature of the skins a coat of white under the skins will make them appear "brighter." You finish off your skin job with a couple of coats of clear for protection...plus the special surface of the vinyl absorbs the clear and makes it integral to the skin, tremendously toughening skin and also making your model easy to clean.


View attachment 285179 View attachment 285180


I have them available on eBay (just go onto eBay and search for "Estes Mercury Redstone" and you will find them. Look for "Skin Kits" in the title. I sell them as Accur8man. If you don't want to mess with eBay just drop me a note at [email protected] and I can sell direct via PayPal Invoice...or answer any questions you may have about the skins. You might want to visit my website, www.accur8.com . I love to just "chat" with fellow modelers with common interests, too!


View attachment 285181 View attachment 285182

John Pursley---

I would like to hear from anyone who has used these skins. Do you have any tips on applying the wraps to avoid trapped air bubbles and misalignment?
 
I would like to hear from anyone who has used these skins. Do you have any tips on applying the wraps to avoid trapped air bubbles and misalignment?

I just received my set of John's wraps for the 2167 version (plastic fins). Initial impression is that the detail is incredible as is the quality of the printing. The instructions are good and it doesn't look like they will be any harder than any other wrap kit. I have had my kit mostly built for some time but I couldn't bring myself to use the thick kit decals (I'm a bit geeky when it comes to scale), so John's kit was a godsend.

I'll post when it comes time to apply them.

Mike
 
I share mike's experience. The wraps had great instructions and the recommendation to use the premium clear from Ace Hardware made things easier while introducing me to a fantastic clear coat. I had no problems with air bubbles. I just took my time, did a couple dry runs, pulled the backing and went for it. They turned out great. I have two redstones, one stock, and one with the wraps. The wrapped one looks a million times better.
 
I just picked up one of these kits at HL last night with a little Christmas money (didn't have a 40% off coupon, but all their rocketry stuff was 20% for Christmas, so I still saved). I think I might just go ahead and order John's wraps from Ebay too before getting started on it.
 
I finally flew my 1921 Mercury Redstone yesterday evening in very light wind. Two flights on the standard C6-3 using the stock Estes 1/8" launch rod that came with an Astron II launch Pad. There was only 17 inches of launch rod guidance until the first launch lug left the rod! The first flight arced into the light breeze at apogee and the motor ejection was well timed. It came down nicely on soft green weeds, 1 foot from a gravel road. The second flight was the more memorable flight, as I was launching just after the sun had gone below the horizon. The fire of the C6 motor was impressive all the way up for it's 1.8 second burn. It went straight up with no hint of stability issues or turning into the breeze. Then the flash of the ejection charge was also impressive some 250 ft above my son and I. This time, the rocket drifted back and landed on the on the gravel road. One of the outboard fins has a little 1/8" ding in it from a gravel hit, but a little drop of CA and clamping pressure will fix it up to nearly new. I was worried that those little outboard fins might break off at the cardboard separator, but it handled the landing impact fairly well. I used 30 minute epoxy for these joints and allowed the epoxy to soak into and through the cardboard.. with hopes that it would give a stronger connection.
Nothing special about my build.. stock with stock decals. I'm happy with the final result and flight performance. I love the slow lift off the pad and longer burn duration of the C6 Estes motors. This is an excellent kit.. love it!

My son isn't much taller than the Mercury Redsone.. but his shadow is much longer at this time of day:
IMG_2459.jpg

I used a small rock to elevate the fins off the blast deflector to prevent damage:
IMG_2462.jpg

A soft first landing on thick soft weeds:
IMG_2463.jpg

Minor damage from second landing on gravel road:
IMG_2466.jpg
 
I debated for a while whether or not to convert to 24 mm, or keep it stock, but after watching the videos, I think I like the slower flight of the C6-3 flight. So I started assembly of mine this evening. I'm still a little on the fence as to whether I want to purchase the eBay wraps for this. I guess I need to decide soon.
ImageUploadedByRocketry Forum1483064016.048028.jpg

** I ordered John's wraps today (12/30) to finish mine **
 
Last edited:
Perhaps it might have been easier to paint this as separate pieces, but the tower wasn't going together without some bending of the parts and I felt that putting it all together would hold alignment better. It'll take some steady hands and a fine paint brush to paint it, but oh well, I've got some plastic model experience in that department.
ImageUploadedByRocketry Forum1483297550.245575.jpg

I'll shoot the whole thing in black, then come back with a brush for the red.
 
I would like to hear from anyone who has used these skins. Do you have any tips on applying the wraps to avoid trapped air bubbles and misalignment?

Just follow the insructions. There are no "tricks" or "secrets" to applying other than simply follow the instructions. The skins are applied during construction starting at the rear of the body tube. There are a total of four skin sections, making application MUCH easier than if it were one long skin section. The top three sections of skin align on their seams (easy enough!) and the bottom most skin has a tick mark to align the skin section above it. You don't have to draw any guidelines or make any measurements. The only real caution I have is to DRY FIT the skin sections mainly to get a feel for handling them as well as to make sure the total length of the skins is the same as the length of the body tube. I have hear from modelers (and personally experienced one myself) where the body was about 3/32" shorter than the skins. The solution is simple. You can adjust the length of the 3rd skin section (the one with the black strip and "UNITED") by trimming the desired amount from the black stripe edge or you can trim the forward edge of the skin with the "STATES" lettering by the desired amount.

The radial section seams are "camouflaged" by making the seams fall at "scale" demarcation areas. The longitudinal seam of the first section (near the fins) is hidden where a fin mounts. The other three skin sections have an overlapping seam. The material is so thin that you almost can't see the seam beyond a couple of feet. The launch lugs also align on this seam. I used to recommend a "butt" seam but saw so many attempts (usually rushed) that ended up looking "uglier" than an overlapping seam. My recent skins are significanty thinner and "brighter" white and overlapping seams don't really stick out visually...it's WAY better than the super thick clear self adhesive markings provided with the Estes kit.

You avoid trapping air bubbles by gradually applying the skin section from the starting edge while gradually removing the backing as you wrap the skin around the body. Simply "sweep" your finger back and forth over the skin to tack the skin down as you work around the tube. If you DO happen to get any "air bubbles", simply use the tip of your #11 knife blade to "prick" a microscopic hole near one edge of the bubble...95% of the time the bubble will "collapse" as soon as you prick it. Just press it down afterwards to be sure the adhesive bonds to the tube.

Alignment is super easy. After you cut each tube wrap out, flip it over and cut a 1/4" (or so) of the backing away from the skin (peel the skin back by about 1") and then re-apply the cut-away backing. With the backing in place, wrap the section around the tube carefully aligning the fore and aft radial edges exactly even. While tightly holding the wrap in place, lift the edge that you had removed (and replaced) the 1/4" backing strip from and remove it (keep holding the wrap tightly, don't let it slip) and then tack the entire edge of the exposed adhesive to the tube. You can release the remainder of the wrap and re-check alignment. If all is well, "swing" the wrap away from the tube (along the 1/4" bonded edge) and start peeling the backing away as you apply the skin. Don't pull, push, or stretch the skin as you apply it. If you got the alignment correct a when you tacked the first edge down, it will align "by itself."

Each succeeding skin section simply "butts" on the forward edge of previously applied sections, making alignment even easier.

I have literally wrapped hundreds of skin sections. It's not difficult. Don't try "wet slide" application or other methods you might find on the web...just follow these instructions (they are the same that come with the skin kit) and you won't have problems. It's MUCH easier than applying water slide decals. Don't make things harder than they need to be by trying something "different."

Of course, I'm just an e-mail away if you need any advice or further instructions. Contact me BEFORE you create problems for yourself!

John Pursley
Accur8 Spacemodels
[email protected]
 
I received my skins in the mail at home yesterday :wink:. Unfortunately, I'm at work in another state until Thursday :facepalm:. Maybe (no promises) I can record video of me applying the skins when I do it.
 
I forget to try to video the skinning process, but it really wasn't that bad, except the fins.
ImageUploadedByRocketry Forum1485553673.186986.jpg

I used AeroGloss Sealer thinking it would provide the necessary smooth surface for the fin skins to adhere to, but it just didn't get them smooth enough I guess. I should have painted the fins with a Gloss White I think. Then I could go back and touch up with White or Black as needed. I also fully assembled my fins, but I gathered from the skin instructions that the fin tip rudders should be added afterward. Oh well, live and learn I guess. I haven't destroyed the fin skins and I might have an adhesive I can use to get them stuck better. I'm going to have to revisit this though. I'm too frustrated right now.
 
Back
Top