Retro Binder Design Excel Build Thread

The Rocketry Forum

Help Support The Rocketry Forum:

This site may earn a commission from merchant affiliate links, including eBay, Amazon, and others.

UPscaler

New Member
TRF Supporter
Joined
Nov 24, 2009
Messages
4,745
Reaction score
1,384
Build thread! Build thread! Build thread!
Be careful what you wish for!

Is it old enough to call it Retro? Let's dig in and find out...


NEWSPAPER! Time to check the dates!


April 1st 1996! Not quite retro. Just a few months younger than me. This is a sweet little time capsule of a kit!


Gone are the days of free giant Tootsie Rolls with every purchase. What ever happened to customer service? :(


Nevermind, it was a tube.


What's in this one?


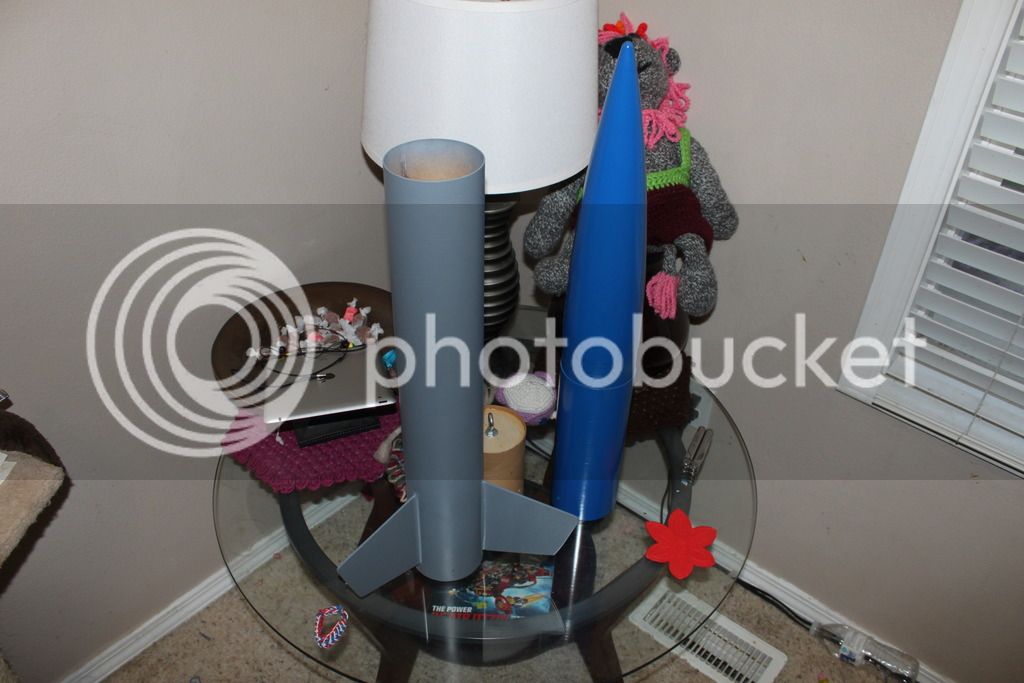
I didn't know the Excel was a RAM-Jet design. Nice!


Any guesses?


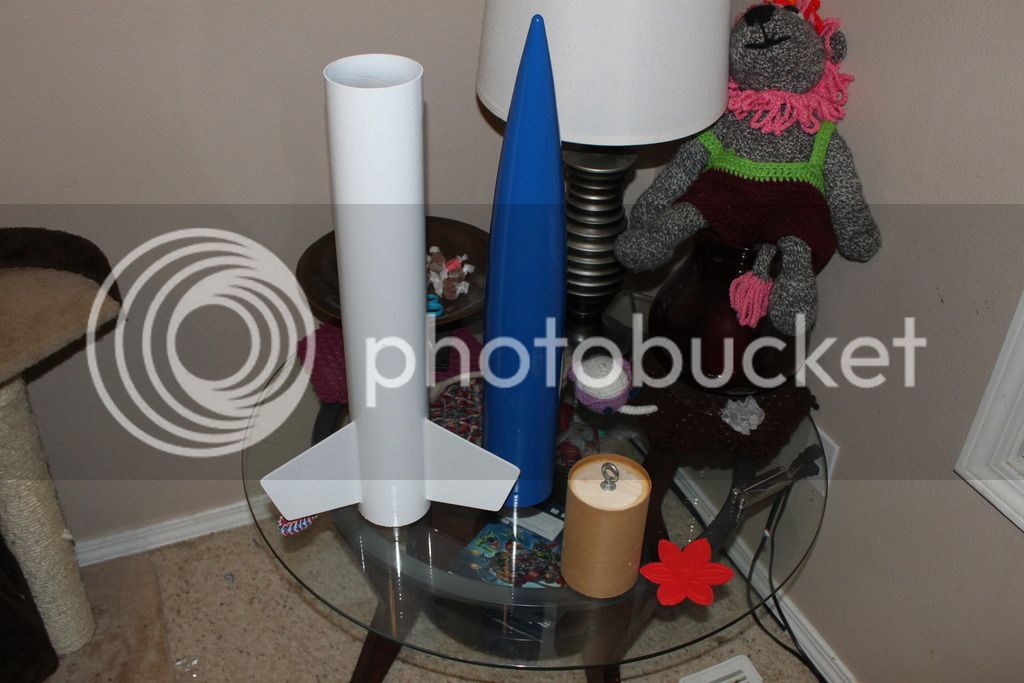
Alright, I had a slight breakdown with this one. I forgot in the good ol days you had to cut your own fin slots. I guess I'll just have to suck it up. This reminds me of BSD kits! Cut your own damn fin slots, we don't have time :wink:


This guy is cute...


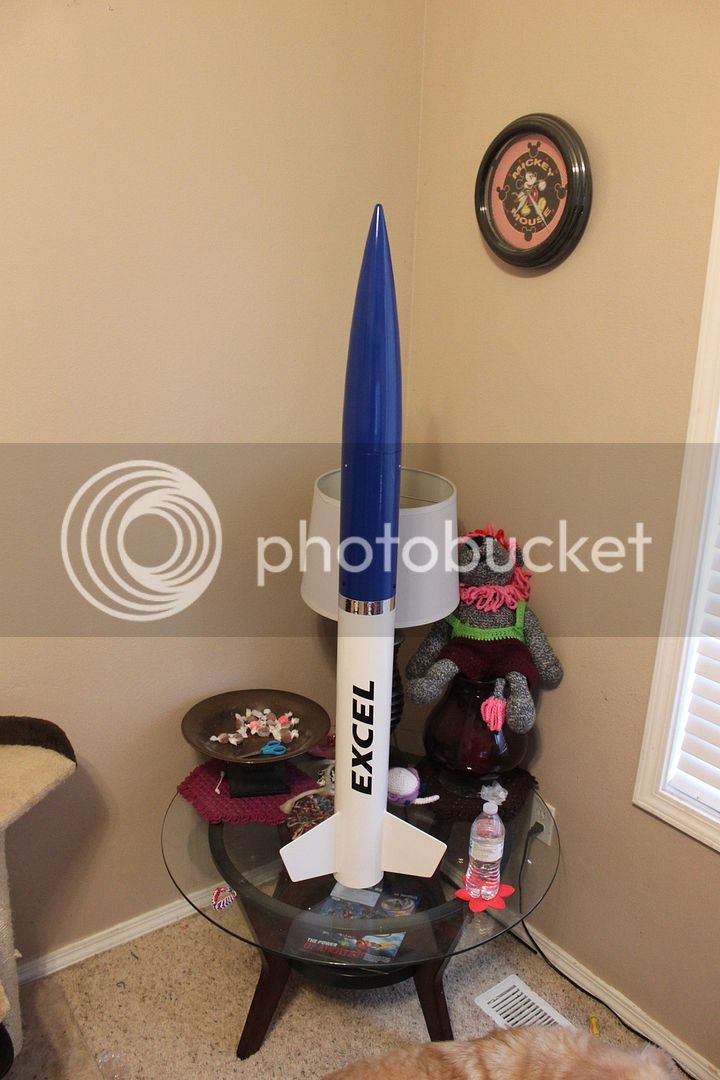
Now THIS is a COMPLETE kit!!!


And finally!


Destructions!


And some 18 year old Decals! I think I'm going to go ahead and paint this thing just like it appears on the website/packaging. I think that will be the first time I've ever done that.


Did this ever get produced? I've never even heard of a Binder HoJo. That would be sweet though!


I love the super aerodynamic 1/2" Launch Lug.


Original price was $64.99. Not bad! If all binder design kits are this complete, it definitely will not be my last. This is awesome!

And since I'm building it, I'll go ahead and tell you guys. I swiped this thing up on ebay for $39.99! I couldn't believe it!


Anndddd that's all she wrote for tonight folks! I'll actually start building it tomorrow, hopefully. Though I think I'll ditch the launch lug and go for some rail buttons...


People really love to go overboard with their fiberglass and carbon fiber these days. Don't get me wrong, I love composites, especially carbon fiber. However, I will be building this thing using only wood glue. Fillets and all. I would not hesitate to put a big mean J motor in it when I'm done. I likely won't, but if anyone wants to test me, PM me for my address and I'll gladly let you buy me a J motor ;)


Braden


P.S. Sorry about the pictures. I still can't use the basic image uploader, or the attachment manager for whatever reason, so I'm using photobucket...
 
Bum! Lucky Bum!!! $39.99 Man, I wish I had the time and $$ to have gotten in on that deal!

Don't apologize for the images. You've got them up, and you don't have to worry about forum crashes (only photobucket crashes).

I'll be watching this one with some interest.

Pointy Side Up!
Jim
 
If all binder design kits are this complete, it definitely will not be my last. This is awesome!

New kits are more complete. Rail buttons, better harness, better parachutes, larger decal packages, higher quality/thicker plywood fins, better nosecones, CNC slotted airframes, longer/thicker couplers.

Yes, the Hojo was a production kit. At least until the fiberglass parts supplier decided to produce their own version of the Hojo with the molds Binder Design paid for, effectively undercutting the price.

Right on Mike. That only makes me want another one more! I've wanted a thug for as long as I can remember, just never got one for whatever reason. That's unfortunate about the HoJo. Some people will hurt anyone to make a buck.


Braden
 
Clean your house.

Boy, I just can't see why so many people have been driven away from the forum.

I have 5 brothers and sisters, and three young cousins who we often baby sit. Not that I owe you any reasoning or justification. I'm not about to apologize that we're not up to your standard of living.


Let's just keep the subject rocket centralized, huh?


Braden

Good call Braden.
 
It was suppose to be funny. Maybe it didn't come across that way, sorry. No harm meant.
 
Alright, First thing I did was draw a line down the motor tube, then sand it. I know, the thinking is backwards there. But I made it work :wink:


I then marked 3/8ths of an inch from one end and wood glued one centering ring there (The instructions call for 1", but I'm leaving it at the perfect length to throw an Aeropack retainer on there in the future).


Then, you know the drill:


Hold your applause for my comedic genius, please.

Installed the slightly nerve racking open ended eye bolt. I've yet to have a failure with these, but I've been told it happens.


And figured I might as well grab the coupler bulkhead as well and throw that one in there. Loc tite on both, of course. Don't want these bad boys spinning free.


Now here's my solution for this kit not having thick enough centering rings to put rail buttons into. I foundthat 1/2" square dowels fit very nicely on the edge of 4" centering rings when I built my first crayon rocket a couple of years ago. So I employed that method and gave the rail buttons something to screw into.


Then a fillet along the bottom ring:


Annnddd the coupler bulkhead was glued in place, and given a nice fillet too:


I decided to throw these pics up while the glue dries! More to come!


Braden
 
More stuff!

Fin slots were cut mostly with a dremel:


However, when I shredded my last cutoff wheel, it was back to the old school tactics:


All said and done, the fins go on nice and straight:


And Here's why I love having a DSLR camera!


Braden
 
Motor Mount glued in:


I decided, since this rocket already is basically set up like a Dual Deploy rocket, I'm going to rivet the coupler in and put shear pins in the nosecone. That way, if I ever feel like going dual deploy with it, I'll just have to get another coupler and build an electronics bay into it.


And finally, after being reminded how many bubbles you get when you use wood glue for fillets, I decided I'll be using basic 15 minute hobby epoxy for the external fillets, and the rear centering ring fillet. I also soaked the bottom lip of the tube with epoxy, do to nightmares of previous cardboard rockets with recessed motor mounts coming back with tubes crushed up to the centering ring from hitting the ground without reinforcement.


That about wraps up my day folks! I appreciate you checking out my thread!


Braden
 
I also soaked the bottom lip of the tube with epoxy, do to nightmares of previous cardboard rockets with recessed motor mounts coming back with tubes crushed up to the centering ring from hitting the ground without reinforcement.

We prevented that a long time ago. All the newer kits have thrust rings that sit flush with the aft end. No notch in the fin tabs anymore either.
 
Glad to see you took my advice.

After spending the past 19 years in a box, this old girl deserves to fly.
I agree! It's a fun little kit to build too! I still love paper and wood rockets.

We prevented that a long time ago. All the newer kits have thrust rings that sit flush with the aft end. No notch in the fin tabs anymore either.
That's good to know! I've been looking at the binder kits a lot lately abyway.The California kid is quite tempting. But I guess I should fly the rockets I have built first ;)

I actually like the tabs. I put CA on the tab and wood glue on the fin roots. Then once it's lined up the CA tacked to the tube helps keep it where I want it :)


Braden
 
I actually like the tabs.

It's less strong and the sharp inside angle creates a stress riser for crack propagation. I think it was a hold over from model rocket construction, just scaled up for high power, same with the recovery harness setup we had at that time.
 
It's less strong and the sharp inside angle creates a stress riser for crack propagation. I think it was a hold over from model rocket construction, just scaled up for high power, same with the recovery harness setup we had at that time.

Ahhh, I guess that would make sense. Always good to know! Thanks for all your insight here Mike!


Braden
 
Alright, didn't get a whole lot done yesterday as we camped out in the local park for 5 hours so we'd have a good spot for fireworks:


And now, the first look at the full product :clap:


Fillets to come!


Braden
 
Hello ladies and gents! On with the build!

I used the box to secure the rocket for filleting:


Then taped off my fillet lines and created fillets. Whoda thunk it.


Then it was on to rail buttons. My square dowels on the centering rings worked like a charm!


And finally, I removed the rail buttons and hit everything with two coats of primer!


Braden
 
Just a small update. Sanded everything smooth and put a light coat of white primer on the fin can (I like to alternate primer colors so I can see what I'm doing better).


Braden
 
Sanded the fin can and did one more coat of grey primer (with two additional on the fins on top of that, to try to hide the wood grain as best I can), and laid out the first coat of blue on the upper section:

IMG_5340_zpsnnjzhsrs.jpg


Braden
 
Braden,

Nice build thread!

What I do to reinforce the bottom of the BT is cut and fit a narrow strip of coupler or BT, glue or epoxy the strip to the inside of the bottom of the BT to double up it's thickness. This acts as a thrust plate and prevents the BT from being easily crushed on a hard landing.

IMG_2934.JPGIMG_2931.JPG

Photos are my scratch built 4" Quantum tube. You can see the bottom of the BT has been doubled up for reinforcement. It's raining today, not the best photos.

Looking forward to your launch photos...
 
Braden,

Nice build thread!

What I do to reinforce the bottom of the BT is cut and fit a narrow strip of coupler or BT, glue or epoxy the strip to the inside of the bottom of the BT to double up it's thickness. This acts as a thrust plate and prevents the BT from being easily crushed on a hard landing.

View attachment 267623View attachment 267624

Photos are my scratch built 4" Quantum tube. You can see the bottom of the BT has been doubled up for reinforcement. It's raining today, not the best photos.

Looking forward to your launch photos...

Right on, I have done that in the past as well. I think I even have a 4" coupler laying around here I could shave a piece off of, but I think the epoxy has soaked in enough that it'll be okay. I'm going to put the parachute closer to the fin can so the nose touches down first anyway. I think it'll be okay!


Braden
 
IMG_5356_zps5fcbtwtf.jpg


I'm just going to let it chill for a couple days, then I'll put the decals on! It looks great (in pictures). *cough*


My rockets live by the five foot rule. Don't come within 5 feet of them, and they look good :wink:


Braden
 
I'm just going to let it chill for a couple days, then I'll put the decals on! It looks great (in pictures). *cough*
My rockets live by the five foot rule. Don't come within 5 feet of them, and they look good :wink:

Braden

Wow. You get that close? Mine are more of the 50ft variety. :facepalm:
Heck, my L3 is still nekid. I gotta paint that up now that it earned it.

Adrian
 
Wow. You get that close? Mine are more of the 50ft variety. :facepalm:
Heck, my L3 is still nekid. I gotta paint that up now that it earned it.

Adrian

Go for it! What's the plans for paint?


As for me, my impatience got the better of me. The white has been drying for over 24 hours, and blue for over 48, so I decided to go ahead with the decals and rivets. So here she is all stacked up ladies and gents!


IMG_5357_zpsmwj8v1qh.jpg


I think it looks pretty great! I'm considering picking up an aeropack retainer for it here soon. And we'll let her fly next I'm I can get to a launch!


Braden
 
Back
Top