MAC Performance 3'' Rayzor - 54mm

The Rocketry Forum

Help Support The Rocketry Forum:

This site may earn a commission from merchant affiliate links, including eBay, Amazon, and others.

RocketHunter

Well-Known Member
Joined
Jun 15, 2013
Messages
390
Reaction score
3
I will be doing a quick build thread for my "Beta" kit from MAC Performance - a 3'' diameter, split fin Rayzor. It has a 54mm motor mount and extended booster and payload tubes, meaning this puppy will hold 54mm 6GXl's and 54/2800's :grin:


I want to say a quick thank you to Mike at MAC Performance for giving me the opportunity to do this. I had the pleasure of meeting him at LDRS and had a really great time chatting about rocketry and his kits. :smile:


You can see the full parts listing and description on MAC Performance's website here (note: this kit is also available with a 38mm MMT):
https://shop.macperformancerocketry...products/rayzor-3-diameter?variant=2603945921


The kit showed up nicely packaged, just 2 days after being shipped.


While it seems almost repetitive to describe the quality of the kit and parts with the other MAC Performance build threads out there, I will reiterate that these kits are just perfect. This is my second kit from MAC Performance - my first was a 3'' ARCAS - and both have been nothing short of flawless. I had gotten other kits (mostly fiberglass) from quite a few other manufacturers that at the time I thought fit together nicely, but looking back now they just don't even compare to the quality of these kits.


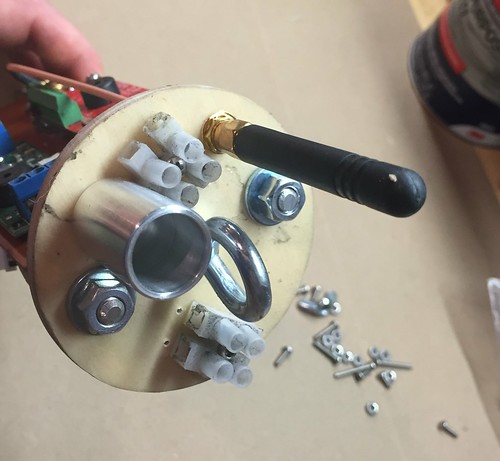
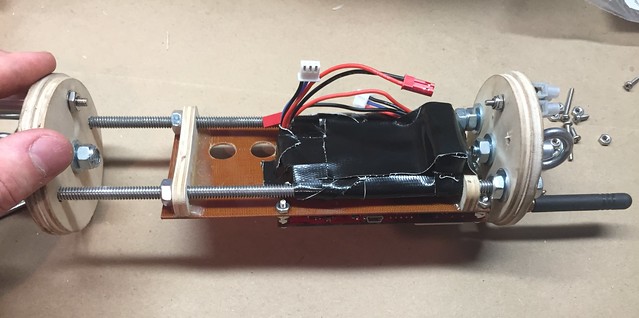
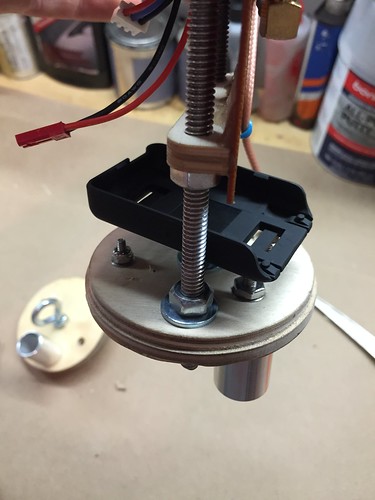
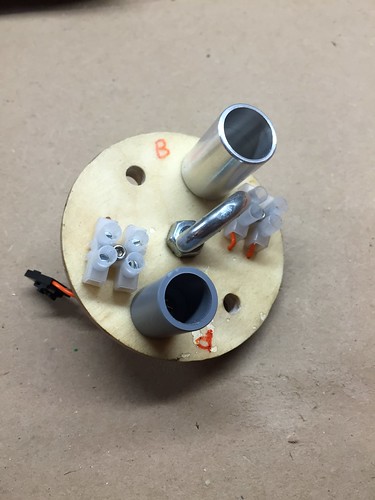
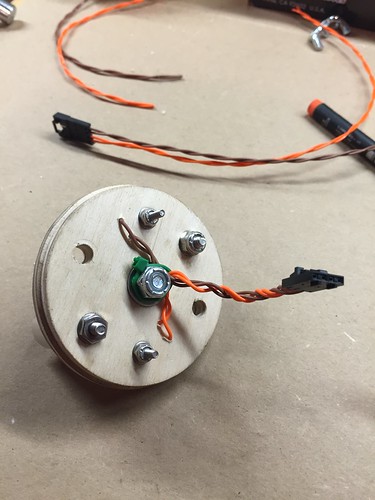
Moving on to the parts, one of my favorite features of MAC Performance kits are the altimeter bays. Included are eyebolts and associated hardware for each end of the electronics bay, pre-cut ALUMINUM threaded rod, sled standoffs and a lightweight canvas phenolic altimeter sled. The bulkheads are stepped, and a perfect fit into the coupler. This whole assembly makes for an easy to build, lightweight, and strong electronics bay.


MAC Performance kits are just great for getting certifications (I got my L2 with one). They are durable, strong, really easy to build, and very complete. They even come with basic instructions to get you pointed in the right direction. Fly one single deploy on an H for L1, complete the electronics bay for dual deploy, pop a J in there for your L2, then let it rip on a 54mm baby L, all in one rocket!


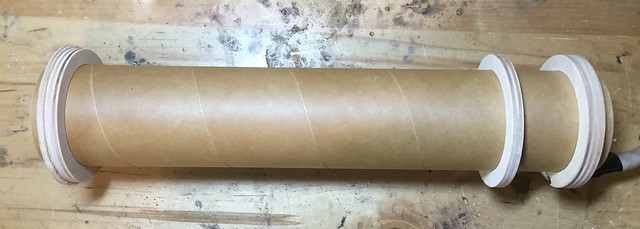
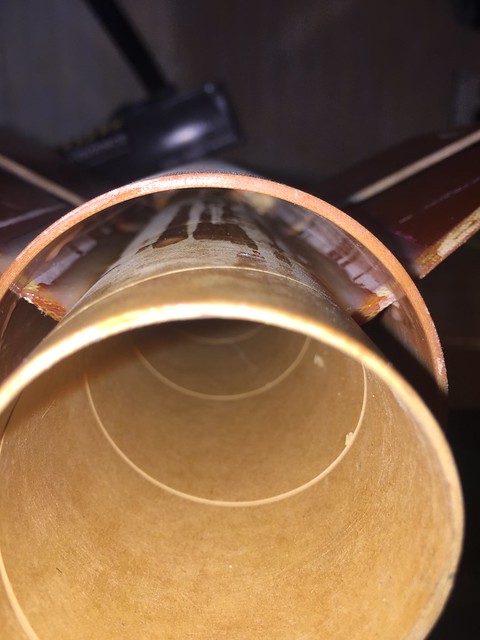
The tubing is very nice - similar in feel to the ubiquitous FWFG tubing, just half the weight and yet still very strong!


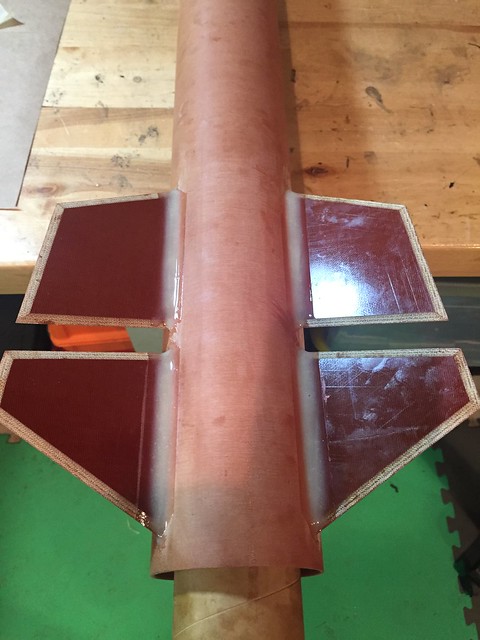
Now comes the fun part - the new Canvas Phenolic fins! They are 1/8'' thick (actually measured at 0.127''), and beautifully beveled. Personally, beveled fins are HUGE - not having to bevel them myself saves a ton of time, and they are better than I would ever get anyway! The canvas phenolic is much lighter than G10, and is still strong and stiff enough for M1.4+ flights on large 54mm motors.


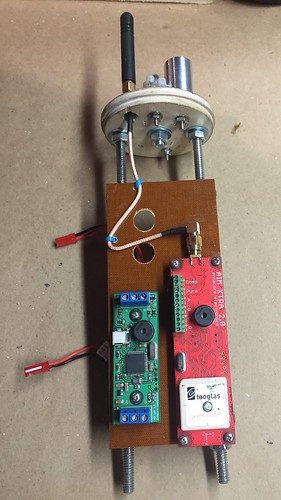
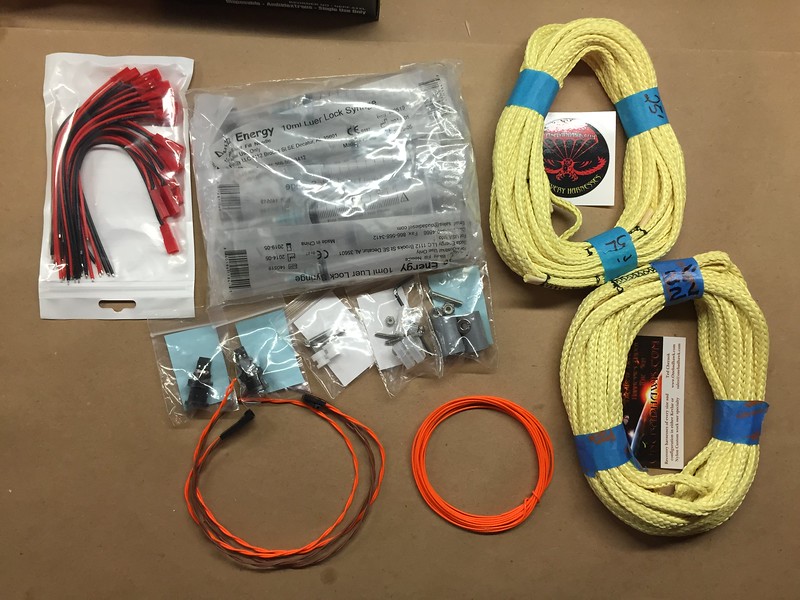
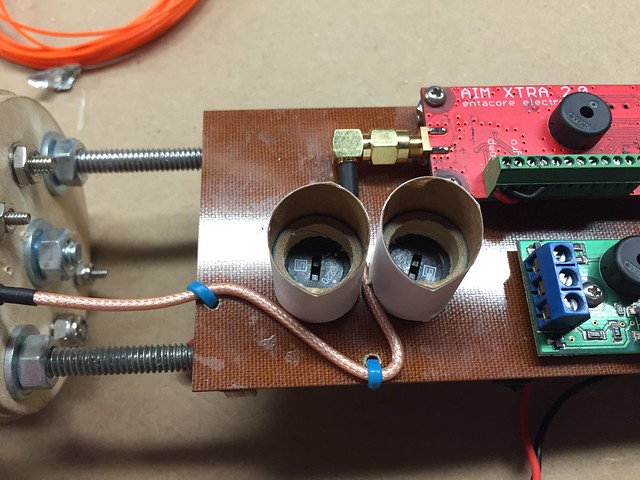
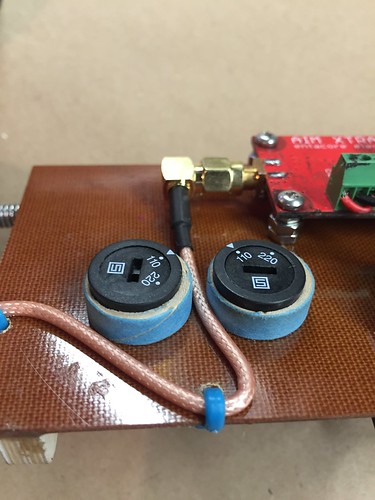
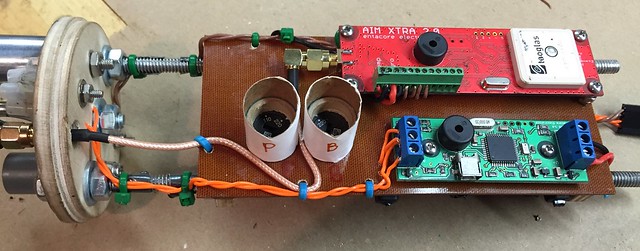
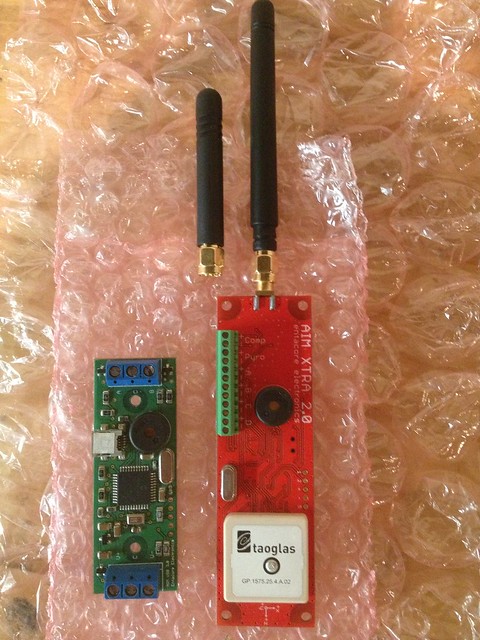
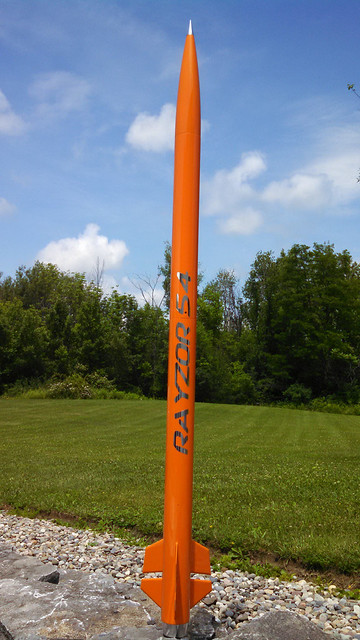
Now, onto my plans for this specific rocket. Dual Deploy and GPS tracking will be handled by an Entacore AIM XTRA unit (the one on the right below). With a full suite of inertial sensors, I'll be able to get GPS flight paths, altitude, velocity and acceleration plots, and even other things like vertical rotation (spin) with a bit more work. Currently I'm planning on going with the stock paint job (picture taken from MAC Performance website) as it is simple, and I don't have any other orange rockets :grin:


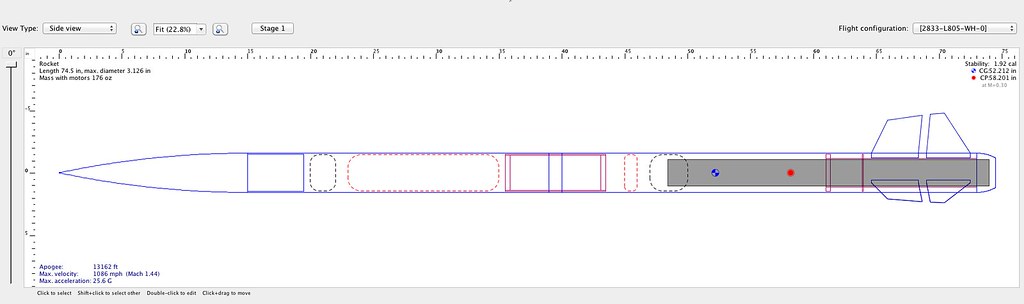
After this it will be a pretty succinct build thread as I'm hoping to get it built, though probably not painted, in time for my club's monthly July launch next saturday. If I make that deadline, I'm planning a flight or two on small J's to 4,500', just under our 5,000' waiver. Additionally, I'm hoping to make it to either the July or August URRG launch, where the 3'' Rayzor will fly on a CTI 2,856 n-s L805-White to really stretch its legs :grin:


View attachment Rayzor_MAC_Performance.ork
 
Last edited:
Sounds very cool, I'll definitely be following your build. Just wondering, what kind of glue are you planning to use, and any plans for internal fillets/foam? It's awesome these kits can fly mach without reinforcement.

I really want to build a MAC Performance kit soon. Probably a shorter 38mm kit, but maybe 54mm...

I'll be using Aeropoxy structural adhesive, purchased here: https://www.giantleaprocketry.com/p...posites.aspx#Aeropoxy_High_Grade_Epoxies_Line . I am going to do internal fillets with my own personal method (though someone out there has probably already done it similarly) that I'll describe in more detail when I get to it. Basically, I leave the rear CR off, and pour down a thick epoxy bead using a syringe, with the booster upside down, then lay it horizontal and they settle out into nice clean internal fillets.
 
I'll be using Aeropoxy structural adhesive, purchased here: https://www.giantleaprocketry.com/p...posites.aspx#Aeropoxy_High_Grade_Epoxies_Line . I am going to do internal fillets with my own personal method (though someone out there has probably already done it similarly) that I'll describe in more detail when I get to it. Basically, I leave the rear CR off, and pour down a thick epoxy bead using a syringe, with the booster upside down, then lay it horizontal and they settle out into nice clean internal fillets.

Thanks. Sounds like a cool build technique.
 
Small update for tonight: realized I forgot to take picture of my MAC Performance charge wells, shock cords, and nomex SC protectors. The charge wells are beautiful, and surprisingly light. They are going to last forever!

https://shop.macperformancerocketry...products/aluminum-deployment-charge-canisters


Matching 15' harnesses and nomex sleeves for drogue and main

https://shop.macperformancerocketry.com/collections/recovery-harnesses/products/recovery-harnesses


And finally, I started work on the electronics bay. I drilled and measured holes for the altimeters and switches - I decided to go with a second backup altimeter as theres plenty of space and the unit was not being used as it was still mounted in a retired rocket. I also measured, bond-prepped, and glued the coupler switch band, and also coated the bulkheads with epoxy to seal the wood to make cleanup easier. I used Aeropoxy structural adhesive.

 
Loving the build, this will be my next project.

Thanks! You should have a lot of fun with it, whatever your plans are. Like I said, it's plenty light enough (~5lbs) to fly on H's and I's to pretty exciting altitudes (3-4,000'), but it can also rip with the 54mm MMT and extended booster. For me, the versatility is awesome because for my home field with only a 5,000' waiver its nice to be able to fully fly that field on (relatively) inexpensive 38mm H, I, and small J motors, and then for the few times a year I am able to drive to URRG with a 20,000' waiver I can also go for some pretty extreme altitudes with the same exact rocket on big 54's.
 
While waiting for parts to come in, I moved ahead with what I had on the electronics bay. I mounted the AIM XTRA and AIM USB, mounted the sled, attached the aluminum charge wells, and mounted the antenna on the bulkhead with an extension to get it away from the all-thread. It will protrude into the main parachute compartment, just like I did on my 3'' ARCAS. I also mounted the Li-po batteries on the opposite side of the sled - they are sandwiched in between the screws holding the altimeters down, and then held in place with a complete wrap of gorilla tape.


Looks great!

Are you concerned with that coax running over the patch antenna?
 
Looks great!

Are you concerned with that coax running over the patch antenna?

good catch Dan, I would be... nice looking build. gotta get me one of these kits. I keep drooling over them at launches and never pull the trigger.
 
Looks great!

Are you concerned with that coax running over the patch antenna?

Thanks! Yes and no. In my ARCAS it was in the same config, though with about 3/4" of spacing vs ~1/4" here, and there it had no effect (I got 12 satellites in just a few minutes at LDRS). I plan on testing it out tomorrow, if it seems to cause any issues I'll just flip the sled around.
 
Lots of updates and progress!

First up, I tested the AIM XTRA's GPS function, and indeed the coax cable seemed to have a somewhat negative effect - it still achieved lock, but not with as many satellites or as quickly as usual. It was an easy fix, since it was caught early (thanks Dan!), I just pulled the sled off and reversed it. Since I had some spare time, I zip-tied the coax cable down, and reinforced the battery section with some zip ties for extra security. Nice and strong now! When my order from Doghouse rocketry arrives, I will finish up the electronics section - mounting the two switches, then wiring the charges and the batteries.


Next, i worked on the MMT and booster assembly. Since I like to use motor backup whenever possible, I had to protect the tubular nylon integrated shock cord anchor. I sewed on one of the nomex sleeves, slipped it through the ring and anchored it, then used gorilla tape to cover the last half inch or so of exposed nylon. Neat, and should hold up very well. I also slipped the ring back just a bit to hide the slightly exposed nylon at the edge of the ring from a direct exposure path to the motor's ejection charge. 3 rings are included with the kit - the forward shock cord anchor, a middle ring, and a rear stepped ring that acts doubles a thrust plate. I will be using a 76-54mm ogive slimline tailcone retainer in place of this, however.


Just to move ahead in any way that I could, I drilled and tapped holes for 4-40 screws to retain the payload tube to the electronics bay, and holes for two (2) 2-56 shear pins. I do these slightly unconventionally - I drill and tap them normally, but then afterwards take the drill bit and open up the hole just a bit. This way, the shear pins can still sorta screw in and hold themselves in during flight, but then after they shear I can just pop them out, rather than painstakingly trying to unscrew them out - it saves precious time when trying to re-prep at the field.


Next, I taped off the fins so that I could sand them in preparation for gluing.


Not sure if this is necessary with phenolic, but I went ahead and sanded the MMT for gluing. On a brief side note, my mobius tripod mount that came with the camera was sitting on the bench, and I had a pretty cool thought - the threads of the eye bolt sticking through the bulkhead match the mounts, and it looks like the camera might just fit mounted horizontally in the electronics bay... that would be very slick!


Meanwhile, I moved ahead with the booster section. I decided to do it all at once - it saves time, and is actually easier if you prepare well because you don't have to worry about getting glue in the wrong places or things out of position. Honestly, though, it's a testament to the quality of the parts - besides prepping for glue bonding, I have had to do ZERO sanding to get parts to fit or fit better - nada! :clap:


To ensure my fins were on straight and aligned, I went to https://www.payloadbay.com/index.php?page=Tools&action=FINGUIDES to make a foamboard cut out. Additionally, to make sure each set of fins were in alignment, I used some scrap pieces of aluminum and clamps to hold the pairs in alignment. Altogether, they should be on quite straight! The booster was left in the upright position (opposite of picture) so that nice fillets would form on the CR's against the direction of the motor thrust. The rear CR was in place solely for alignment, and is not glued in.


That's all for today! Tomorrow I will begin filleting, doing matching pairs of internals and externals at once.
 
Coleman you really do beautiful work...
Clean and meticulous...

This is gonna be a great flyer for sure....

Teddy
 
Coleman you really do beautiful work...
Clean and meticulous...

This is gonna be a great flyer for sure....

Teddy

Thanks teddy, I try, though it's still not nearly as neat or meticulous as any of your builds :D

Nice kit and nice build. I'll be watching. Thanks for sharing.

Thanks, glad you like them!

On to today's progress - got a bunch of deliveries so I was able to finish up the electronics bay. I got my order from Doghouse rocketry - two switches, 4-way locking connectors, terminal strips, charge wells, and some spare wire. From amazon, JST connectors for the Li-po batteries (2S 1320 mah for the XTRA, 2S 210 mah for the USB), and syringes for doing the internal fillets. From teddy @ onebadhawk recovery harnesses, beautiful 11/32'' kevlar harnesses :grin:


I found a slick way to mount my switches using 13-18mm CR's and 18mm paper tubes. First I used one 13-18mm CR as a spacer between the lip of the switch and the sled. Then, I slipped a short section of tube over that, a superglued it on. I then slid a second CR down the tube, leaving no where for the screwdriver to go except into the switch.


I love the doghouse rocketry locking connectors - neat, orderly and most importantly they will not separate under g forces.

19298110789_dde8b37303.jpg


When wiring everything up, I went a bit overkill with the zip-ties, but it cant hurt to be cautious I guess :p


So far, it weighs ~4.5 lbs. It is still missing all the fillets, motor retainer, and parachute/nomex/quick-links. I seem to be on track for my estimated 5 1/2 lbs. Tomorrow I will do the first of three sets of fillets, one set a day, with Aeropoxy structural adhesive. That puts me on track to be built by friday for ground testing and a flight on saturday. Sanding, filling, and paint will come after it flies :tongue:
 
Thanks teddy, I try, though it's still not nearly as neat or meticulous as any of your builds :D


Thanks, glad you like them!

On to today's progress - got a bunch of deliveries so I was able to finish up the electronics bay. I got my order from Doghouse rocketry - two switches, 4-way locking connectors, terminal strips, charge wells, and some spare wire. From amazon, JST connectors for the Li-po batteries (2S 1320 mah for the XTRA, 2S 210 mah for the USB), and syringes for doing the internal fillets. From teddy @ onebadhawk recovery harnesses, beautiful 11/32'' kevlar harnesses :grin:


I found a slick way to mount my switches using 13-18mm CR's and 18mm paper tubes. First I used one 13-18mm CR as a spacer between the lip of the switch and the sled. Then, I slipped a short section of tube over that, a superglued it on. I then slid a second CR down the tube, leaving no where for the screwdriver to go except into the switch.


I love the doghouse rocketry locking connectors - neat, orderly and most importantly they will not separate under g forces.

19298110789_dde8b37303.jpg


When wiring everything up, I went a bit overkill with the zip-ties, but it cant hurt to be cautious I guess :p


So far, it weighs ~4.5 lbs. It is still missing all the fillets, motor retainer, and parachute/nomex/quick-links. I seem to be on track for my estimated 5 1/2 lbs. Tomorrow I will do the first of three sets of fillets, one set a day, with Aeropoxy structural adhesive. That puts me on track to be built by friday for ground testing and a flight on saturday. Sanding, filling, and paint will come after it flies :tongue:

Nice work on the sled Coleman, everything looks organized and coming together fine. Love Teddy's work. Also make sure you test those JST connectors for polarity. I had a fluke, one-off JST connector wired backwards from the manufacturer and did not notice until I fried my altimeter. So I always check their polarity now.

I look forward to seeing the build progress and ultimately some videos.
 
Thank you both for the kind words...

That's a fantastic idea making a sleeve to go over the switch
to lead the screwdriver into the switch...

Coleman,,
It has been said,,
A smart man learns from his mistakes,,
A REALLY smart man learns from others mistakes that he witnesses....

You watched me trying to arm an altimeter "hunt and peck"
through a vent hole with a screwdriver,, I just couldn't find the switch..........

My greatest compliments Coleman,,,
You are a VERY bright young man.............

Teddy

Thanks Teddy, though it was more precipitated by my 3'' ARCAS which had the same switch mounted normally, and just as you say it was just difficult and annoying trying to find the right spot with the screwdriver while out at the pad. This rocket is all about ease of use and reliability, so that I can easily and safely get multiple flights in per day with it.

Nice work on the sled Coleman, everything looks organized and coming together fine. Love Teddy's work. Also make sure you test those JST connectors for polarity. I had a fluke, one-off JST connector wired backwards from the manufacturer and did not notice until I fried my altimeter. So I always check their polarity now.

I look forward to seeing the build progress and ultimately some videos.

Thank you! That stinks that it fried your altimeter, I actually had a similar experience a while back, except in that case the entire bag of 10 were wrong. I got lucky and noticed before plugging them in to the altimeter!
 
Quick post for tonight, I didn't have much time so only a couple pictures. I did a pair of internal and a pair of external fillets. Tomorrow I'll do the next set and document/explain my process better. The split fins made the internals a bit tougher to do, but it worked out OK.

 
Ahhhhhh, I hope you do a ground test with that backup altimeter. I have an AIM 2.0 USB device and the instructions clearly state that Rf from a tracker can cause the device to malfunction. I just pulled this from the AIM 3 manual I downloaded from the
Entacore site.

2.4.2 RF interference
Please note that the AIM USB is sensitive to RF interference. If you do place a tracking transmitter or
any kind of telemetry device in close proximity to the AIM USB, it will affect its performance and might
even trigger a false launch.
Tests have indicated that a 100mW transmitter with a quarter-wave whip antenna placed adjacent
to the AIM will reset it and cause it to malfunction. This is a severe case, but keep it in mind when
designing you electronics bay. Other radio controlled sources in the vicinity should not affect the AIM.

I've been burned by Rf and your least worry would be a deployment on the pad. Worst would be a deployment on ascent by your backup AIM 3.0. :jaw: If it shuts down, your AIM 2.0 Xtra will carry you through if it performs nominally.
I see your bulkhead mounted antenna and that should put the AIM 3.0 in the null but I still get nervous with any Rf above 50mW. If you've flown that configuration in another rocket already that's encouraging but I'd still be careful.

Your project is very nice Coleman and I'd hate to see an Rf anomaly wreck the flight for you. Make sure you setup everything with bare ematches, turn everything on for 45 minutes to an hour and let it sit. You can do this test at home while you're doing other stuff.:surprised:
If the AIM 3.0 still beeps it's ready to go, doesn't reset or pop the matches, you stand a good chance it won't misbehave and give you grief on the launch. Best of luck on the flight. Kurt
 
Last edited:
Ahhhhhh, I hope you do a ground test with that backup altimeter. I have an AIM 2.0 USB device and the instructions clearly state that Rf from a tracker can cause the device to malfunction. I just pulled this from the AIM 3 manual I downloaded from the
Entacore site.

2.4.2 RF interference
Please note that the AIM USB is sensitive to RF interference. If you do place a tracking transmitter or
any kind of telemetry device in close proximity to the AIM USB, it will affect its performance and might
even trigger a false launch.
Tests have indicated that a 100mW transmitter with a quarter-wave whip antenna placed adjacent
to the AIM will reset it and cause it to malfunction. This is a severe case, but keep it in mind when
designing you electronics bay. Other radio controlled sources in the vicinity should not affect the AIM.

I've been burned by Rf and your least worry would be a deployment on the pad. Worst would be a deployment on ascent by your backup AIM 3.0. :jaw: If it shuts down, your AIM 2.0 Xtra will carry you through if it performs nominally.
I see your bulkhead mounted antenna and that should put the AIM 3.0 in the null but I still get nervous with any Rf above 50mW. If you've flown that configuration in another rocket already that's encouraging but I'd still be careful.

Your project is very nice Coleman and I'd hate to see an Rf anomaly wreck the flight for you. Make sure you setup everything with bare ematches, turn everything on for 45 minutes to an hour and let it sit. You can do this test at home while you're doing other stuff.:surprised:
If the AIM 3.0 still beeps it's ready to go, doesn't reset or pop the matches, you stand a good chance it won't misbehave and give you grief on the launch. Best of luck on the flight. Kurt

Thanks for the heads up, its a very valid point, but I'm pretty confident it will be just fine. I flew an AIM XTRA and a USB 2.0 in a BH38 together with the USB directly on the opposite side of the sled of where the antenna was, and in that case it flew fine as a far as I could tell (only flew a few flights in the dual configuration until I removed the USB to put into another rocket). In this case, as you say, the antenna is in a much better spot than that, so I should be safe. I'll test it out though just to be sure!
 
I think I bought an I386 Blue Streak, but honestly, it was a month ago and I forget! :facepalm:

Want to keep it in sight for the first flight.

I236 or I303 maybe? Don't think there is an I386 Blue Streak. Either would be great motors for the Scorpion.

RocketHunter, I agree the Scorpion is a great design. It also looks like the MPR38 has the same fins at the Rayzor, but not split... Both are really cool fin sets.
 
Last edited:
Thanks for the heads up, its a very valid point, but I'm pretty confident it will be just fine. I flew an AIM XTRA and a USB 2.0 in a BH38 together with the USB directly on the opposite side of the sled of where the antenna was, and in that case it flew fine as a far as I could tell (only flew a few flights in the dual configuration until I removed the USB to put into another rocket). In this case, as you say, the antenna is in a much better spot than that, so I should be safe. I'll test it out though just to be sure!

Great to hear you'll test it. I had a downward facing bulkhead mounted antenna with a 150Mw Rdf tracker and a different altimeter that unbeknownst to me had Rf issues. Chutes blew on the pad. I turned the altimeter on and I was absent mindedly shoving the igniter up the motor and all of a sudden it hit me. The beeping STOPPED! I jumped back and the top part of the rocket popped off. I scrambled over, was going to try to get the key in to stop the main but didn't make it. So only my paint job and pride were hurt.

Ya gotta be careful 'cause Teddy's harnesses will do a "dental flossing" of your airframe if blown on ascent. I read where they're sooooo........... tough. Did a strongman routine on a 1/4" forged eyebolt and tore the eye
right off the shank.:shock: Suffice it to say that rocket blew the charge at the wrong time. :wink: Kurt

Yes that's absolutely correct Kurt,,
They certainly did..
My harnesses are definitely not the weak link in a rocket,, that's for sure..

Teddy
 
I236 or I303 maybe? Don't think there is an I386 Blue Streak. Either would be great motors for the Scorpion.

RocketHunter, I agree the Scorpion is a great design. It also looks like the MPR38 has the same fins at the Rayzor, but not split... Both are really cool fin sets.

I236. Had to look at the tube when I got home. :eek:
 
Never updated this thread with some flights :facepalm:

First flight was on a J400-SS:

[video=youtube;Sg33DgjgFMI]https://www.youtube.com/watch?v=Sg33DgjgFMI[/video]

Next two flights were at METRA on a J396 Spitfire, and then a J425 Blue Streak. For these I finally got it painted orange, and I also just recently placed my order from stickershock for the vinyl lettering :D So by the fourth flight, it'll finally look right :lol:

[video=youtube;nz3V_gxxGTs]https://www.youtube.com/watch?v=nz3V_gxxGTs[/video]

The rocket flies beautifully, and my altimeter setup has worked flawlessly. No onboard video though for the 2nd and 3rd flights, the camera for some reason seemed to be interfering with GPS lock so I opted to turn it off. I'm considering mounting it in the NC instead.

19702449934_24969b5d4e_z.jpg
20298846906_ab92b815c2_z.jpg
19704111303_f024556e19_z.jpg
 
Back
Top