I like the arrangement where all the recovery comes out the top rather than breaking the rocket in the middle. It is a bit different sort of setup and packs very well. It leaves room for long motors in the lower section.
The electronics bay is bolted to the lower section (or equivalent fairly solid attachment method) and the upper tube is solidly attached to the electronics bay. Only the nosecone comes off during flight.
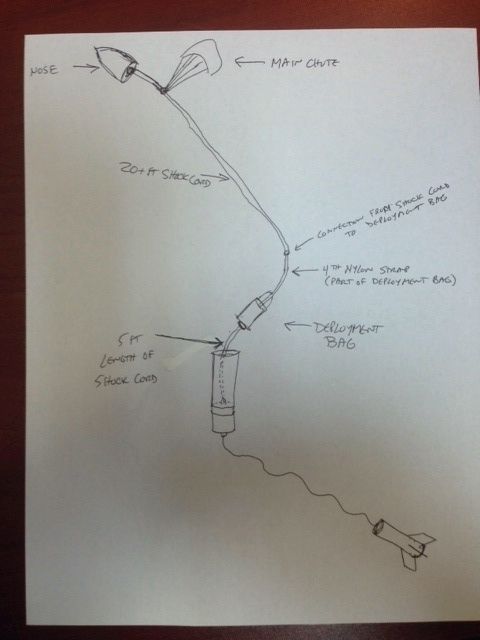
The forward bulkhead of the electronics bay contains two attachment points (at least for larger rockets) and a single ejection charge canister or equivalent pressurization method. This is for deploying the drogue. The main is released by a tether of some form.
One of the attachment points on the electronics bay bulkhead is the main harness connection point. Then the harness or line is zig-zag folded neatly in the available space. Only enough line is needed to get the chute perhaps 6' past the upper end of the upper tube. More, or even less, can be used. It is not critical.
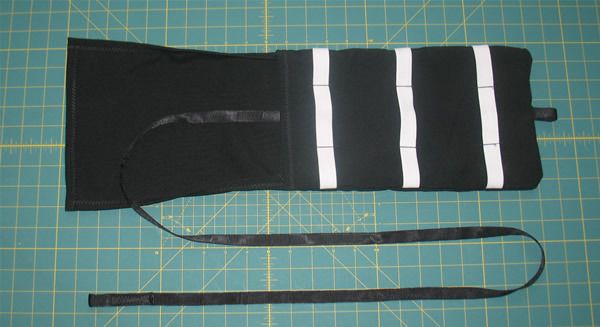
On top of this neatly stowed harness goes the D-bag with included chute. The part of the bag which would open to deploy the main goes downwards. The flap is held on by rubber bands cinching the harness along the side in a way which releases easily enough, allowing the harness itself to then open the D-bag flap. The whole bag assembly can slide freely in the upper tube but should not have a lot of free space on the sides. You want it nearly volume filling.
At the top of the D-bag there is a quick link connector attached. This link connects to two lines. One is the rather short bag hold-down line which goes down beside the bag and attaches to a tether, which then connects to the other attachment point on the ebay upper bulkhead. This line is attached under tension, compressing the bag down snugly against the main chute's recovery harness so it is immobile. The short link line needs to be heavy duty, as it will transfer the full drogue force.
The other attachment to the quick link at the top of the dbag is the drogue harness. This can be of whatever length you desire. I think I used about 20' for my 6" rocket. The length is not critical but should not be too short. At the other end of this line is the drogue of course. The harness for the drogue is stored neatly on top of the dbag, with the drogue stowed right on top the line.
There is also a short line connecting the nosecone to the drogue.
Beside all this is a section of small tubing (I used a 38mm liner section for a 6" rocket) which channels the ejection gasses from the ebay forward bulkhead charge well to along the side of the dbag and out to the top of the tube. So it is pressurized more at the top than the bottom so there is no tendency to try to blow the dbag out. It also helps keep everything pretty clean relative to more common methods.
With the upper tube properly sized, when the nosecone is put in place, a slight compression is required before pinning. There is no free space for stuff to move around under shock, vibe, and G loading. This in turn makes deployment very predictable.
There are details on some of this in
https://www.rocketryforum.com/showthread.php?37382-Sprite-6-quot-and-a-baby-O The thread doesn't contain all the pictures one might want but should document a lot of this.
I learned this method from Jerry O'Sullivan and consider it one of the best ways to handle deployment for moderate sized rockets provided one feels free to bash the kit or to scratch build.
Gerald


") The major difference from a standard DD is that I do not use a drogue at apogee. That way, when the pilot chute comes out, the rest of the rocket clears the bag quickly because it is falling faster than it would with a drogue. At least that how it seems to work for me.
The major difference from a standard DD is that I do not use a drogue at apogee. That way, when the pilot chute comes out, the rest of the rocket clears the bag quickly because it is falling faster than it would with a drogue. At least that how it seems to work for me.