Estes Photon Probe

The Rocketry Forum

Help Support The Rocketry Forum:

This site may earn a commission from merchant affiliate links, including eBay, Amazon, and others.

Agatheron

Well-Known Member
Joined
Jun 2, 2014
Messages
153
Reaction score
0
I'm currently working on a few builds, one of which is a Photon Probe that I won last year at a meet. I already have its companion with the Photon Disruptor. I wanted to use this particular build as a practice for some techniques that were new to me, namely papering fins as well as using Elmer's Wood Filler and heavy sanding to achieve an almost plastic look. So far so good.

ImageUploadedByRocketry Forum1434081355.895406.jpg

This is after the wood filler, lots of sanding, and then the first layer of primer followed by lots of sanding with 600 grit sandpaper.

It's a lot smoother than any other rocket I've personally built so far. It's a bit more involved, but I like it. :)
 
Multifin lineup is a weak point for me. And I'm ashamed of how horrible I am at it. This one is in my build pile but im wary of messing it up. I've almost perfected the wood filler method but it takes 2 to 3 coats to get it all smooth. I have discovered that a palm sander and fine sand paper does wonders, IF your fins are large enough for it. I currently have 4 sanding blocks for small fins. Good looking job so far. I'll be keeping an eye on the progress.
 
Your Photon Probe is looking pretty sweet! The extra fins and strakes on this rocket really set it off.

I built one on these last year. On its first flight, it landed on a minuscule sidewalk that crosses our club's flying field and I had reglue one of the rear fins. Dang!

I've found that mine flies best on C6-3s. The delay on the C6-5 is too long. Good luck!
 
That makes it similar to the Disruptor, which is also multifin and draggy. I'll keep that in mind. I should probably get B6-2s for lower flights.
 
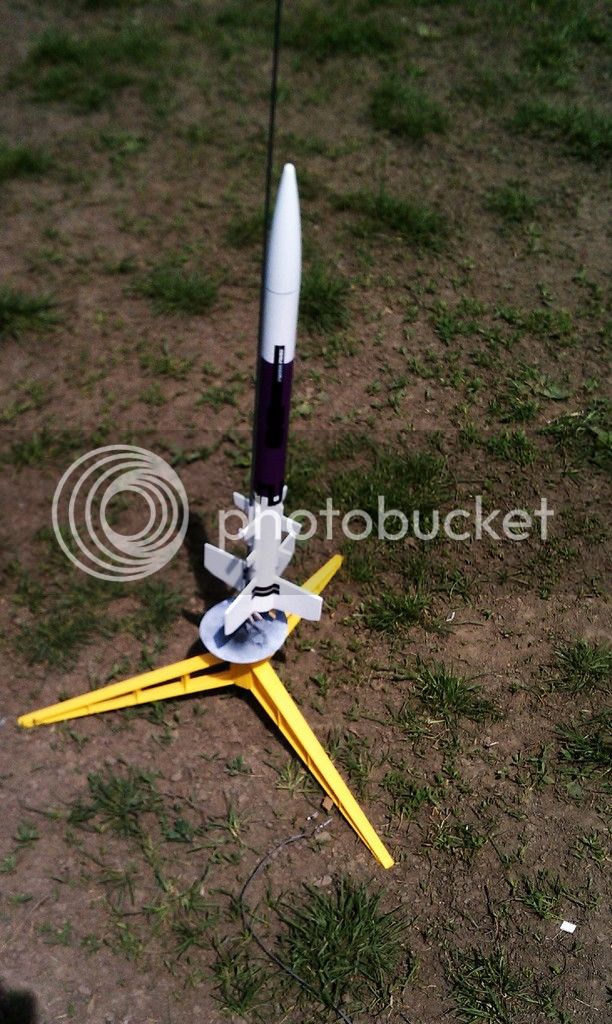
I used an angle iron rubber banded to the body tube along the fin line to keep all the fins straight. for the smaller fins on the strakes, shims were used to center them.
Photon%20Probe%20on%20the%20pad_zps8dz3gz19.jpg
 
I used an angle iron rubber banded to the body tube along the fin line to keep all the fins straight. for the smaller fins on the strakes, shims were used to center them.
Photon%20Probe%20on%20the%20pad_zps8dz3gz19.jpg

Nice looking job!

What shade/brand of paint did you use on that purple (it looks just about right for my Estes Wizard build (1980's livery)).
 
Last edited:
An update photo. Gloss white (Tamiya Pure White rattle can) is done, nice and smooth. I'm very happy with how this has turned out. I need to let the paint cure a bit. Up next is masking for the purple stripe. :) I plan on using the Tamiya tape. My regular vinyl tape that I use for models I find is too strong for cardboard airframes. ImageUploadedByRocketry Forum1434322415.720528.jpg
 
An update photo. Gloss white (Tamiya Pure White rattle can) is done, nice and smooth. I'm very happy with how this has turned out. I need to let the paint cure a bit. Up next is masking for the purple stripe. :) I plan on using the Tamiya tape. My regular vinyl tape that I use for models I find is too strong for cardboard airframes. View attachment 265602

What color/brand purple you planning on?
 
The can is right beside it. Tamiya Gloss Purple in a rattle can. I don't have the number at my fingertips.
 
Latest picture. The purple is Tamiya TS-24.

All I need to do now is add decals and then do a clear coat. I have a pearl clear from Tamiya that I may use, it gives a neat finish.
1544570_10153001975032075_384379693337769804_n.jpg
 
And decals are on. I'm going to let them cure overnight and then do a clear coat followed by a spray of possibly a pearl coat:

ImageUploadedByRocketry Forum1434687509.570337.jpg
 
Just an update. As much as the externals of the rocket are done, I hadn't attached the parachute yet. As luck would have it, I came across a Sunward Hobbies ejection baffle designed for a BT-55 tube. Perfect for this. I've glued together the baffle, and will be putting it into the Photon Probe this afternoon, followed by securing the shock cord. I'll snap a picture of the baffle when I'm home.
 
Please be sure to sim or do the string test to be sure of stability after adding the baffle.
It's a considerable amount of weight for this rocket, and on a mid size motor for it, it may not be stable w/ the baffle.
I hate to see such a fine job and great looking rocket end up as a lawn dart on it's maiden voyage!
Best wishes & luck.
 
I've not installed it yet, but yes, I was planning to do a stability test before launching. Thanks for the tip. It didn't strike me as all that heavy. I just weighed it, and it comes in at 1/4 oz. I'll still do the stability test, but would adding 0.25 oz to a 3.5 oz rocket make that much of a difference? Or is it more about how far down the tube the baffle is positioned? I have some lead shot that I can use to stabilised the nose cone if necessary.
 
Thanks! I've been told elsewhere that even if one has a baffle, there should be at least one sheet of wadding or a small bit of dog barf. Hoping to get some time today to install it and the parachute cord, I may get a chance to fly it tomorrow.
 
Ah crud. The top plate of the baffle broke as I was inserting into the tube. So now it's basically a laundry shelf...
 
Interesting that Sunward's website states to "install as far forward as possible but leave room for recovery system". I would think that would move the CG way forward, have to jump on OpenRocket and see what it does. Rocketreviews had a Rocksim file.

I had to guess on the length of the baffle tube but used your weight. If you do decide to use this baffle, shoot for 9 3/4" from front of body tube. The baffle will be split across the CG. (See attached OpenRocket/Rocksim file).

With one plate broken off, makes a handy pocket for the dog barf.

BTW Great looking job!

View attachment oop_estes_photon_probe_baffle.rkt
 
Last edited:
Back
Top