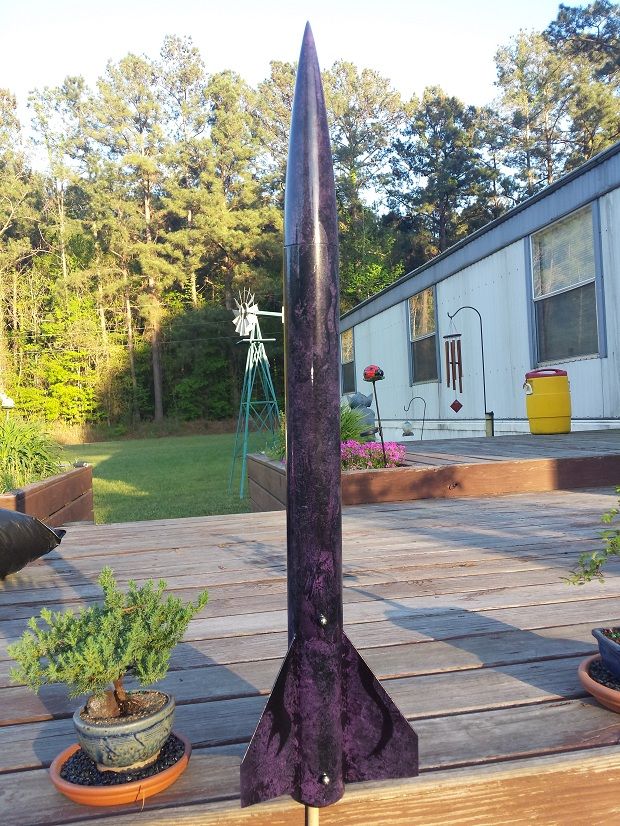
Wildman Sport build.

The Rocketry Forum

Help Support The Rocketry Forum:

This site may earn a commission from merchant affiliate links, including eBay, Amazon, and others.

MikeyDSlagle

Well-Known Member
Joined
Dec 16, 2013
Messages
2,591
Reaction score
572
Hello all. Don't think I have done a build thread yet so I thought I would do one of my Wildman sport. There probably won't be a whole lot of innovative ideas here but maybe someone will enjoy reading the thread. I thought I would document the build because it is my first fiberglass kit. My girlfriend got the kit for me for my birthday and there has been comments like "that's all that is in there...for that price", "no instructions!!??" just to name a couple so it will probably be my last fiberglass build as well :lol: And I got a pretty awful look when I mentioned the price for a wrap from Stickershock. Looks like I will be painting this one myself.

The Wildman Sport is a nice kit. The nose cone had a few rings that needed sanded but took only a moment to get em sanded smooth.

Everything sanded and ready to go. Sanded 2 notches in the forward centering ring for the shock cord mount. I usually put the notches on the outside so the shock cord would be out of the way of the initial blast from the ejection charge. I'm using heavier cord on this one and this seems like it would be a stronger mount.

View attachment 257853

My goodies from Sirius Rocketry. They got my parts to me really fast. That was nice.

View attachment 257854

I decided to go with the PML HAMR 29 over the Aeropack because I like the fine threads of the HAMR. (and I like saying HAMR LOL) They are pretty much the same otherwise, even price. I had doubts as to whether or not it would fit but it fits really nice with just enough slop for the JB Weld.

View attachment 257855

And finally my goody bag from Rocketry Warehouse. I had intended to use the purple shock cord attached to a few feet of the kevlar but the it weighed in at 2.5 oz. The final weight will determine if it gets used or not. I could have done without the huge swivel. But oh well. I ordered the Delrin buttons with countersunk heads for this build but they sent the ones with plain round heads anyway. The buttons themselves are countersunk but the screws aren't. I hope to eventually use a cable cutter for dual deploy with this rocket hence the piece of G10 for a sled. That's a 38mm bulkhead that I will use in the nose cone. Also got me some reusable rivets... not sure if I will use em for anything. But ya never know.

View attachment 257856
 
Last edited:
Okay so on with the build.

For the motor mount and shock cord. I looped it through the notches and tied a knot in the end. I gave the MMT and kevlar a good smearing of epoxy and set em in place. The HAMR is simply there to hold it up while it cures. It is not attached.

View attachment 257896

Once cured. I taped some popsicle sticks to a bamboo skewer to smear epoxy just ahead of the body tube slots. Ever notice how many kitchen utensils make their way to the work bench? HA I slid the MMT in from the front and used the fins and rear centering ring to get it in the right spot. I drilled a couple of holes in the rear CR so I could remove it.

View attachment 257897

And then I hit a snag. My fins won't fit into the slots. I managed to get epoxy in the slots. No worries, just a few quick passes with my Harbor Freight 9.99 Dremel and all is well.

View attachment 257898

When I mounted my shock cord, I wrapped it halfway around the MMT. So now I have to modify the fins to account for that. Set em in a stack and take em to my belt/disc combo sander. Only took a few passes.

View attachment 257899

Fins are ready to be attached. With my fin jig I can only do one at a time, but using 5 minute epoxy it doesn't take long. I got the idea for that jig off of the boards here at TRF. It is ridiculously simple and effective. I built mine from scrap I had around the house. Not glamorous but effective.

View attachment 257900

I hope to get more done later today.

Mike
 
Why are you saying it may be your last fiberglass build? I think you will like the FG rockets. Don't know to many flyers who go back to paper after going to a FG rocket.
Have fun fly safe
 
Why are you saying it may be your last fiberglass build? I think you will like the FG rockets. Don't know to many flyers who go back to paper after going to a FG rocket.
Have fun fly safe

That was a joke..my girlfriend has made comments about the price being a bit high and no instructions or parachute. I knew all that going in so it wasn't a surprise for me. She is used to the Estes kits I do and most of those I get on sale. It was a shock to her is all.

I'm loving the build. I was shopping for parts to scratch build me a FG bird when I found this kit for 50 dollars, cheaper than buying the parts seperate.

Mike
 
Yes.. I recently built a PSII kit with some hpr enhancements -assembly was fun and quick. .but spent twice as long with sand primer repeat ...repeat..repeat - so coming back to work on a no paint WM rocket was a pleasure.

Kenny
 
Nice job on the build so far. I put mine together on Sunday, and aside from a lot of sanding to get an Estes retainer to fit the build was a snap. I used the foam and fly method. Looking forward to seeing your DD setup. My local group has a lot of ceiling restrictions (2000' limit) so I don't have much need to set up anything more than motor deploy. I checked ThrustCurve for viable motors for this rocket and about half break my ceiling restriction :(
 
That was a joke..my girlfriend has made comments about the price being a bit high and no instructions or parachute. I knew all that going in so it wasn't a surprise for me. She is used to the Estes kits I do and most of those I get on sale. It was a shock to her is all.

I'm loving the build. I was shopping for parts to scratch build me a FG bird when I found this kit for 50 dollars, cheaper than buying the parts seperate.

Mike

It's why i never tell mine the cost other than, "I got it at a good deal."
 
Nice job on the build so far. I put mine together on Sunday, and aside from a lot of sanding to get an Estes retainer to fit the build was a snap. I used the foam and fly method. Looking forward to seeing your DD setup. My local group has a lot of ceiling restrictions (2000' limit) so I don't have much need to set up anything more than motor deploy. I checked ThrustCurve for viable motors for this rocket and about half break my ceiling restriction :(

Thanks. I had a minor set back on the dual deployment. Not sure if I have enough room left in the NC after I added the foam. I will play around with it a bit and see what I can come up with. My plan was to have the motor eject the laundry along with a drogue. And then use a cable cutter to deploy the main. The problem I have around here is actually finding a place to launch. I have a few options, just have to catch the folks and get permission. Close by is a wildlife management area with HUGE open spaces. I just can't get a straight answer on the steps I need to take to use them. I like to keeo my birds fairly low, 1000 feet is plenty high enough for me. I just like the idea of dual deployment. Sometimes I like to over-complicate, or under simplify, things. Not to mention I don't want to have to walk forever to recover my birds.

It's why i never tell mine the cost other than, "I got it at a good deal."

LOL. That's normally what I tell her about most things but she bought this one for me so that wouldn't work.


Next up on the build:

I marked and laid for my rail buttons. Used 1/8" drill bit and ran a tap in them. Nothing to it. They have since been removed so I can apply the finish and I didn't want the bottom one foamed in. Just at the pint where the leading edge of the fins meets the tube is a notch, leftover fin slot. It'll have to go... but later.

View attachment 258028

Here is what is going in the NC. Two pieces of 10-24 all thread and a 38mm bulkhead going in to be foamed. The bulkhead that came with the kit on the other. I have it setting backwards in the picture. Doh!

View attachment 258029

As you can see, I need more foam. I wanted it to cover the bulkhead about one inch or so.

View attachment 258030 View attachment 258031

Now that is more like it. I smeared the inside of the BT with epoxy, along with the fin tabs. Poured the foam in and put the rear CR back on. I drilled some holes in the CR to give the foam somewhere to go. As you can see, if found a few cracks along the fins. That's fine and expected. I'll deal with it later.

View attachment 258033 View attachment 258032

Got the tail sanded and cleaned up. I will dress it up some more after I get the retainer mounted.

View attachment 258034

And here is the NC as it will be when flying. Well, the all-threads will either be double nutted or have some couplers on them. The nuts come off, then the bulkhead, giving me access to the inside. My sled will slide down the all-thread and be held in place with.... friction and imagination. Like I say, I am still working on that part.

View attachment 258036

The u-bolt takes up more room than expected on the inside and I had to trim the sled. It looks like hell but it may work. It is just a mock up anyway. I will worry about that when the time comes. I do have some 1/4" eye bolts but they are not forged or what have ya, they are just bent around to make an eye and only rated at 80 lbs I think. Don't know if I can trust it or not. Push comes to shove I will scratch the u bolt and just use kevlar. That will give me about 3 1/4 inches of clearance inside. Right now I have around 2 1/2. The altimeter I intend to use, the Adept22, according to their site is 2.8 inches long. I think I can accommodate it as is, but will have to see.

Pretty much now all that is left is the finishing. More as it develops.

All comments, concerns and criticisms welcome... well maybe not so much the criticisms. Thanks for reading.

Mike
 
Last edited:
Not much progress lately. Weather not cooperating and general everyday life getting in the way. I did manage to get the base coat of paint. I don't know if it was the paint or the weather but the stuff was gummy. I was using Krylon Maxx. Let it dry and started sanding. It just balled up on my paper. Not clogged the paper like primer usually does. It just balled up. I finally wet sanded and got it to a smooth finish. This coat served it's purpose though. It showed me the imperfections, epoxy spots and what not that needed attention. And it turns out I needed fillets for aesthetics. Bah. So I tried 3 different methods for my fillets. All with epoxy. First was just plain epoxy. Which works just fine. The second I mixed baby powder in the epoxy to thicken it. That worked great. The third I used baby powder and black paint to color it. You know what ya get when you mix epoxy, baby powder and paint? A mess. A gooey, sticky, non hardening mess. Four hours and it was like RTV silicone. I cut and scraped with my hobby knife before resorting to a dremel with wire brush to get the crap off. It was pretty but wouldn't harden. So I finally got it all off and went back with my baby powder epoxy. Had a few air bubbles to contend with but that was nothing new. (I didn't realize that first picture was so blurry)

View attachment 258319 View attachment 258318

When I was wet sanding, the water would puddle over my fillets. And looked like large glossy fillets. I liked the way it looked. I may try to go bigger with my fillets. Not sure though with as much trouble as I had with these.

So here is the rocket as it stands now, on a cluttered work area.

View attachment 258322

We've got more rain headed this way so it will be a while before I can get the finish on it. And I'll roll over the idea about larger fillets.

Thanks,
Mike
 
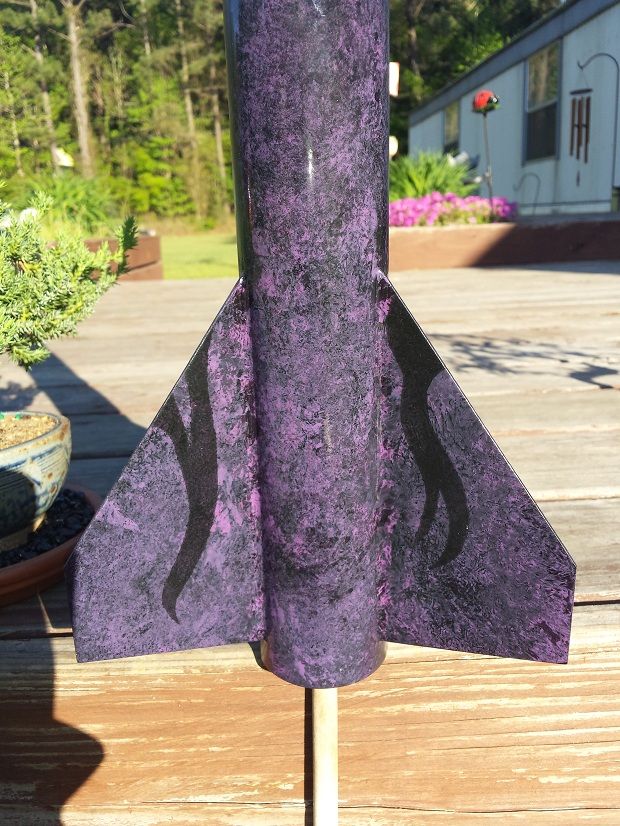
Well we finally had a good stretch of nice weather down here so I got a little bit more done. I tried a new approach to painting my rocket using plastic or "Saran" wrap. It didn't work as I had intended, my paint dried to fast. So I had to improvise. But it turned out okay.

(bear with me, TRF not letting me upload pics so I am linking them in with Photobucket. They may be a bit big.)


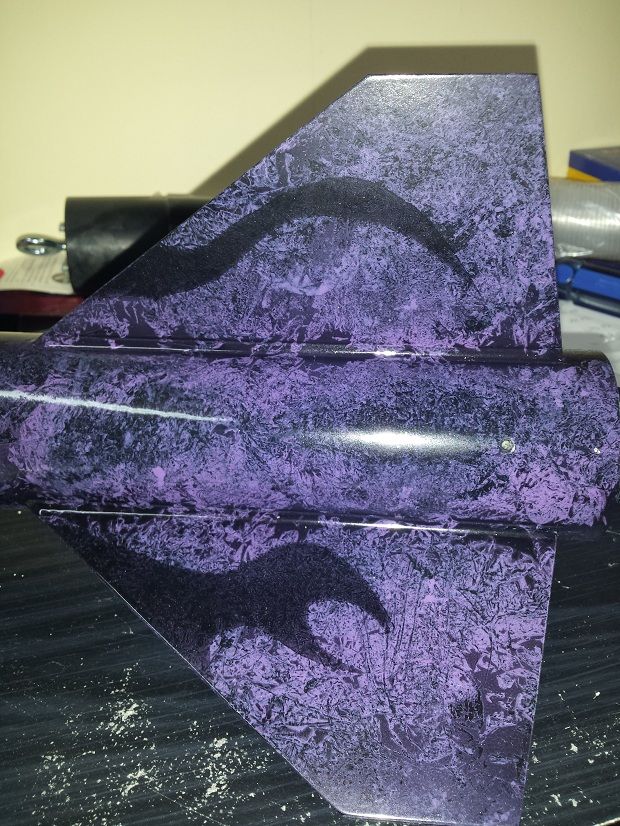
A closeup of the fins. All the fins have different "flames". Im not a big fan of flames but wanted to try and see how it worked. I used black so they would be subtle. I originally used metallic purple craft paint, but that stuff bleeds through the masking tape and messes up the lines.


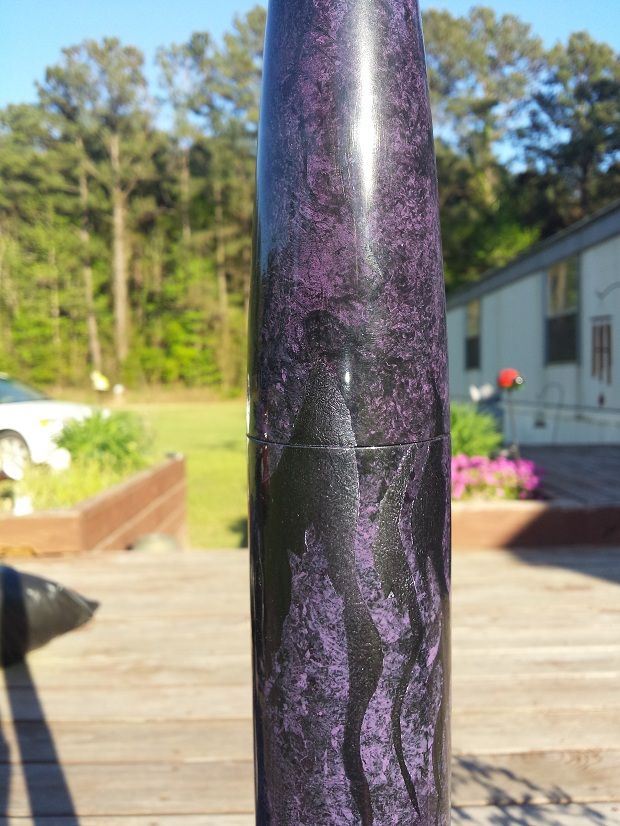
Here's the flames on the NC joint. I was gonna have the NC black and turn into the flames. But I thought to try it this way. They are really subtle but stand out in the sunlight. You may can notice a slight metallic look to these because these were the ones I tried the purple metallic on.


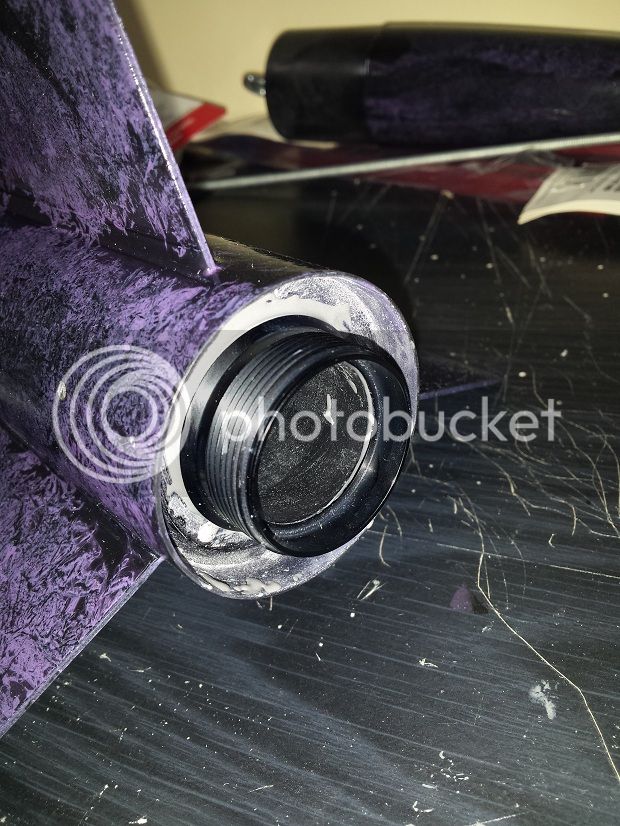
Here is the installed HAMR. Nice snug fit:


Another shot of the fin detail. This one is the rail button side:


And here is the pretty much finished product:


Somehow I goofed around and got JB Weld on my finish. Wiped it off and it hazed my finish. Grrr. I was able to wax and polish the area to shine it up though. Only noticeable by me. All that is really left is to dress up the area around the HAMR once the JB cures and add the recovery and what not and she will be ready to fly. Need some light winds and a big field. (and some cash for a chute and motors)


Mike
 
Very nice.

Was this the technique where put a coat on, the use saran wrap wadded up to "pull" off paint, leaving the marble looking finish?
 
Very nice.

Was this the technique where put a coat on, the use saran wrap wadded up to "pull" off paint, leaving the marble looking finish?

Thanks

Yes, that was the idea. I did several trial runs and it worked fine. But the larger area of the rocket allowed the paint to dry. It worked on part of the rocket but other parts the saran wrap got stuck 8n the paint. I resorted to using wadded up saran wrap and blotting the paint on and off.

Mike
 
Back
Top